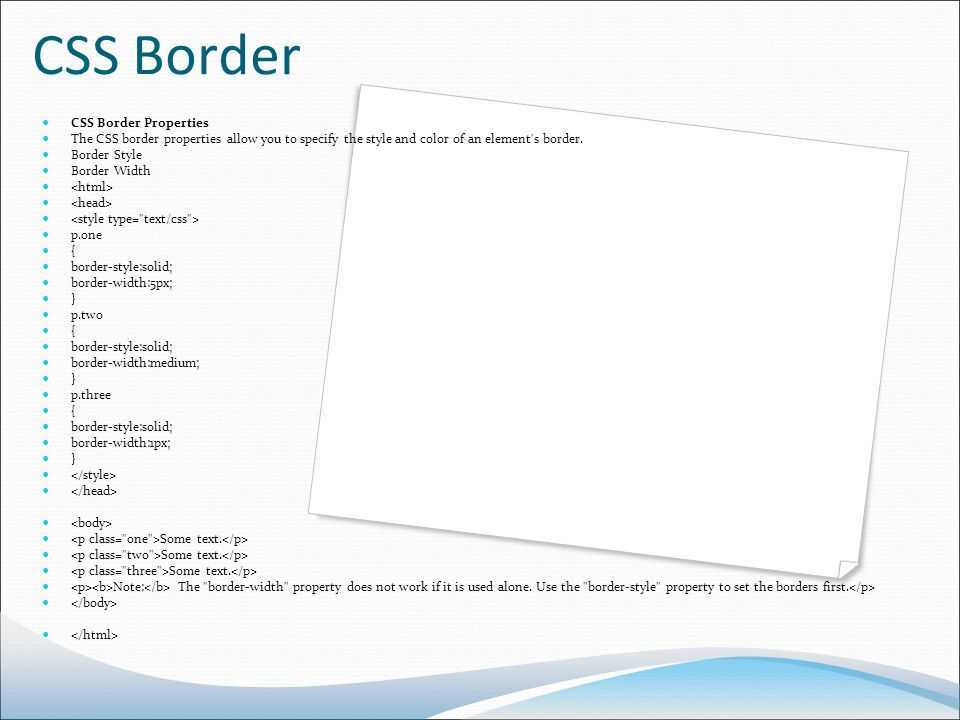
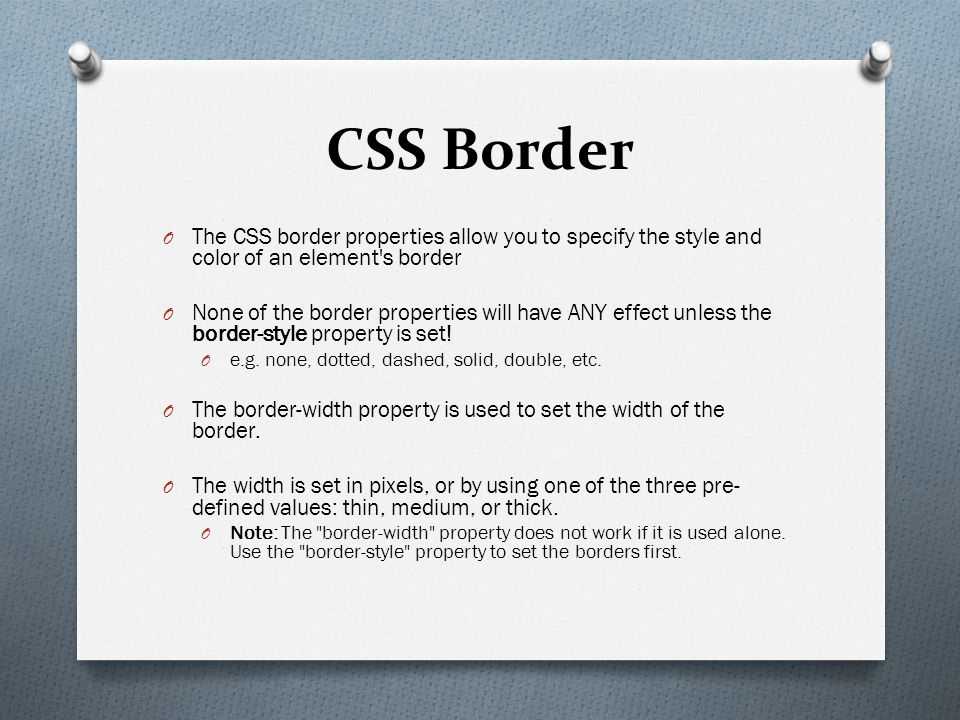
CSS Border Style
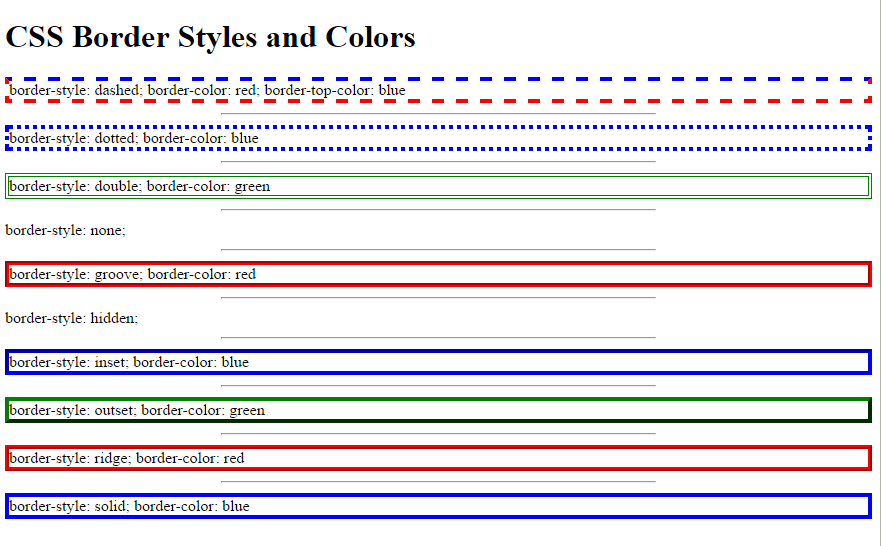
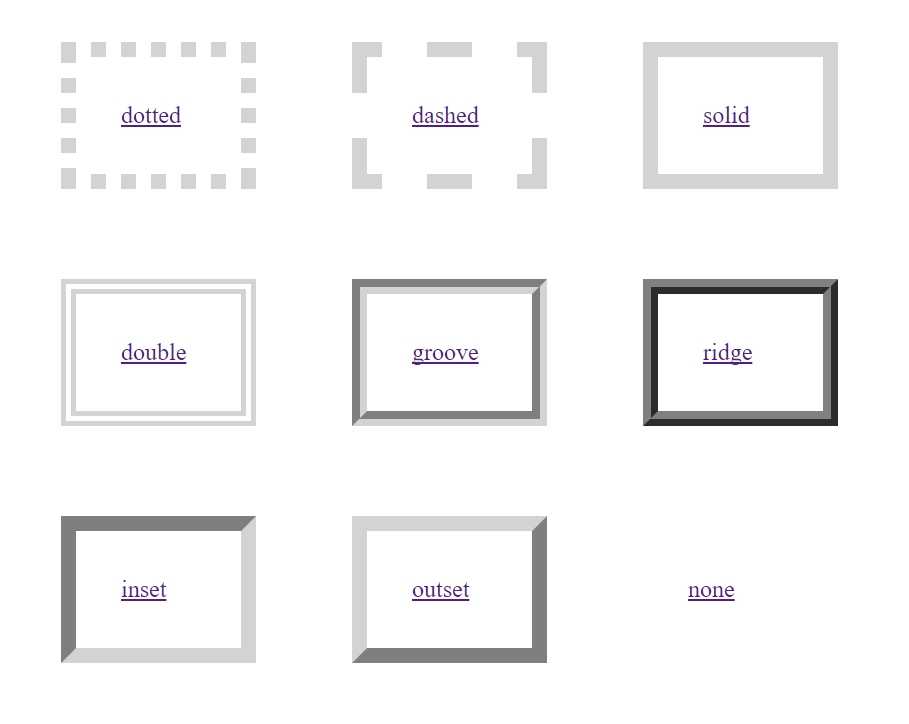
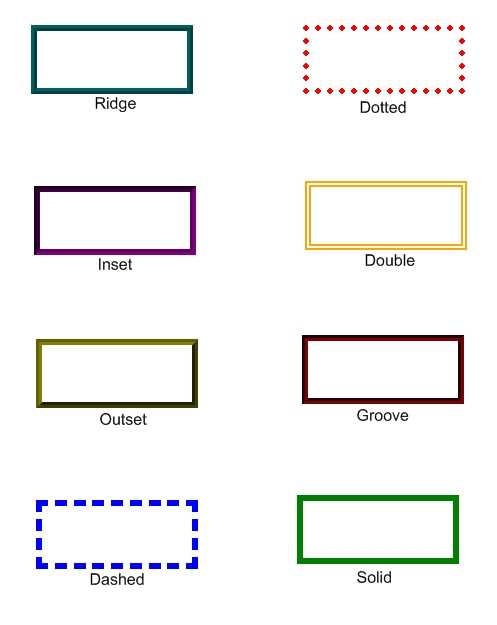
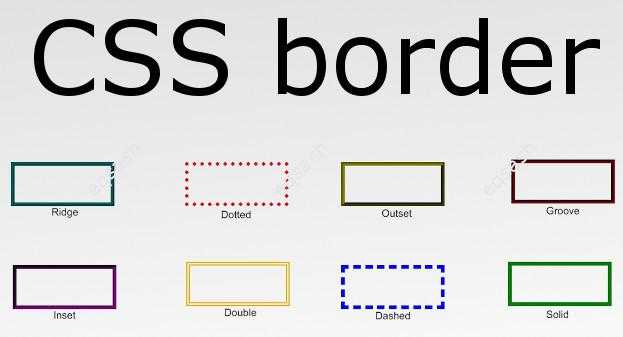
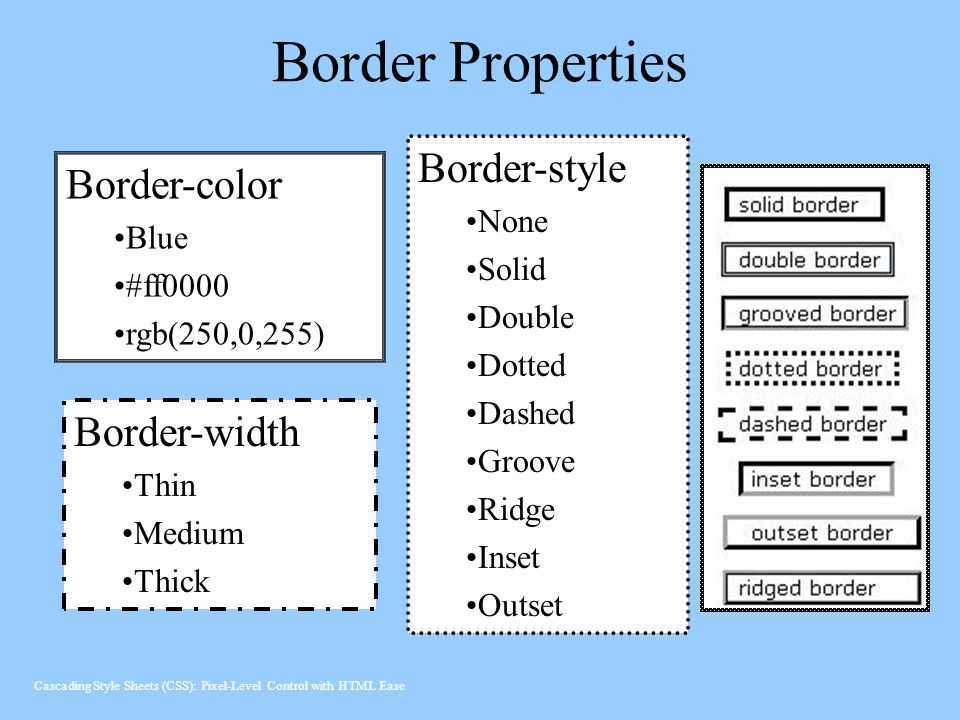
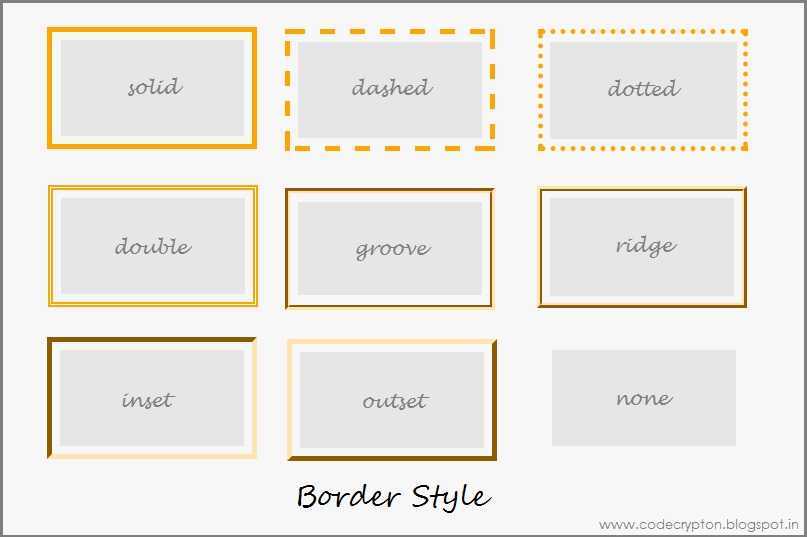
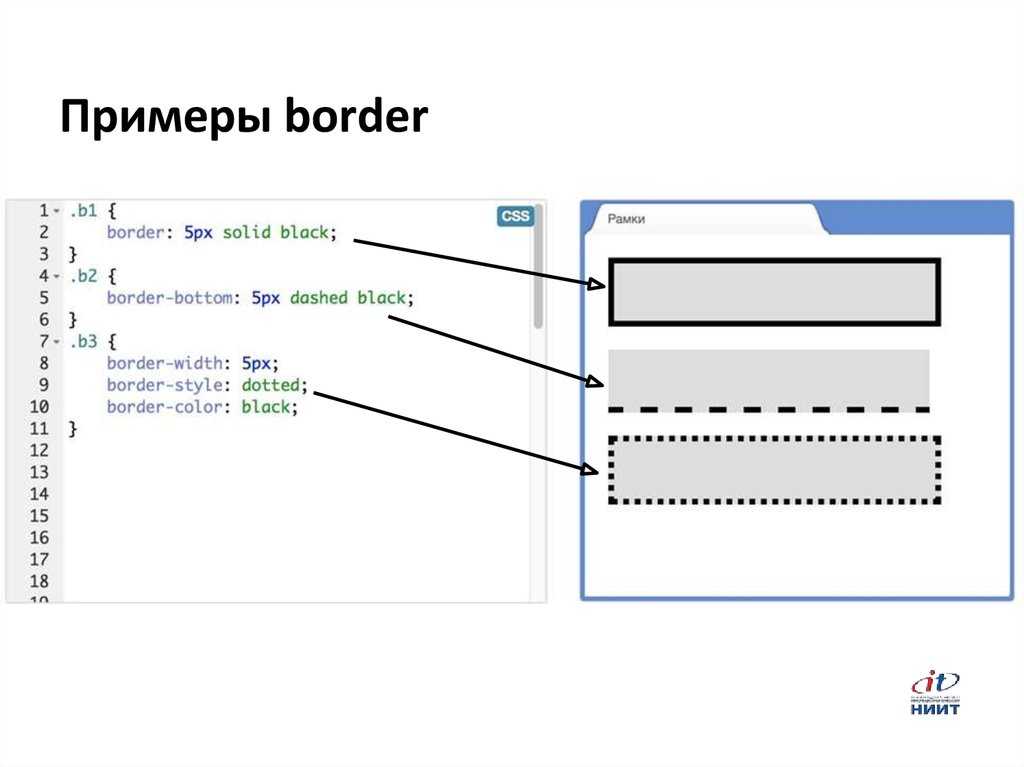
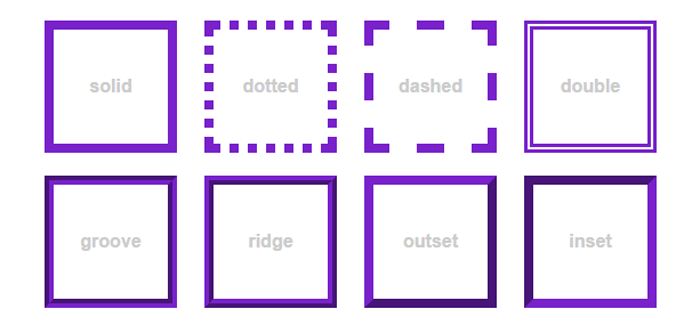
With the CSS border-style property, designers can specify the type of border they want to display. The sub-property supports 10 values CSS border options to define the style. These are:
- none: no border is set
- double: sets a double border
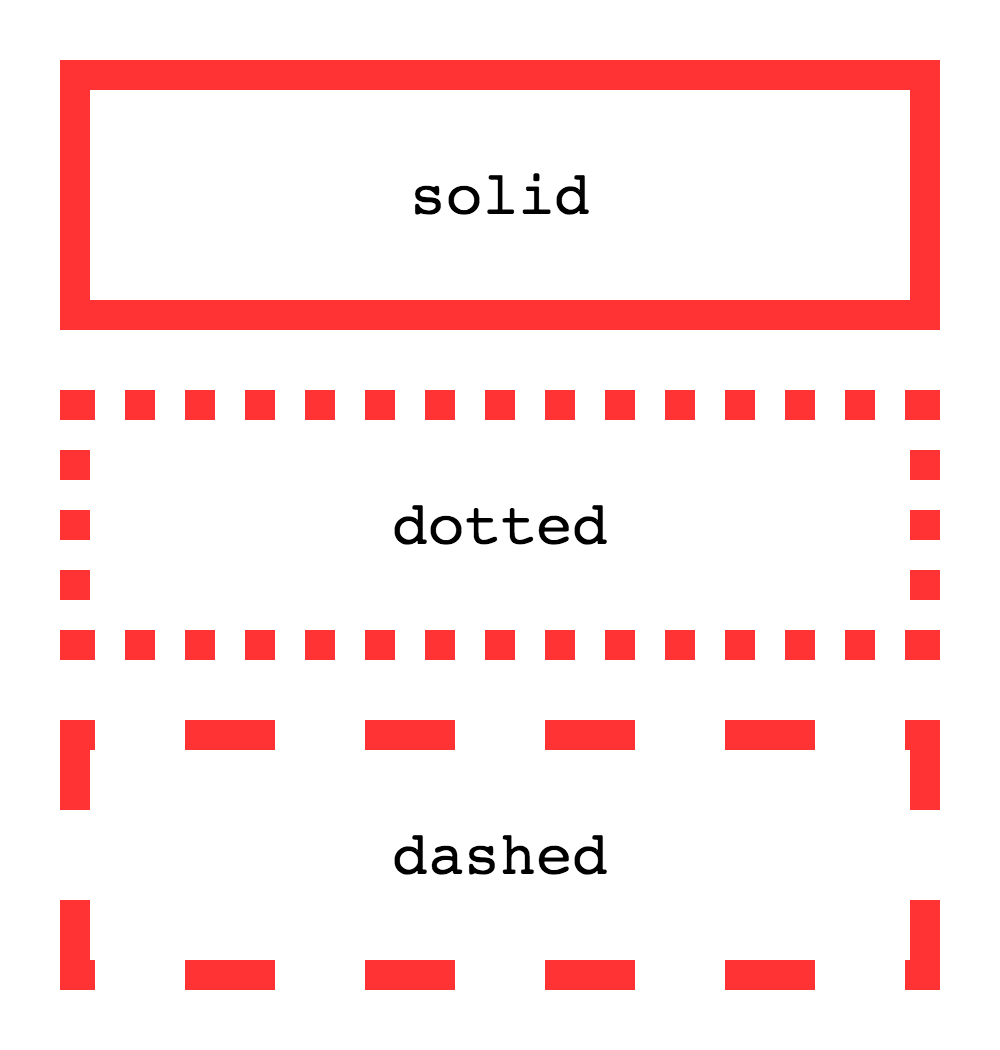
- solid: sets a solid border
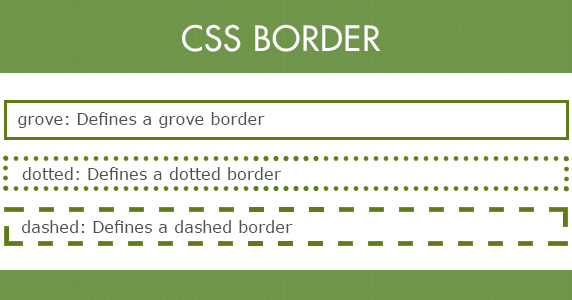
- dotted: sets a CSS dotted border
- dashed: sets a dashed border
- hidden: sets a hidden border
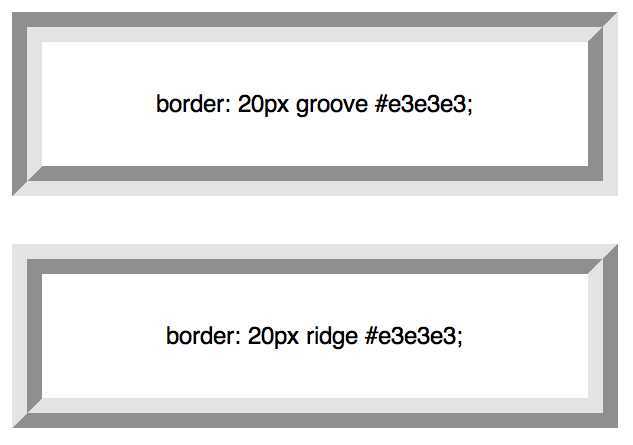
- groove: sets a 3D groove border
- inset: sets a 3D inset border making the element seem embedded
- ridge: sets a 3D ridge border
- outset: sets a 3D outset border that makes the element seem embossed
The visual effect of the ridge, groove, outset, and inset rely on the border color. Black is the default color if the border color is not set.
In CSS, the border-style property takes between 1 and 4 values. If a designer defines one value, then it applies to all the sides of an element.
When a web designer defines two values, the first value applies to the top and bottom borders. The second value applies to the right and left borders. When a designer defines three values, the first applies to the top, the second applies to the left and right, and the third applies to the bottom border.
If a designer defines four values, the values apply to the top, right, bottom, and left respectively.
Logical properties #
In the Logical Properties module you discovered how to refer to block flow and inline flow, rather than explicit top, right, bottom or left sides.
You have this capability with borders, too:
In this example, has all sides defined as having a , dotted border that is the current text color. The border is then defined as , solid and red. This means that in left-to-right languages—like English— the red border will be on the right side of the box. In right-to-left languages—like Arabic— the red border will be on the left side of the box.
Browser support is varied for logical properties in borders, so make sure you check support before using.
CSS Справочники
CSS СправочникCSS ПоддержкаCSS СелекторыCSS ФункцииCSS ЗвукCSS Веб шрифтыCSS АнимацииCSS ДлиныCSS Конвертер px-emCSS Названия цветаCSS Значения цветаCSS по умолчаниюCSS Символы
CSS Свойства
align-content
align-items
align-self
all
animation
animation-delay
animation-direction
animation-duration
animation-fill-mode
animation-iteration-count
animation-name
animation-play-state
animation-timing-function
backface-visibility
background
background-attachment
background-blend-mode
background-clip
background-color
background-image
background-origin
background-position
background-repeat
background-size
border
border-bottom
border-bottom-color
border-bottom-left-radius
border-bottom-right-radius
border-bottom-style
border-bottom-width
border-collapse
border-color
border-image
border-image-outset
border-image-repeat
border-image-slice
border-image-source
border-image-width
border-left
border-left-color
border-left-style
border-left-width
border-radius
border-right
border-right-color
border-right-style
border-right-width
border-spacing
border-style
border-top
border-top-color
border-top-left-radius
border-top-right-radius
border-top-style
border-top-width
border-width
bottom
box-decoration-break
box-shadow
box-sizing
caption-side
caret-color
@charset
clear
clip
color
column-count
column-fill
column-gap
column-rule
column-rule-color
column-rule-style
column-rule-width
column-span
column-width
columns
content
counter-increment
counter-reset
cursor
direction
display
empty-cells
filter
flex
flex-basis
flex-direction
flex-flow
flex-grow
flex-shrink
flex-wrap
float
font
@font-face
font-family
font-kerning
font-size
font-size-adjust
font-stretch
font-style
font-variant
font-weight
grid
grid-area
grid-auto-columns
grid-auto-flow
grid-auto-rows
grid-column
grid-column-end
grid-column-gap
grid-column-start
grid-gap
grid-row
grid-row-end
grid-row-gap
grid-row-start
grid-template
grid-template-areas
grid-template-columns
grid-template-rows
hanging-punctuation
height
hyphens
@import
isolation
justify-content
@keyframes
left
letter-spacing
line-height
list-style
list-style-image
list-style-position
list-style-type
margin
margin-bottom
margin-left
margin-right
margin-top
max-height
max-width
@media
min-height
min-width
mix-blend-mode
object-fit
object-position
opacity
order
outline
outline-color
outline-offset
outline-style
outline-width
overflow
overflow-x
overflow-y
padding
padding-bottom
padding-left
padding-right
padding-top
page-break-after
page-break-before
page-break-inside
perspective
perspective-origin
pointer-events
position
quotes
resize
right
tab-size
table-layout
text-align
text-align-last
text-decoration
text-decoration-color
text-decoration-line
text-decoration-style
text-indent
text-justify
text-overflow
text-shadow
text-transform
top
transform
transform-origin
transform-style
transition
transition-delay
transition-duration
transition-property
transition-timing-function
unicode-bidi
user-select
vertical-align
visibility
white-space
width
word-break
word-spacing
word-wrap
writing-mode
z-index
Вопрос-ответ:
Что такое border top css?
Border top css — это стиль, который позволяет задать границу верхней части элемента. Он может быть использован для придания различных эффектов дизайна на сайте.
Как задать border top css на элементе?
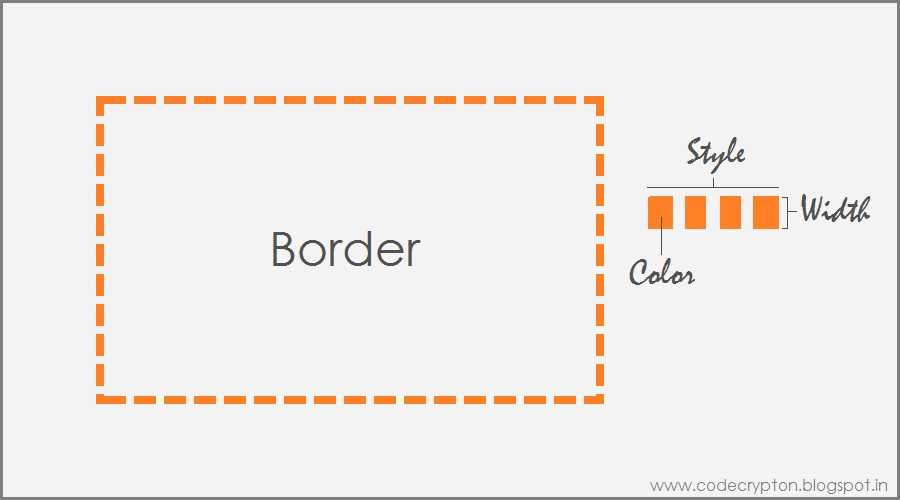
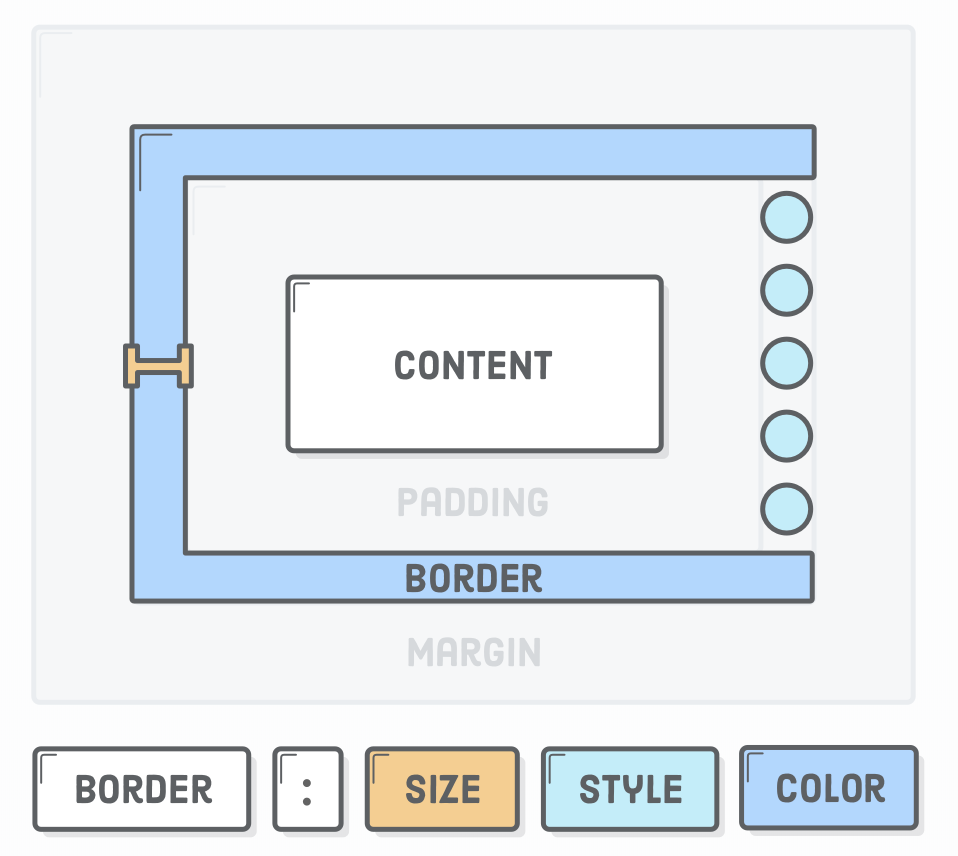
Чтобы задать border top css на элементе, нужно в CSS указать свойство border-top, например: border-top: 2px solid #000;. Первый аргумент указывает толщину линии, второй — ее тип (например, сплошная, пунктирная), а третий — цвет.
Как использовать border top css для создания линии-разделителя?
Для того чтобы создать линию-разделитель при помощи border top css, нужно задать нужную толщину и цвет линии. Например, можно задать толщину 1px и цвет #ccc. Для лучшего эффекта можно также задать margin сверху и снизу от элемента.
Можно ли задать несколько border top css для одного элемента?
Да, можно. Для этого нужно использовать свойство border-top и проставлять значения через запятую. Например: border-top: 1px solid #000, 3px dotted #ccc;.

Как задать border top css для нескольких элементов одновременно?
Для задания border top css для нескольких элементов одновременно можно использовать классы в CSS. Нужно задать стиль для нужного класса, а затем назначить этот класс необходимым элементам на странице.
Можно ли задать border top css только для части элемента?
Да, можно. Для этого нужно задать значение свойства border-top для нужного блока, а затем использовать свойство padding-top для задания отступа сверху. Таким образом, border top css будет расположен только на части элемента.
Как использовать border top css для создания эффекта hover?
Можно задать стиль border top css для элемента, а затем при помощи псевдокласса :hover изменить его параметры при наведении на элемент курсора. Например, border-top: 1px solid #000; можно заменить на border-top: 3px solid #ccc; при :hover.
Применяя условно
Наведение, фокус и другие состояния
Tailwind позволяет условно применять служебные классы в разных состояниях с помощью модификаторов вариантов. Например, используйте , чтобы применять утилиту только при hover.
Полный список всех доступных модификаторов состояния смотрите в документации Наведение, фокус и другие состояния.
Контрольные точки и медиа-запросы
Вы также можете использовать модификаторы вариантов для таргетинга на медиа-запросы, такие как реагирующие контрольные точки, темный режим, предпочтения с уменьшенным движением и многое другое. Например, используйте , чтобы применить утилиту только на экранах среднего размера и выше.
Чтобы узнать больше, ознакомьтесь с документацией по адаптивному дизайну, темному режиму и .
Некоторые приемы с границей
Рамка вокруг изображения
Пример:
img{
	padding20px; /* Поля вокруг изображения */
	margin-right10px; /* отступ справа */
	margin-bottom10px; /* отступ снизу */
	outline1px solid #666; /* параметры границы */
	background#f0f0f0; /* цвет фона */
}
|
Результат:
Двойная рамка с использованием CSS
Пример:
p{
	border5px solid red;
	outline6px solid orange;
}
|
Результат:
Путь осилит идущий,
И поэтому я иду.
Через горы и пущи,
Через радость мою и беду.
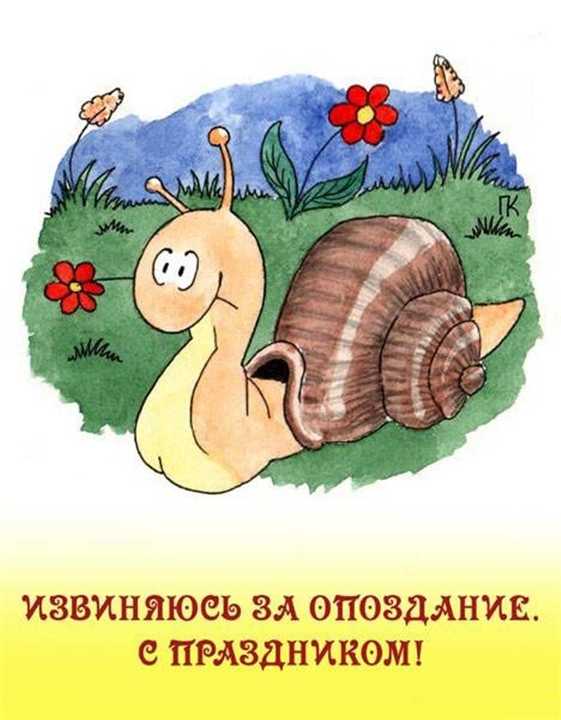
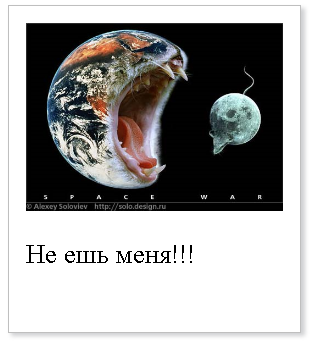
Эффектные рамки для изображений
Пример:
...
.photo {
	width	 150px;
	padding	 10px 10px 20px 10px;
	border	 1px solid #BFBFBF;
	background-color	 white;
	-webkit-box-shadow	 2px 2px 3px rgba(135, 139, 144, 0.4);
	-moz-box-shadow	 2px 2px 3px rgba(135, 139, 144, 0.4);
	box-shadow		 2px 2px 3px rgba(135, 139, 144, 0.4);
}
|
<style><head> <body> <div class="photo"> <img src="2.JPG" width="150" alt=""> <p>Не ешь меня!!!<p> <div> ... |
Результат:
CSS Border Shadow
You can combine the CSS box-shadow property with the border property when you need to create a shadow effect. Two values are necessary to set the box-shadow property that is the v-offset and the h-offset:
- h-offset: The value defines horizontal shadow offset. A negative value set applies the shadow on the left side while a positive value applies the shadow on the right side.
- v-offset: The value defines the vertical shadow offset. A negative value applies the shadow above while a positive value applies the shadow below the box.
H-offset and v-offset accept four values that translate into shadow. These values include:
- Blur: Add a third value to include a blur effect. The shadow blur increases the higher the number.
- Spread: Add a fourth value that defines the shadow spread. A negative value decreases the shadow size while a positive value increases it.
- Color: Add a color value to establish the shadow color. When you fail to define a shadow color, it will assume the color of the text.
- Inset: Add the inset keyword to define the shadow within the box.
What’s more, you can define various shadows. To do this, you just need to separate the values by commas. Ensure you increase the v- and h-offset values for the cascading shadows to make them visible.

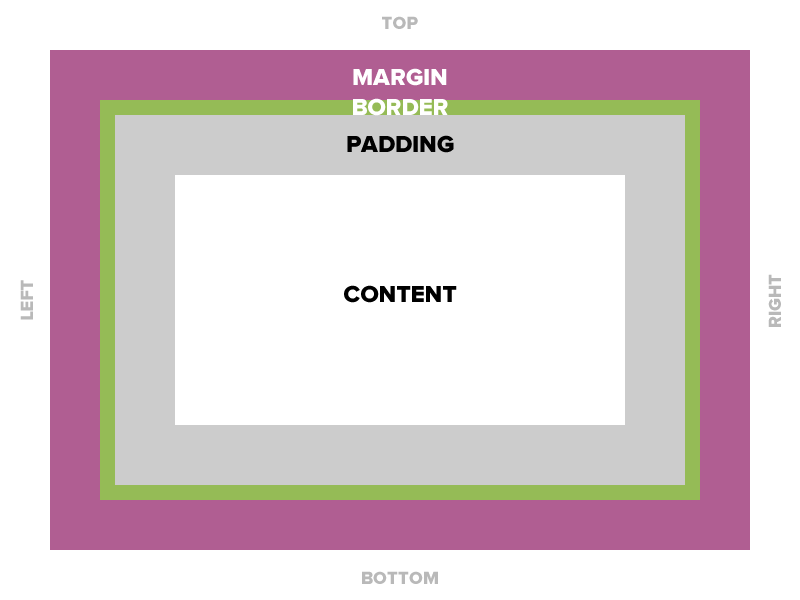

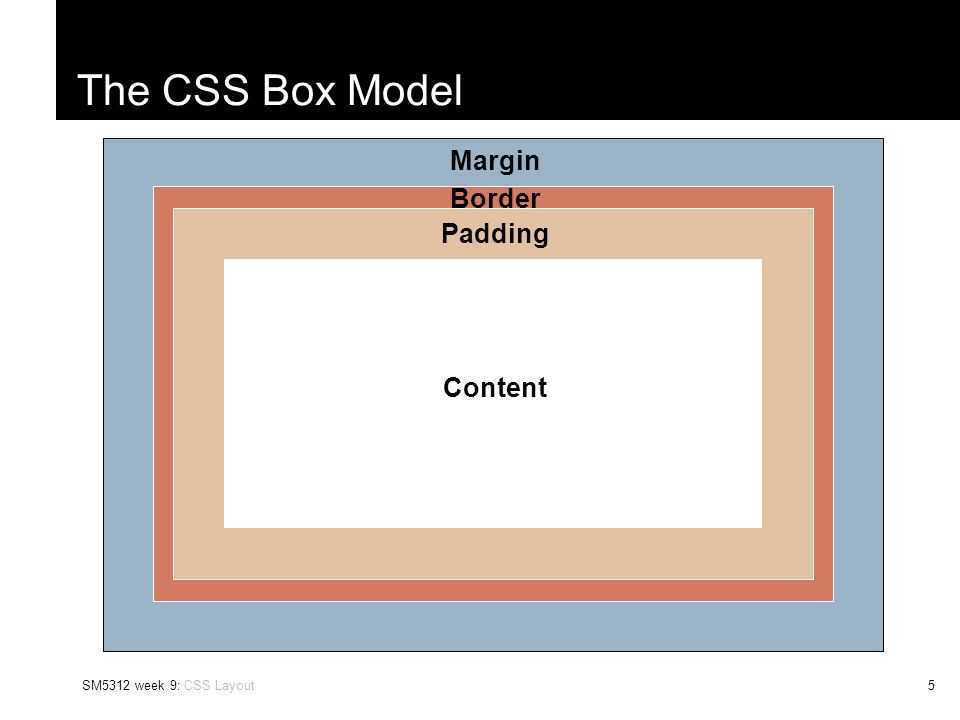
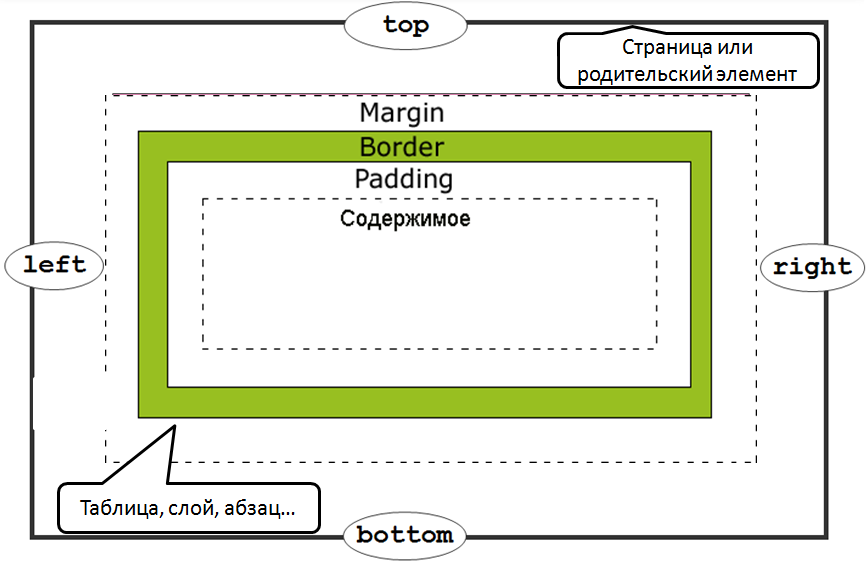
Стиль границ элемента,css-свойство border-style и его производные
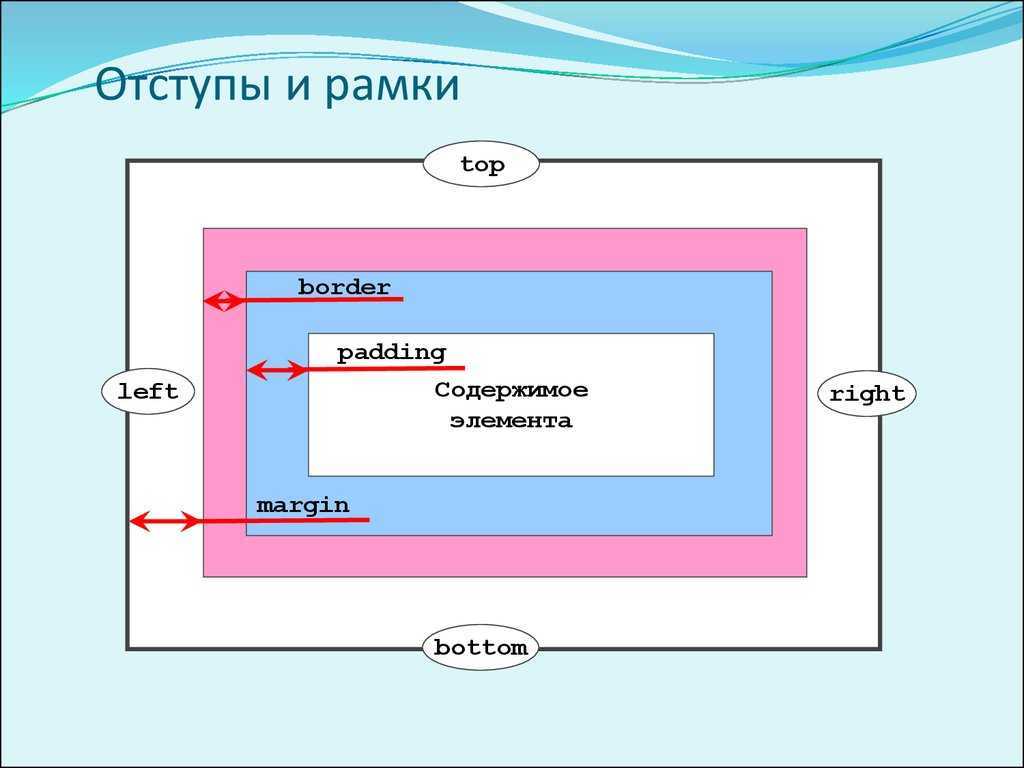
Для установки границ элементов CSS предоставляет целый набор свойств, позволяющих задать стиль, толщину и цвет
границ как по отдельности для каждой из сторон элемента, так и для всех сторон одновременно. Свойств достаточно много, но описывать их все по
отдельности мы не будем, т.к. они очень похожи по своему назначению и легко разбиваются на группы.
Для установки стиля границ используются следующие ненаследуемые свойства
border-style,
border-top-style,
border-bottom-style,
border-left-style,
border-right-style (см. пример №1).
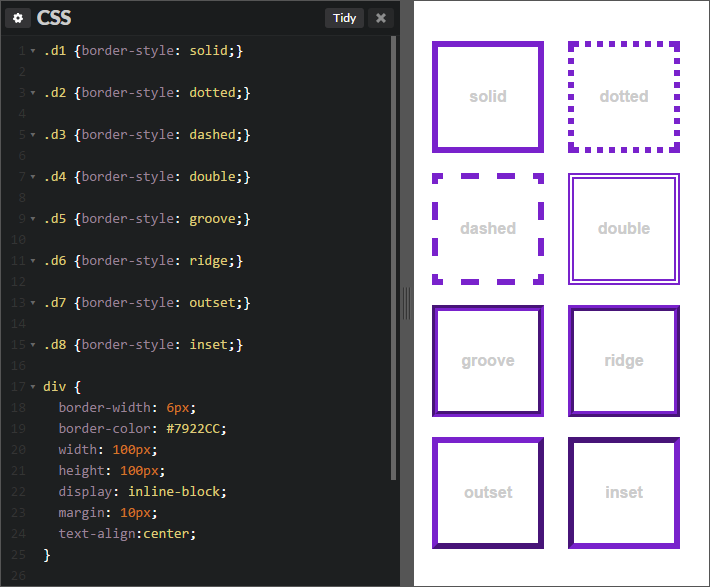
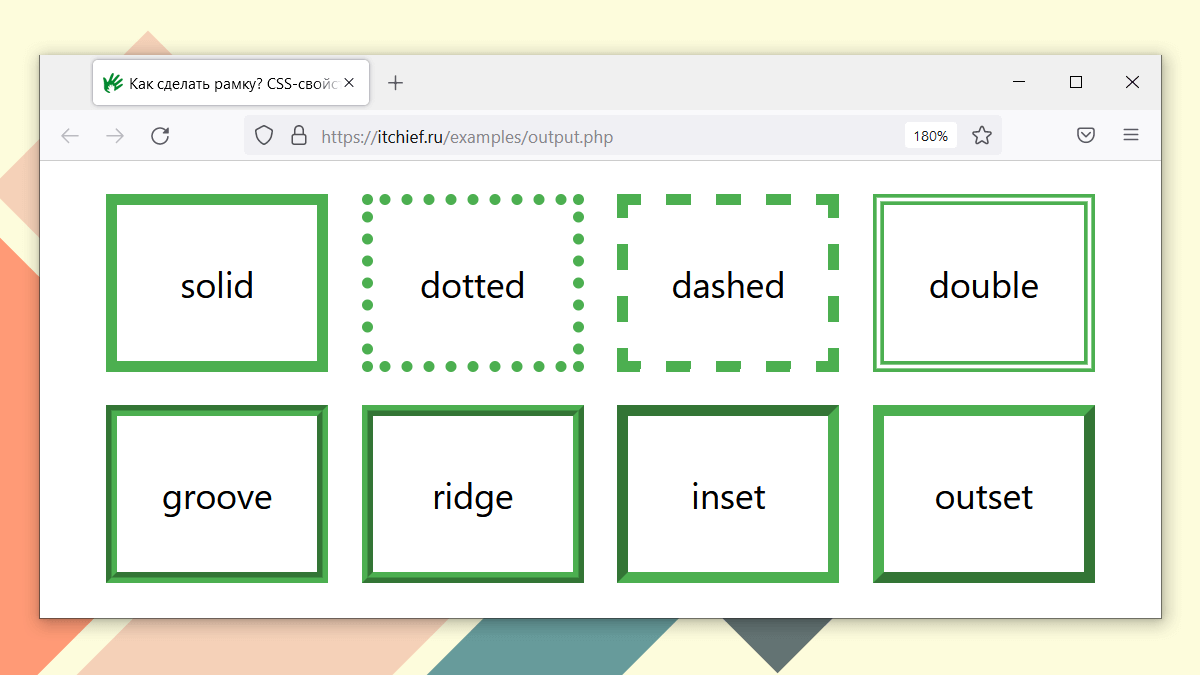
Все они могут принимать ряд значений, которые определяют внешний вид границы:
- none – граница не отображается, браузер обнуляет ее толщину (значение используется по умолчанию);
-
hidden – в принципе тоже самое, что и none, за исключением того,
что в случае применения данного значения к границам ячеек таблицы, у которой значение свойства
border-collapse установлено как collapse, граница вокруг ячейки не
будет отображаться вообще, включая и совмещенные границы смежных ячеек; - dotted – линия границы будет иметь точечный вид;
- dashed – линия границы будет иметь пунктирный вид;
- solid – линия границы будет сплошной;
- double – линия границы будет двойной;
- groove – линия границы будет иметь объемный рифленый вид с эффектом вдавленности;
- ridge – линия границы будет иметь объемный рифленый вид с эффектом выпуклости;
- inset – линия границы будет иметь объемный вид с эффектом вдавленности;
- outset – линия границы будет иметь объемный вид с эффектом выпуклости.
<!DOCTYPE html>
<html>
<head>
	<meta charset="utf-8">
	<meta name="robots" content="noindex">
	<title>Установка границ элементов</title>

	<style>
		p{
		margin-top: 5em;
		padding: 2em;
		width: 400px;
		min-height: 40px;
		border: solid 15px green;
		}

		/* Стили границ по отдельности */
		.border_1{
		border-top-style: solid;
		border-right-style: dashed;
		border-bottom-style: groove;
		border-left-style: double;
		}

	</style>

</head>
<body>

	<p class="border_1">
		Стили границ по отдельности<br>
		border-top-style: solid;<br>
		border-right-style: dashed;<br>
		border-bottom-style: groove;<br>
		border-left-style: double;
	</p>

</body>
</html>
Пример №1. Определение стиля границ элементов
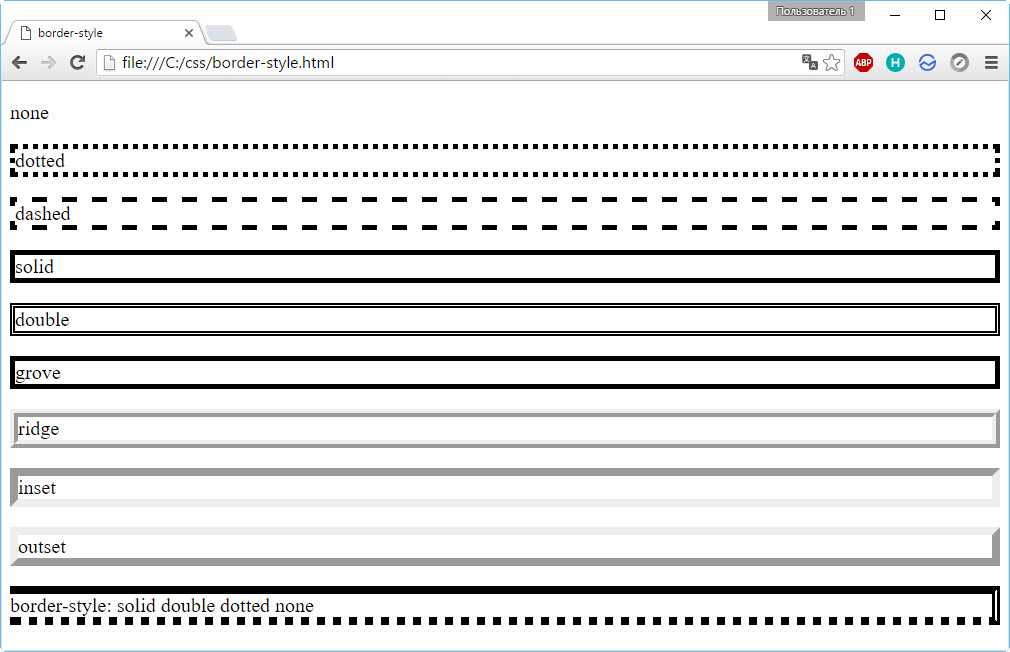
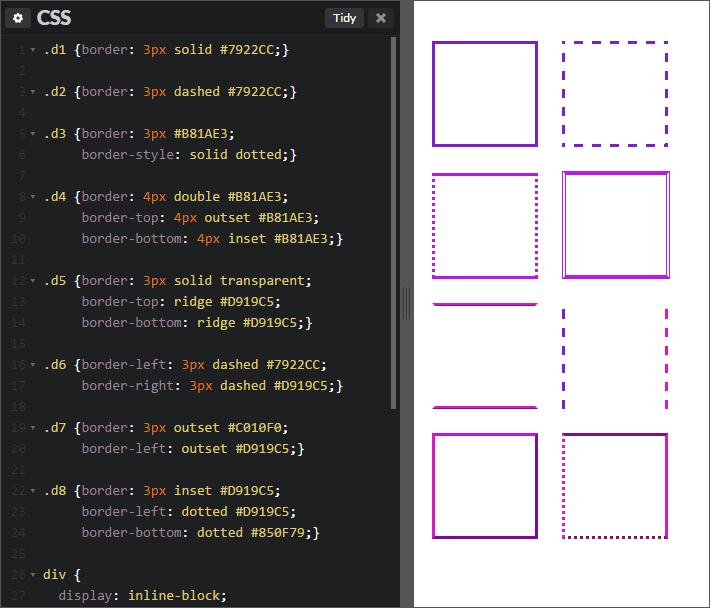
Следует отметить, что свойство border-style может принимать через пробел два, три или даже
четыре значения (см. пример №2):
- одно значение – стиль задается для всех четырех сторон элемента;
-
два значения – первое значение задает стиль верхней и нижней границы элемента, второе – правой и
левой; -
три значения – первое значение задает стиль верхней границы элемента, второе – правой и левой,
третье – нижней границы элемента; - четыре значения – границы устанавливаются по часовой стрелке: верхняя, правая, нижняя и левая.
<!DOCTYPE html>
<html>
<head>
	<meta charset="utf-8">
	<title>Сокращенное свойства border-style</title>

	<style>

		p{
		margin-top: 5em;
		padding: 2em;
		width: 400px;
		min-height: 40px;
		border: solid 15px green;
		}

		/* Четыре значения */
		.border_1{
		border-style: none dotted dashed solid;
		}

		/* Три значения */
		.border_2{
		border-style: double groove ridge;
		}

		/* Два значения */
		.border_3{
		border-style: inset outset;
		}

		/* Одно значение */
		.border_4{
		border-style: dashed;
		}

	</style>

</head>
<body>

	<p class="border_1">
		Четыре значения<br>
		border-style: none dotted dashed solid;
	</p>

	<p class="border_2">
		Три значения<br>
		border-style: double groove ridge;
	</p>

	<p class="border_3">
		Два значения<br>
		border-style: inset outset;
	</p>

	<p class="border_4">
		Одно значение<br>
		border-style: dashed;
	</p>

</body>
</html>
Пример №2. Использование сокращенного свойства border-style
CSS Border — Global Shorthand Property
The smallest possible shorthand property for border for all sides of an element is border.
Syntax
h2 {border: thick dotted green;}
The above code will add a green, dotted and thick border on all the four sides of h2 element.
Example
Let us see an example:
<html>
<head>
<style>
   p {
      border: green dashed thick; padding: 10px;
   }
</style>
</head>
<body>
   <h2>Border Shorthand Property</h2>
   <p>Check the borders!!!</p>
</body>
</html>
But you still have the option of overriding the border shorthand property with any individual property passed exclusively. See the following sample code to clarify this point:
   h2 {border: thin solid gray;}
   h2 {border-bottom-width: 15px;}
The above code will have a thin, solid and gray border on all the sides except for the bottom where the width will be of 15px.
Let us see an example:
<html>
<head>
<style>
   p {
      border: #40a944 dashed thick; border-bottom-width: 15px; padding: 10px;
   }
</style>
</head>
<body>
   <h2>Border Shorthand Property</h2>
   <p>Check the borders!!!</p>
</body>
</html>