
What’s the idea
There are two key things scope brings to CSS:
- More control over which selectors target which elements (i.e. better manipulation
of the cascade) - The ability for one set of styles to override another based on proximity
in the DOM
Scoped styles allow you to contain a set of styles within a single component
on the page.
You can use a selector that only works within a Card component,
and a separate selector that only works in an Accordion.
You can stop selectors from one component from targeting elements
in a child component — or you can allow them reach in, if that’s what you need.
You will not need BEM-style classnames anymore.
Furthermore, proximity becomes a first-class citizen in the cascade.
If two components target the same element (with the same specificity),
the inner component’s styles will override those of the outer component.
Какие есть отличия у тегов div, p, span, a?
Тег <a> предназначен для создания ссылок. В зависимости от присутствия атрибутов name или href тег
<a>
устанавливает ссылку или якорь. Якорем называется закладка внутри страницы, которую можно указать в
качестве
цели
ссылки. При использовании ссылки, которая указывает на якорь, происходит переход к закладке внутри
веб-страницы.
Для создания ссылки необходимо сообщить браузеру, что является ссылкой, а также указать адрес документа,
на
который следует сделать ссылку. В качестве значения атрибута href используется адрес документа (URL,
Universal
Resource Locator, универсальный указатель ресурсов), на который происходит переход. Адрес ссылки может
быть
абсолютным и относительным. Абсолютные адреса работают везде и всюду независимо от имени сайта или
веб-страницы,
где прописана ссылка. Относительные ссылки, как следует из их названия, построены относительно текущего
документа
или корня сайта. <a> — строчный элемент
Элемент <div> является блочным элементом и предназначен для выделения фрагмента документа с целью
изменения
вида содержимого.Как и при использовании других блочных элементов, содержимое тега <div> всегда
начинается
с
новой строки. После него также добавляется перенос строки.
Тег <p> определяет текстовый абзац. Тег <p> является блочным элементом, всегда начинается с новой
строки,
абзацы текста идущие друг за другом разделяются между собой отбивкой. Величиной отбивки можно управлять с
помощью
стилей. Если закрывающего тега нет, считается, что конец абзаца совпадает с началом следующего блочного
элемента.
Тег <span> предназначен для определения строчных элементов документа. В отличие от блочных элементов,
таких
как <table>, <p> или <div>, с помощью тега <span> можно выделить часть информации внутри
других
тегов и установить для нее свой стиль. Например, внутри абзаца (тега <p>) можно изменить цвет и
размер
первой
буквы, если добавить начальный и конечный тег <span> и определить для него стиль текста.
Backwards Compatibility
Overlaid and other types of irregular tables are very rare on the web, but we still require a mechanism to mark them up correctly. Ideally, we could do with something more generic, like the from WAI—ARIA‘s state and properties Module, as this could be used to describe the associated headers for each cell, label for a form control, and so on. There is no mention of a generic attribute for labelling objects in the HTML 5 . Also, backwards compatibility is a concern for the HTML 5 working group, as they include a for backwards compatibility with older WYSIWYG editors.
The element is purely presentational — if it wasn’t supported, the worst thing that would happen in a user agent is that the text would be displayed without the presentational information. It doesn’t create an accessibility barrier in the same way that removing something as vital for comprehension as the attribute would.
There is no doubt that we require something that allows irregular data tables to be marked up so that they are understandable by assistive technology, and this is something that the attribute does adequately right now. I would love to see something more generic introduced that would also work in other areas or rich internet applications, like WAI—ARIA‘s attribute, but at the same time, we need to ensure whatever is proposed doesn’t break the web. W3C technologies should be built considering accessibility from the ground up. I do hope that the HTML Working Group participants change their stance on this issue and consider keeping the attribute, as we definitely need it to support accessibility.
[]
Category: Accessibility.
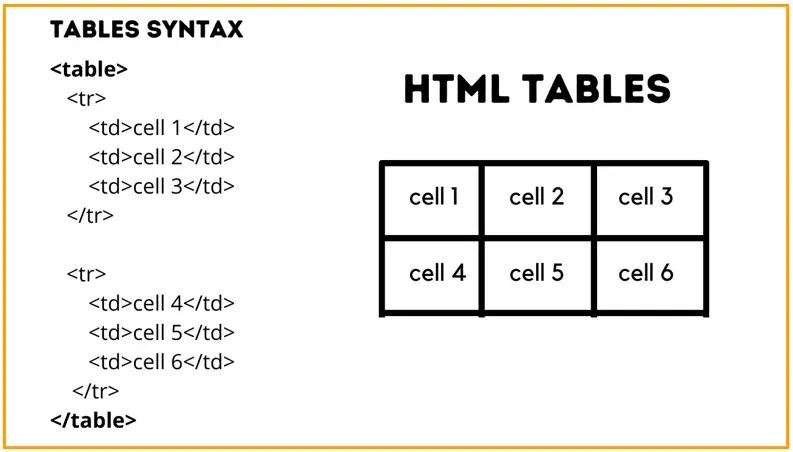
Definition and Syntax
This is not a complicated new feature in HTML5. Here’s the definition :
So if you put a element anywhere in the document and add the attribute, the styles contained inside that element will only apply to that part of the document. Here’s an example, with some surrounding content so you can theoretically (more on that in a minute) see the effects:
<!-- normal css styles declared in the <head> as usual -->
<article>
<h1>Blah Title Blah</h1>
<p>Blah blah article blah blah.</p>
</article>

<article>
  <!-- This style block applies to parent article only -->
  <style scoped>
  h1 {
    color: hotpink;
  }

  article {
    border: solid 1px hotpink;
  }
  </style>

<h1>Blah Title Blah</h1>
<p>Blah blah article blah blah.</p>
</article>

<article>
<h1>Blah Title Blah</h1>
<p>Blah blah article blah blah.</p>
</article>
The example HTML above would naturally exist inside of a regular HTML5 page with a , , etc. The styles declared in the customary way (in the document’s ) would apply to the entire document (as usual). But the styles in the element inside the second element would apply to that article only.
So the second article would get a hot pink heading with a hot pink border, but the others would get whatever styles had been applied in the document stylesheet. Of course, as would be the case with any sets of styles, customary cascade and specificity rules I assume would apply.
Of course, if the attribute is removed, then the styles will apply to the entire document. So you can’t just stick a element inside something, you need the attribute to enable this feature.
Presenting data #
Table elements have semantic meanings that are used by assistive technologies to enable navigating through the rows and columns without getting ‘lost’. The element should not be used for presentation. If you need a heading over a list, use a and a list. If you want to lay out content in many columns, use multi-column layout. If you want to lay out content in a grid, use CSS grid. Only use a table for data. Think of it this way: if your data requires a spreadsheet in order to be presented at a meeting, use. If you would like to use the features available in presentation software like Keynote or Powerpoint, you probably need a description list.
While sorting table columns is the purview of JavaScript, marking up your headers to let users know the column is sortable is the purview of HTML. Let your users know the table columns are sortable with iconography showing ascending, descending, or unsorted. The column currently sorted should include the aria-sort attribute with the enumerated value of the sort direction. The can politely announce updates to sort order via aria-live and a span that is dynamically updated, and which is visible to screen reader users. As the column is sortable by clicking on the header content, the header content should be a .
If you’re not presenting tabular data, don’t use a . If you do use a table for presentation, set .
Many developers use tables to lay out forms but there is no need to. But you do need to know about HTML forms, so we will cover that next.
What I didn’t tell you
There is even more to data tables than I have mentioned here. For example, I haven’t mentioned the attribute at all (until now), and I did not describe the and elements in great depth. Neither have I gone into formatting and styling or the border models. Also missing is an example of a really complex table.
For those of you looking for even more detailed information, here are links to some further reading:
- Tables in HTML documents
- CSS formatting of tables
- Techniques for Accessible HTML Tables
- Building accessible websites: Tables and frames
- A table, s’il vous plaît
Posted on October 27, 2004 in Web Standards, Accessibility, (X)HTML
- Previous post: Document titles and title separators
- Next post: Mozilla, clearers, and dropped floats
Как стилизовать svg? Какие основные атрибуты и CSS-свойства используются для этого?
- CSS Свойства / атрибуты svg
-
fill
Заливка элемента
-
fill-rule
Свойство определяет как будут заливаться сложные фигуры, имеющие пересечения внутри себя. Для
простых
фигур
ни на что не влияет -
fill-opacity
Управление прозрачностью заливки
-
stroke
Цвет обводки
-
stroke-width
Толщина обводки
-
stroke-linecap
Свойство определяет как будут выглядеть концы линий. Возможные значения: butt, round, square
-
stroke-linejoin
Определяет как будут выглядеть соединения линий на углах. Возможные значения: miter, round, bevel
-
stroke-dasharray
Управляет видом пунктирной обводки
-
stroke-dashoffset
Свойство позволяет задать смещение пунктирной обводки относительно первоначального положения
Created with Fabric.js 3.6.2

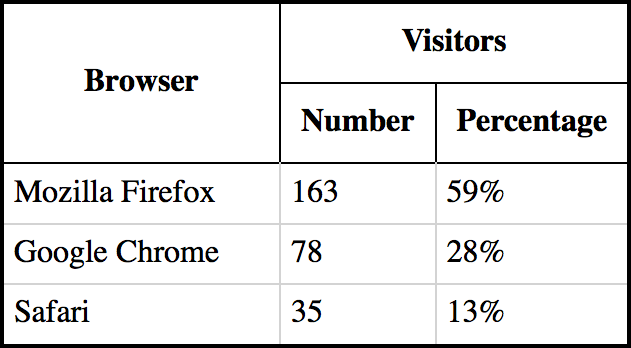
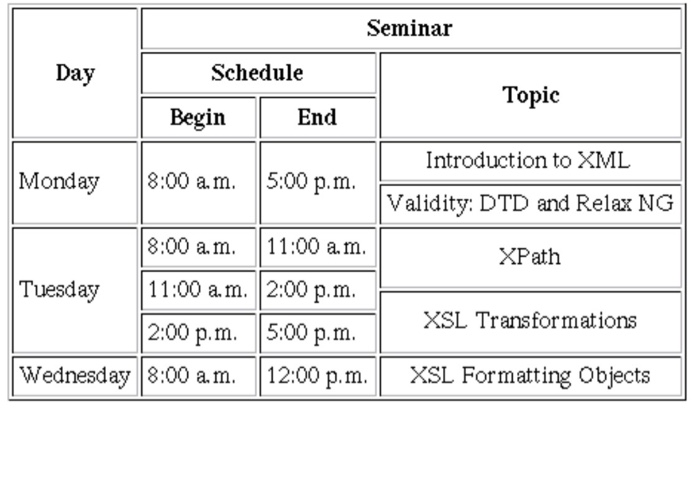
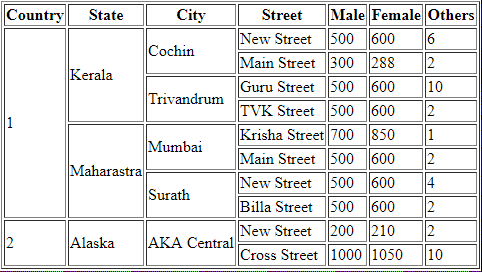
Explaining the table: the summary attribute
A sighted person can easily decide whether or not to study a table in detail. A quick glance will tell how large the table is and roughly what it contains. A person using a screen reader can’t do that unless we add a attribute to the table element. This way you can provide a more detailed description of the table than is suitable for the element.
The contents of the summary attribute will not be rendered by visual browsers, so make the description long enough for anyone hearing it to understand what the table is about. Don’t overdo it though, and use the summary attribute only when necessary, i.e. for more complex tables where a summary will make it easier for someone using a screen reader to understand the contents of the table.
Styling tables #
There are two relatively obscure elements that were briefly mentioned: the column group, , element and its only descendant, the empty column element. The element is used to define groups of columns, or elements, within a table.
If used, the column grouping should be nested in the , immediately after the and before any table data. If they span more than one column, use the attribute.
The content outline order for a table is generally as follows, with and being the two elements that should be included:
Neither nor has semantic meaning in terms of helping to make the table more accessible, but they do allow for limited column styling, including setting a width for the column with CSS.
styles will style a column as long as there are no or styles that override that styling. For example, when is used to merge cells in some rows of a table but not all, you can’t be sure that a selector such as , which selects the 8th child of every row, will highlight the 8th column in full or will highlight the 8th column for several rows, but with a smattering of 9th and 10th column cells, depending on what row or column cells were merged.
Unfortunately, only a few properties are supported, the styles aren’t inherited into the cells, and the only way of using the element in targeting cells is with a complex selector including the relational selector.
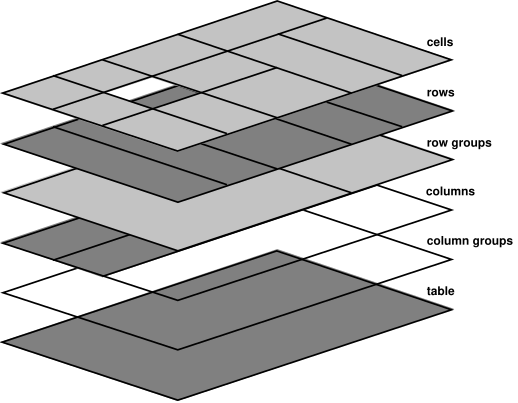
If both the and the have a background color, the of the will be on top. The order of drawing is: table, column groups, columns, rowgroups, rows, with cells last and on top, as shown in the . The and elements are not descendants of or elements, and do not inherit their styling.
To stripe a table, CSS structural selectors come in handy. For example, will add a translucent black to each odd row in the body of the table, letting any background effects that are set on show through.
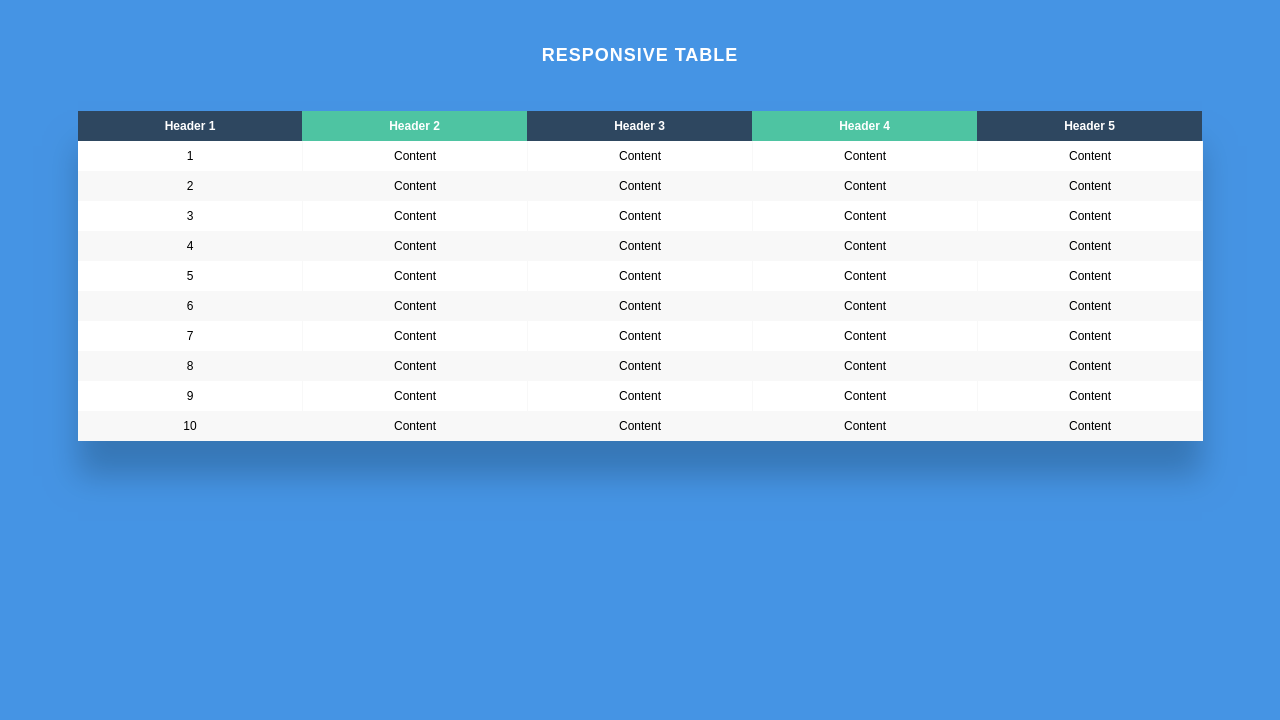
Tables are not responsive by default. Rather, they are sized according to their content by default. Extra measures are needed to get table layout styling to effectively work across a variety of devices. If you are changing the CSS display property for table elements, include ARIA attributes. While that may sound redundant, the CSS property can affect the accessibility tree in some browsers.
Example
Let’s observe the function of these four attribute range constants through code, take request as an example
Example: pageScopeDemo04.jsp:
<%@page contentType="text/html;charset=utf-8"%>
<%@page import="java.util.*"%>
<%
    pageContext.setAttribute("name","solitary wolf",PageContext.REQUEST_SCOPE);  //Set attributes and specify the range of attributes
    pageContext.setAttribute("date",new Date(),PageContext.REQUEST_SCOPE); //Set attributes and specify the range of attributes
%>
<jsp:forward page="/pageScopeDemo05.jsp"/>
pageScopeDemo05.jsp:
<%@page contentType="text/html;charset=utf-8"%>
<%@page import="java.util.*"%>
<%
    //Use request object to get attributes
    String refName = (String)request.getAttribute("name");
    Date refDate = (Date)request.getAttribute("date");
    //You can also use the pageContext object to get attributes, as long as you specify the attribute range of the object when getting it
    String refName2 = (String)pageContext.getAttribute("name", PageContext.REQUEST_SCOPE);
    Date refDate2 = (Date)pageContext.getAttribute("date", PageContext.REQUEST_SCOPE);
%>
 Use request object to get attributes:
<h1>Name: <%=refName%></h1>
 <h1>Date: <%=refDate%></h1>
 Use the pageContext object to get attributes:
<h1>Name: <%=refName2%></h1>
 <h1>Date: <%=refDate2%></h1>
Fifth, the four types of attribute scope use occasions
1. Request: If a client sends a request to the server, the data generated will be useless after the user has read it. Data like this will exist in the request field, like news data, which is useless after the user has read it.2. Session: If the client sends a request to the server, the data generated will still be useful for a while after the user runs out. Data like this is stored in the session domain. Like shopping data, the user needs to see his shopping information and wait a while. Use this shopping data to check out. 3, application (servletContext): If a client sends a request to the server, the generated data will be used by other users after the user runs out. Data like this is stored in the application (servletContext) domain, like chat data.
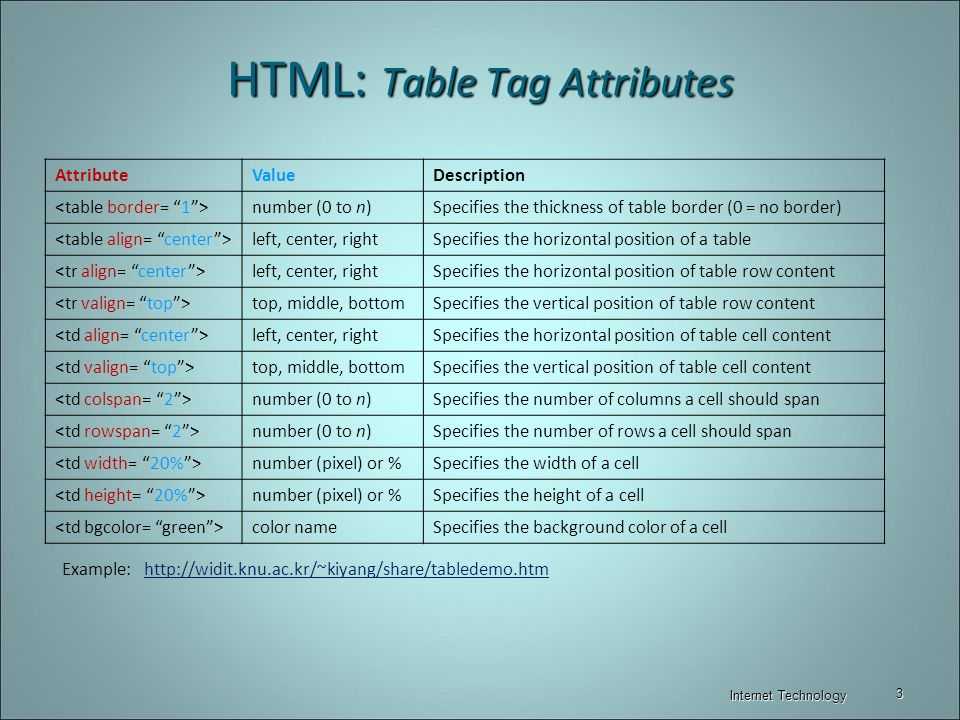
How to Use the Scope Attribute in HTML Tables
The scope attribute is used to define whether a specific header is intended for either a column, row, or a group of both. I know the definition might be challenging to understand but hold on – with the help of an example you will better understand it.
The main purpose of the scope element is to show the target data so that the user does not have to rely on assumptions. The attribute is declared in the header cell , and it takes the values , , and .
The values and indicated that the header cell is providing inforamation for either the rows or columns respectively.
Scope Syntax
An Example with use of
| Semester | Grade | |
|---|---|---|
| 1 | Jan — April | Credit |
| 2 | May — August | Pass |
| 2 | September — December | Distinction |
What the attribute has done, is that it shows whether a header cell belongs to either the column, row, or a group of both.
In this case the headers belong to the column because it’s what we set in the code. You can play around by changing the attribute to see the different behaviors.
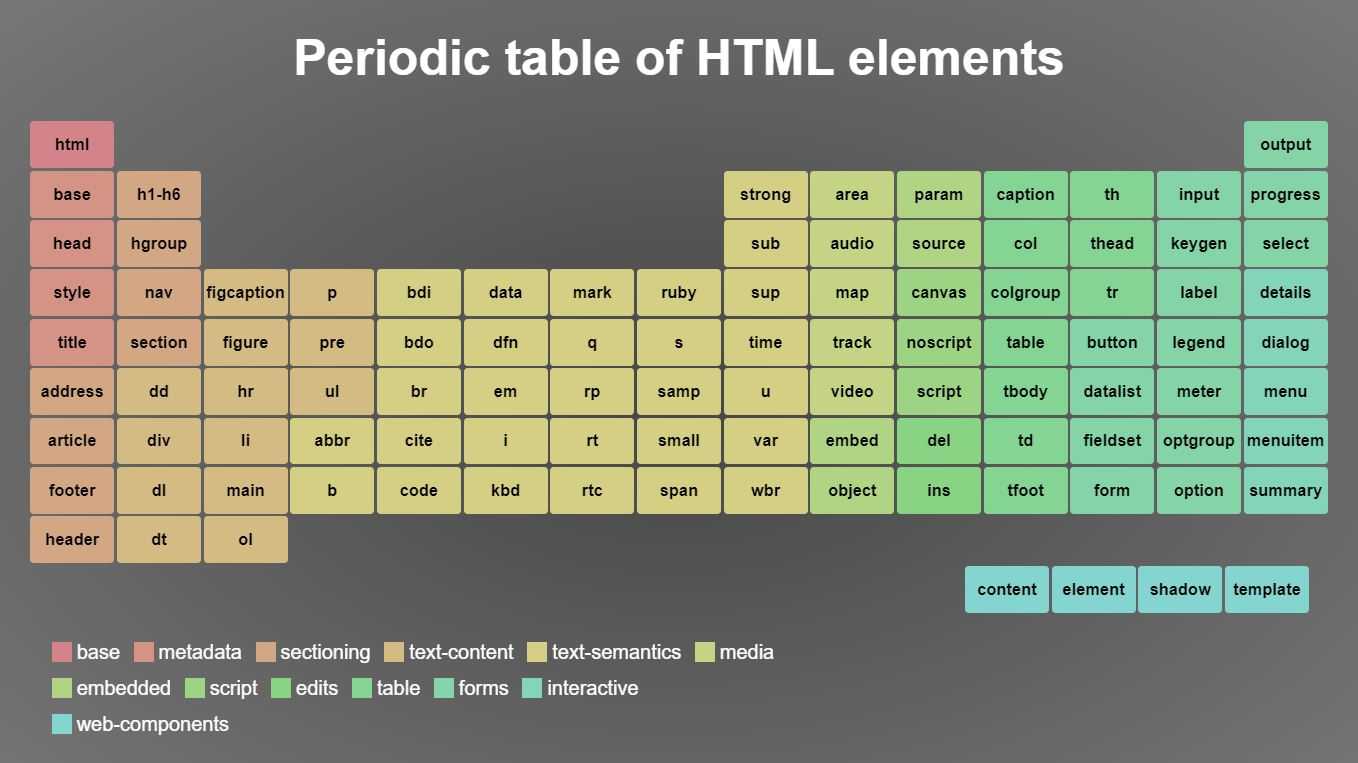
HTML5 теги, как сделать верстку семантичной и зачем это нужно?
- Что такое семантическая
вёрстка
и зачем она нужна - HTML5 Семантические
элементы
Семантикой в вёрстке называют подбор тегов по смыслу элемента. Прошли эпохи вёрстки на таблицах и дивах. Теперь
почти для всего есть отдельный тег. Например, для меню есть тег
<nav>, а для основного контента страницы — <main>.
Семантическая вёрстка — подход к разметке, который опирается не на содержание сайта, а на смысловое
предназначение каждого блока и логическую структуру документа.
- <article> Определяет статью
- <aside> Определяет содержание в стороне от содержимого страницы
- <details> Определяет дополнительные сведения, которые пользователь может просматривать или
скрывать - <summary> Определяет видимый заголовок для элемента <Details>
- <figcaption> Определяет заголовок для элемента <Figure>
- <figure> Задает автономное содержимое, например иллюстрации, диаграммы, фотографии, списки кодов
и т.д. - <footer> Определяет нижний колонтитул для документа или раздела
- <header> Задает заголовок для документа или раздела
- <main> Указывает основное содержимое документа
- <mark> Определяет выделенный текст
- <nav> Определяет навигационные ссылки
- <section> Определяет раздел в документе
- <time> Определяет дату и время
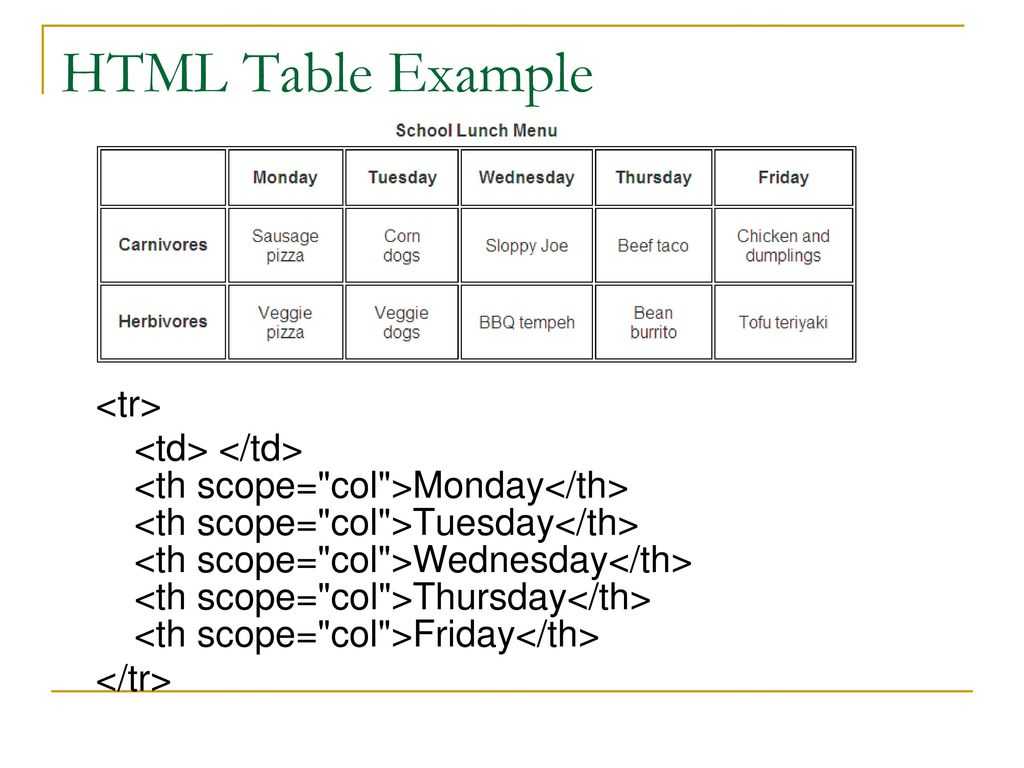
Associate the Data Cells with the Appropriate Headers
Now that we’ve created headers, we need to associate the data cells with the appropriate headers.
The attribute
The scope attribute identifies whether a table header is a column header or a row header. Here is the markup for the table, using the attribute:
The attribute tells the browser and screen reader that everything within a column that is associated to the header with in that column, and that a cell with is a header for all cells in that row.
All elements should generally always have a scope attribute. While screen readers may correctly guess whether a header is a column header or a row header based on the table layout, assigning a scope makes this unambiguous.
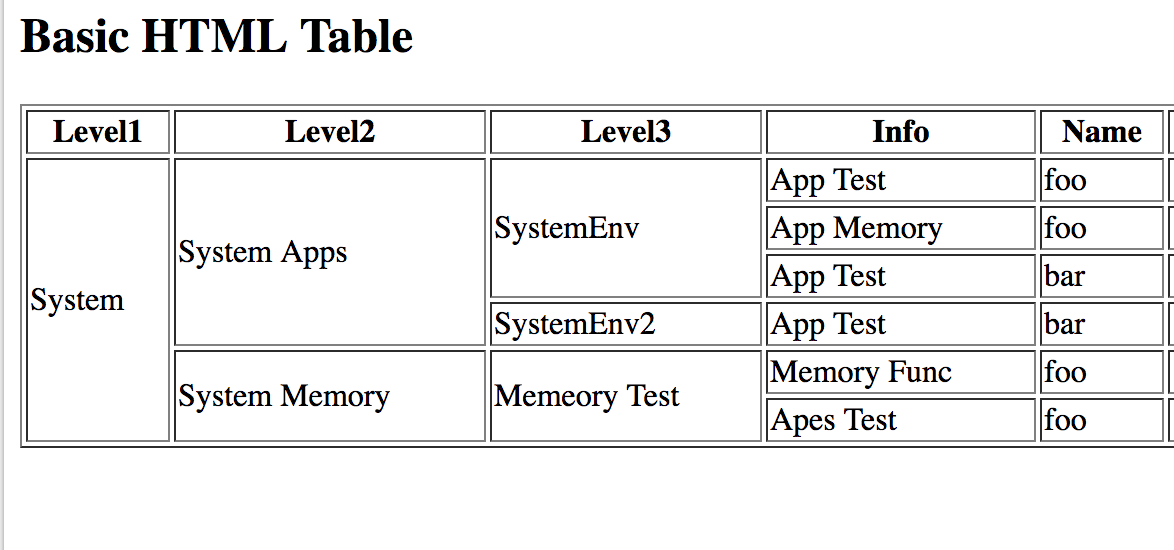
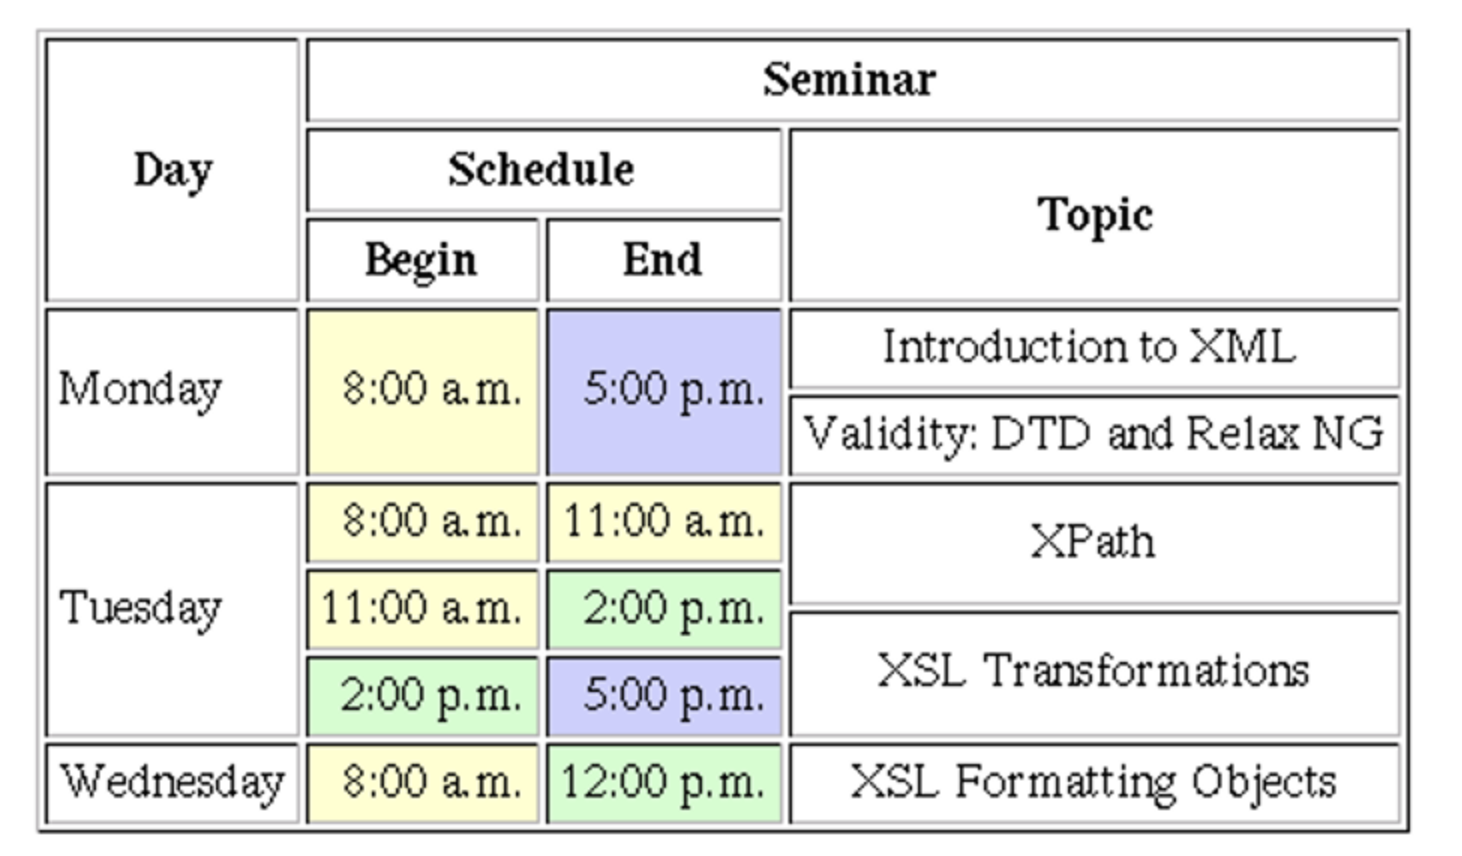
Spanned headers
Scope will apply even if the table is complex with multiple levels of headers (such as in spanned cells). The scope of a table header will apply to all cells over which that header spans.
| Name | Age | Birthday | |
|---|---|---|---|
| by birth | Jackie | 5 | April 5 |
| Beth | 8 | January 14 | |
| by marriage | Beth | 8 | January 14 |
In this example, the «by birth» row header has a scope of row, as do the headers with the names. The cell showing the age for Jackie will have 3 headers — one column header («Age») and two row headers («by birth» and «Jackie»). A screen reader would identify all of them, including the data cell content (e.g., it might read «by birth. Jackie. Age. 5.»).
Note
Despite being standard markup for tables for many years, some screen readers still do not fully support complex tables with spanned or multiple levels of row and/or column headers. When possible, try to ‘flatten’ the table and avoid spanned cells and multiple levels of header cells.
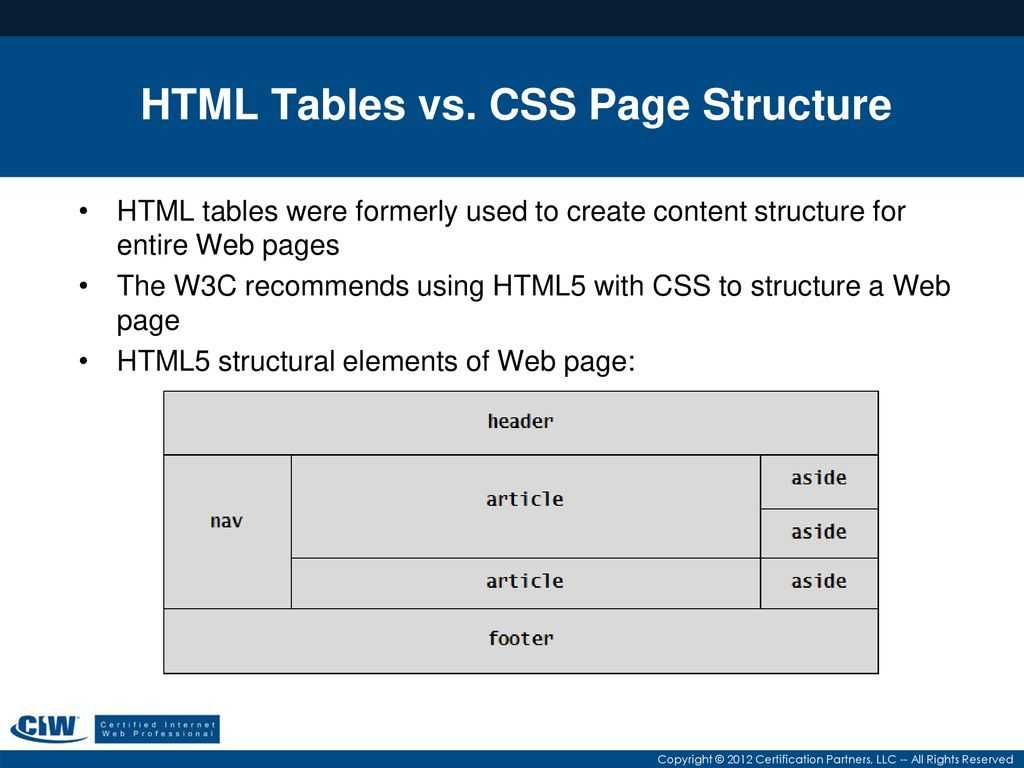
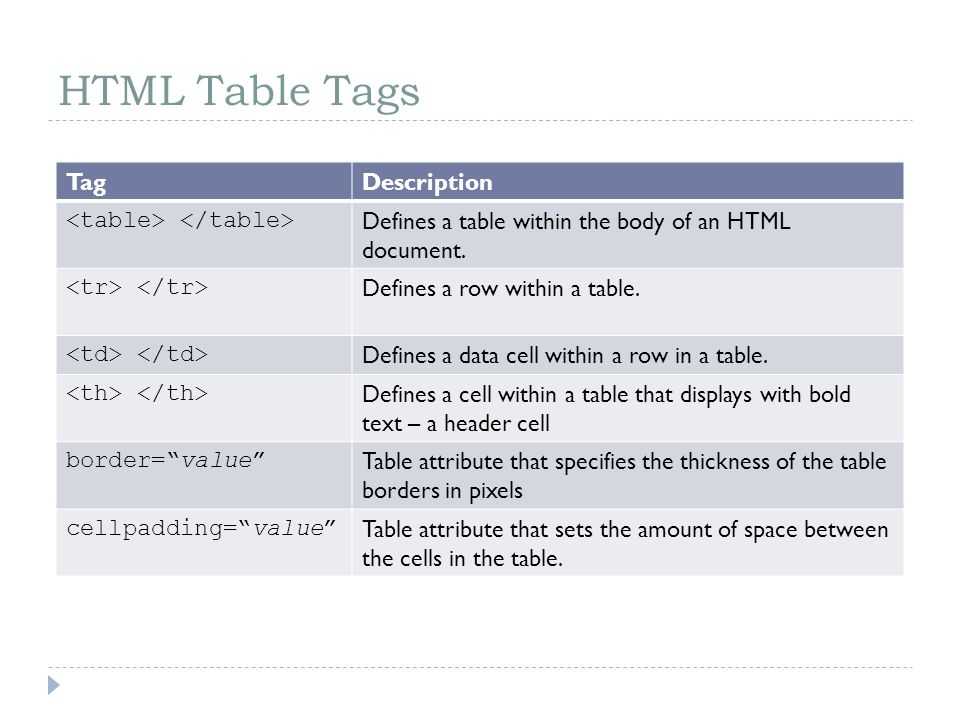
Структура таблиц
Структура таблиц очень похожа на структуру HTML-страницы. Только для страницы мы используем теги <header>, <main> и <footer>, а для таблицы — <thead>, <tbody> и <tfoot>.
Согласно , в таблице может быть только по одной секции thead и tfoot, а вот tbody — несколько.
Эти элементы полезны не только для доступности, но и для стилизации (как логичные точки добавления CSS к таблице).
Шапка таблицы <thead>
Этим тегом задают заголовочную секцию таблицы. Чаще всего речь идёт о первой строке — содержащей заголовки столбцов.
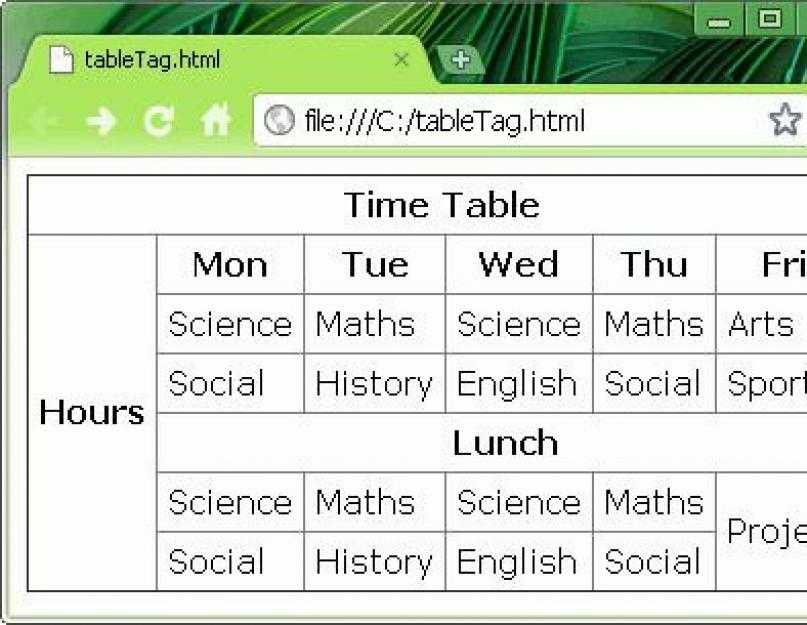


Браузер и поисковики считают эту часть заголовочным колонтитулом таблицы. Например, при печати колонтитулы таблицы будут на каждой напечатанной странице — и благодаря такой шапке вы не забудете, что значат данные каждого столбца.
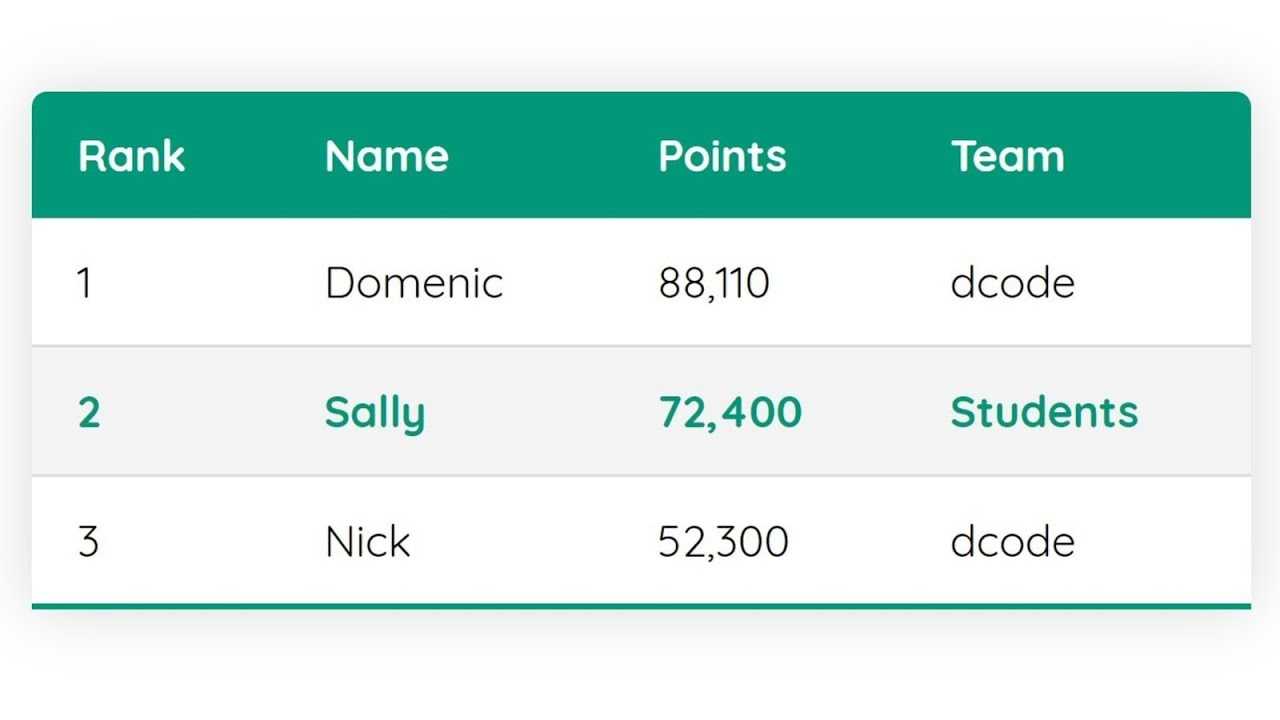
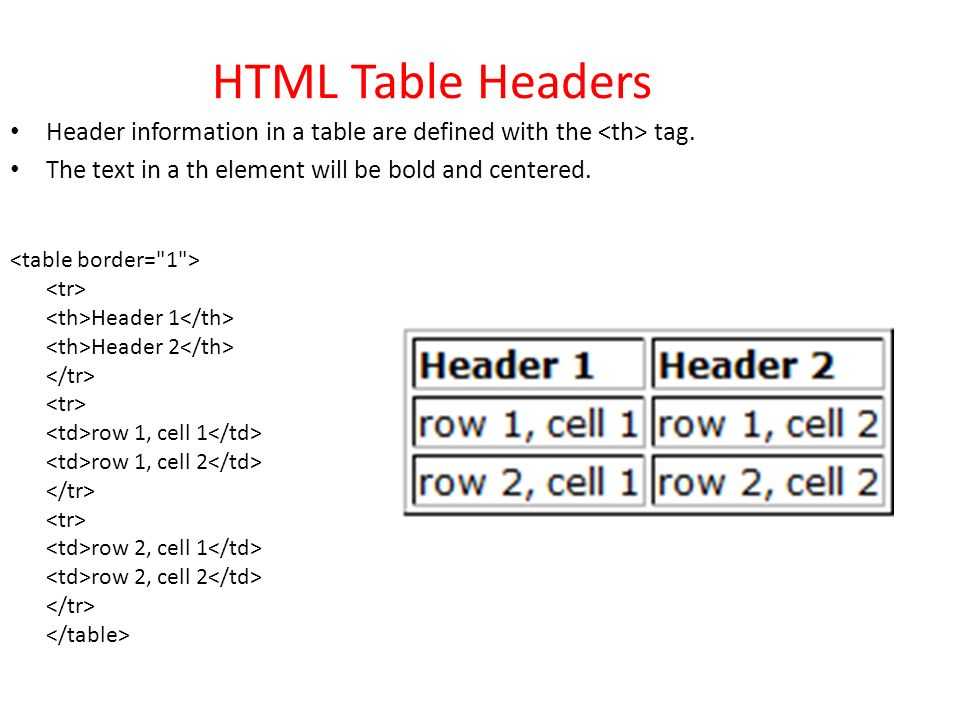
В <thead> для ячеек используют тег <th>. Контент в ячейке th браузер выравнивает по центру, а текст к тому же отображает жирным шрифтом.
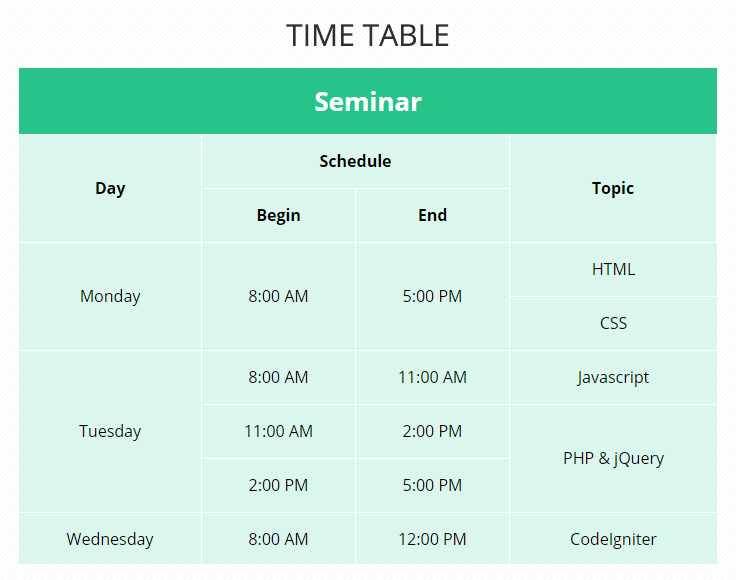
Например:
Сaption
| th | th | |||
|---|---|---|---|---|
| td | td | td | td | td |
| td | td | td | td | td |
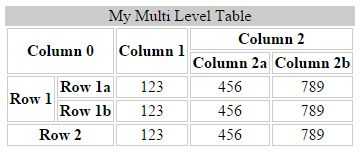
Из примера видно, что первая строка объединяет две ячейки <th>. Первая ячейка первой строки — это заголовок для других ячеек первого столбца, а вторая ячейка первой строки — это заголовок четырёх оставшихся столбцов.
Заголовки столбцов и строк. Тег <th>
Тег <th> задаёт особые ячейки, с которых начинаются строки или столбцы. В такой ячейке обычно хранится атрибут для всех данных строки или столбца.
Как мы и говорили выше, к содержимому таких ячеек применяется определённый стиль: по умолчанию это выделение жирным шрифтом и выравнивание по центру ячейки.
Благодаря заголовочным ячейкам таблица выглядит лучше, а искать данные в ней становится проще.
Важно. Не применяйте для визуального форматирования — только для выделения ячейки-заголовка
Этот принцип касается всех элементов разметки, которые обладают семантикой.
Тег <th> даёт ещё одно преимущество: вместе с атрибутом scope он связывает каждый заголовок со всеми данными строки или столбца. То есть добавляет к интуитивной, визуально считываемой связи такую, которую понимают и программы.
К тегу <th> и атрибуту scope мы вернёмся ближе к концу статьи, где подробнее поговорим о доступности таблиц для пользователей с ограниченными возможностями.
Тело таблицы <tbody>
Секция <tbody> содержит основную часть информации и группирует главные части таблицы. То есть можно использовать <tbody> сколько угодно раз, чтобы разбивать основной контент таблицы на части, данные которых связаны общей логикой.
Тег <tbody> семантически важен: браузер, поисковые роботы и помощники для людей с ограниченными возможностями благодаря ему понимают, где находится основное содержимое таблицы.
Тело таблицы располагается после заголовка <caption> и шапки <thead>.
Пример:
| Месяц | Дни недели | Оплата(тыс. р.) |
|---|---|---|
| Январь | Понедельник | 50 |
| Вторник | 40 | |
| Среда | 35 | |
| Четверг | 40 | |
| Пятница | 15 | |
| Суббота | 60 | |
| Воскресенье | 30 | |
| Февраль | Понедельник | 20 |
| Вторник | 25 | |
| Среда | 15 | |
| Четверг | 70 | |
| Пятница | 77 | |
| Суббота | 63 | |
| Воскресенье | 30 |
Здесь нет заголовка <caption>, поэтому нужно его придумать и скрыть с помощью CSS (для доступности веб-содержимого).
Данные основной части таблицы надо сгруппировать по смыслу. У нас сначала идёт январь, затем февраль. Значит, для данных каждого месяца логично использовать свой <tbody>:
- в первом <tbody> будут январские строки;
- во втором <tbody> — февральские.
Подвал таблицы <tfoot>
Секция <tfoot> используется для группировки содержимого нижней части таблицы.
Семантически это итог таблицы (например, результат подсчёта сумм по столбцам).
А ещё это нижний колонтитул таблицы, браузер выводит его после <tbody>, а при печати таблицы содержимое <tfoot> может быть как на каждой напечатанной странице, так и только на последней (это зависит от браузера).
Важно. Чтобы предотвратить проблемы с доступностью (клавиатурная навигация и специальные возможности), размещать следует после
Для ячеек в секции <tfoot> следует использовать тег <td>.
Пример:
Таблица чисел
| Нечётное | Чётное |
|---|---|
| 1 | 2 |
| 3 | 4 |
| 5 | 6 |
| Вы узнали, что такое чётные и нечётные числа |
Чекбоксы и радиокнопки
В чем заключаются отличие чекбокса от радио кнопок? Как связать радиокнопки в группу?
Отличие в том, что активных чекбоксов в группе может быть от нуля до всех из них, а в группе радиокнопок
всегда
активна только одна
Чекбокс — это элемент <input> с атрибутом type="checkbox"
Радиокнопка — это тоже элемент <input>, но с атрибутом type="radio". Чтобы связать
радиокнопки
в группу,
каждому элементу нужно прописать атрибут name с именем группы радиокнопок (т.е. значение
name
должно
быть одинаковым у всех кнопок в группе,
тогда можно будет выбрать только одну из них).
Добавление атрибута name элементам группы чекбоксов не имеет такого же эффекта
Table captions:
The <caption> element can be used to provide a short description of a table, much like an image caption. By default, most visual browsers render the element centered above the table. The CSS property can be used to change that, if necessary. Most browsers will only display the caption either above () or below () the table contents, while some will accept or as values. I’ll leave it to you to experiment with this.
When used, the <caption> element must be the very first thing after the opening <table> tag:
| Company | Employees | Founded |
|---|---|---|
| ACME Inc | 1000 | 1947 |
| XYZ Corp | 2000 | 1973 |
You can of course use CSS to style the caption if you wish. However, be aware that it can be a little tricky to style it consistently across browsers. I’ll leave that as another exercise for you.
Когда стоит использовать тег img, а когда background-image?
Когда мы вспоминаем основное назначение html и css оно для нас становится очевидным.
Различие состоит в том, что картинки несущие смысловую нагрузку или же каким-либо образом относящиеся
к содержанию страницы следует вставлять тегом img (картинки в тексте, баннеры, картинки слайдера,
аватарки и
тд).
Все остальное (просто элементы оформления: различного рода разделители, маркеры, фоны и тд.)
следует вставлять в дизайн используя background-image.
Когда следует использовать тег IMG
Если изображение это часть содержимого, например логотип, или диаграмма или персонаж
Если изображение имеет важное семантическое значение, например значок предупреждения.
Это гарантирует, что смысл изображения может быть передан во всех пользовательских агентах, включая
считыватели
экрана (при условии,
что тег <img> имеет атрибут alt)
Для возможности менять изображение с backend-a
Используя img для вывода картинок несущих на себе смысловую нагрузку, мы даем возможность
поисковикам прочитать альты этих картинок и лучше понять что они из себя представляют,
есть возможность получения дополнительного трафика на сайт из сервисов поиска по картинкам,
получаем лучшую уникализацию контента (поисковики любят текст разбавленный картинками,
поскольку это обычно улучшает поведенческие факторы посетителей ресурса).
Если нужно, чтобы при печати страницы изображение было включено по умолчанию
Img с анимацией меньше нагружает браузеры
Когда следует использовать фоновое изображение CSS
- Если изображение не является частью содержимого.
- Используя свойство фона мы можем вывести на странице только часть изображения
- Если надо использовать метод спрайтов (за счет того, что все иконки подгружаются с 1 картинки
уменьшается
количество обращений к серверу при загрузке страницы, что положительно сказывается на скорости)
для ускорения загрузки сайта
Учебник HTML
HTML уроки: HTML Атрибуты
Все теги HTML
- <!— Комментарий —>
- <!DOCTYPE>
- <a>
- <abbr>
- <acronym>
- <address>
- <applet>
- <area>
- <article>
- <aside>
- <audio>
- <b>
- <base>
- <basefont>
- <bdi>
- <bdo>
- <bgsound>
- <big>
- <blink>
- <blockquote>
- <body>
- <br>
- <button>
- <canvas>
- <caption>
- <center>
- <cite>
- <code>
- <col>
- <colgroup>
- <command>
- <comment>
- <data>
- <datalist>
- <dd>
- <del>
- <details>
- <dfn>
- <dialog>
- <dir>
- <div>
- <dl>
- <dt>
- <em>
- <embed>
- <fieldset>
- <figcaption>
- <figure>
- <font>
- <footer>
- <form>
- <frame>
- <frameset>
- <h1>
- <h2>
- <h3>
- <h4>
- <h5>
- <h6>
- <head>
- <header>
- <hgroup>
- <hr>
- <html>
- <i>
- <iframe>
- <img>
- <input>
- <ins>
- <kbd>
- <keygen>
- <label>
- <legend>
- <li>
- <link>
- <main>
- <map>
- <mark>
- <marquee>
- <menu>
- <menuitem>
- <meta>
- <meter>
- <nav>
- <nobr>
- <noembed>
- <noframes>
- <noindex>
- <noscript>
- <object>
- <ol>
- <optgroup>
- <option>
- <output>
- <p>
- <param>
- <picture>
- <plaintext>
- <pre>
- <progress>
- <q>
- <rp>
- <rt>
- <rtc>
- <ruby>
- <s>
- <samp>
- <script>
- <section>
- <select>
- <small>
- <source>
- <spacer>
- <span>
- <strike>
- <strong>
- <style>
- <sub>
- <summary>
- <sup>
- <table>
- <tbody>
- <td>
- <template>
- <textarea>
- <tfoot>
- <th>
- <thead>
- <time>
- <title>
- <tr>
- <track>
- <tt>
- <u>
- <ul>
- <var>
- <video>
- <wbr>
- <xmp>
Теги по назначению
- Документ
- Звук и видео
- Изображения
- Комментарии
- Объекты
- Скрипты
- Списки
- Ссылки
- Таблицы
- Текстовые блоки
- Форматирование текста
- Формы
- Фреймы
wm-school
Важно помнить!
Теги <thead> и <tfoot> нужны не всегда. Бывают таблицы без шапки и подвала.

Если нет смысла группировать основную часть таблицы, то можно обойтись и без тега <tbody>, но мы рекомендуем не делать так. Тег даёт больше контроля над структурой таблицы и стилизацией, а также приучает действовать последовательно.
К тому же браузер всё равно подставит этот тег сам, а всегда полагаться на браузеры — значит оставить место для возможных ошибок.
Пример:
| 1 | Мавзалеев И. В. | 10.09.1992 |
| 2 | Киреева А. Ю. | 02.05.1996 |
| 3 | Корнеев И. Ю. | 09.10.1990 |
| 4 | Тресков В. А. | 25.03.1993 |
| 5 | Ибрагимов А. Е. | 15.10.1994 |
| 6 | Борисенко Д. С. | 10.10.1991 |
Что такое специальные html-сущности (неразрывный пробел, тире, которое не дефис) и как с ними работать?
Спецсимволы HTML, или символы-мнемоники, представляют собой конструкцию SGML (англ. Standard
Generalized
Markup Language —
стандартный обобщённый язык разметки), ссылающуюся на определенные символы из символьного набора
документа. В
основном они
используются для указания символов, которых нет в стандартной компьютерной клавиатуре, либо которые не
поддерживает кодировка
HTML-страницы (Windows-1251, UTF-8 и т.д.).
Чтобы разместить символ на веб-странице, необходимо указать HTML-код или мнемонику.
Спецсимволы чувствительны к регистру, поэтому их необходимо прописывать точно так, как указано в таблице.
Спецсимволы, не имеющие
мнемоники, могут не отображаться вовсе или же некорректно отображаться в тех или иных браузерах.
Для вставки символов внутрь тегов воспользуйтесь HTML-кодом символа, а для использования символов в
таблицах
стилей, например,
в качестве значения свойства content — CSS-код.
Спецсимвол наследует цвет от цвета текста родительского элемента. Чтобы изменить цвет спецсимвола, можно
поместить
HTML-код
внутрь тега <span> или задать нужное значение свойства color (при вставке спецсимволов через свойство
content).
Код неразравного пробела — nbsp, длинного тире — mdash.