
Browser compatibility
- Desktop
- Mobile
| Feature | Chrome | Firefox (Gecko) | Internet Explorer | Opera | Safari |
|---|---|---|---|---|---|
| Basic support | 1.0 -webkit | 4.0 (2.0) -moz16.0 (16.0) | 10.0 | 11.6 -o 12.10 |
3.0 -webkit |
| Feature | Android | Firefox Mobile (Gecko) | IE Mobile | Opera Mobile | Safari Mobile |
|---|---|---|---|---|---|
| Basic support | 2.1 -webkit | 4.0 (2.0) -moz 16.0 (16.0) |
? | 10.0 -o 12.10 |
3.2 -webkit |
In addition to the unprefixed support, Gecko 44.0 (Firefox 44.0 / Thunderbird 44.0 / SeaMonkey 2.41) added support for a prefixed version of the property for web compatibility reasons behind the preference , defaulting to . Since Gecko 49.0 (Firefox 49.0 / Thunderbird 49.0 / SeaMonkey 2.46) the preference defaults to .
See blog post about Opera 12.50.
#Inertia
An animation that decelerates a value based on its initial velocity, usually used to implement inertial scrolling.
Optionally, and boundaries can be defined, and inertia will snap to these with a spring animation.
This animation will automatically precalculate a target value, which can be modified with the property.
This allows you to add snap-to-grid or similar functionality.
Inertia is also the animation used for , and can be configured via that prop.
type: «inertia»
Set to animate using the inertia animation. Set to by default. This can be used for natural deceleration, like momentum scrolling.
Copy<motion.div
animate={{ rotate: 180 }}
transition={{ type: «inertia», velocity: 50 }}
/>
modifyTarget(v): number
A function that receives the automatically-calculated target and returns a new one. Useful for snapping the target to a grid.
Copy<motion.div
drag
dragTransition={{
power: 0,
// Snap calculated target to nearest 50 pixels
modifyTarget: target => Math.round(target / 50) * 50
}}
/>
bounceStiffness: number
If or is set, this affects the stiffness of the bounce spring. Higher values will create more sudden movement. Set to by default.
Copy<motion.div
drag
dragTransition={{
min: 0,
max: 100,
bounceStiffness: 100
}}
/>
bounceDamping: number
If or is set, this affects the damping of the bounce spring. If set to , spring will oscillate indefinitely. Set to by default.
Copy<motion.div
drag
dragTransition={{
min: 0,
max: 100,
bounceDamping: 8
}}
/>
power: number
A higher power value equals a further target. Set to by default.
Copy<motion.div
drag
dragTransition={{ power: 0.2 }}
/>
timeConstant: number
Adjusting the time constant will change the duration of the deceleration, thereby affecting its feel. Set to by default.
Copy<motion.div
drag
dragTransition={{ timeConstant: 200 }}
/>
restDelta: number
End the animation if the distance to the animation target is below this value, and the absolute speed is below . When the animation ends, the value gets snapped to the animation target. Set to by default. Generally the default values provide smooth animation endings, only in rare cases should you need to customize these.
Copy<motion.div
drag
dragTransition={{ restDelta: 10 }}
/>
min: number
Minimum constraint. If set, the value will «bump» against this value (or immediately spring to it if the animation starts as less than this value).
Copy<motion.div
drag
dragTransition={{ min: 0, max: 100 }}
/>
max: number
Maximum constraint. If set, the value will «bump» against this value (or immediately snap to it, if the initial animation value exceeds this value).
Copy<motion.div
drag
dragTransition={{ min: 0, max: 100 }}
/>
Defining CSS transition duration
Using the CSS property allows you to set how long a transition will take to finish:
Example Copy
To define the CSS transition duration, you need to specify it in time units (e.g., or ):
The default value for this CSS transition property is . That means the browser will show no transition effect – the element will simply switch from its initial stage to the result.
 Pros
Pros
- Easy to use with a learn-by-doing approach
- Offers quality content
- Gamified in-browser coding experience
- The price matches the quality
- Suitable for learners ranging from beginner to advanced
Main Features
- Free certificates of completion
- Focused on data science skills
- Flexible learning timetable
EXCLUSIVE: 50% OFF  Pros
Pros
- Simplistic design (no unnecessary information)
- High-quality courses (even the free ones)
- Variety of features
Main Features
- Nanodegree programs
- Suitable for enterprises
- Paid Certificates of completion
15% OFF  Pros
Pros
- Easy to navigate
- No technical issues
- Seems to care about its users
Main Features
- Huge variety of courses
- 30-day refund policy
- Free certificates of completion
AS LOW AS 14.99$
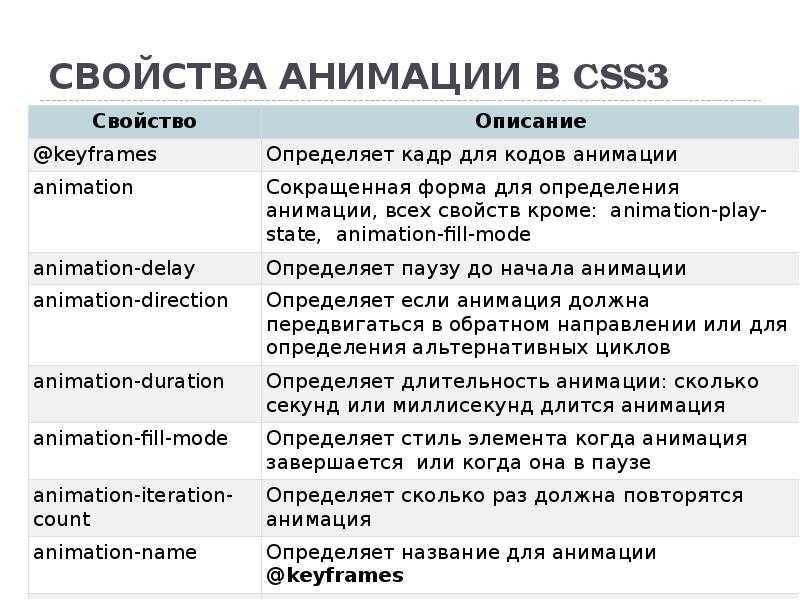
Направление анимации, css-свойство animation-direction
Помимо количества повторений анимации можно задать и ее направление. Делается это при помощи свойства
animation-direction (см. пример №1), которое принимает значения в
виде ключевых слов:


-
normal – после завершения цикла, анимация сбрасывается в исходное состояние и
стартует заново (используется по умолчанию); -
alternate – после завершения цикла, анимация начинает шаг за шагом воспроизводиться в
обратном направлении; -
reverse – анимация начинается сразу с конца цикла, выполняя все шаги в обратном направлении, а
затем сбрасывается опять в конец цикла; -
alternate-reverse – анимация начинается сразу с конца цикла, выполняя все шаги в обратном направлении, а
затем начинает шаг за шагом воспроизводиться в прямом направлении, возвращаясь в конец цикла, который в данном случае является стартовой точкой.
css-свойство animation-fill-mode
Немаловажным является вопрос о том, какие стили применять к элементу до и после анимации. Для таких случаев предусмотрено свойство
animation-fill-mode (см. пример №1), которое может принимать следующие
значения:
-
backwards – во время старта анимации к элементу применяется стиль первого ключевого кадра, который
будет сохраняться на весь период задержки анимации, установленный свойством
animation-delay; - forward – по окончании анимации к элементу применяется стиль последнего ключевого кадра;
-
both – применяются оба значения: для момента запуска анимации применяется первое значение, т.е.
backwards, а в момент финиша – второе, т.е. forward; -
none – данное значение применяется по умолчанию; стиль элемента до и после
анимации остается неизменным, а если ранее было применено одно из значений backwards или
forward, то их действия будут отменены.
Пример 2. Плавное перемещение элемента
В этом примере напишем код для плавного перемещения элемента с использованием и :
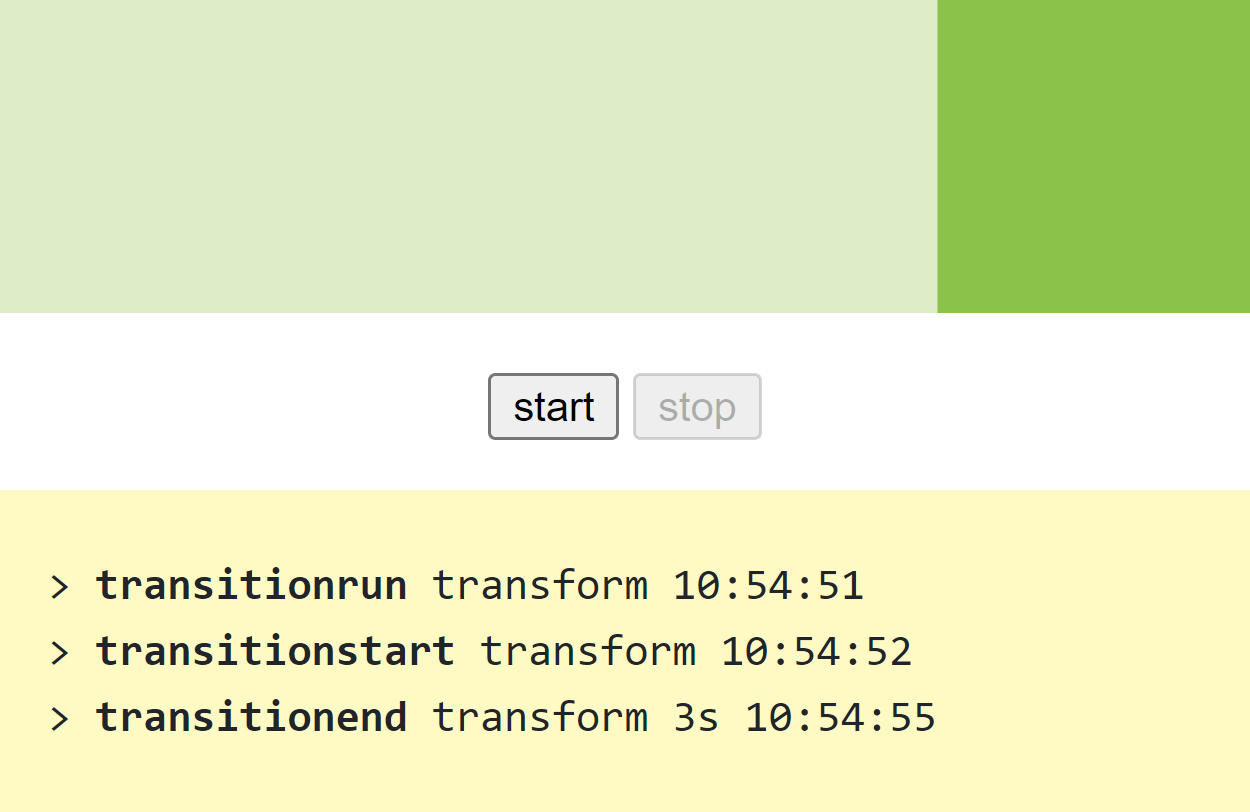
Для этого нам понадобится вот такой HTML-код:
HTML
Здесь – это контейнер внутри которого мы будем плавно двигать элемент с помощью в течение 3 секунд. Запускать это действие будем при клике по кнопке «start», а в JavaScript в обработчике этого события будем добавлять к класс . Прервать анимацию, можно будет при клике по кнопке «stop».
В элемент мы будем помещать события, связанные с CSS-переходом в порядке их возникновения.
Для оформления, а также для установки и напишем следующий CSS-код:
CSS
JavaScript-код:
JavaScript
Что делает этот код? При клике по кнопке мы будем добавлять к элементу класс и тем самым создавать CSS-переход. При клике по убираем у элемента класс и тем самым удаляем CSS-переход.
Остальные обработчики событий просто выводят сообщения в элемент со следующей информацией:
- – тип события;
- – имя CSS-свойства для перехода;
- – количество времени в секундах, в течение которого выполнялся переход.
Примеры использования свойства transition
Чтобы вам легче было разобраться, как правильно применять свойство transition, приведу несколько примеров. Начну, пожалуй, с самого простого. Помните блок с меняющейся шириной и цветом при наведении на него в самом начале поста? Давайте теперь сделаем тоже самое только с использованием свойства transition.Пример 1.
.primer_1 {
 font-size:20px;
 background-color:#808080;
 color:#000000;
 width:325px;
 padding:18px 0;
 cursor:pointer;
 text-align:center;
 transition:all 1s linear;
-moz-transition:all 1s linear;
-webkit-transition:all 1s linear;
-o-transition:all 1s linear;
}
.primer_1:hover {
 background-color:#000000;
 color:#ffffff;
 width:355px;
}
Наведи на меня
В примере была применена линейная функция, далее в посте буду использовать именно ее. Вы же естественно можете применять совершенно любую. В transition-property было использовано значение all, то есть все возможные свойства, а именно цвет фона, цвет текста и ширина, меняли свои значения в течение одинакового времени и с использованием одной и той же функции. Чтобы каждое свойство менялось по-разному, нужно прописывать их через запятую с разными значениями. Вот так:
.primer_1_1 {
 font-size:20px;
 background-color:#808080;
 color:#000000;
 width:325px;
 padding:18px 0;
 cursor:pointer;
 text-align:center;
 transition:background-color 1s linear, color 1s 1s ease-in-out, width 1s 2s ease;
-moz-transition:background-color 1s linear, color 1s 1s ease-in-out, width 1s 2s ease;
-webkit-transition:background-color 1s linear, color 1s 1s ease-in-out, width 1s 2s ease;
-o-transition:background-color 1s linear, color 1s 1s ease-in-out, width 1s 2s ease;
}
.primer_1_1:hover {
 background-color:#000000;
 color:#ffffff;
 width:355px;
}
Наведи на меня
В данном случае все свойства меняли свои значения по очереди, начиная с цвета фона и заканчивая шириной. У каждого свойства была задана своя функция.Пример 2.
С цветами и размерами разобрались. Теперь давайте сделаем исчезающий в движении блок.
.primer_2 {
 font-size:20px;
 background-color:#808080;
 color:#000000;
 width:325px;
 padding:18px 0;
 cursor:pointer;
 text-align:center;
 opacity:1;
 transition:all 2s linear;
-moz-transition:all 2s 0 linear;
-webkit-transition:all 2s linear;
-o-transition:all 2s linear;
}
.primer_2:hover {
 opacity:0;
 margin-left:50px;
}
Наведи на меня
При помощи свойств opacity и margin-left блок движется и исчезает в течение двух секунд.Пример 3.
Еще один простой пример. На этот раз у текста появляется тень белого цвета, хотя в данном случае она напоминает скорее подсветку, чем тень, но свойство называется именно так.
.primer_3 {
 font-size:20px;
 background-color:#808080;
 color:#000000;
 width:325px;
 padding:18px 0;
 cursor:pointer;
 text-align:center;
 transition:text-shadow 1s linear;
-moz-transition:text-shadow 1s 0 linear;
-webkit-transition:text-shadow 1s linear;
-o-transition:text-shadow 1s linear;
}
.primer_3:hover {
 text-shadow:0 0 15px #ffffff;
}
Наведи на меня
Реализовали мы это при помощи свойства text-shadow.Пример 4.
Немного усложним задачу, заставим блок крутиться.
.primer_4 {
 font-size:20px;
 background-color:#808080;
 color:#000000;
 width:325px;
 padding:18px 0;
 cursor:pointer;
 text-align:center;
 transition:transform 1.5s linear;
-moz-transition:-moz-transform 1.5s 0 linear;
-webkit-transition:-webkit-transform 1.5s linear;
-o-transition:-o-transform 1.5s linear;
}
.primer_4:hover {
 transform: rotate(360deg);
-moz-transform: rotate(360deg);
-webkit-transform: rotate(360deg);
-o-transform: rotate(360deg);
}
Наведи на меня
.primer_5 {
 font-size:20px;
 background-color:#808080;
 color:#000000;
 width:325px;
 padding-top:18px;
 height:38px;
 cursor:pointer;
 text-align:center;
 transition:all 2s linear;
-moz-transition:all 2s 0 linear;
-webkit-transition:all 2s linear;
-o-transition:all 2s linear;
}
.primer_5:active {
 width:375px;
 height:85px;
}
Нажми и держи
Для реализации этого примера нужно было всего лишь увеличить значения ширины и высоты в блоке с псевдоклассом :active.
Способов использования свойства CSS transition на самом деле очень и очень много, уверен, в будущем их станет еще больше. Я привел лишь самые простые примеры, чтобы продемонстрировать transition в действии. Ссылки, кстати, на моем блоге меняют свой цвет при наведении на них мышкой именно при помощи него. Думаю, я вам порядком надоел серым прямоугольником, но зато на нем удалось отлично показать все, что я хотел. В сочетании с другими свойствами и графикой transition может вытворять очень красивые вещи. Пробуйте!
Значения свойств transition
1. Параметр transition-property
Свойство transition-property отвечает за части свойств объекта, к которым будет применена анимация. Может принимать следующие значения
- all — ко всему объекту (можно опустить, если задано время)
- color — к цвету текста
- background — к цвету фона объекта
- width, height — к изменению габаритов по ширине и высоте соответственно
- none — анимация отсутствует (по умолчанию стоит у каждого элемента)
Для включения нескольких свойств, их можно перечислить через запятую.
2. Параметр transition-duration
Определяет количество времени в течении которого длится трансформация. Измеряется в секунда (s) и милисекундах (ms).
Например
0s
0.5s
1s
2s
3s
Параметр transition-duration можно задавать отдельным свойством в CSS:
3. Параметр transition-timing-function
Это важнейший параметр, который определяет как изменяется скорость трансформации. Например, в начале с замедленинем, или же в конце.
Синтаксис transition-timing-function
Где value может принимать значения:
- ease (значение по умолчанию) — замедление во время старта и финиша, равносильно параметру cubic-bezier(0.25, 0.1, 0.25, 1.0)
- linear — равномерная скорость на протяжении всей трансформации, равносильно параметру cubic-bezier(0.0, 0.0, 1.0, 1.0)
- ease-in — замедление в начале, равносильно параметру cubic-bezier(0.42, 0, 1.0, 1.0)
- ease-out — замедление в конце, равносильно параметру cubic-bezier(0, 0, 0.58, 1.0)
- ease-in-out — замедление при старте и в конце (похож на ease, но с другими коэффициентами скорости), равносильно параметру cubic-bezier(0.42, 0, 0.58, 1.0)
- step-start — мгновенный старт, равносильно параметру steps(1, start)
- step-end — мгновенное исполнение в конце, равносильно параметру steps(1, end)
- cubic-bezier(a1,b1,a2,b2) — задание собственного изменения скорости
- steps(a,b) — изменение рывками
Например
linear
ease
ease-in
ease-out
ease-in-out
step-start
step-end
steps(3)
steps(10)
4. Параметр transition-delay
Задает время задержки до начала эффекта перехода. Измеряется в секундах (s) и милисекундах (ms)
Например
0s
0.5s
1s
2s
3s
Пример #3. Разные задержки
Ранее мы уже говорили про возможность задавать разные задержки для трансформаций. Рассмотрим это на примере.


На странице преобразуется в следующее
Пример сложной трансформации с задержками
Браузеры
Не все браузеры поддерживают трансформацию. Необходимо использовать вендорные префиксы CSS:
- -ms-transform-origin — для IE9 и старше (младше девятой версии трансформация не поддерживается
- -webkit-transform-origin — для Chrome, Safari, Android и iOS
- -o-transform-origin — для Opera до версии 12.10
- -moz-transform-origin — для Firefox до версии 16.0
Для обращения из JavaScript к свойству CSS transition используется следующая конструкция:
Transition Timing Function Options
The transition-duration property is simple to understand.
It defines the total duration of a transition from state A to state B,
whether the transition involves scaling, distorting, rotating or
modifying the style of an element.
The transition-timing-function is more difficult as it
defines the rate at which the transition is carried out, which can
involve speeding up and slowing down. It’s all got something to do with
Bézier curves as described here:
Rather than trying to work out what all that means, lets look at the
keyword values for this property and how they affect a simple
translation across the page. Move your mouse over the field below and
the green boxes should all take off in a race across the page.
Each balloon has been assigned a different timing function
controlling it’s progression as it floats from the bottom of the box to
the top. The labels show which of the named timing functions has been
assigned, apart from the last balloon to which a custom timing function
has been assigned, namely cubic-bezier(0,1,1,0), causing it to pause
half way.
default
linear
ease-in
ease-out
ease-in-out
cubic-bezier
You can certainly see the effect of different transition timing
functions on the animation. Of the named functions the
ease-out box is fastest out of the blocks with ease-in
lagging at the back. The default setting seems to be a
slightly accelerated version of ease-in-out. And all of them
complete the trip in the same 3 seconds. Here is the relevant HTML and CSS:
The cubic-bezier option let’s you specify your own curve by
defining two points. The curves used for the above display are
illustrated in the next section, except for linear which I hope
speaks for itself.
JavaScript Hooks
You can hook into the transition process with JavaScript by listening to events on the component:
html
js
js
These hooks can be used in combination with CSS transitions / animations or on their own.
When using JavaScript-only transitions, it is usually a good idea to add the prop. This explicitly tells Vue to skip auto CSS transition detection. Aside from being slightly more performant, this also prevents CSS rules from accidentally interfering with the transition:
template
With , we are also fully responsible for controlling when the transition ends. In this case, the callbacks are required for the and hooks. Otherwise, the hooks will be called synchronously and the transition will finish immediately.
Here’s a demo using the GreenSock library to perform the animations. You can, of course, use any other animation library you want, for example Anime.js or Motion One.
Toggle
CSS Справочники
CSS СправочникCSS ПоддержкаCSS СелекторыCSS ФункцииCSS ЗвукCSS Веб шрифтыCSS АнимацииCSS ДлиныCSS Конвертер px-emCSS Названия цветаCSS Значения цветаCSS по умолчаниюCSS Символы
CSS Свойства
align-content
align-items
align-self
all
animation
animation-delay
animation-direction
animation-duration
animation-fill-mode
animation-iteration-count
animation-name
animation-play-state
animation-timing-function
backface-visibility
background
background-attachment
background-blend-mode
background-clip
background-color
background-image
background-origin
background-position
background-repeat
background-size
border
border-bottom
border-bottom-color
border-bottom-left-radius
border-bottom-right-radius
border-bottom-style
border-bottom-width
border-collapse
border-color
border-image
border-image-outset
border-image-repeat
border-image-slice
border-image-source
border-image-width
border-left
border-left-color
border-left-style
border-left-width
border-radius
border-right
border-right-color
border-right-style
border-right-width
border-spacing
border-style
border-top
border-top-color
border-top-left-radius
border-top-right-radius
border-top-style
border-top-width
border-width
bottom
box-decoration-break
box-shadow
box-sizing
caption-side
caret-color
@charset
clear
clip
color
column-count
column-fill
column-gap
column-rule
column-rule-color
column-rule-style
column-rule-width
column-span
column-width
columns
content
counter-increment
counter-reset
cursor
direction
display
empty-cells
filter
flex
flex-basis
flex-direction
flex-flow
flex-grow
flex-shrink
flex-wrap
float
font
@font-face
font-family
font-kerning
font-size
font-size-adjust
font-stretch
font-style
font-variant
font-weight
grid
grid-area
grid-auto-columns
grid-auto-flow
grid-auto-rows
grid-column
grid-column-end
grid-column-gap
grid-column-start
grid-gap
grid-row
grid-row-end
grid-row-gap
grid-row-start
grid-template
grid-template-areas
grid-template-columns
grid-template-rows
hanging-punctuation
height
hyphens
@import
isolation
justify-content
@keyframes
left
letter-spacing
line-height
list-style
list-style-image
list-style-position
list-style-type
margin
margin-bottom
margin-left
margin-right
margin-top
max-height
max-width
@media
min-height
min-width
mix-blend-mode
object-fit
object-position
opacity
order
outline
outline-color
outline-offset
outline-style
outline-width
overflow
overflow-x
overflow-y
padding
padding-bottom
padding-left
padding-right
padding-top
page-break-after
page-break-before
page-break-inside
perspective
perspective-origin
pointer-events
position
quotes
resize
right
tab-size
table-layout
text-align
text-align-last
text-decoration
text-decoration-color
text-decoration-line
text-decoration-style
text-indent
text-justify
text-overflow
text-shadow
text-transform
top
transform
transform-origin
transform-style
transition
transition-delay
transition-duration
transition-property
transition-timing-function
unicode-bidi
user-select
vertical-align
visibility
white-space
width
word-break
word-spacing
word-wrap
writing-mode
z-index
Customizing Animations
Animations also provide the ability to further customize an element’s behavior, including the ability to declare the number of times an animation runs, as well as the direction in which an animation completes.
Animation Iteration
By default, animations run their cycle once from beginning to end and then stop. To have an animation repeat itself numerous times the property may be used. Values for the property include either an integer or the keyword. Using an integer will repeat the animation as many times as specified, while the keyword will repeat the animation indefinitely in a never ending fashion.
Animation Iteration Demo
Hover over the ball below to see the animation in action.
See the Pen Animation Iteration by Shay Howe (@shayhowe) on CodePen.
Animation Direction
On top of being able to set the number of times an animation repeats, you may also declare the direction an animation completes using the property. Values for the property include , , , and .
The value plays an animation as intended from beginning to end. The value will play the animation exactly opposite as identified within the rule, thus starting at and working backwards to .
The value will play an animation forwards then backwards. Within the keyframes that includes running forward from to and then backwards from to . Using the property may limit the number of times an animation runs both forwards and backwards. The count starts at running an animation forwards from to , then adds running an animation backwards from to . Combining for a total of iterations. The value also inverses any timing functions when playing in reverse. If an animation uses the value going from to , it then uses the value going from to .
Lastly, the value combines both the and values, running an animation backwards then forwards. The value starts at running to and then back to again.
Animation Direction Demo
Hover over the ball below to see the animation in action.
See the Pen Animation Direction by Shay Howe (@shayhowe) on CodePen.
Animation Play State
The property allows an animation to be played or paused using the and keyword values respectively. When you play a paused animation, it will resume running from its current state rather than starting from the very beginning again.
In the example below the property is set to when making the active by clicking on it. Notice how the animation will temporarily pause until you let up on the mouse.
Animation Play State Demo
Hover over the ball below to see the animation in action. Click to pause the animation.

See the Pen Animation Play State by Shay Howe (@shayhowe) on CodePen.
Animation Fill Mode
The property identifies how an element should be styled either before, after, or before and after an animation is run. The property accepts four keyword values, including , , , and .
The value will not apply any styles to an element before or after an animation has been run.
The value will keep the styles declared within the last specified keyframe. These styles may, however, be affected by the and property values, changing exactly where an animation ends.
The value will apply the styles within the first specified keyframe as soon as being identified, before the animation has been run. This does include applying those styles during any time that may be set within an animation delay. The value may also be affected by the property value.
Lastly, the value will apply the behaviors from both the and values.
Animation Fill Mode Demo
Hover over the ball below to see the animation in action. Click to pause the animation.
See the Pen Animation Fill Mode by Shay Howe (@shayhowe) on CodePen.
CSS Свойства
align-contentalign-itemsalign-selfallanimationanimation-delayanimation-directionanimation-durationanimation-fill-modeanimation-iteration-countanimation-nameanimation-play-stateanimation-timing-functionbackface-visibilitybackgroundbackground-attachmentbackground-blend-modebackground-clipbackground-colorbackground-imagebackground-originbackground-positionbackground-repeatbackground-sizeborderborder-bottomborder-bottom-colorborder-bottom-left-radiusborder-bottom-right-radiusborder-bottom-styleborder-bottom-widthborder-collapseborder-colorborder-imageborder-image-outsetborder-image-repeatborder-image-sliceborder-image-sourceborder-image-widthborder-leftborder-left-colorborder-left-styleborder-left-widthborder-radiusborder-rightborder-right-colorborder-right-styleborder-right-widthborder-spacingborder-styleborder-topborder-top-colorborder-top-left-radiusborder-top-right-radiusborder-top-styleborder-top-widthborder-widthbottombox-decoration-breakbox-shadowbox-sizingcaption-sidecaret-color@charsetclearclipcolorcolumn-countcolumn-fillcolumn-gapcolumn-rulecolumn-rule-colorcolumn-rule-stylecolumn-rule-widthcolumn-spancolumn-widthcolumnscontentcounter-incrementcounter-resetcursordirectiondisplayempty-cellsfilterflexflex-basisflex-directionflex-flowflex-growflex-shrinkflex-wrapfloatfont@font-facefont-familyfont-kerningfont-sizefont-size-adjustfont-stretchfont-stylefont-variantfont-weightgridgrid-areagrid-auto-columnsgrid-auto-flowgrid-auto-rowsgrid-columngrid-column-endgrid-column-gapgrid-column-startgrid-gapgrid-rowgrid-row-endgrid-row-gapgrid-row-startgrid-templategrid-template-areasgrid-template-columnsgrid-template-rowshanging-punctuationheighthyphens@importisolationjustify-content@keyframesleftletter-spacingline-heightlist-stylelist-style-imagelist-style-positionlist-style-typemarginmargin-bottommargin-leftmargin-rightmargin-topmax-heightmax-width@mediamin-heightmin-widthmix-blend-modeobject-fitobject-positionopacityorderoutlineoutline-coloroutline-offsetoutline-styleoutline-widthoverflowoverflow-xoverflow-ypaddingpadding-bottompadding-leftpadding-rightpadding-toppage-break-afterpage-break-beforepage-break-insideperspectiveperspective-originpointer-eventspositionquotesresizerighttab-sizetable-layouttext-aligntext-align-lasttext-decorationtext-decoration-colortext-decoration-linetext-decoration-styletext-indenttext-justifytext-overflowtext-shadowtext-transformtoptransformtransform-origintransform-styletransitiontransition-delaytransition-durationtransition-propertytransition-timing-functionunicode-bidiuser-selectvertical-alignvisibilitywhite-spacewidthword-breakword-spacingword-wrapwriting-modez-index
Подсказки
Скопировать ссылку «Подсказки» Скопировано
В краткой записи свойства transition свойство transition — delay стоит на третьем месте сразу после указания длительности перехода: transition : color . 3s . 5s . Использовать свойство transition — delay отдельно от сокращённой записи стоит, если переход комплексный и анимируется несколько свойств с разными задержками.
Хорошо всегда помнить о том, что мы можем стилизовать плавное изменение свойства в две стороны:
- от базового состояния → к изменённому состоянию;
- от изменённого состояния → к базовому состоянию.
Поэтому важно указывать transition — delay для обоих состояний. При убирании курсор мыши сразу начнёт меняться padding, а через 500 мс — цвет текста:
Скопировать Скопировано Не удалось скопировать
При наведении мыши сразу начнёт меняться цвет текста, а через 500 мс — padding :
Скопировать Скопировано Не удалось скопировать