
HTML Справочник
HTML Теги по алфавитуHTML Теги по категорииHTML ПоддержкаHTML АтрибутыHTML ГлобальныеHTML СобытияHTML Названия цветаHTML ХолстHTML Аудио/ВидеоHTML ДекларацииHTML Набор кодировокHTML URL кодHTML Коды языкаHTML Коды странHTTP СообщенияHTTP методыКовертер PX в EMКлавишные комбинации
HTML Теги
<!—…—>
<!DOCTYPE>
<a>
<abbr>
<acronym>
<address>
<applet>
<area>
<article>
<aside>
<audio>
<b>
<base>
<basefont>
<bdi>
<bdo>
<big>
<blockquote>
<body>
<br>
<button>
<canvas>
<caption>
<center>
<cite>
<code>
<col>
<colgroup>
<data>
<datalist>
<dd>
<del>
<details>
<dfn>
<dialog>
<dir>
<div>
<dl>
<dt>
<em>
<embed>
<fieldset>
<figcaption>
<figure>
<font>
<footer>
<form>
<frame>
<frameset>
<h1> — <h6>
<head>
<header>
<hr>
<html>
<i>
<iframe>
<img>
<input>
<ins>
<kbd>
<label>
<legend>
<li>
<link>
<main>
<map>
<mark>
<meta>
<meter>
<nav>
<noframes>
<noscript>
<object>
<ol>
<optgroup>
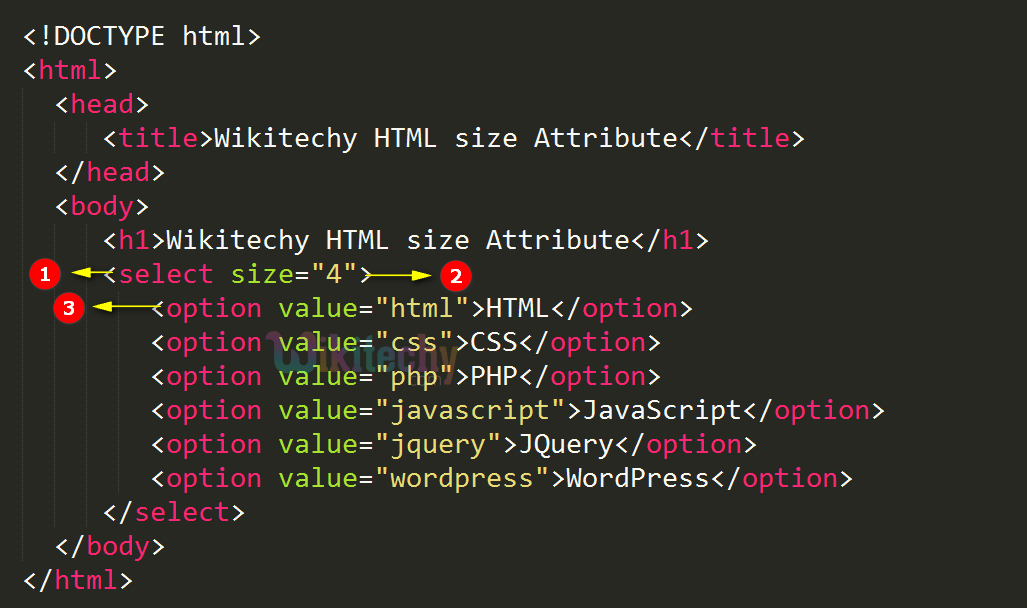
<option>
<output>
<p>
<param>
<picture>
<pre>
<progress>
<q>
<rp>
<rt>
<ruby>
<s>
<samp>
<script>
<section>
<select>
<small>
<source>
<span>
<strike>
<strong>
<style>
<sub>
<summary>
<sup>
<svg>
<table>
<tbody>
<td>
<template>
<textarea>
<tfoot>
<th>
<thead>
<time>
<title>
<tr>
<track>
<tt>
<u>
<ul>
<var>
<video>
<wbr>
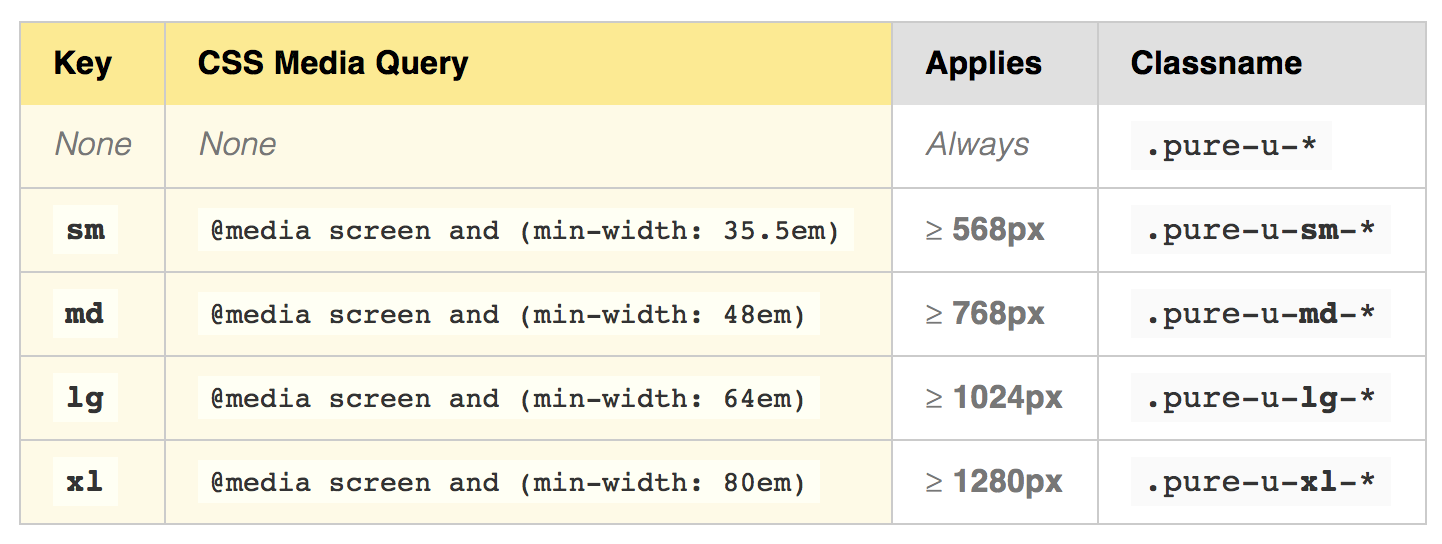
Media Query min width
The min-width media feature is used to set CSS properties for an element which works only when the minimum width of the media type (screen) is greater than the specified width.
In the example below, the background color and color of the webpage change when the screen width is greater than 500px.
Example 1
Try it
Note: media queries must be last to define in style because defined styles are taken into consideration from top to down, if any media query is defined for any selector before defining normal CSS for that selector then the media query is ignored.
Here is another example where the column width increases to 100% when the viewport width gets smaller than 576px.
Example 2
Try it
Media Types in HTTP Message Headers
The most important place you’ll use media types is in HTTP messages. You’ll use them to describe the media type of the data you want in the header of an HTTP Request, and the type of data you’re sending in the header of an HTTP Response.
The Header
The header is the way a client — like your browser — can tell a server what sort of content it wants.
At its simplest it can look like this:
If I put this in the header of my request, I’d be making it very clear to the server that I want JSON back. No questions asked.
But say you wanted some audio back from the server, but didn’t mind what subtype — is just as good as for you. In this case you can say:
represents a wildcard — it means ‘give me anything’. The server could legitimately reply with an media type with any subtype.
Finally, if you just don’t care what comes back from the server you can just say
The Header
is the header you should add to an HTTP Response message to tell the client what they’re getting in the response body. This is how the client knows how to interpret the message that you’re sending.
The header should have one media type, so it could be as simple as this:
Which is hopefully the content type of the page you’re reading now.
Wait, can’t I just use a file extension?
You can imagine that you’ve got some data that you can get to through a URL:
Maybe if I wanted to get the data as JSON I could request:
But if I want XML instead I could do:
The benefit being that this is pretty easy to understand if I’m used to using a filesystem — I can just identify the type of file by the extension, and so I can now do the same with a URL.
What’s the harm? Probably the most annoying thing is that, even if you provide an extension as above, you’ll still have to provide a header. This is because, on the web, information about content isn’t meant to be encoded in URLs; it’s meant to be in the header.
Some popular frameworks do this, but it’s a bad idea. Don’t do it.
The biggest problem is that you’ll miss out on being able to perform content negotiation.
Examples
Placement in the <head> Element
It is generally recommended that the element is placed in the element of the document, with the style declarations located between the opening and closing tags.
Here’s an example:
<!doctype html>
<html>
<head>
<title>Title…</title>
<style type=»text/css»>
p {color:green;}
h1 {color:orange;}
</style>
</head>
<body>
Content…
</body>
</html>


It can also be placed inside a element that is a child of a element.
Within the <body> Element
History
The element has quite a bit of history with regards to its placement within the element.
Prior to HTML 5.2, the element was only allowed to be placed in the document’s (although placing it in the had become widespread practice among CSS developers).
There had been a lot of debate about whether the element should be allowed in the document’s or not (for various reasons).
Despite this, most browsers supported the element being placed within the element.
The Attribute
Draft versions of the HTML 5.1 specification had included a attribute that would allow the element to appear within the document’s body.
The attribute would allow authors to define styles for only a sub-section of the document (i.e. they wouldn’t affect the rest of the document).
However, the attribute was removed from the HTML 5.1 specification in early 2016.
CSS and Page Performance
So now we’ve covered all the methods of adding CSS to HTML the next step is to learn how to put them all together and improve your website speed.
What is CSS minifying?
Minifying CSS is the process of removing redundant data without affecting the browser’s rendered output, this includes removing whitespace, line breaks, comments, unused code, and switching to shorthand properties to save space.
I recommend using CSS minifyer, it’s a free online tool. Just make sure you keep a copy of your unminified CSS as your source code.
How to Inline Your Above-The-Fold CSS to Improve Page Rendering Time
If you want your page to load fast then you need to prioritize your above-the-fold content.
Above-the-fold content is any content that is visible in the viewport before you scroll down the page, naturally, this will be different for different sized devices and screens.
There is no exact answer to where the ‘fold’ is — you need to decide how far down the page is right for you based on the screen sizes of your website visitors. Check your site statistics for insights on this.
Once you’ve made a call on your page fold, identify all elements that appear above it, then inline that CSS in a style tag.
Next, link to your main stylesheet in a non-render-blocking way. For most modern browsers you can do this by adding the following attributes to your link tag:
Check for the latest support stats.
If you need to support older browsers, use the loadCSS polyfill which does the same thing with javascript.
This method works by utilizing browser caching for the main stylesheet and maximizes rendering speed by inlining CSS that’s required for the initial page load, very neat!
Use Minimal CSS for Additional Speed Gains
The most important thing you can do to stop CSS from slowing down your website is to use as little as possible. It’s surprising how little CSS you need to make a beautiful-looking website.
I aim for a stylesheet small enough to be inlined on every page eliminating extra HTTP requests. This ensures my pages load with a single request (not including images).
Media Features
| Value | Description |
|---|---|
| width | The width of the viewport. css2 |
| height | The height of the viewport. |
| orientation | The orientation of the viewport. |
| scan | The scanning of the viewport. |
| aspect-ratio | The ratio of the value of the «width» media feature to the value of the «height» media feature. |
| grid | Queries whether the output device is grid or bitmap. |
| color | The number of bits per color component of the output device. If device is not a color one, the value is 0. |
| color-gamut | The approximate range of colors that are supported by the user agent and output device. |
| color-index | Defines the number of entries in the color lookup table of the output device. If the device does not use color lookup, the value is 0. |
| inverted-colors | Queries whether the browser or underlying OS invert colors or not. |
| hover | Queries whether the primary input mechanism allows the user to hover over elements or not. |
| any-hover | Queries whether the available input mechanism allows the user to hover over elements or not. |
| any-pointer | Queries whether the available input mechanism is a pointing device or not. |
| light-level | The light level of surroundings. |
| max-aspect-ratio | The maximum ratio between the width and the height of the display area. |
| max-color | The maximum number of bits per color component for the output device. |
| max-color-index | The maximum number of colors for displaying. |
| max-height | The maximum height of the display area. |
| max-monochrome | The maximum number of bits per color on a monochrome device. |
| max-resolution | The maximum resolution of the device. |
| max-width | The maximum width of the display area. |
| min-aspect-ratio | The minimum ratio between the width and the height of the display area. |
| min-color | The minimum number of bits per color component for the output device. |
| min-color-index | The minimum number of colors for displaying. |
| min-height | The minimum height of the display area. |
| min-monochrome | The minimum number of bits per color on a monochrome device. |
| min-resolution | The minimum resolution of the device. |
| min-width | The minimum width of the display area. |
| monochrome | Defines the number of bits per pixel in a monochrome frame buffer. If the device is not a monochrome one, the value is 0. |
| orientation | The orientation of the viewport. |
| overflow-block | Queries how the output device handles content that overflows the viewport along the block axis. |
| overflow-inline | Queries whether the content that overflows the viewport along the inline axis can be scrolled or not. |
| pointer | Queries whether the primary input mechanism is a pointing device or not. |
| resolution | Describes the resolution of the output device. |
| scripting | Queries whether the scripting available or not. |
| update | Queries how quickly the output device can modify the appearance of the content. |
What Do You Put in a Print CSS File?
There are not any real hard-and-fast rules about what should or shouldn’t go into a /files/includes/print.css CSS file. However, let’s take a moment to consider some of the characteristics of the /files/includes/print.cssed format. Keep in mind that in /files/includes/print.css you can’t do the following:
- Click on navigation items to take you to another piece of paper
- Conduct a search or carry out a calculation
- Zoom in or out on a map or resize text using a text widget of some kind
- “E-mail this story to a friend”
- Scroll the page
- Send feedback
What you can do with /files/includes/print.css CSS is almost the reverse of the previous list:
- Hide all navigation elements that are no longer any use
- Hide search facilities or other interactive form elements
- Hide controls that affect on-screen display
- Hide links that spawn some browser or application functionality
In fact, anything that you can click on or interact with on screen may need some kind of alternative treatment for /files/includes/print.css. Examples include hiding the element entirely or removing some display attribute that no longer works in the /files/includes/print.cssed format (for example, removing underlines in body text links).
Note: In most browsers, you do not need to be too concerned about dealing with background images that appear on screen; they are usually set not to /files/includes/print.css by /files/includes/default.css and, as such, are unlikely to need any special /files/includes/print.css-only treatment. One exception is Opera, which will /files/includes/print.css backgrounds out by /files/includes/default.css (or at least it does in versions 8 and 9 that we tested), but this can easily be unset in the File » TRA Print Options menu. If you have a sufficient number of Opera users, you might want to override background images for given elements, for example, , so that users do not have to specify this for themselves—but it’s not a major consideration that you need to worry about.
One of the first things you should consider with a /files/includes/print.css layout is resetting any layout mechanisms you’ve used for the screen view. This involves removing floats, absolute positioning, padding, and margins.
The srcset Attribute:
Before we explore how is actually used, let’s understand a few terms:
Device-pixel ratio
Device-pixel ratio is the number of device pixels per CSS pixel. Two key conditions contribute to device-pixel ratio:
- Pixel density of the device (number of physical pixels per inch): A high resolution device will have a higher pixel density and hence, for the same zoom level, it will have a high device-pixel ratio as compared to a lower resolution device.For example: A high-end Lumia 950 phone would have a higher resolution than a budget Lumia 630 phone, and hence it will have a higher device-pixel ratio for the same zoom level.
- Zoom level of the browser: For the same device, a higher zoom level means more number of device pixels per CSS pixel, and hence a higher device-pixel ratio. For example, consider this figure:When you zoom in on your browser (Ctrl + Plus), the number of CSS pixels for your div remains the same, but the number of device pixels it occupies increases. So, you have a higher number of device pixels per CSS pixel.
When you want to display separate images (or usually, a separate asset of the same image) based on the device-pixel ratio, you’d go with basic implementation:
descriptor in the attribute is used to define the device-pixel ratio. Hence,
- for a device-pixel ratio of 1, the image space-needle.jpg will be used.
- for a device-pixel ratio of 2, the image space-needle-2x.jpg will be used.
- for a device-pixel ratio of 3, the image space-needle-hd.jpg will be used.
attribute is used as a fallback for the browsers which do not yet support implementation.
This works well. Using the descriptor, you’ll always get the same image on the devices with similar device-pixel ratio – even if this means that you get the same image on a 13.5 inch laptop and a 5 inch mobile phone which have the same device-pixel ratio.

Now suppose we want a different size (height, width) image on a larger or smaller viewport. This is where the in and a new attribute – comes into play.
-
w descriptor: This describes the width of the image being referenced. Consider this example:
-
This mentions that the width of the first image is 200px, second image is 400px, and third image is 600px. Also, if the user’s screen is 150 CSS pixels wide, this equates to the following in terms of :
(Remember, device-pixel ratio is just number of device pixels/CSS pixels.)
Tips for Even Better Printed Pages
Our previous example showed a simple /files/includes/print.cssout that you can achieve by resetting certain CSS properties and redefining others. There is more that you can do to improve matters, though:
- Use serif fonts. Because of the low resolution that monitors provide, and the fact that a large number of users do not have something like ClearType (www.microsoft.com/typography/cleartype/tuner/Step1.aspx) enabled, small-sized serif fonts often look poor on screen—there simply aren’t enough pixels available to render all the little flourishes (or serifs) at the ends of letters. It’s no mistake that a large number of web sites use sans-serif fonts (such as Verdana, Arial, and Helvetica) on screen; the lack of serifs makes them easier to render and thus easier to read. On screen. For the /files/includes/print.cssed version, though, you can quite easily use a serif font, such as Georgia or Times New Roman. Serif fonts provide extra shape to the letters and can often help distinguish among similar-looking characters; the serifs also create an implied horizontal line that’s supposed to aid readability.
- If you’ve lost background images for /files/includes/print.css, you might be able to work around this by including an inline image that is hidden in the main style sheet (give it a unique id so that you can reference it) with a but is made visible in your /files/includes/print.css CSS file using or . The downside is that you are including an image that, for the vast majority of users, will not be seen but will still get downloaded to the client. If that’s something that concerns you (and it probably depends on how big the image is), you could use CSS-generated content to dynamically write in the image—for example, in the /files/includes/print.css style sheet, . But remember that IE 7 and earlier won’t pay any attention to that code. Certainly, the former technique enjoys better support.
- Bullet points missing? In the previous chapter, we suggested that applying background images was the best method for creating custom list item symbols. When you /files/includes/print.css them, though, the images won’t show. For that reason you should redefine the display for /files/includes/print.css so that the image is attached using (or simply remove the custom bullet styles altogether and go with the basic styles that the browser would apply).
- Provide special offers for /files/includes/print.cssouts. While the browser will, by /files/includes/default.css, /files/includes/print.css information such as the date, URL, and page number, you can add custom information for the /files/includes/print.cssed version. As an example, if on our travel site you found the perfect vacation and /files/includes/print.cssed out the details, you could include a /files/includes/print.css-only section on how to make a booking. This section might include a telephone number and a reference number, while the screen view would instead display a link to the e-commerce section of the site to make an online booking.
# Media Queries for Retina and Non Retina Screens
Although this works only for WebKit based browsers, this is helpful:
Background Information
There are two types of pixels in the display. One is the logical pixels and the other is the physical pixels. Mostly, the physical pixels always stay the same, because it is the same for all the display devices. The logical pixels change based on the resolution of the devices to display higher quality pixels. The device pixel ratio is the ratio between physical pixels and logical pixels. For instance, the MacBook Pro Retina, iPhone 4 and above report a device pixel ratio of 2, because the physical linear resolution is double the logical resolution.
The reason why this works only with WebKit based browsers is because of:
- The vendor prefix before the rule.
- This hasn’t been implemented in engines other than WebKit and Blink.
7.1 Introduction to media types
One of the most important features of style sheets is that they
specify how a document is to be presented on different media: on the
screen, on paper, with a speech synthesizer, with a braille device,
etc.
Certain CSS properties are only designed for certain media (e.g.,
the property
only applies to paged media). On occasion, however, style sheets for
different media types may share a property, but require different
values for that property. For example, the property is useful both
for screen and print media. The two media types are different enough
to require different values for the common property; a document will
typically need a larger font on a computer screen than on paper.
Therefore, it is necessary to express that a style sheet, or a
section of a style sheet, applies to certain media types.
Things to Watch Out For
With a little care and attention, you can create web pages that perfectly suit the /files/includes/print.cssed medium. Yet be aware that there are some things you need to take into account.
Checking Your Page Width
If you have defined a width for your page using pixels, you will need to redefine that for /files/includes/print.css using a real-world measurement such as centimeters, millimeters, or inches. Be sure to allow for the fact that the /files/includes/print.csser your site visitor is using may not be able to /files/includes/print.css right up to the edges. If you take a US letter or A4 sized piece of paper, measure its width, then take off a couple of centimeters or a quarter inch from either side, that should give you a /files/includes/print.cssable page width.
Printing Errors with CSS Positioning
If you have reset all the positioning properties as suggested earlier in this chapter, you will probably not run into difficulties. However, be sure to try /files/includes/print.cssing a web page with a lot of content—a page that you would expect to run into several /files/includes/print.cssed pages—to make sure that the entire web page /files/includes/print.csss. Using floats and absolute position can affect the /files/includes/print.cssout, resulting in only the first page getting /files/includes/print.cssed. If this happens, double-check the CSS for the container of the content that is being “clipped” and ensure that you have set and .
Note: In case you’re wondering “What’s that value? And why haven’t we heard about it before?” it’s because that’s the browser’s /files/includes/default.css positioning model. You would not normally need to set this yourself—we only have to do this to get around a known /files/includes/print.cssing problem.
Getting Feedback About Your “Funny Printouts”
Despite all your hard work, someone is bound to ask, “Why does your page not /files/includes/print.css out properly?” Many users expect that what they see on screen will be replicated in the /files/includes/print.cssout. Remember that you can use /files/includes/print.css CSS itself to address the issue (e.g., perhaps a block of text that reads “This page has been crafted for perfect /files/includes/print.cssing…” that is hidden on screen but set as for the /files/includes/print.cssed version).
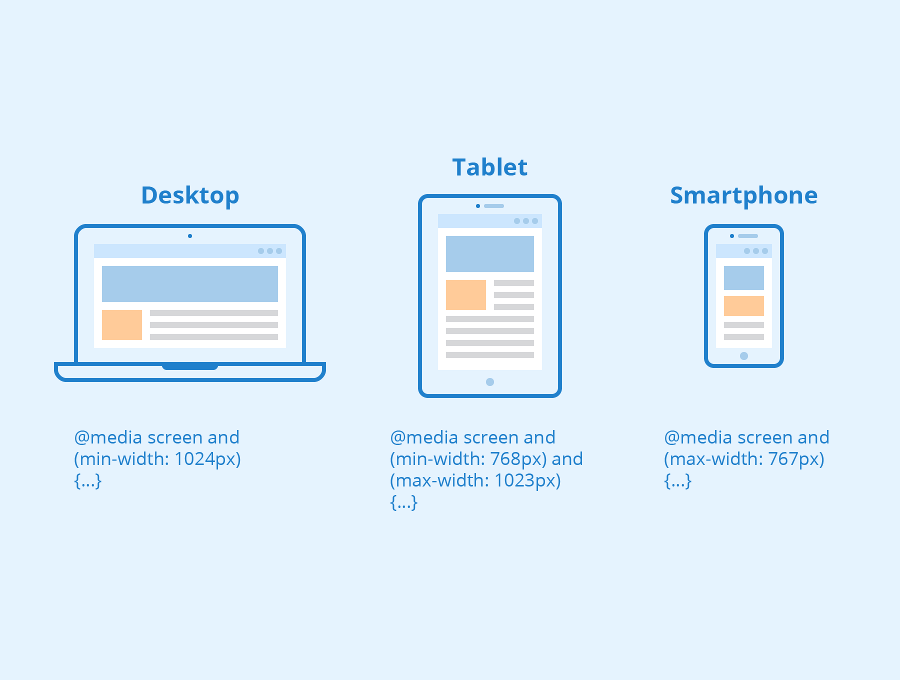
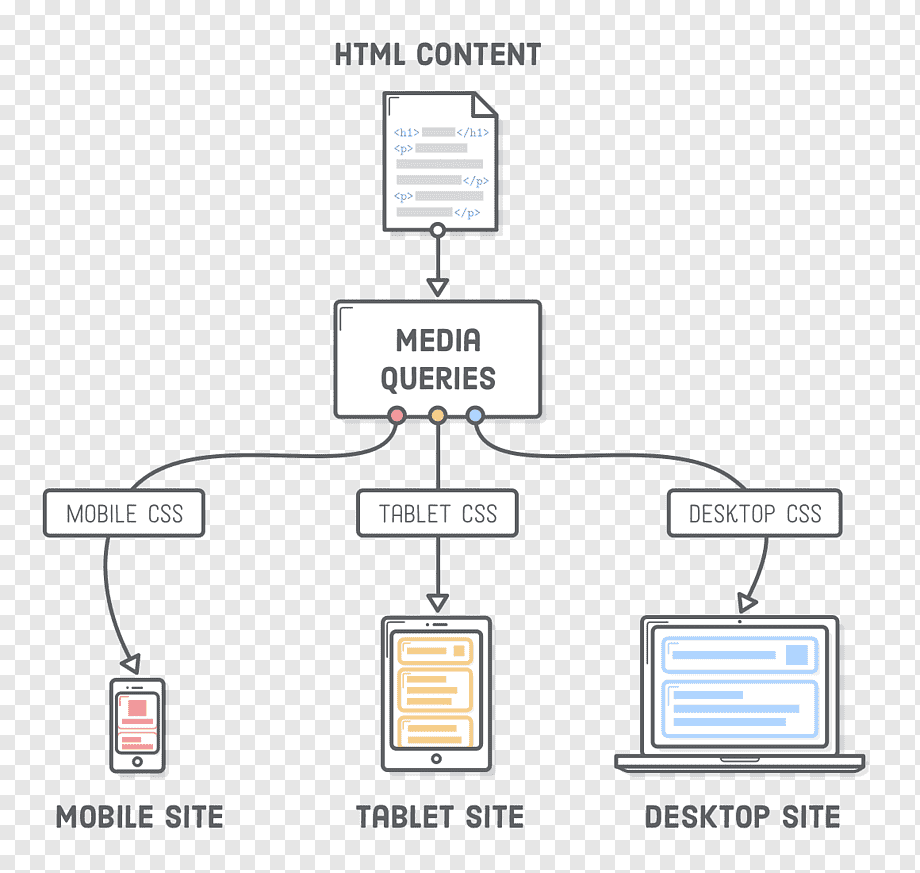
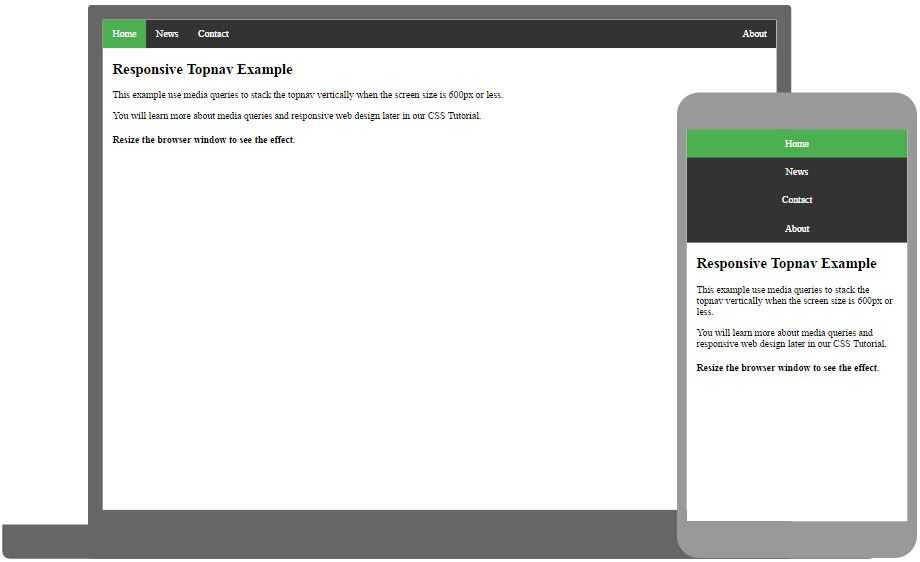
Адаптивный дизайн с Media Queries
О нововведениях в HTML5 мы уже говорили, но ещё одно преимущество раскрывается именно в его использовании в адаптивности сайта. В совместном использовании с CSS3 появляется возможность использовать такую интересную спецификацию, как Media Queries.
Данная спецификация позволяет масштабировать и изменять сайт в зависимости от заданных значений размера экрана. Сайты с фиксированной шириной уходят навсегда в историю — именно резиновый дизайн сайта является современной тенденцией.
Преимущество адаптивного сайта:
- корректное отображение на всех устройствах
- возможность детального контроля над любым блоком сайта
- отсутствие дубликатов сайта
- преимущество в ранжировке
- повышение посещаемости
- понижение отказов
Как видно, преимуществ гораздо больше, чем можно было подумать. Адаптивность ценится не только пользователями сайта, но и поисковыми машинами, что позволяет получить необходимое преимущество в выдаче и занять лидирующие позиции в топе.
Дело в том, что с недавних пор Google и Яндекс буквально навязывают веб-мастерам создавать адаптивные сайты и за это поощряют их высокими позициями. Тем самым, в скором времени адаптивные сайты навсегда отодвинут устаревшие сайты, даже если последние имеют большую ценность.
Эта позиция верна и логична — такие условия подвергнут серьёзным изменениям веб-сайтов в лучшую сторону. Качество ресурсов станет выше, что повысит юзабилити и послужит развитию этой сферы. В конечно итоге, такая политика создаст комфортную среду для пользователей — что является неоспоримым плюсом!
Что касается посетителей сайта — адаптивность сайта не останется незамеченным: посещаемость будет расти, а отказы падать. Этот фактор положительно отразится на доходе проекта. Не говоря уже о существенной разгрузке сайта и простоте его использования.
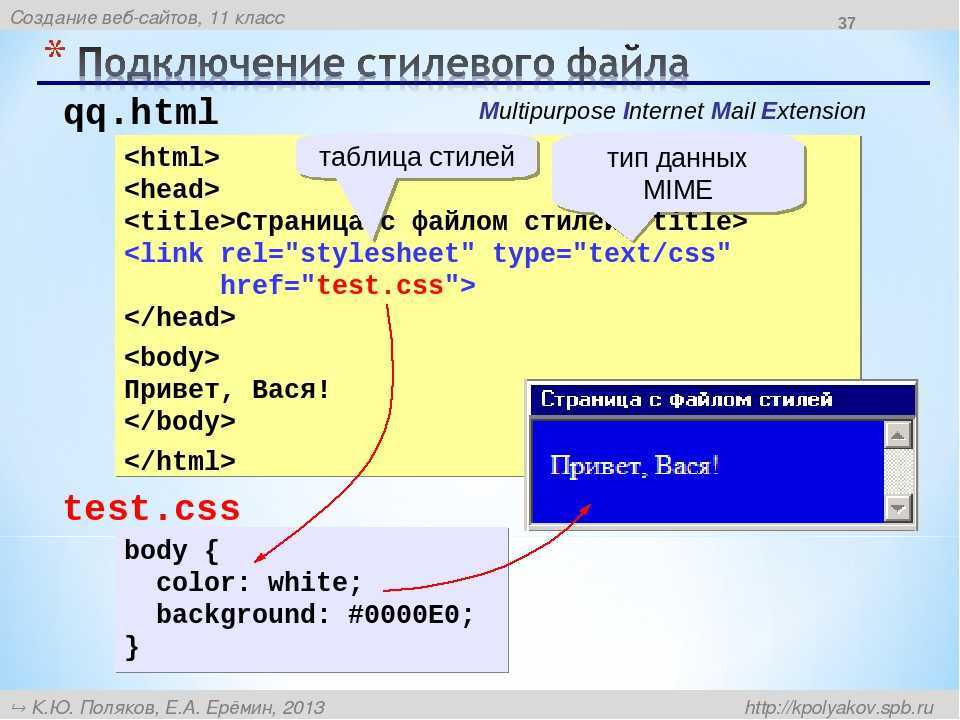
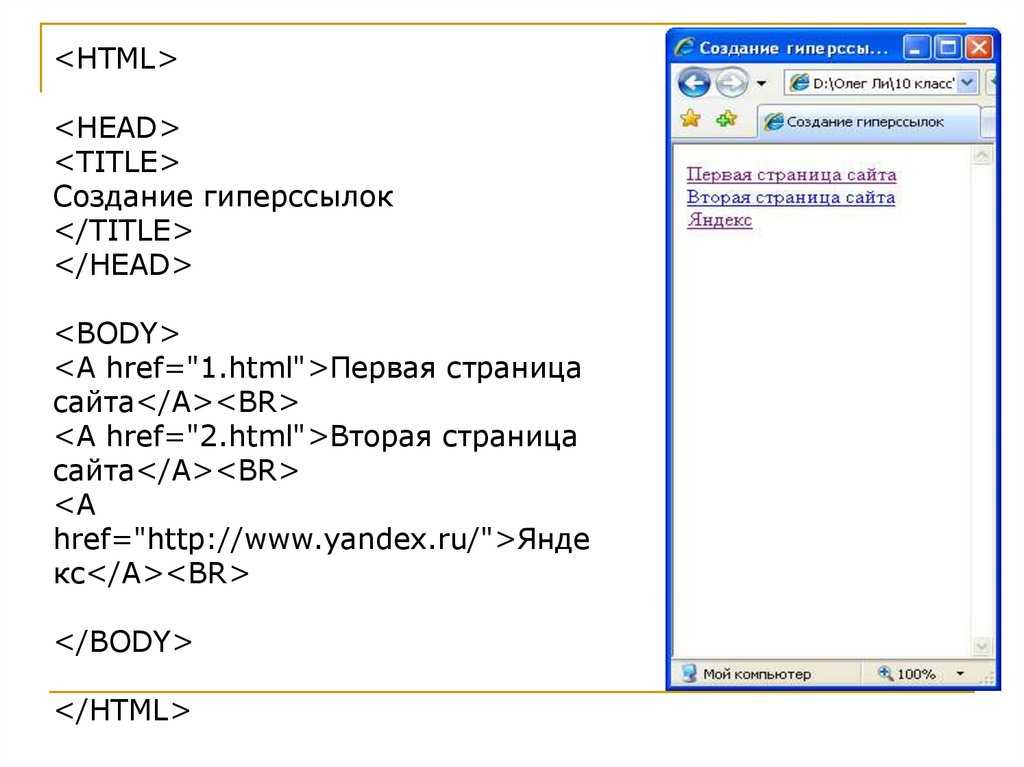
Link to a Stylesheet File
This is the most common method of attaching CSS rules to HTML documents.
With this method, all your style rules are contained in a single text file that’s saved with the .css extension. This file is saved on your server and you link to it directly from each HTML file. We use a tag which is a simple line of HTML that you put in the section of your HTML document, it looks like this:
The attribute is set to to tell the browser that the linked file is a Cascading Style Sheet (CSS).
If you’re using HTML5, the attribute is not required, you can remove it and save a few bytes per page.
The attribute is where you specify the path to your CSS file.
If the CSS file is in the same folder as your HTML file then no path is required, you only need to specify the filename like in the example above.
If it’s saved in a folder, then you can specify the folder path relative to the HTML file like this:
You can also specify a path relative to the root of your domain by prefixing with a forward slash like this:
Absolute URLs also work:
The attribute in a link tag specifies when the CSS rules are to be applied. Here are the most common values:
- indicates for use on a computer screen.
- for projected presentations.
- for handheld devices (typically with small screens).
- to style printed web pages.
- (default value) This is what most people choose. You can leave off the media attribute completely if you want your styles to be applied for all media types.
Advantages of linking to a separate CSS file
-
Changes to your CSS are reflected across all pages: You only need to make a CSS change once in your single CSS file and all website pages will update.
-
Changing your website theme is easy: You can replace your CSS file to completely change the look of your website. Check out CSS Zen Garden for the best example of this.
-
-
Site speed increases for multiple page requests: When a person first visits your website their browser downloads the HTML of the current page plus the linked CSS file. When they navigate to another page, their browser only needs to download the HTML of the new page, the CSS file is cached so doesn’t need to be downloaded again. This can make a big difference particularly if you have a large CSS file.


Disadvantages
An additional HTTP request is required for each linked CSS file: Excess HTTP requests can delay the rendering of your page. We’ll cover the solution to this problem shortly.
Creating a Print Style Sheet
In our experience, the greatest use you’ll have for different media types is with /files/includes/print.cssed output. There are a few quirks to be aware of (and we’ll cover those), but it’s very well supported in general and can be put to great use.
We’ve mentioned the various techniques that you can use to link to a style sheet with different media. Our preference is to do the following:
- Create a basic CSS file that contains generic visual styles that are understood by most browsers. Avoid CSS layout and anything that could be considered intermediate-to-advanced CSS. This CSS file is attached to the document using a element but without specifying any media type whatsoever.
- Create a second style sheet that is used for more advanced screen styles and use the statement embedded in the file to attach it. Netscape 4 won’t see this advanced file, but other newer browsers will.
- Create a /files/includes/print.css-only style sheet and attach it using the element with .
Note: You should declare the /files/includes/print.css style sheet last (link to it even after any block inside the HTML page). If you declare the /files/includes/print.css style sheet first, you could undo any values set there in the subsequent generic style sheets if they are not scoped for or some other medium.
Translating that English into markup, we get this in the document:
and in the basic CSS file: