
HTML Учебник
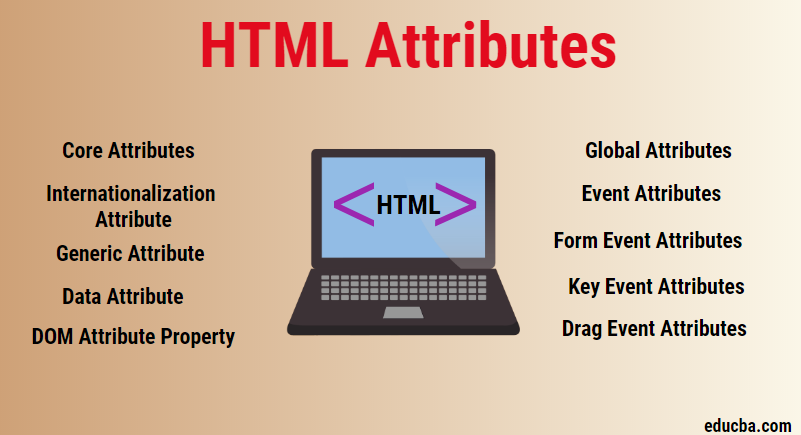
HTML ГлавнаяHTML ВведениеHTML РедакторHTML ОсновныеHTML ЭлементыHTML АтрибутыHTML ЗаголовкиHTML ПараграфыHTML СтилиHTML ФорматированиеHTML ЦитированиеHTML КомментарииHTML Цвет
Цвет
RGB
HEX
HSL
HTML с CSSHTML Ссылки
Ссылки
Ссылки цветные
Ссылки закладки
HTML Изображение
Изображение
Изображение карта
Изображение фон
Элемент картинки
HTML ТаблицыHTML Списки
Списки
Неупорядоченный список
Упорядоченный список
Другие списки
HTML БлокиHTML КлассыHTML ИдентификаторыHTML ФреймыHTML с JavaScriptHTML Путь к файлуHTML Мета тегиHTML Методы версткиHTML Адаптивный дизайнHTML Компьютерный кодHTML5 СемантикаHTML5 СинтаксисHTML СущностьHTML СимволыHTML ЭмодзиHTML КодировкаHTML URL КодировкаHTML в XHTML
Атрибут formmethod
Ввод атрибута определяет HTTP метод для отправки данных формы на URL адрес действия.
Примечание: Этот атрибут переопределяет атрибут method объекта элемента.
Атрибут работает со следующими типами входных данных: submit и image.
Данные формы могут быть отправлены в виде переменных URL адреса (method=»get») или как HTTP post транзакция (method=»post»).
Примечание метод «get»:
- Этот метод добавляет данные формы к URL адресу парами имя/значение
- Этот метод полезен для отправки форм, когда пользователь хочет добавить результат в закладки
- Существует ограничение на количество данных, которые вы можете разместить в URL адресе (зависит от браузера),
поэтому вы не можете быть уверены, что все данные формы будут правильно переданы - Никогда не используйте метод «get» для передачи конфиденциальной информации!
(пароль или другая конфиденциальная информация будет видна в адресной строке браузера)
Примечание метод «post»:
- Этот метод отправляет данные формы в виде транзакции HTTP post
- Отправленные формы с помощью метода «post» не могут быть помечены закладками
- Метод «post» является более надежным и безопасным, чем «get», и не имеет ограничений по размеру
Пример
Форма с двумя кнопками отправки. Первый отправляется данные формы с помощью method=»get».
Второй отправляется данные формы с помощью method=»post»:
<form action=»/action_page.html» method=»get»>
<label for=»fname»>Имя:</label>
<input type=»text» id=»fname» name=»fname»><br><br>
<label for=»lname»>Фамилия:</label>
<input type=»text» id=»lname» name=»lname»><br><br>
<input type=»submit» value=»Отправить GET»>
<input type=»submit» formmethod=»post» value=»Отправить POST»></form>
7.8. The raise statement
raise_stmt ::= "raise" ]
If no expressions are present, re-raises the
exception that is currently being handled, which is also known as the active exception.
If there isn’t currently an active exception, a exception is raised
indicating that this is an error.
Otherwise, evaluates the first expression as the exception
object. It must be either a subclass or an instance of .
If it is a class, the exception instance will be obtained when needed by
instantiating the class with no arguments.
The type of the exception is the exception instance’s class, the
value is the instance itself.
A traceback object is normally created automatically when an exception is raised
and attached to it as the attribute, which is writable.
You can create an exception and set your own traceback in one step using the
exception method (which returns the
same exception instance, with its traceback set to its argument), like so:
raise Exception("foo occurred").with_traceback(tracebackobj)
The clause is used for exception chaining: if given, the second
expression must be another exception class or instance. If the second
expression is an exception instance, it will be attached to the raised
exception as the attribute (which is writable). If the
expression is an exception class, the class will be instantiated and the
resulting exception instance will be attached to the raised exception as the
attribute. If the raised exception is not handled, both
exceptions will be printed:
>>> try
...     print(1  )
... except Exception as exc
...     raise RuntimeError("Something bad happened") from exc
...
Traceback (most recent call last):
  File "<stdin>", line 2, in <module>
ZeroDivisionError: division by zero

The above exception was the direct cause of the following exception:

Traceback (most recent call last):
  File "<stdin>", line 4, in <module>
RuntimeError: Something bad happened
A similar mechanism works implicitly if a new exception is raised when
an exception is already being handled. An exception may be handled
when an or clause, or a
statement, is used. The previous exception is then
attached as the new exception’s attribute:
>>> try
...     print(1  )
... except
...     raise RuntimeError("Something bad happened")
...
Traceback (most recent call last):
  File "<stdin>", line 2, in <module>
ZeroDivisionError: division by zero

During handling of the above exception, another exception occurred:

Traceback (most recent call last):
  File "<stdin>", line 4, in <module>
RuntimeError: Something bad happened
Exception chaining can be explicitly suppressed by specifying in
the clause:
>>> try
...     print(1  )
... except
...     raise RuntimeError("Something bad happened") from None
...
Traceback (most recent call last):
  File "<stdin>", line 4, in <module>
RuntimeError: Something bad happened
Additional information on exceptions can be found in section ,
and information about handling exceptions is in section .
Changed in version 3.3: is now permitted as in .
New in version 3.3: The attribute to suppress automatic display of the
exception context.
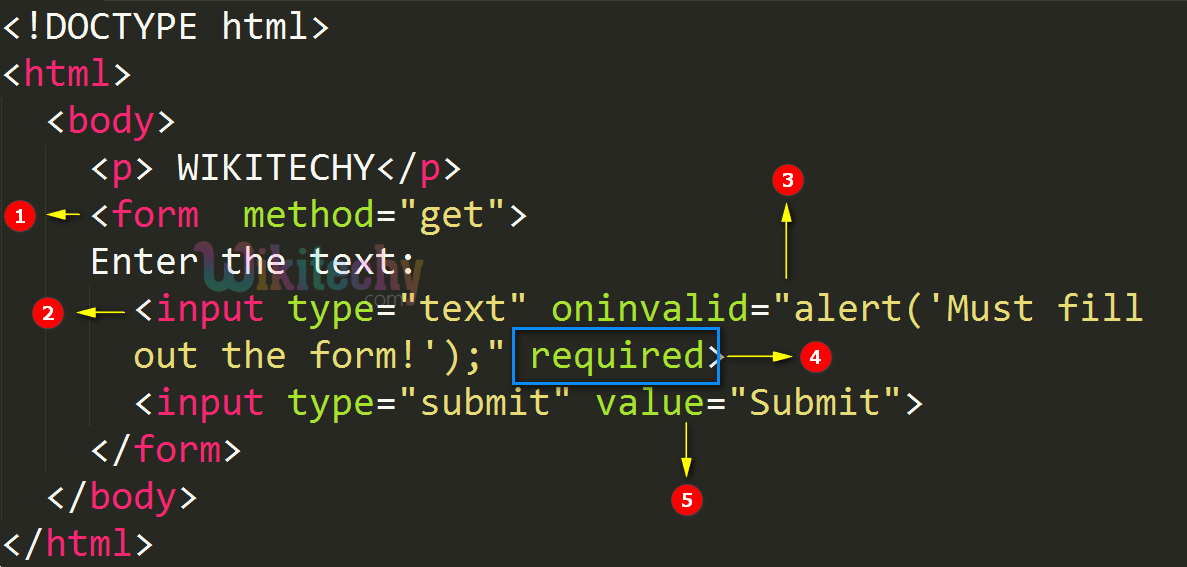
formnovalidate
The formnovalidate attribute is used to prevent the validation of a specific input element.
The formnovalidate attribute overrides the novalidate attribute of the <form> element.
The formmethod attribute is used with the following type:
type=»submit»
Supported Browser
Below is complete syntax along with example
<!DOCTYPE html>

<html>

    <head>
    	 <title>Title name will go here</title>
    </head>

    <body>

		<form action="demo_form.php">
		  First Name: <input type="text" name="fname" required>
		  <input type="submit">
		  <input type="submit" formnovalidate value="submit without validate">
		</form>


    </body>

</html>
Comments
Another great little snippet, as much as i do hate iframes because of there restrictions i do like the ability to manipulate them for file uploads.
Strange, just can’t get this to work. Uploaded a really basic page with just the form and the iframe page and it will not work. http://www.mercury14.co.uk/asdfgh/form.php Am I missing something obvious?
I have the same problem. I created the iframe.php file, but nothing appears, whilst it does in the demo. Help please.
If anyone else is having problems making this work try this for the iframe.php page: <p>I’m probably being loaded inside an iframe.</p> <p>Text value: <?php echo $_POST; ?></p>
That’s because to render
Found this page while trying to solve this exact problem. I ended up using jQuery to build a GET query string and PHP to process it. I wanted to send data from a form on a page to a form in a fancybox iframe which is then submitted by AJAX – seems to work quite nicely.
Can you share how you did that? I’m trying to do the exact same thing. I have a form and when the user presses enter I want the php file to search for the data, and post to a fancybox iframe…
I recently used the same trick for an image uploader. I styled the file input by opacity:0 and its wrapper div with some nice looking image for the uploader button and its hover too. once the image is browsed or dragged, it is posted to the iframe and uploaded to the server and displays it in the seamless iframe just above it to show the resized and cropped image. I’d love to write an article about it with all the code. All by HTML5, CSS3. I used js just to trigger form submit on change of file input.
I’m new to this and I’m having trouble. I have a site with a css drop down menu that is 40px high, the menu content changes a lot so having the menu on each page would be a large hassle. I’ve tried a iFrame for the menu, but the drop down parts of the menu are cut off by the iFrame. Is there a better way to do this or a trick to make the iFrame hover over the page content so the drop downs are viable?
Look up how to use PHP modularly; you use separate PHP files and load them together into one page that works like one file. Once you edit the navigation, for example, it will be edited on all the pages.
This totally rocks! Takes my php file and loads into an iframe without refreshing the page! EXACTLY WHAT I WAS HOPING FOR! Thank you for posting this. You’ve just made one persons life much easier!
Reference
To display an input, render the built-in browser component.
Props
supports all
You can by passing one of these props:
- : A boolean. For a checkbox input or a radio button, controls whether it is selected.
- : A string. For a text input, controls its text. (For a radio button, specifies its form data.)
When you pass either of them, you must also pass an handler that updates the passed value.
These props are only relevant for uncontrolled inputs:
- : A boolean. Specifies for and inputs.
- : A string. Specifies for a text input.
These props are relevant both for uncontrolled and controlled inputs:
- : A string. Specifies which filetypes are accepted by a input.
- : A string. Specifies the alternative image text for a input.
- : A string. Specifies the media (microphone, video, or camera) captured by a input.
- : A string. Specifies one of the possible
- : A boolean. If , React will focus the element on mount.
- : A string. Specifies the form field name for the element’s directionality.
- : A boolean. If , the input will not be interactive and will appear dimmed.
- : does not accept children.
- : A string. Specifies the of the this input belongs to. If omitted, it’s the closest parent form.
- : A string. Overrides the parent for and .
- : A string. Overrides the parent for and .
- : A string. Overrides the parent for and .
- : A string. Overrides the parent for and .
- : A string. Overrides the parent for and .
- : A string. Specifies the image height for .
- : A string. Specifies the of the with the autocomplete options.
- : A number. Specifies the maximum value of numerical and datetime inputs.
- : A number. Specifies the maximum length of text and other inputs.
- : A number. Specifies the minimum value of numerical and datetime inputs.
- : A number. Specifies the minimum length of text and other inputs.
- : A boolean. Specifies whether multiple values are allowed for and .
- : A string. Specifies the name for this input that’s
- : An function. Required for Fires immediately when the input’s value is changed by the user (for example, it fires on every keystroke). Behaves like the browser event.
- : A version of that fires in the
- : An function. Fires immediately when the value is changed by the user. For historical reasons, in React it is idiomatic to use instead which works similarly.
- : A version of that fires in the
- : An function. Fires if an input fails validation on form submit. Unlike the built-in event, the React event bubbles.
- : A version of that fires in the
- : An function. Fires after the selection inside the changes. React extends the event to also fire for empty selection and on edits (which may affect the selection).
- : A version of that fires in the
- : A string. Specifies the pattern that the must match.
- : A string. Displayed in a dimmed color when the input value is empty.
- : A boolean. If , the input is not editable by the user.
- : A boolean. If , the value must be provided for the form to submit.
- : A number. Similar to setting width, but the unit depends on the control.
- : A string. Specifies the image source for a input.
- : A positive number or an string. Specifies the distance between valid values.
- : A string. One of the
- : A string. Specifies the image width for a input.
Caveats
- Checkboxes need (or ), not (or ).
- If a text input receives a string prop, it will be
- If a checkbox or a radio button receives a boolean prop, it will be
- An input can’t be both controlled and uncontrolled at the same time.
- An input cannot switch between being controlled or uncontrolled over its lifetime.
- Every controlled input needs an event handler that synchronously updates its backing value.
Использование
Плагин модальных элементов переключает состояние вашего скрытого содержимого по требованию с помощью атрибутов или JavaScript. Он также добавляет в класс для преодоления поведения при прокрутке по умолчанию, и создает зону для клика вне модального элемента, нужную для закрытия открытых модальных элементов, класс .
Через атрибуты
Активируйте модальный элемент без JavaScript. Установите в контролирующем элементе, таком как кнопка, наряду с или , для обращения к функциональности “toggle” для частного модального элемента.
Параметры можно передавать атрибутами или JavaScript. Для использования атрибутов добавьте имя параметра в , например .
| Название | Тип | По умолч. | Описание |
|---|---|---|---|
| boolean or the string | Подключает модальный элемент с затемненным фоном. Еще – задает для фона, который не закрывает модальный элемент по клику на фоне. | ||
| boolean | Закрывает модальный элемент по нажатию ESC | ||
| boolean | Фокусируется на модальном элементе по инициализации. |
Методы
Асинхронные методы и переходы
Все методы API асинхронны и запускают переход. Они возвращаются функции, вызвавшей их, с началом перехода, но до его конца. Плюс, вызов метода к компоненту, выполняющему переход, будет проигнорирован.
toggle
Вручную изменяет состояние модального элемента. Возвращается к функции-вызову до того, как модальный элемент показан или скрыт. (т.е. до того, как произойдет событие или ).
show
Вручную открывает модальный элемент. Возвращается к функции-вызову до того, как модальный элемент показан. (т.е. до того, как произойдет событие ).
hide
Вручную прячет модальный элемент. Возвращается к функции-вызову до того, как модальный элемент показан. (т.е. до того, как произойдет событие ).
handleUpdate
Вручную обновляет позицию модального элемента, если высота его изменяется во время открытия (т.е. в случае возникновения полосы прокрутки).
getInstance
Статический метод, который позволяет вам получить модальный экземпляр, связанный с элементом DOM.
События
Модальный элемент в Bootstrap имеет несколько событий для встраивания в функциональность. Все события модальных элементов запускаются внутри самих элементов (т.е. в ).
| Тип события | Описание |
|---|---|
| Это событие запускается немедленно, когда экземпляр метода вызван. Если оно вызвано кликом, элемент, на который кликнули, доступен как свойство события . | |
| Это событие запускается, когда модальный элемент сделан видимым юзеру (будет ждать завершения переходов CSS). Если оно вызвано кликом, элемент, на который кликнули, доступен как свойство события . | |
| Это событие запускается немедленно, когда экземпляр метода вызван. | |
| Это событие запускается, когда модальный элемент больше не является скрытым (будет ждать завершения переходов CSS). | |
| Это событие вызывается, когда отображается модальное изображение, его фон статичен , и выполняется щелчок за пределами модального режима или нажатие клавиши выхода с параметром клавиатуры или , установленным в значение . |
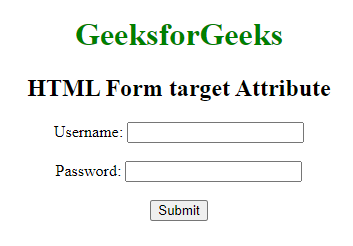
How to use formtarget attribute in HTML?
The formtarget attribute in HTML is utilized to specify the display location of the received response after form submission. It takes precedence over the target attribute of the HTML
form tag
. The formtarget attribute should only be used when working with
input type submit
an image.
These are the
Attribute Values
associated with the formtarget attribute −
| 1. Serial Number | Importance | Description provided below. | ||
|
1 |
_blank |
The response is shown in a separate window or tab. | ||
|
2 |
_self |
The value that is automatically set as a default. The output is shown within the existing frame. | ||
|
3 |
_parent |
The output is shown in the parent frame. | ||
|
4 |
_top |
The response appears in the entire window body. | ||
| 5 | framename | The output is shown in an iframe with a specified name. |
Example
To gain proficiency in utilizing the formtarget attribute in HTML, you can attempt to execute the provided code snippet.
«»».
HTML formtarget attribute
Javascript — Submit Form to New Window/Tab, Apparently the formtarget which made this possible is depreciated (which I never actually knew) and it seems that Google may have removed this …
HTML formtarget Attribute
❮ HTML <button> tag
Example
A form containing two
submit buttons
. The initial submission is used to send the
form data
to the default target (»
_self
«), while the second submission sends the form data to a new window with the target attribute set to «_blank».
Try it Yourself »
Definition and Usage
The attribute
indicates the destination where the form response should be displayed upon submission, overriding the form’s
attribute.
The attribute
is specifically utilized for buttons that have
.
Browser Support
The attribute’s full support is indicated by the numbers in the table, specifying the earliest browser version.
| Attribute | |||||||||||
|---|---|---|---|---|---|---|---|---|---|---|---|
| formtarget | 9.0 | 10.0 | 4.0 | 5.1 | 10.6 |
Attribute Values
| Value | Description | |
|---|---|---|
| _blank | Opens the response in a separate window or tab. | |
| _self | The default behavior is to load the response in the same frame. | |
| _parent | The response is loaded in the frame of the parent. | |
| _top | Displays the response in the entire window body. | |
|
framename |
Displays the response within a designated iframe. |
❮ HTML
tag
HTML | DOM Input Submit formTarget Property, The Input Submit formTarget Property in HTML DOM is used to set or return the value of the formtarget attribute of the submit field. The Target …
Tags:
blank not working for button in chrome
Атрибут formtarget
Определяет окно или фрейм в которое будет загружаться результат, возвращаемый обработчиком формы, в виде HTML-документа.
Значения
В качестве значения используется имя окна или фрейма, заданное атрибутом name . Если установлено несуществующее имя, то будет открыто новое окно. В качестве зарезервированных имен можно указывать следующие.


_blank Загружает страницу в новое окно браузера. _self Загружает страницу в текущее окно. _parent Загружает страницу во фрейм-родитель, если фреймов нет, то это значение работает как _self . _top Отменяет все фреймы и загружает страницу в полном окне браузера, если фреймов нет, то это значение работает как _self .
step
The step attribute is used for mathematical term matching case. If you insert a value between (0-9), the input field only accept the value which is multiplication of that value
As we put the value 4, it will accept (-8, -4, 0, 4, 8, 12)
The following input type is support by the rquired attributes:
type=»number»
type=»range»
type=»date»
type=»datetime»
type=»datetime-local»
type=»month»
type=»time»
type=»week»
Supported Browser
Below is complete syntax along with example
<!DOCTYPE html>

<html>

    <head>
    	 <title>Title name will go here</title>
    </head>

    <body>

		<form action="demo_form.php">
			<input type="number" name="number" step="4"/>
			<input type="submit">
		</form>

    </body>

</html>
7.5. The del statement
del_stmt ::= "del"
Deletion is recursively defined very similar to the way assignment is defined.
Rather than spelling it out in full details, here are some hints.
Deletion of a target list recursively deletes each target, from left to right.
Deletion of a name removes the binding of that name from the local or global
namespace, depending on whether the name occurs in a statement
in the same code block. If the name is unbound, a exception
will be raised.
Deletion of attribute references, subscriptions and slicings is passed to the
primary object involved; deletion of a slicing is in general equivalent to
assignment of an empty slice of the right type (but even this is determined by
the sliced object).
required
The required attribute is used for a required input field. Without filling the input field user can’t submit the form.
The following input type is support by the rquired attributes:
type=»text»
type=»search»
type=»url»
type=»tel»
type=»password»
type=»date»
type=»pickers»
type=»number»
type=»checkbox»
type=»radio»
type=»file»
Supported Browser
Below is complete syntax along with example
<!DOCTYPE html>

<html>

    <head>
    	 <title>Title name will go here</title>
    </head>

    <body>

		<form action="demo_form.php">
			First Name: <input type="text" name="fname" required/>
			<input type="submit">
		</form>

    </body>

</html>
Отличия IE8-
Чтобы было проще ориентироваться, я собрал отличия IE8-, которые имеют отношение ко всплытию, в одну секцию.
Их знание понадобится, если вы решите писать на чистом JS, без фреймворков и вам понадобится поддержка IE8-.
Нет свойства
Обратим внимание, что при назначении обработчика через у нас есть , поэтому , как правило, не нужно, а вот при назначении через обработчик не получает , так что текущий элемент, если нужен, можно будет взять лишь из замыкания.
Вместо в IE8- используется
Если мы пишем обработчик, который будет поддерживать и IE8- и современные браузеры, то можно начать его так:
Для остановки всплытия используется код .
Кросс-браузерно остановить всплытие можно так:
Далее в учебнике мы будем использовать стандартные свойства и вызовы, поскольку добавление этих строк, обеспечивающих совместимость – достаточно простая и очевидная задача. Кроме того, никто не мешает подключить полифил.

Ещё раз хотелось бы заметить – эти отличия нужно знать при написании JS-кода с поддержкой IE8- без фреймворков. Почти все JS-фреймворки обеспечивают кросс-браузерную поддержку , и .
7.12. The global statement
global_stmt ::= "global" ("," )*
The statement is a declaration which holds for the entire
current code block. It means that the listed identifiers are to be interpreted
as globals. It would be impossible to assign to a global variable without
, although free variables may refer to globals without being
declared global.
Names listed in a statement must not be used in the same code
block textually preceding that statement.
Names listed in a statement must not be defined as formal
parameters, or as targets in statements or clauses, or in a target list,
definition, function definition, statement, or variable
annotation.
CPython implementation detail: The current implementation does not enforce some of these restrictions, but
programs should not abuse this freedom, as future implementations may enforce
them or silently change the meaning of the program.