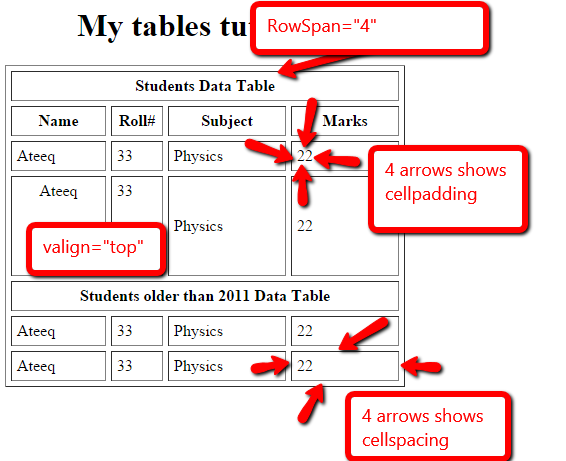
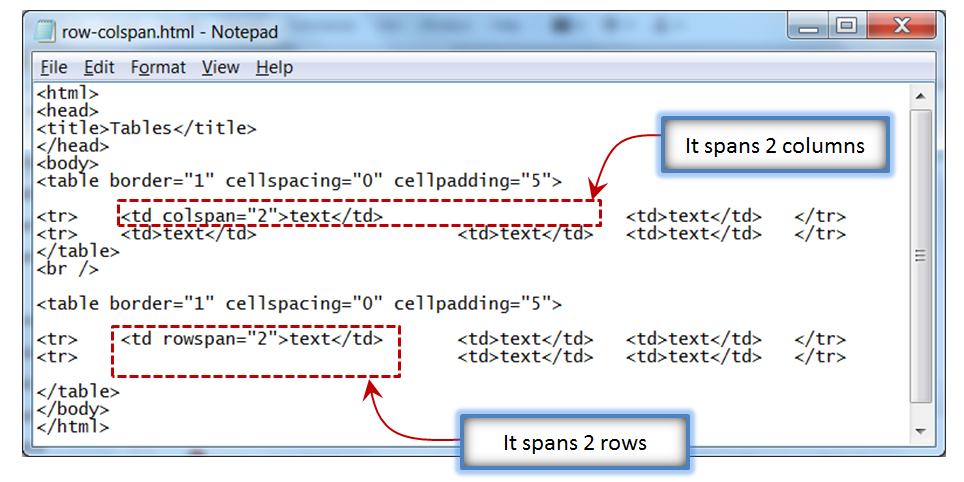
Colspan and Rowspan Attributes
You will use colspan attribute if you want to merge two or more columns into a single column. Similar way you will use rowspan if you want to merge two or more rows.
Example
<!DOCTYPE html>


<html>


<head>


<title>HTML Table Colspan/Rowspan</title>


</head>


<body>


<tableborder="1">


<tr>


<th>Column 1</th>


<th>Column 2</th>


<th>Column 3</th>


</tr>


<tr>


<tdrowspan="2">Row 1 Cell 1</td>


<td>Row 1 Cell 2</td>


<td>Row 1 Cell 3</td>


</tr>


<tr>


<td>Row 2 Cell 2</td>


<td>Row 2 Cell 3</td>


</tr>


<tr>


<tdcolspan="3">Row 3 Cell 1</td>


</tr>


</table>


</body>


</html>
This will produce the following result −
Tables Backgrounds
You can set table background using one of the following two ways −
-
bgcolor attribute − You can set background color for whole table or just for one cell.
-
background attribute − You can set background image for whole table or just for one cell.
You can also set border color also using bordercolor attribute.
Note − The bgcolor, background, and bordercolor attributes deprecated in HTML5. Do not use these attributes.
Example
<!DOCTYPE html>


<html>


<head>


<title>HTML Table Background</title>


</head>


<body>


<tableborder="1"bordercolor="green"bgcolor="yellow">


<tr>


<th>Column 1</th>


<th>Column 2</th>


<th>Column 3</th>


</tr>


<tr>


<tdrowspan="2">Row 1 Cell 1</td>


<td>Row 1 Cell 2</td>


<td>Row 1 Cell 3</td>


</tr>


<tr>


<td>Row 2 Cell 2</td>


<td>Row 2 Cell 3</td>


</tr>


<tr>


<tdcolspan="3">Row 3 Cell 1</td>


</tr>


</table>


</body>


</html>
This will produce the following result −
Here is an example of using background attribute. Here we will use an image available in /images directory.
<!DOCTYPE html>


<html>


<head>


<title>HTML Table Background</title>


</head>


<body>


<tableborder="1"bordercolor="green"background="/images/test.png">


<tr>


<th>Column 1</th>


<th>Column 2</th>


<th>Column 3</th>


</tr>


<tr>


<tdrowspan="2">Row 1 Cell 1</td>


<td>Row 1 Cell 2</td><td>Row 1 Cell 3</td>


</tr>


<tr>


<td>Row 2 Cell 2</td>


<td>Row 2 Cell 3</td>


</tr>


<tr>


<tdcolspan="3">Row 3 Cell 1</td>


</tr>


</table>


</body>


</html>
This will produce the following result. Here background image did not apply to table’s header.
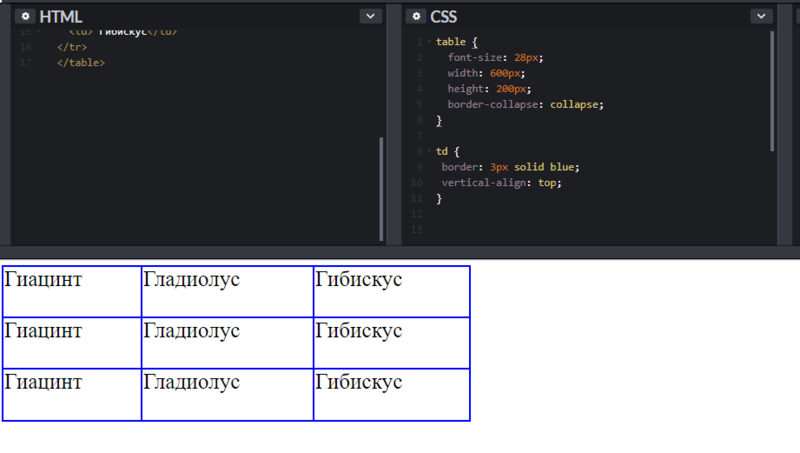
Creating and styling a table with CSS properties
So, the CSS alternative for cellpadding will be:
The CSS alternative for cellspacing will be:
Let’s see how to use them step by step:
- First thing you need to do is creating a <table> element which will contain <th>, <tr> and <td> tags.
- Style the table with the border-collapse property. Set the value to «separate».
Note that the «separate» value is set by default when you define the border property.
- Add the padding property to the <th> and <td> elements for defining the cellpadding.
- For setting the cellspacing, define the border-spacing property for the <table> element.
Example of setting cellspacing with the border-spacing property:
- Style the <table>, <th>, <tr>, and <td> elements and give color, background-color and text-align properties where needed.
Result
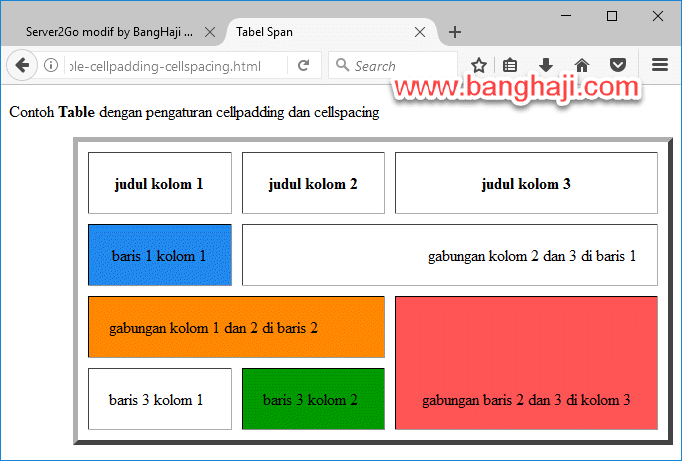
How to adjust spacing separately for the top, right, left, and bottom of each cell?
You can use the CSS property to adjust the spacing of each cell in an HTML table separately. The property takes up to four values, which correspond to the top, right, bottom, and left sides of the element, respectively.
Here’s an example of how to adjust the spacing of each cell separately in an HTML table:
In this example, the first cell in the first row has a padding of 10 pixels for the top, 20 pixels for the right, 30 pixels for the bottom, and 40 pixels for the left. The second cell in the first row has a padding of 20 pixels for the top and bottom, and 30 pixels for the right and left. The first cell in the second row has a padding of 0 pixels for the top and right, and 10 pixels for the bottom. The second cell in the second row has a padding of 0 pixels for the top and bottom, and 20 pixels for the right and left.
Cell Spacing using CSS
You can also set the cell spacing using CSS. Here is an example of setting the cell spacing to 10 pixels using CSS:
<style>
table {
border-collapse: separate;
border-spacing: 50px;
}
</style>
<table>
<tr>
<td>Row 1, Column 1</td>
<td>Row 1, Column 2</td>
</tr>
<tr>
<td>Row 2, Column 1</td>
<td>Row 2, Column 2</td>
</tr>
</table>
Browser View
| Row 1, Column 1 | Row 1, Column 2 |
| Row 2, Column 1 | Row 2, Column 2 |
In the above example, the border-collapse property is set to separate to ensure that the table cells are not merged together. The border-spacing property is set to 10px to create 10 pixels of space between adjacent cells in the table. Note that the border-spacing property is not supported in some older browsers, so it’s important to test your code in different web browsers to ensure that the table looks as expected.
Can I set different cell spacing values for different cells or rows?
No, it is not possible to set different cell spacing values for different cells or rows in an HTML table using standard HTML attributes or properties.
The cellspacing attribute sets the spacing between all cells in the table, and any value set for the cellspacing attribute applies to the entire table. Similarly, if you use CSS to set the border-spacing property, the value applies to the entire table.
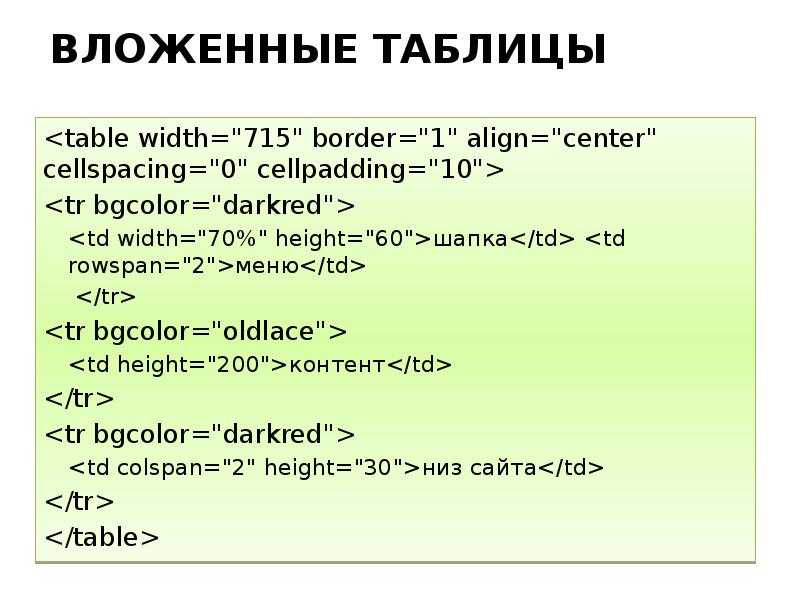
If you need to have different spacing between cells or rows, you may need to use additional HTML or CSS markup to achieve the desired effect. For example, you could use nested tables to create separate sections with different cell spacing. Another option is to use CSS to style individual cells or rows with different padding or margin values to create the appearance of different spacing.
Following is an example of using nested tables to create different cell spacing:
<table cellspacing=»50″ border=5 bordercolor=red>
<tr>
<td>
<table cellspacing=»25″ border=2 bordercolor=blue>
<tr>
<td>R1, C1</td>
<td>R1, C2</td>
</tr>
<tr>
<td>R2, C1</td>
<td>R2, C2</td>
</tr>
</table>
</td>
<td>
<table cellspacing=»35″ border=2 bordercolor=green>
<tr>
<td>R1, C3</td>
<td>R1, C4</td>
</tr>
<tr>
<td>R2, C3</td>
<td>R2, C4</td>
</tr>
</table>
</td>
</tr>
</table>
Browser View
|
|
In the above example, two nested tables are used to create two sections of the main table. The first nested table has a cellspacing value of 5, while the second nested table has a cellspacing value of 20. This results in different spacing between the cells in the two sections of the main table.
HTML References
HTML by AlphabetHTML by CategoryHTML Browser SupportHTML AttributesHTML Global AttributesHTML EventsHTML ColorsHTML CanvasHTML Audio/VideoHTML Character SetsHTML DoctypesHTML URL EncodeHTML Language CodesHTML Country CodesHTTP MessagesHTTP MethodsPX to EM ConverterKeyboard Shortcuts
HTML Tags
<!—>
<!DOCTYPE>
<a>
<abbr>
<acronym>
<address>
<applet>
<area>
<article>
<aside>
<audio>
<b>
<base>
<basefont>
<bdi>
<bdo>
<big>
<blockquote>
<body>
<br>
<button>
<canvas>
<caption>
<center>
<cite>
<code>
<col>
<colgroup>
<data>
<datalist>
<dd>
<del>
<details>
<dfn>
<dialog>
<dir>
<div>
<dl>
<dt>
<em>
<embed>
<fieldset>
<figcaption>
<figure>
<font>
<footer>
<form>
<frame>
<frameset>
<h1> — <h6>
<head>
<header>
<hr>
<html>
<i>
<iframe>
<img>
<input>
<ins>
<kbd>
<label>
<legend>
<li>
<link>
<main>
<map>
<mark>
<meta>
<meter>
<nav>
<noframes>
<noscript>
<object>
<ol>
<optgroup>
<option>
<output>
<p>
<param>
<picture>
<pre>
<progress>
<q>
<rp>
<rt>
<ruby>
<s>
<samp>
<script>
<section>
<select>
<small>
<source>
<span>
<strike>
<strong>
<style>
<sub>
<summary>
<sup>
<svg>
<table>
<tbody>
<td>
<template>
<textarea>
<tfoot>
<th>
<thead>
<time>
<title>
<tr>
<track>
<tt>
<u>
<ul>
<var>
<video>
<wbr>
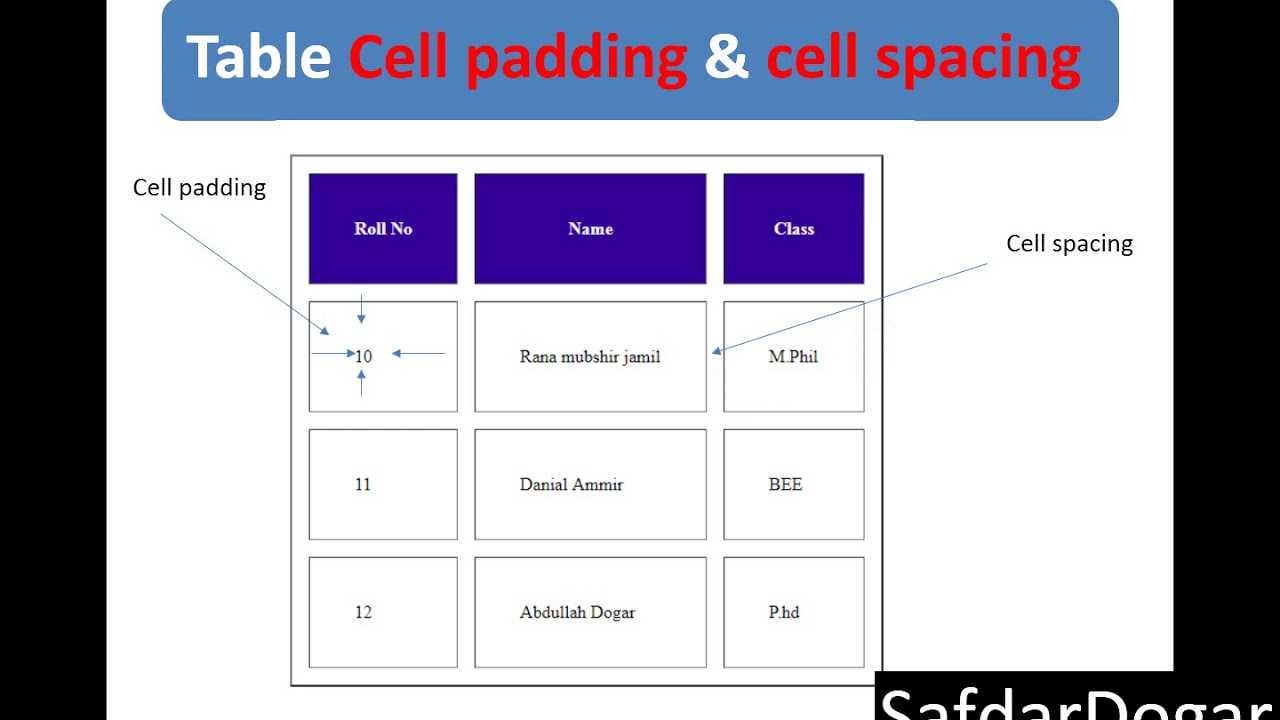
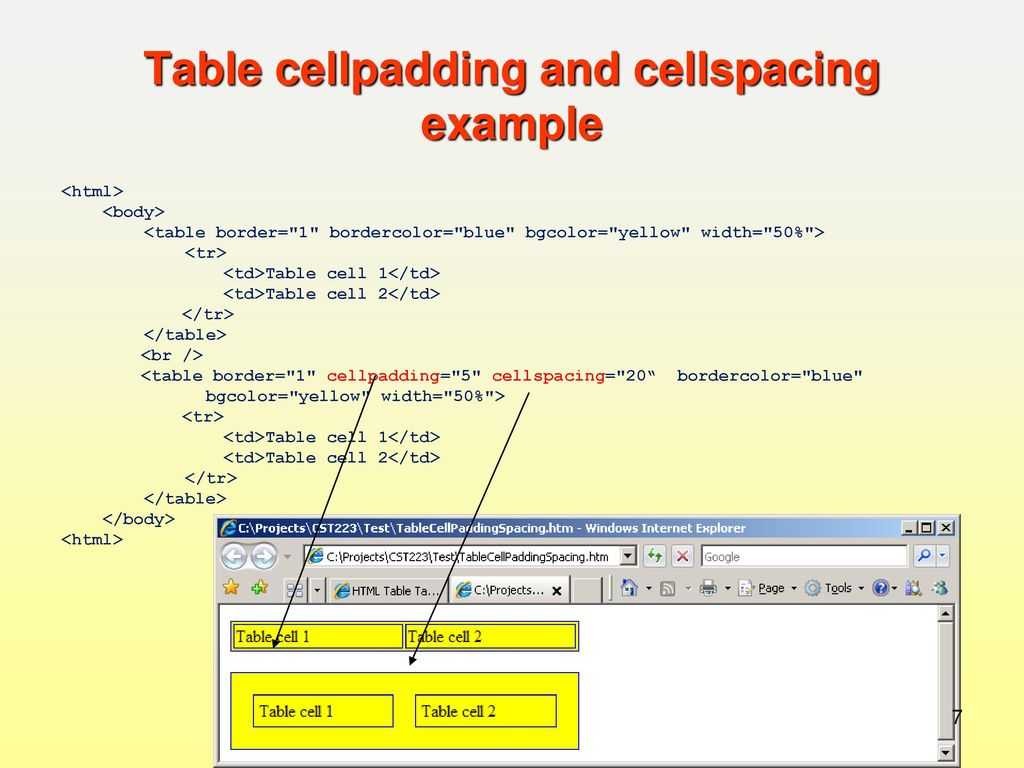
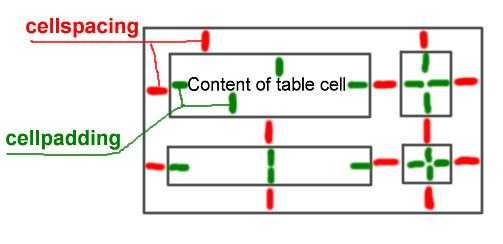
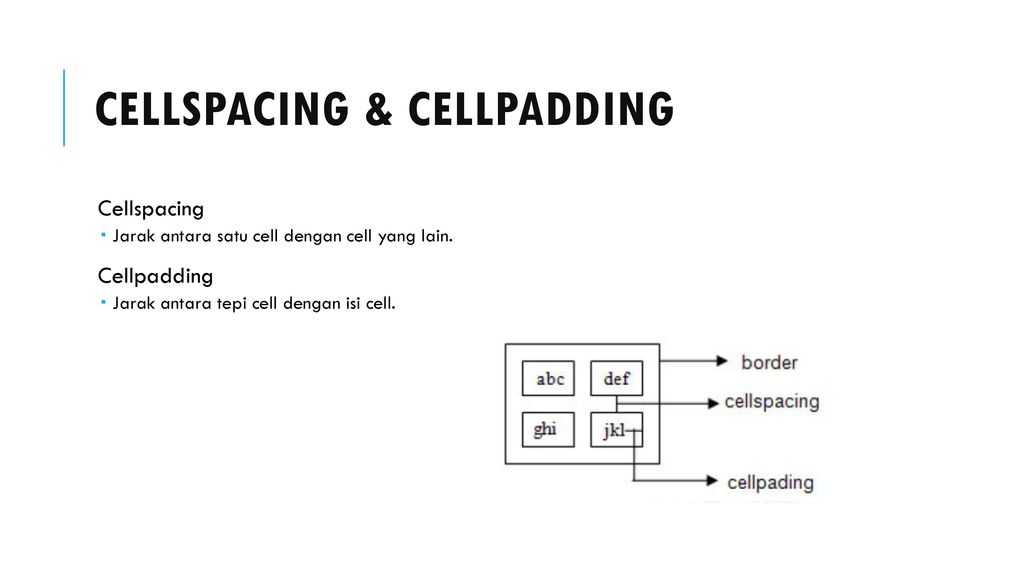
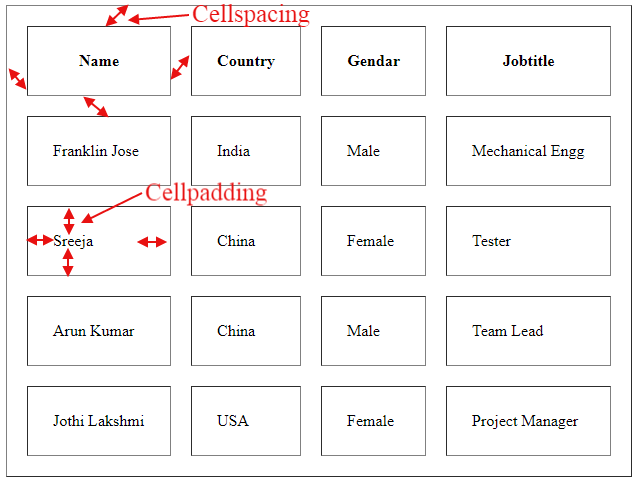
What is cellpadding in HTML tables
Cellpadding is used to define the distance or space inside the cell. If you have some content inside a cell the cell will leave space on each side top, left, right, bottom that’s cellpadding. Cellpadding is an important feature to format and make table cells good. Default value of cellpadding is zero 0 which you can change by adding attribute cellpadding=”5px” in table tag. What is the cell? Cell is actually <td></td> and for headings its <th></th> while <tr></tr> is a table row which contains the cells. So the cellpadding only works to give space inside the cells.
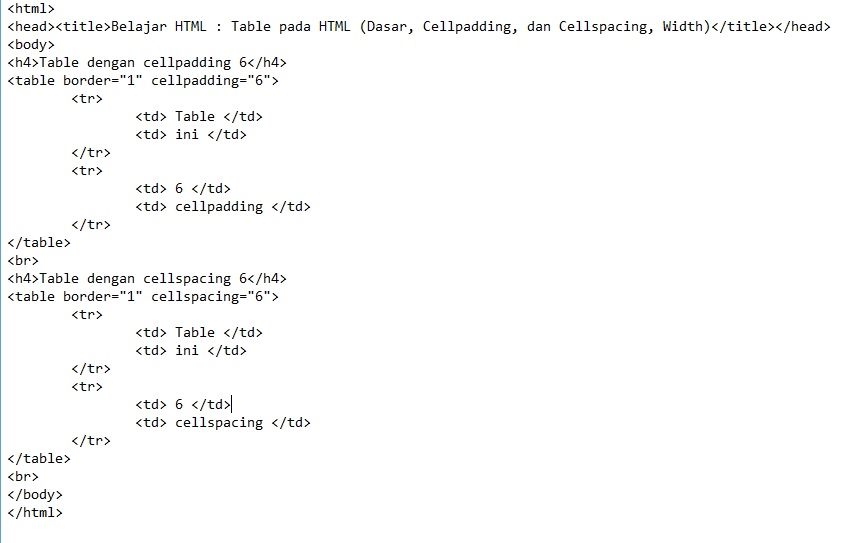
The General Format of Specifying cellpadding
In example above we are starting a table in which cellpadding=”5px” attribute tells browser to add 5px spacing inside each cell. Let’s now have a look to complete table’s code below which have 5px cellpadding.
Note: If your CSS defining the table, tr, td styles in which it says td padding should be something else than cellpadding will not work. CSS style for td padding will override the HTML table cellpadding attribute.
In example above we have two rows first row have two table headings with <th> tag. On other hand second row have <td> table data cells. So both headings and data are cells which will have spacing inside. As you have seen we defined cellpadding in table tag.
HTML/Атрибут cellspacing (Элемент table)
(X)HTML
<table cellspacing=""> ... </table>
Описание
Атрибут / параметр (от англ. «cell spacing» ‒ «расстояние между ячейками») устанавливает величину отступа от границ ячеек до границ соседних элементов (других ячеек или границы таблицы).
Поддержка браузерами
Chrome
Поддерж.
Firefox
Поддерж.
Opera
Поддерж.
Maxthon
Поддерж.
IExplorer
Поддерж.
Safari
Поддерж.
iOS
Поддерж.
Android
Поддерж.
Спецификация
| Верс. | Раздел |
|---|---|
| HTML | |
| 2.0 | |
| 3. 2 | Tables |
4.01
11.3.3 Cell marginscellspacing = length …DTD:
5.0
4.9.1 The table element
5.1
4.9.1. The table element
XHTML1.0
Extensible HyperText Markup LanguageDTD:
1.1
Extensible HyperText Markup Language
Значения
В качестве значения указывается длина отступа. Допустимы следующие значения длины:
- <число>
- Если в качестве значения указывается только число, то длина отступа рассчитывается в пикселях.
- <процент>%
- Если в качестве значения указывается число с «» ЗНАКОМ ПРОЦЕНТА , то длина отступа рассчитывается в процентах на основе доступного вертикального и горизонтального пространства.
Пример использования
Листинг кода
<!DOCTYPE html PUBLIC «-//W3C//DTD XHTML 1.1//EN» «http://www.w3.org/TR/xhtml11/DTD/xhtml11.dtd»><html xmlns=»http://www.w3.org/1999/xhtml»><head><meta http-equiv=»Content-Type» content=»text/html; charset=utf-8″ /><title>Параметр cellspacing (Элемент table)</title></head><body><h2>Пример использования атрибута «cellspacing»</h2><h3>Таблица умножения на 3</h3><table border=»1″ cellspacing=»5″><tbody><tr> <td>1</td> <td>*3</td> <td>=</td> <td>3</td> </tr>

Параметр cellspacing (Элемент table)
Атрибуты cellpadding и cellspacing на CSS
Программирование на Python для начинающих
Бесплатный курс по Python даст Вам всю необходимую базу для начала программирования на языке Python.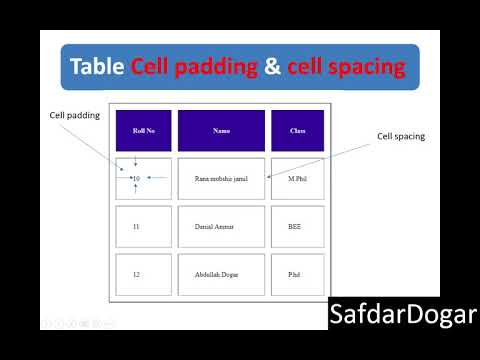
Чтобы получить Видеокурс,заполните форму
| E-mail: | |
| Имя: | |
Другие курсы
После семинара:
— Вы получите бесплатный подарок с подробным описанием каждого шага.
Записаться
Другие курсы
Когда, совершив ошибку, не исправил её, это и называется совершить ошибку.
Конфуций
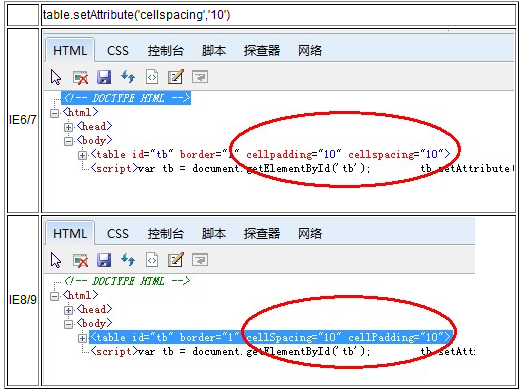
Те, кто беспокоится о валидности своей вёрстки по HTML5, столкнулись с той проблемой, что в HTML5 убрали атрибуты cellpadding и cellspacing. Безусловно, имеется вариант указать cellpadding и cellspacing через CSS, о чём я сейчас и напишу.
Начнём с атрибута cellpadding, отвечающего за поля внутри ячеек.
Как видите, всё достаточно очевидно. А теперь перейдём к атрибуту cellspacing.
Этот атрибут отвечает за границы между ячейками. Здесь несколько сложнее и свойства зависят от того, что Вы хотите сделать: обнулить границы или поставить иные значения. Если обнулить, то это делается так:
Данный код обнулит cellspacing, как правило, это и требуется. А если же нужно не обнулить, а изменить значения, то можно использовать border-spacing:
Это отступы ячеек друг от друга сверху, справа, снизу и слева. То есть числа идут по часовой стрелке, аналогично, как и в свойствах
padding
Вот так легко можно задавать атрибуты cellpadding и cellspacing на CSS.
- Создано 17.04.2013 12:32:46
- Михаил Русаков
Предыдущая статьяСледующая статья
Копирование материалов разрешается только с указанием автора (Михаил Русаков) и индексируемой прямой ссылкой на сайт (http://myrusakov.ru)!
Добавляйтесь ко мне в друзья : http://vk.com/myrusakov.
Если Вы не хотите пропустить новые материалы на сайте,то Вы можете подписаться на обновления: Подписаться на обновления
Если у Вас остались какие-либо вопросы, либо у Вас есть желание высказаться по поводу этой статьи, то Вы можете оставить свой комментарий внизу страницы.
Порекомендуйте эту статью друзьям:
Если Вам понравился сайт, то разместите ссылку на него (у себя на сайте, на форуме, в контакте):
- Кнопка: <a href=»https://myrusakov.ru» target=»_blank»><img src=»https://myrusakov.
ru/images/button.gif» alt=»Как создать свой сайт» /></a>Она выглядит вот так:
- Текстовая ссылка:<a href=»https://myrusakov.ru» target=»_blank»>Как создать свой сайт</a>
Она выглядит вот так: Как создать свой сайт
- BB-код ссылки для форумов (например, можете поставить её в подписи): [URL=»https://myrusakov.ru»]Как создать свой сайт
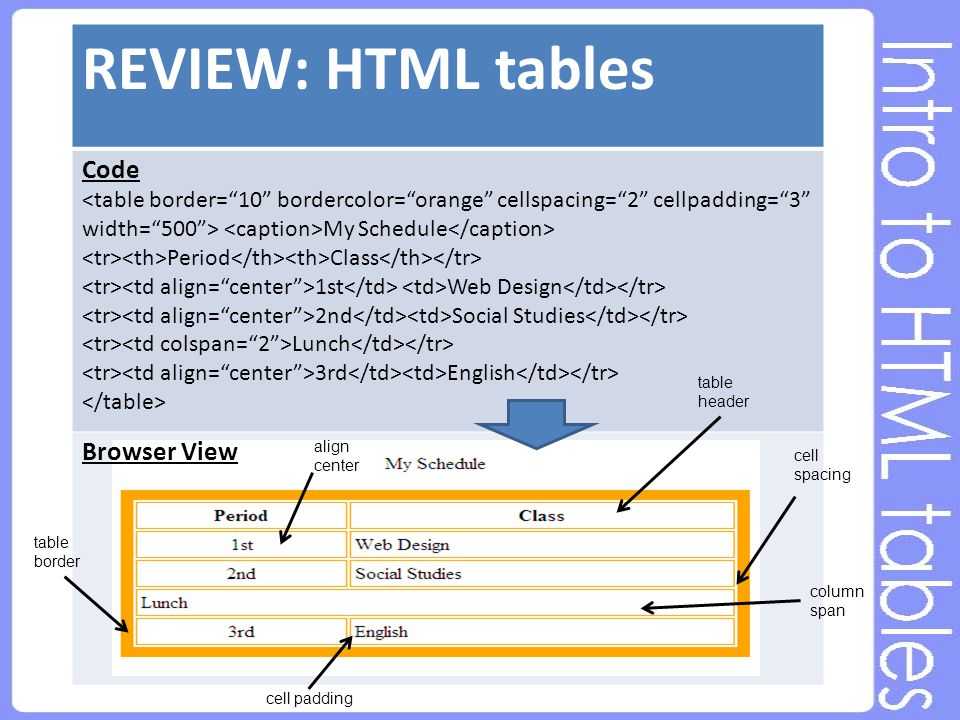
Cellpadding and Cellspacing Attributes
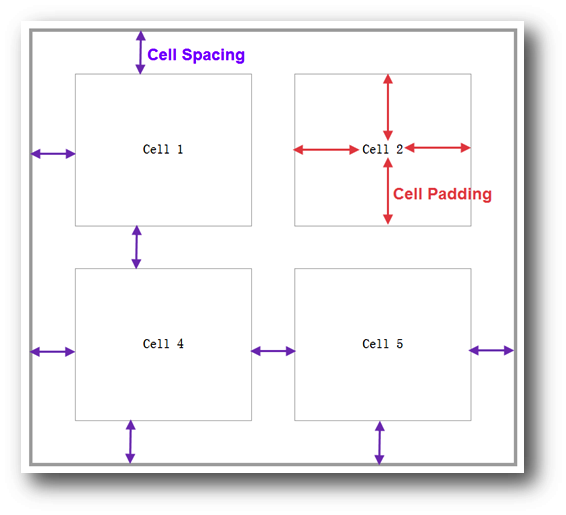
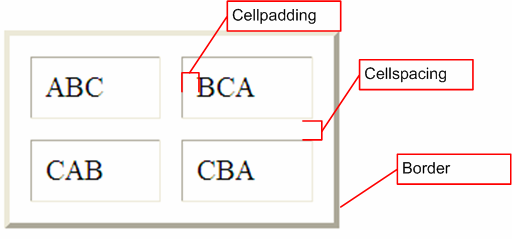
There are two attributes called cellpadding and cellspacing which you will use to adjust the white space in your table cells. The cellspacing attribute defines space between table cells, while cellpadding represents the distance between cell borders and the content within a cell.
Example
<!DOCTYPE html>
<html>

   <head>
      <title>HTML Table Cellpadding</title>
   </head>

   <body>
      <table border = "1" cellpadding = "5" cellspacing = "5">
         <tr>
            <th>Name</th>
            <th>Salary</th>
         </tr>
         <tr>
            <td>Ramesh Raman</td>
            <td>5000</td>
         </tr>
         <tr>
            <td>Shabbir Hussein</td>
            <td>7000</td>
         </tr>
      </table>
   </body>

</html>
This will produce the following result −
Nested Tables
You can use one table inside another table. Not only tables you can use almost all the tags inside table data tag <td>.
Example
Following is the example of using another table and other tags inside a table cell.
<!DOCTYPE html>


<html>


<head>


<title>HTML Table</title>


</head>


<body>


<tableborder="1"width="100%">


<tr>


<td>


<tableborder="1"width="100%">


<tr>


<th>Name</th>


<th>Salary</th>


</tr>


<tr>


<td>Ramesh Raman</td>


<td>5000</td>


</tr>


<tr>


<td>Shabbir Hussein</td>


<td>7000</td>


</tr>


</table>


</td>


</tr>


</table>


</body>


</html>
This will produce the following result −
Отступы и отступы таблицы HTML
❮ Назад
Далее ❯
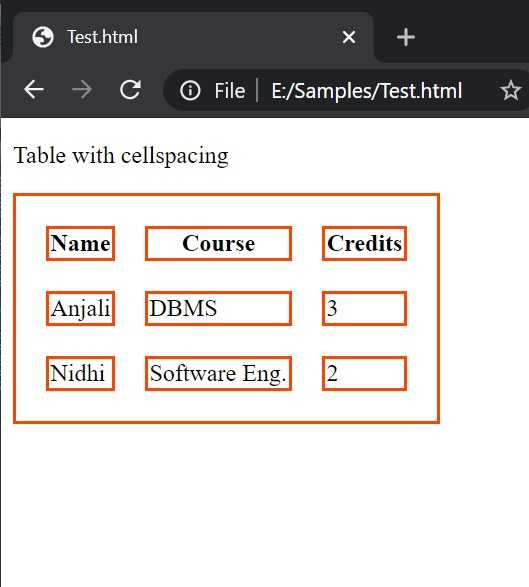
В таблицах HTML можно настроить отступы внутри ячеек, а также расстояние между ячейками.
| привет | привет | привет |
привет
привет
привет
привет
привет
привет
| привет | привет | привет |
| привет | привет | привет |
| привет | привет | привет |
Таблица HTML — заполнение ячеек
Заполнение ячеек — это пространство между краями ячеек и содержимым ячейки.
По умолчанию для отступов установлено значение 0.
Чтобы добавить отступы к ячейкам таблицы, используйте свойство CSS :
Пример
-й, тд
{ отступ: 15 пикселей; }
Попробуйте сами »
Чтобы добавить отступ только над содержимым, используйте свойство .
И остальные стороны с ,
Пример
th, td
{ padding-top: 10px; padding-bottom: 20 пикселей; padding-left: 30px; padding-right: 40px; }
Попробуйте сами »
Таблица HTML — интервал между ячейками
Интервал между ячейками — это расстояние между ячейками.
По умолчанию расстояние составляет 2 пикселя.
Чтобы изменить расстояние между ячейками таблицы, используйте CSS в таблице элемент:
Пример
таблица
{ border-spacing:
30 пикселей; }
Попробуйте сами »
❮ Предыдущая
Следующий ❯
NEW
Мы только что запустили Видео W3Schools
Узнать
Основные примеры
ФОРУМ |
О
W3Schools оптимизирован для обучения и обучения. Примеры могут быть упрощены для улучшения чтения и обучения.
Учебники, ссылки и примеры постоянно пересматриваются, чтобы избежать ошибок, но мы не можем гарантировать полную правильность всего содержания.

Copyright 1999-2022 Refsnes Data. Все права защищены. W3Schools работает на основе W3.CSS.
Table Header, Body, and Footer
Tables can be divided into three portions − a header, a body, and a foot. The head and foot are rather similar to headers and footers in a word-processed document that remain the same for every page, while the body is the main content holder of the table.
The three elements for separating the head, body, and foot of a table are −
-
<thead> − to create a separate table header.
-
<tbody> − to indicate the main body of the table.
-
<tfoot> − to create a separate table footer.
A table may contain several <tbody> elements to indicate different pages or groups of data. But it is notable that <thead> and <tfoot> tags should appear before <tbody>
Example
<!DOCTYPE html>


<html>


<head>


<title>HTML Table</title>


</head>


<body>


<tableborder="1"width="100%">


<thead>


<tr>


<tdcolspan="4">This is the head of the table</td>


</tr>


</thead>


<tfoot>


<tr>


<tdcolspan="4">This is the foot of the table</td>


</tr>


</tfoot>


<tbody>


<tr>


<td>Cell 1</td>


<td>Cell 2</td>


<td>Cell 3</td>


<td>Cell 4</td>


</tr>


</tbody>


</table>


</body>


</html>
This will produce the following result −
Nested Tables
You can use one table inside another table. Not only tables you can use almost all the tags inside table data tag <td>.
Example
Following is the example of using another table and other tags inside a table cell.
<!DOCTYPE html>
<html>

   <head>
      <title>HTML Table</title>
   </head>

   <body>
      <table border = "1" width = "100%">

         <tr>
            <td>
               <table border = "1" width = "100%">
                  <tr>
                     <th>Name</th>
                     <th>Salary</th>
                  </tr>
                  <tr>
                     <td>Ramesh Raman</td>
                     <td>5000</td>
                  </tr>
                  <tr>
                     <td>Shabbir Hussein</td>
                     <td>7000</td>
                  </tr>
               </table>
            </td>
         </tr>

      </table>
   </body>

</html>
This will produce the following result −
More Examples
How to add collapsed borders to a table (with CSS):
<html><head><style>table, th, td { border: 1px solid
black; border-collapse: collapse;}</style></head><body><table> <tr>
<th>Month</th> <th>Savings</th> </tr>
<tr> <td>January</td>
<td>$100</td> </tr> <tr>
<td>February</td> <td>$80</td> </tr>
</table></body></html>
How to right-align a table (with CSS):
<table style=»float:right»> <tr>
<th>Month</th> <th>Savings</th> </tr>
<tr> <td>January</td>
<td>$100</td> </tr> <tr>
<td>February</td> <td>$80</td> </tr>
</table>
How to center-align a table (with CSS):
<html><head><style>table, th, td { border: 1px solid
black;}table.center { margin-left: auto;
margin-right: auto;}</style></head><body><table
class=»center»> <tr>
<th>Month</th> <th>Savings</th> </tr>
<tr> <td>January</td>
<td>$100</td> </tr> <tr>
<td>February</td> <td>$80</td> </tr>
</table>
How to add background-color to a table (with CSS):
<table style=»background-color:#00FF00″> <tr>
<th>Month</th> <th>Savings</th> </tr>
<tr> <td>January</td>
<td>$100</td> </tr> <tr>
<td>February</td> <td>$80</td> </tr>
</table>
How to add padding to a table (with CSS):
<html><head><style>table, th, td { border: 1px solid
black;}th, td { padding: 10px;}</style></head><body><table> <tr>
<th>Month</th> <th>Savings</th> </tr>
<tr> <td>January</td>
<td>$100</td> </tr> <tr>
<td>February</td> <td>$80</td> </tr>
</table></body></html>
How to set table width (with CSS):
<table style=»width:400px»> <tr>
<th>Month</th> <th>Savings</th> </tr>
<tr> <td>January</td>
<td>$100</td> </tr> <tr>
<td>February</td> <td>$80</td> </tr>
</table>
How to create table headers:
How to create a table with a caption:
<table>
<caption>Monthly savings</caption> <tr>
<th>Month</th> <th>Savings</th> </tr>
<tr> <td>January</td>
<td>$100</td> </tr> <tr>
<td>February</td> <td>$80</td> </tr>
</table>