
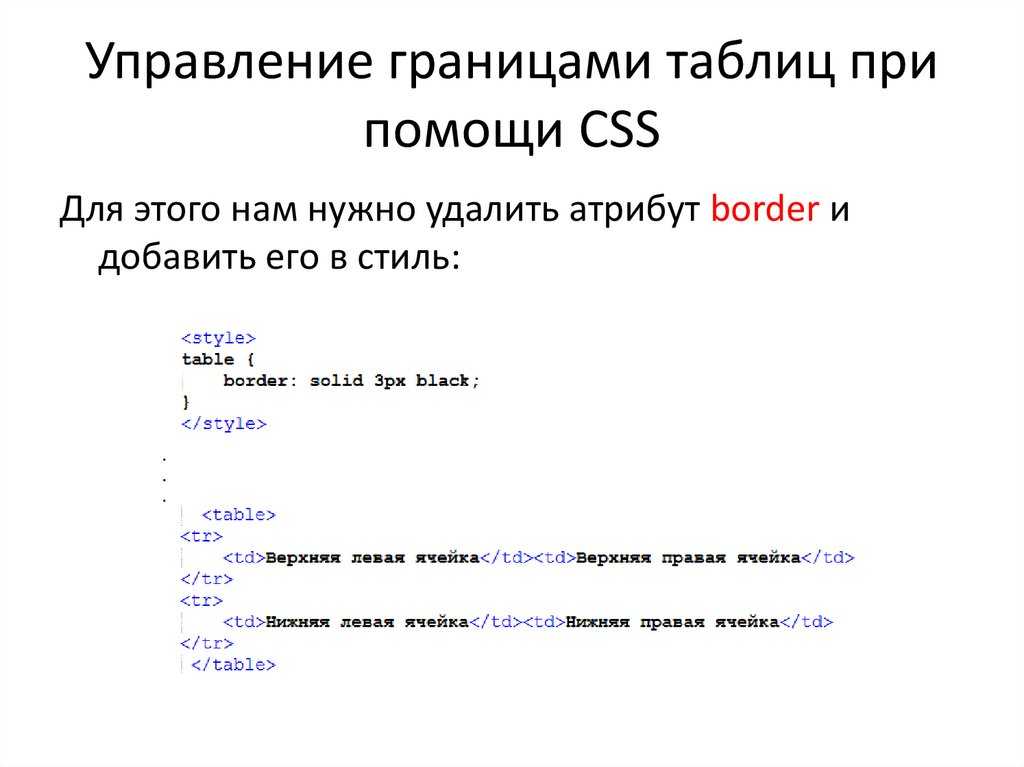
CSS border-spacing property
The border-spacing CSS property sets the distance between the borders of neighbouring table cells. This property applies only when the border-collapse is separate. This property will be ignored if the collapsing border model is used.
The border-spacing property applies to an HTML property that is performed using the separated borders model. It determines the spacing between the cells, as the distinct borders of the cells of the table rendered by the separated borders model are not shared.
The border-spacing can be defined using one or two length values. If two values are given, the first sets the horizontal spacing, and the second set the vertical spacing. If only one value is given, it sets both the horizontal and vertical spacing to the specified value. Negative values are not allowed.
| Initial Value | |
| Applies to | The table and inline table elements. |
| Inherited | No |
| Animatable | Yes. The spacing amount is animatable. |
| Version | CSS2 |
| DOM Syntax | object.style.borderSpacing = «10px»; |
Управление макетом таблицы
Таблица расширяется и сжимается для размещения данных, содержащихся в ней. Это поведение работает по умолчанию. По мере заполнения данных внутри таблицы они продолжают расширяться, пока есть место. Однако иногда необходимо установить фиксированную ширину таблицы или столбца, чтобы управлять макетом.
Вы можете сделать это с помощью CSS-свойства . Это свойство определяет алгоритм, который будет использоваться для размещения ячеек таблицы, строк и столбцов. Это свойство принимает одно из двух значений:
- auto — использует алгоритм автоматической раскладки таблицы. С помощью этого алгоритма ширина таблицы и ее ячеек настраиваются в соответствии с содержимым. Это значение установлено по умолчанию.
- fixed — Использует алгоритм фиксированной таблицы. При использовании этого алгоритма горизонтальное расположение таблицы не зависит от содержимого ячеек; это зависит только от ширины столбцов, границ и расстояния между ячейками. В плане производительности это работает быстрее
Правила в следующем примере указывают, что таблица HTML создана с использованием алгоритма фиксированной разметки и имеет фиксированную ширину 300 пикселей.
Вы можете оптимизировать производительность рендеринга таблицы, указав значение для свойства . Фиксированное значение этого свойства заставляет таблицу отображаться по одной строке за раз, предоставляя пользователям информацию быстрее, в то время как при установленном значении пользователь будет дожидаться загрузки всей таблицы, прежде чем браузер сможет посчитать размеры ячеек.
Width and Height of Table Cell
To set the width or height of an HTML table cell, we can use HTML width or height attributes. However, changing the width of a cell will also change the width of other cells in a column or row.
Let’s just say we want to change the width of the second cell of the table that exists in the second row. Then, you have to use inline CSS code to set the width property for the specific cell.
<table>
    <tr>
        <th>Heading 1<th>
        <th>Heading 2<th>
        <th>Heading 3<th>
    <tr>
    <tr>
        <td>Cell 1<td>
        <td style="width: 60%;">Cell 2<td>
        <td>Cell 3<td>
    <tr>
    <tr>
        <td>Cell 4<td>
        <td>Cell 5<td>
        <td>Cell 6<td>
    <tr>
    <tr>
        <td>Cell 7<td>
        <td>Cell 8<td>
        <td>Cell 9<td>
    <tr>
<table>
Now, the output is shown below in the image.

The other cells in the second column also have the same width.
Now, the height. The height also works in the same way, the whole row’s height will change. But this is extremely helpful in some cases like you want to show a paragraph in your table and you want to set the specific width or height for that row or column.
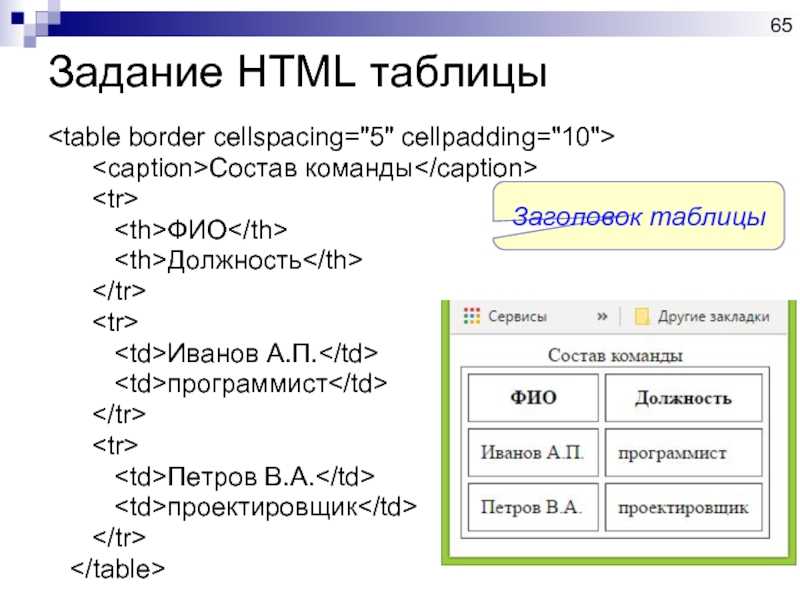
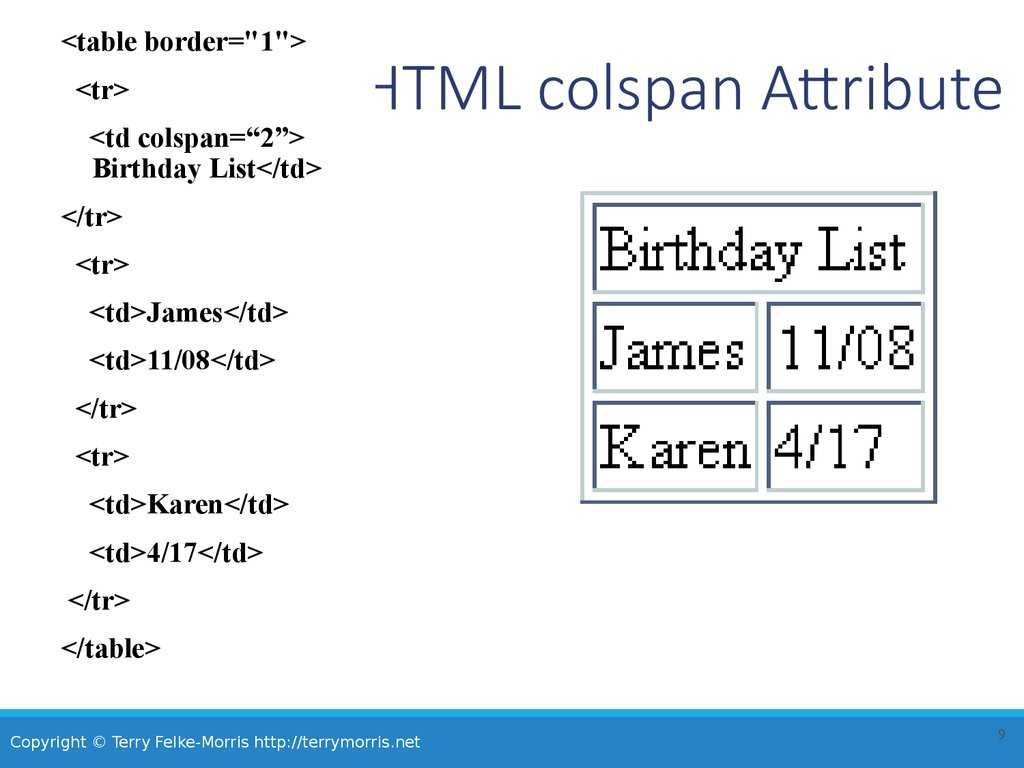
Merge or Span Table Cells over Multiple Rows or Columns
Like Excel or Google Sheets, sometimes we want to merge or span an HTML table cell over rows or columns. In HTML, we have colspan and rowspan attributes to do this job. To understand it better, I used another HTML table example that will look like this after making changes.
The above table shows students and their favorite subjects. Each student has 3 favorite subjects and every table cell that contains student’s name is span over three rows. How I did that, let’s see the code first and then understand.
<table>
    <tr>
        <th>Name<th>
        <th>Favourite Subjects<th>
    <tr>
    <!-- Student 1 -->
    <tr>
        <td rowspan="3">Sara<td>
        <td>History<td>
    <tr>
    <tr>
        <td>Zoology<td>
    <tr>
    <tr>
        <td>Math<td>
    <tr>
    <!-- Student 2 -->
    <tr>
        <td rowspan="3">Zeeshan<td>
        <td>Psychology<td>
    <tr>
    <tr>
        <td>Science<td>
    <tr>
    <tr>
        <td>Programming<td>
    <tr>
<table>
In the above HTML table code, the table structure is the same, just I used rowspan attribute for that cell which I want to span and give the number of rows.
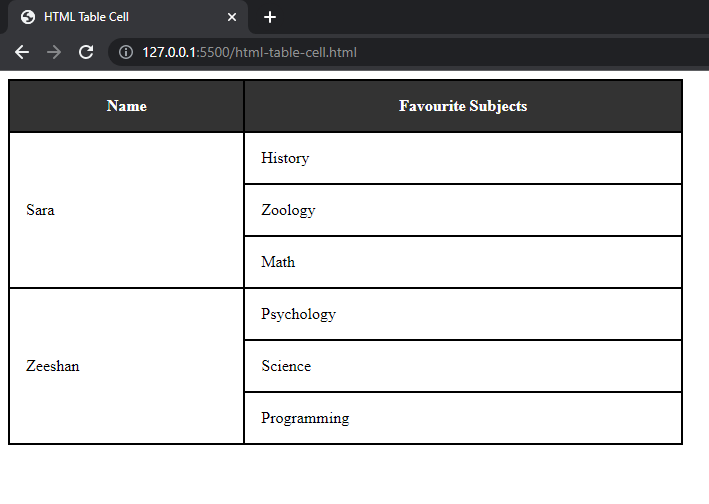
If you want to span a cell over multiple columns then the process is the same. Just use the colspan attribute for the cell that you want to span as in the code below.
<table width="50%">
    <tr>
        <th>Name<th>
        <th colspan="3">Favourite Subjects<th>
    <tr>
    <!-- Student 1 -->
    <tr>
        <td>Sara<td>
        <td>History<td>
        <td>Zoology<td>
        <td>Math<td>
    <tr>
    <!-- Student 2 -->
    <tr>
        <td>Zeeshan<td>
        <td>Psychology<td>
        <td>Science<td>
        <td>Programming<td>
    <tr>
<table>
The output is shown below that shows changes to the same table in which you can see a table cell span over multiple columns.
That’s it. This is all about HTML table cells and their formatting.
As this tutorial was focused on the cells of HTML tables. If you want to learn more, then see this tutorial about HTML Tables with Code Examples.
If you have questions regarding this tutorial then feel free to ask in the comment section below.
And don’t forget to help others by sharing this tutorial!
CSS Справочники
CSS СправочникCSS ПоддержкаCSS СелекторыCSS ФункцииCSS ЗвукCSS Веб шрифтыCSS АнимацииCSS ДлиныCSS Конвертер px-emCSS Названия цветаCSS Значения цветаCSS по умолчаниюCSS Символы
CSS Свойства
align-content
align-items
align-self
all
animation
animation-delay
animation-direction
animation-duration
animation-fill-mode
animation-iteration-count
animation-name
animation-play-state
animation-timing-function
backface-visibility
background
background-attachment
background-blend-mode
background-clip
background-color
background-image
background-origin
background-position
background-repeat
background-size
border
border-bottom
border-bottom-color
border-bottom-left-radius
border-bottom-right-radius
border-bottom-style
border-bottom-width
border-collapse
border-color
border-image
border-image-outset
border-image-repeat
border-image-slice
border-image-source
border-image-width
border-left
border-left-color
border-left-style
border-left-width
border-radius
border-right
border-right-color
border-right-style
border-right-width
border-spacing
border-style
border-top
border-top-color
border-top-left-radius
border-top-right-radius
border-top-style
border-top-width
border-width
bottom
box-decoration-break
box-shadow
box-sizing
caption-side
caret-color
@charset
clear
clip
color
column-count
column-fill
column-gap
column-rule
column-rule-color
column-rule-style
column-rule-width
column-span
column-width
columns
content
counter-increment
counter-reset
cursor
direction
display
empty-cells
filter
flex
flex-basis
flex-direction
flex-flow
flex-grow
flex-shrink
flex-wrap
float
font
@font-face
font-family
font-kerning
font-size
font-size-adjust
font-stretch
font-style
font-variant
font-weight
grid
grid-area
grid-auto-columns
grid-auto-flow
grid-auto-rows
grid-column
grid-column-end
grid-column-gap
grid-column-start
grid-gap
grid-row
grid-row-end
grid-row-gap
grid-row-start
grid-template
grid-template-areas
grid-template-columns
grid-template-rows
hanging-punctuation
height
hyphens
@import
isolation
justify-content
@keyframes
left
letter-spacing
line-height
list-style
list-style-image
list-style-position
list-style-type
margin
margin-bottom
margin-left
margin-right
margin-top
max-height
max-width
@media
min-height
min-width
mix-blend-mode
object-fit
object-position
opacity
order
outline
outline-color
outline-offset
outline-style
outline-width
overflow
overflow-x
overflow-y
padding
padding-bottom
padding-left
padding-right
padding-top
page-break-after
page-break-before
page-break-inside
perspective
perspective-origin
pointer-events
position
quotes
resize
right
tab-size
table-layout
text-align
text-align-last
text-decoration
text-decoration-color
text-decoration-line
text-decoration-style
text-indent
text-justify
text-overflow
text-shadow
text-transform
top
transform
transform-origin
transform-style
transition
transition-delay
transition-duration
transition-property
transition-timing-function
unicode-bidi
user-select
vertical-align
visibility
white-space
width
word-break
word-spacing
word-wrap
writing-mode
z-index
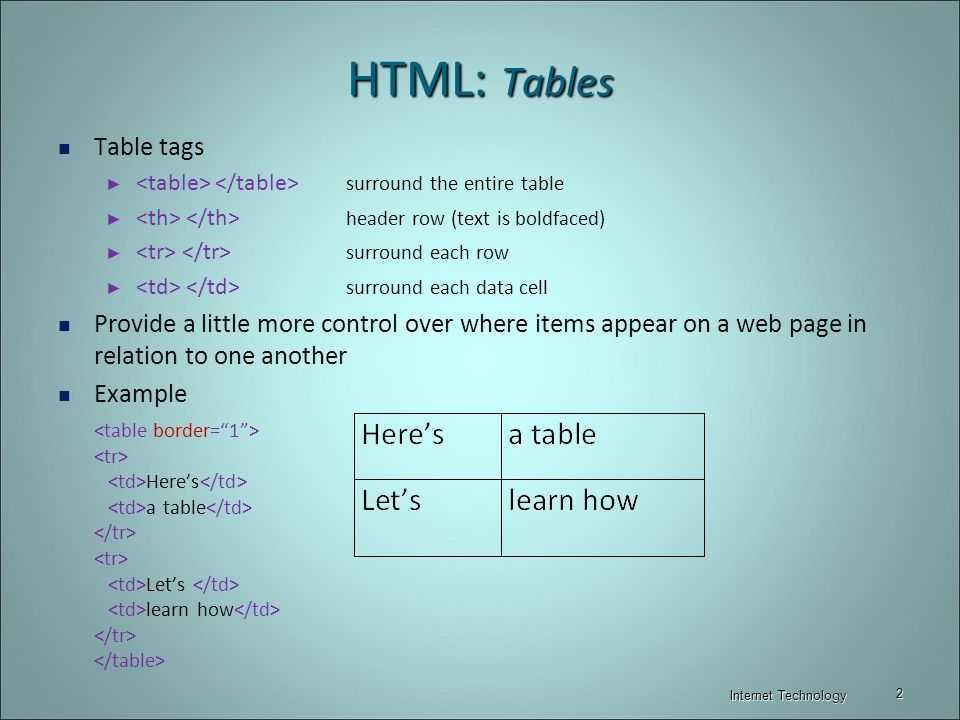
How to Add a Cell in HTML Table
We use the pair of <td> tags to define a new cell in the HTML table. The <td> tag stands for table data and this tag creates normal cells in HTML tables.
Syntax to create a cell in the HTML table:
<td> This is a Table Cell <td>
Each <td> tag encloses in a pair of <tr> tags. The <tr> tag stands for table row which is used to create rows.
<tr>
   <td> Cell 1 <td>
   <td> Cell 2 <td>
   <td> Cell 3 <td>
<tr>
You can add any number of cells in a table row. In the above code, I added three cells in a row.
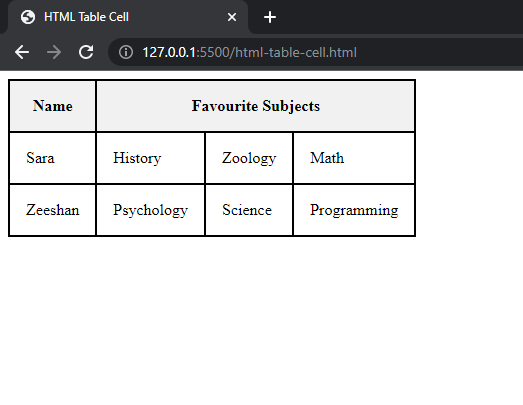
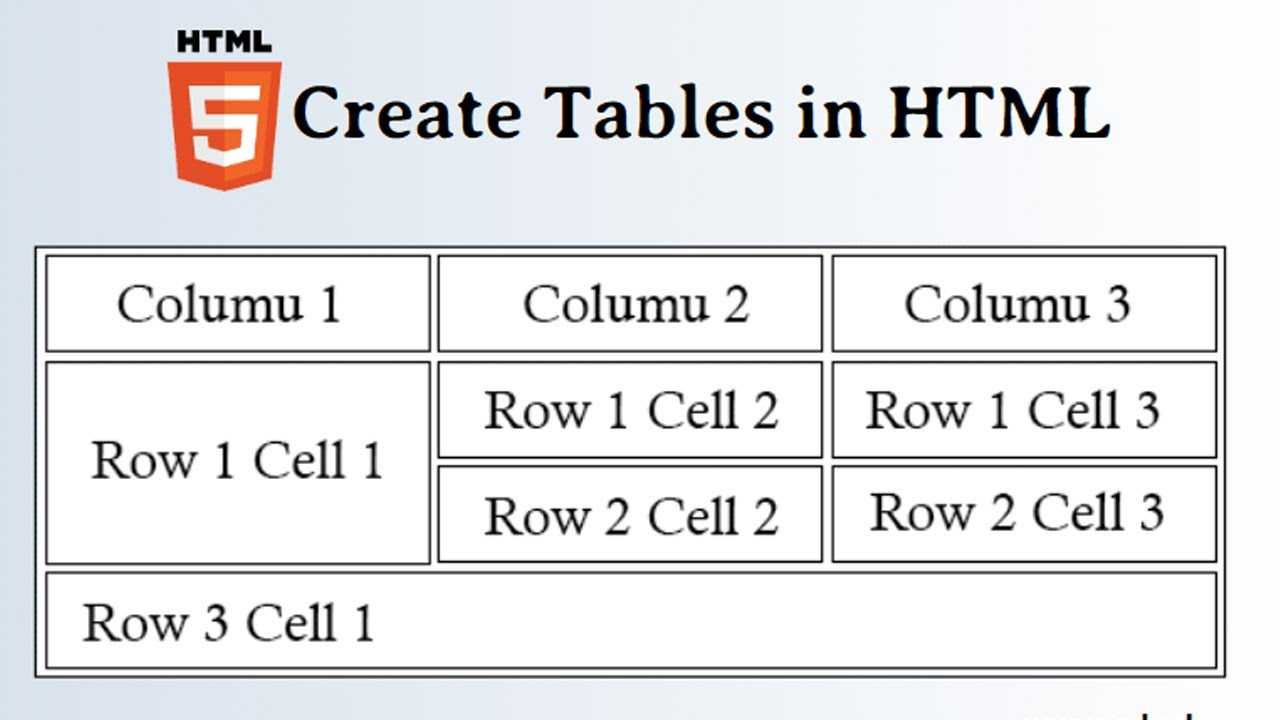
Here below is the basic structure of the HTML table. This HTML code will create a table with 3 rows, 3 columns, and 9 table cells.
<table>
    <tr>
        <td>Cell 1<td>
        <td>Cell 2<td>
        <td>Cell 3<td>
    <tr>
    <tr>
        <td>Cell 4<td>
        <td>Cell 5<td>
        <td>Cell 6<td>
    <tr>
    <tr>
        <td>Cell 7<td>
        <td>Cell 8<td>
        <td>Cell 9<td>
    <tr>
<table>
Code Explanation:
- The pair of <table> tags are crucial no matter what. It tells the browser that it’s the markup for an HTML table. And the content of the HTML table goes inside these tags.
- The pair of <tr> tags define a row and <td> tags define the cells for a table row.
- Each cell appears next to each other in a row. And when we add multiple cells in multiple rows in a table, then all cells create a structure of rows and columns.
Code Output:
The above code output shows table cells that are very simple with no formatting like borders, or padding. Even it doesn’t have the look of a table because we just use HTML code. We have to use CSS styles to make it look better. But don’t worry, we’re also going to see that in this tutorial.

We have different ways to format an HTML table cell like changing cell spacing, padding, border, background color, width, height, merging cells, and more. Let’s explore them one by one with code examples.
Note: We’ll make changes to the same HTML table code given above.
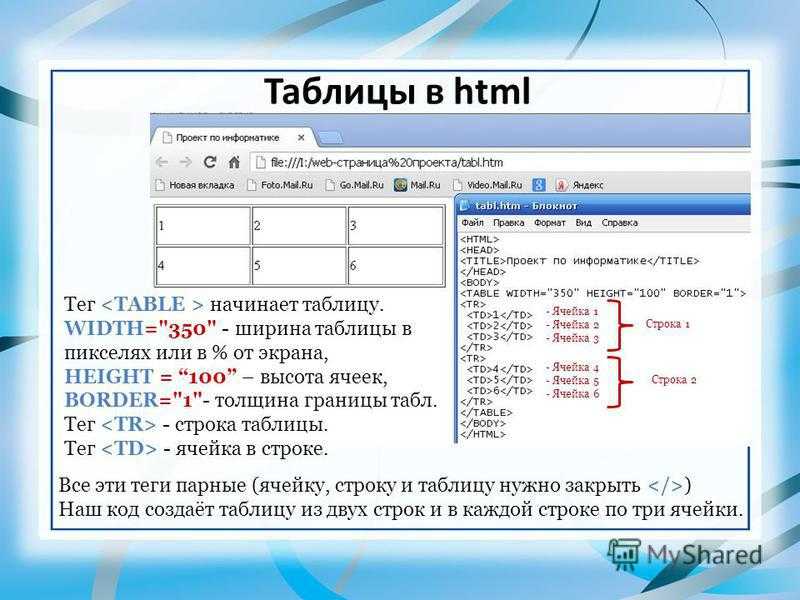
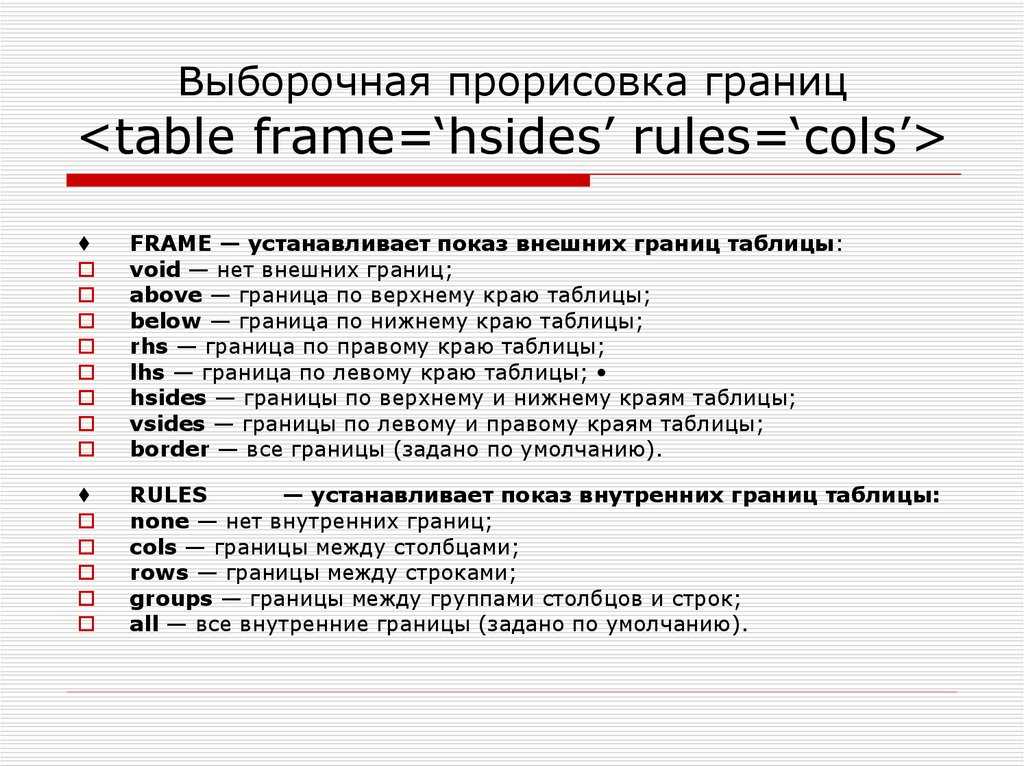
Теги группирования элементов таблиц
Для группирования элементов таблиц служат теги <thead>, <tbody> и <tfoot>.
Так же, как веб-страница может содержать «шапку», «тело» и «подвал», таблица может содержать головную, основную и нижнюю части. Для логического группирования строк в верхней части таблицы (то есть для соз
дания верхней шапки таблицы) используется тег <thead>. Заголовки таблицы
должны быть помещены в элемент <thead>, например:
Основное содержимое (тело) таблицы должно находиться внутри элемента <tbody> (таких блоков в таблице может быть несколько). Для логического группирования строк в нижней части таблицы (то есть для создания «подвала» таблицы) используется тег <tfoot> (в одной таблице допускается не более одного тега <tfoot>). В исходном коде тег <tfoot> ставится до тега <tbody>.
Кроме логического группирования одной из причин использования элементов <thead> и <tfoot> является то, что если ваша таблица слишком длинная для единовременного отображения на экране (или для печати), то браузер будет отображать и заголовок (<thead>) и последнюю строку (<tfoot>), когда пользователь станет прокручивать вашу таблицу.
Пример: Теги <thead>, <tbody> и <tfoot>
- Результат
- HTML-код
- Попробуй сам »
| Это шапка таблицы | |||
|---|---|---|---|
| Это подвал таблицы | |||
| Ячейка 1 | Ячейка 2 | Ячейка 3 | Ячейка 4 |
Несмотря на то, что мы перед <tbody> добавили <tfoot>, он, тем не менее, появляется в конце таблицы.
Это исходит из того, что <tbody> может содержать много строк. Но браузеру нужно отобразить нижнюю часть таблицы до получения всех (потенциально многочисленных) строк данных. Вот почему <tfoot> в коде прописывается перед элементом <tbody>.
Cellspacing with border-spacing CSS
Since cellpadding and cellspacing attribute on HTML has been deprecated on HTML5. We need another alternative for padding and spacing of cells.
So, In this section we will be using border-spacing to CSS property which allows of cellspacing on table.
Okay, Lets add the following HTML. It is exactly same to the HTML code of above sections just without any attributes in tag.
Now lets add border-spacing property on our CSS.
In the above CSS, I’ve set border-spacing to 25px which sets the cellspacing to 25px. So, with this property the result design should be same to that of section 1.
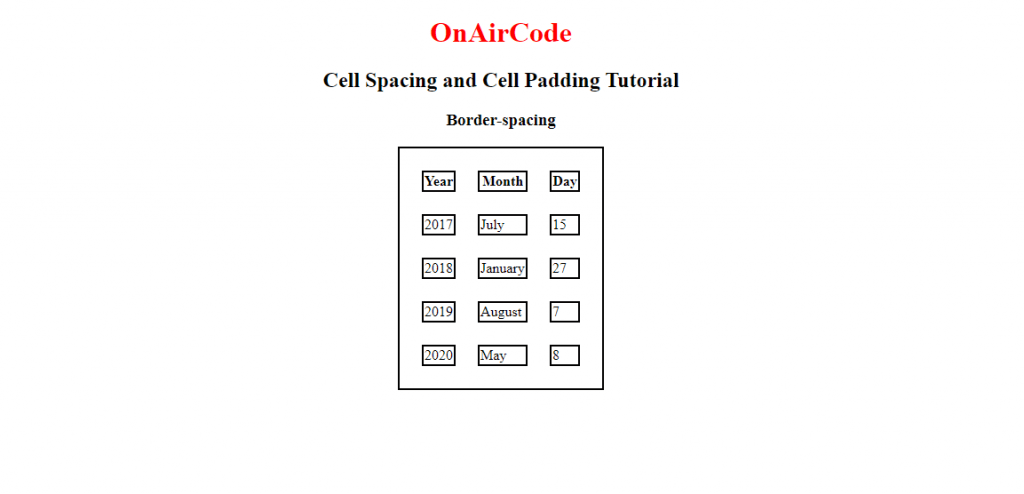 table spacing with border-spacing
Border-spacing
Okay, Since the special feature of this section is . Lets look into this property with more details. First of all, property is only applicable to tables or inline-tables unlike CSS ,which ,though, we will use it as a cell padding in following section, can be applied to any elements.
Also requires that property be set to which is its default value. This means that if you change border-collapse property setting it to other than then property won’t work.
In our CSS, we haven’t used property coz it’s default property is already .
Now lets look into values of the property. It can have three different types of values.
- Length Length
- initial
- inherit
Length Length: allows us to set values in px, cm etc with first length denoting the space between horizontally adjacent cells and second length denoting the space between vertically adjacent cells.
However In tutorial we have only used one length as: this sets the distance to between all adjacent cells be it vertical or horizontal.
Note: initial is used to set to default value and inherit is used to inherit value from its parent
CSS Properties
align-contentalign-itemsalign-selfallanimationanimation-delayanimation-directionanimation-durationanimation-fill-modeanimation-iteration-countanimation-nameanimation-play-stateanimation-timing-functionbackface-visibilitybackgroundbackground-attachmentbackground-blend-modebackground-clipbackground-colorbackground-imagebackground-originbackground-positionbackground-repeatbackground-sizeborderborder-bottomborder-bottom-colorborder-bottom-left-radiusborder-bottom-right-radiusborder-bottom-styleborder-bottom-widthborder-collapseborder-colorborder-imageborder-image-outsetborder-image-repeatborder-image-sliceborder-image-sourceborder-image-widthborder-leftborder-left-colorborder-left-styleborder-left-widthborder-radiusborder-rightborder-right-colorborder-right-styleborder-right-widthborder-spacingborder-styleborder-topborder-top-colorborder-top-left-radiusborder-top-right-radiusborder-top-styleborder-top-widthborder-widthbottombox-shadowbox-sizingcaption-sideclearclipcolorcolumn-countcolumn-fillcolumn-gapcolumn-rulecolumn-rule-colorcolumn-rule-stylecolumn-rule-widthcolumn-spancolumn-widthcolumnscontentcounter-incrementcounter-resetcursordirectiondisplayempty-cellsfilterflexflex-basisflex-directionflex-flowflex-growflex-shrinkflex-wrapfloatfont@font-facefont-familyfont-sizefont-size-adjustfont-stretchfont-stylefont-variantfont-weighthanging-punctuationheightjustify-content@keyframesleftletter-spacingline-heightlist-stylelist-style-imagelist-style-positionlist-style-typemarginmargin-bottommargin-leftmargin-rightmargin-topmax-heightmax-width@mediamin-heightmin-widthnav-downnav-indexnav-leftnav-rightnav-upopacityorderoutlineoutline-coloroutline-offsetoutline-styleoutline-widthoverflowoverflow-xoverflow-ypaddingpadding-bottompadding-leftpadding-rightpadding-toppage-break-afterpage-break-beforepage-break-insideperspectiveperspective-originpositionquotesresizerighttab-sizetable-layouttext-aligntext-align-lasttext-decorationtext-decoration-colortext-decoration-linetext-decoration-styletext-indenttext-justifytext-overflowtext-shadowtext-transformtoptransformtransform-origintransform-styletransitiontransition-delaytransition-durationtransition-propertytransition-timing-functionunicode-bidivertical-alignvisibilitywhite-spacewidthword-breakword-spacingword-wrapz-index
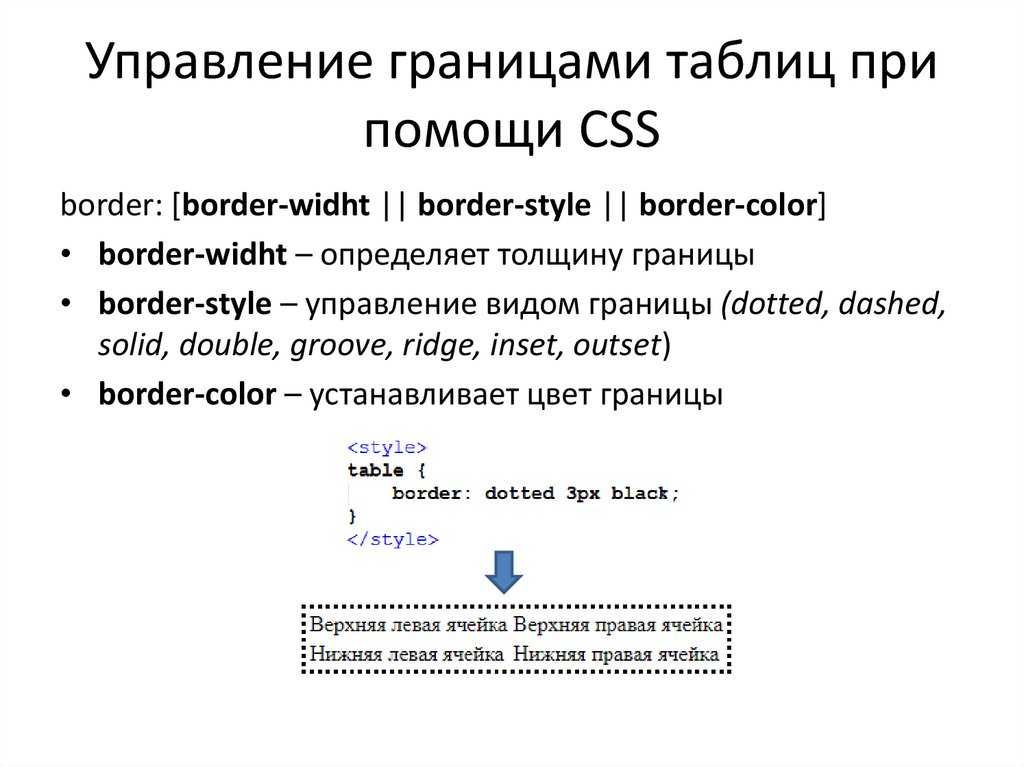
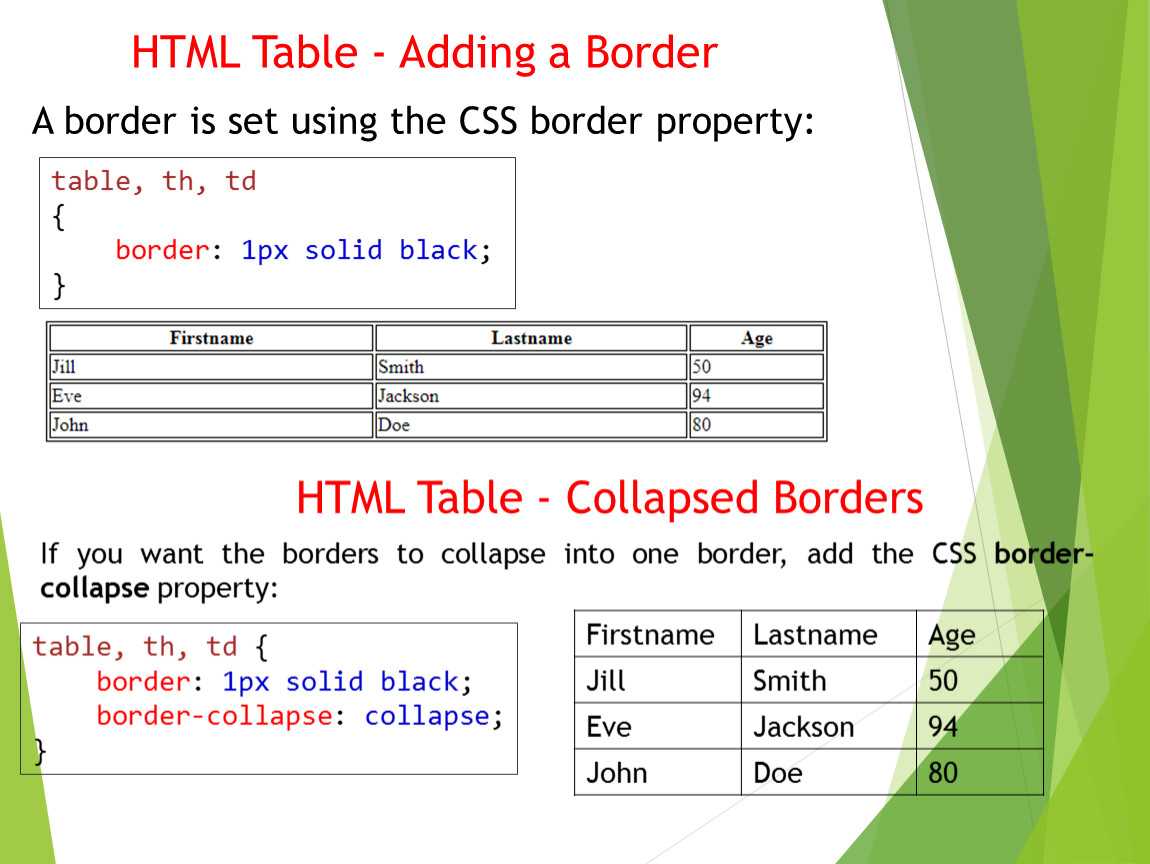
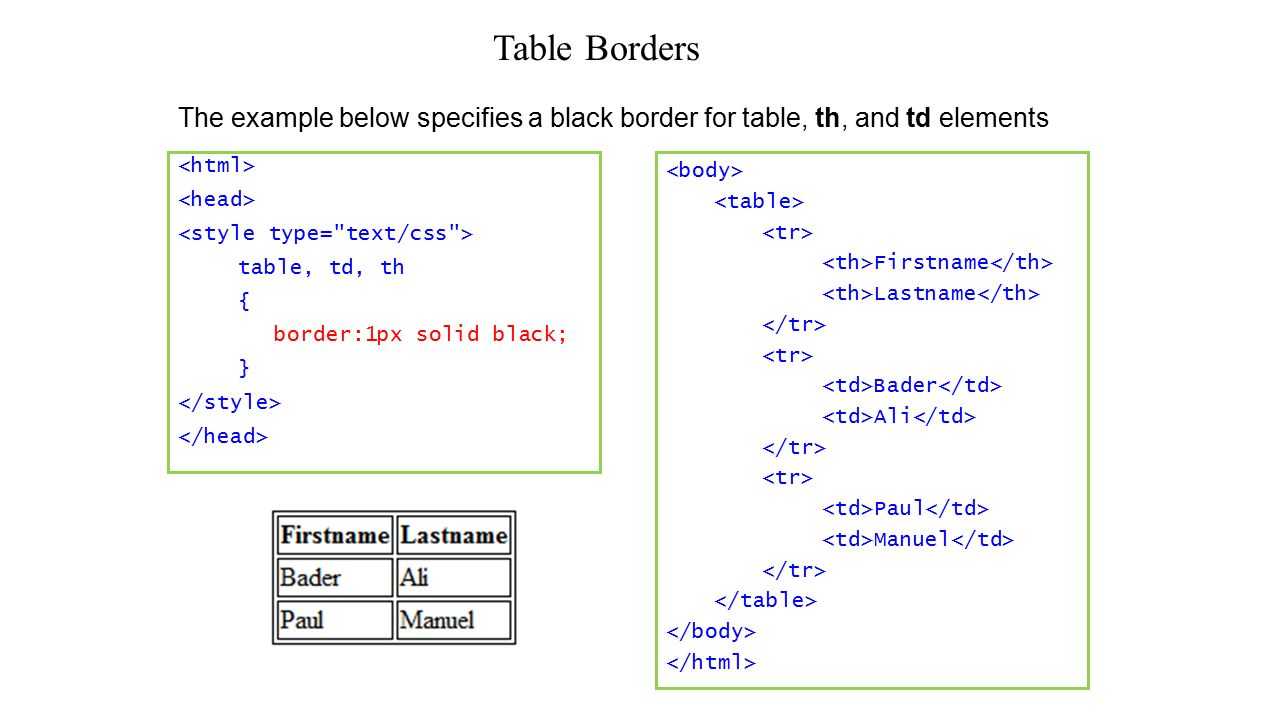
HTML Table Cell Border
We can use CSS shorthand border property to add borders around each cell of a table. The below CSS will add 2 pixels of the border with solid weight and black color to the table cells.
<style>

table, tr, td{
    border 2px solid black;
}

</style>
Code Output:
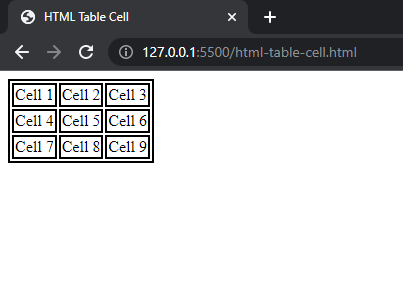
Here because we applied the CSS to <table>, <tr>, and <td> elements, the above output shows the border of the cell separated from the table border. To solve this issue, we are going to use border-collapse property as shown below.
<style>

table, tr, td{
    border 2px solid black;
    border-collapse collapse;
}

</style>
Code Output in Browser:
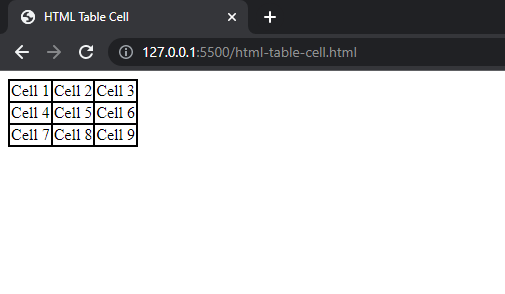
Another noticeable thing is cell spacing. The cells are too closed like the content of the cells is stuck. Let’s solve this problem by adding some space around the cell text.
How to apply css border-spacing to every other row?
Question:
I am constructing a CSS table utilizing
which must meet two specified criteria.
- The lower section of every row consists of personalized content that extends across the entire width of the table.
- Visible margin between rows
Despite my attempts to manipulate colspan and
border spacing
, I have not been successful in getting it to function.
One possible solution is to utilize border-spacing in combination with an extra table row. However, I am unable to selectively apply the border-spacing to alternate rows, and I am also unable to make my customized row span the entire width of the table.
Please refer to the non-functional example at this link: https://codepen.io/joshuaohana/pen/VwzWbZp.
I want to create the »
extra row
of information» in this codepen
«»».
- full width
- This ensures that it is linked to the row above it, eliminating any margin or red border in the background.
Is there a way to utilize colspan, border-spacing, or any other method to set this up?
Solution 1:
I am providing an additional response as I am unable to generate a fiddle or codepen. In this snippet, you can observe that the margin is visible behind the background, which I assume is what you are referring to. To address this, I introduced an extra div just above the table row, named row1 and row2 for each respective row and its extra-info. The crucial factor here is the display property »
table-row
-group«, which allows us to enclose the row data and
extra info
in a div, preventing the row width from getting distorted. Regarding the spacing between the header and the rows+extra-info, I believe the most effective approach is to utilize
below each div where you desire to create space.
Solution 2:
The spacing between the table data is automatically calculated when you specify the width of the table. To apply a border to columns, you need to use the
within
. Additionally, you can create a div with the class «main» to give it a
box-shadow
property. The rows already have a solid 1px black border.
Border-spacing — CSS: Cascading Style Sheets, The border-spacing property may be specified as either one or two values. When one <length> value is specified, it defines both the horizontal and vertical …
CSS Properties
align-contentalign-itemsalign-selfallanimationanimation-delayanimation-directionanimation-durationanimation-fill-modeanimation-iteration-countanimation-nameanimation-play-stateanimation-timing-functionbackface-visibilitybackgroundbackground-attachmentbackground-blend-modebackground-clipbackground-colorbackground-imagebackground-originbackground-positionbackground-repeatbackground-sizeborderborder-bottomborder-bottom-colorborder-bottom-left-radiusborder-bottom-right-radiusborder-bottom-styleborder-bottom-widthborder-collapseborder-colorborder-imageborder-image-outsetborder-image-repeatborder-image-sliceborder-image-sourceborder-image-widthborder-leftborder-left-colorborder-left-styleborder-left-widthborder-radiusborder-rightborder-right-colorborder-right-styleborder-right-widthborder-spacingborder-styleborder-topborder-top-colorborder-top-left-radiusborder-top-right-radiusborder-top-styleborder-top-widthborder-widthbottombox-decoration-breakbox-shadowbox-sizingcaption-sidecaret-color@charsetclearclipclip-pathcolorcolumn-countcolumn-fillcolumn-gapcolumn-rulecolumn-rule-colorcolumn-rule-stylecolumn-rule-widthcolumn-spancolumn-widthcolumnscontentcounter-incrementcounter-resetcursordirectiondisplayempty-cellsfilterflexflex-basisflex-directionflex-flowflex-growflex-shrinkflex-wrapfloatfont@font-facefont-familyfont-kerningfont-sizefont-size-adjustfont-stretchfont-stylefont-variantfont-weightgridgrid-areagrid-auto-columnsgrid-auto-flowgrid-auto-rowsgrid-columngrid-column-endgrid-column-gapgrid-column-startgrid-gapgrid-rowgrid-row-endgrid-row-gapgrid-row-startgrid-templategrid-template-areasgrid-template-columnsgrid-template-rowshanging-punctuationheighthyphens@importisolationjustify-content@keyframesleftletter-spacingline-heightlist-stylelist-style-imagelist-style-positionlist-style-typemarginmargin-bottommargin-leftmargin-rightmargin-topmax-heightmax-width@mediamin-heightmin-widthmix-blend-modeobject-fitobject-positionopacityorderoutlineoutline-coloroutline-offsetoutline-styleoutline-widthoverflowoverflow-xoverflow-ypaddingpadding-bottompadding-leftpadding-rightpadding-toppage-break-afterpage-break-beforepage-break-insideperspectiveperspective-originpointer-eventspositionquotesresizerightscroll-behaviortab-sizetable-layouttext-aligntext-align-lasttext-decorationtext-decoration-colortext-decoration-linetext-decoration-styletext-indenttext-justifytext-overflowtext-shadowtext-transformtoptransformtransform-origintransform-styletransitiontransition-delaytransition-durationtransition-propertytransition-timing-functionunicode-bidiuser-selectvertical-alignvisibilitywhite-spacewidthword-breakword-spacingword-wrapwriting-modez-index
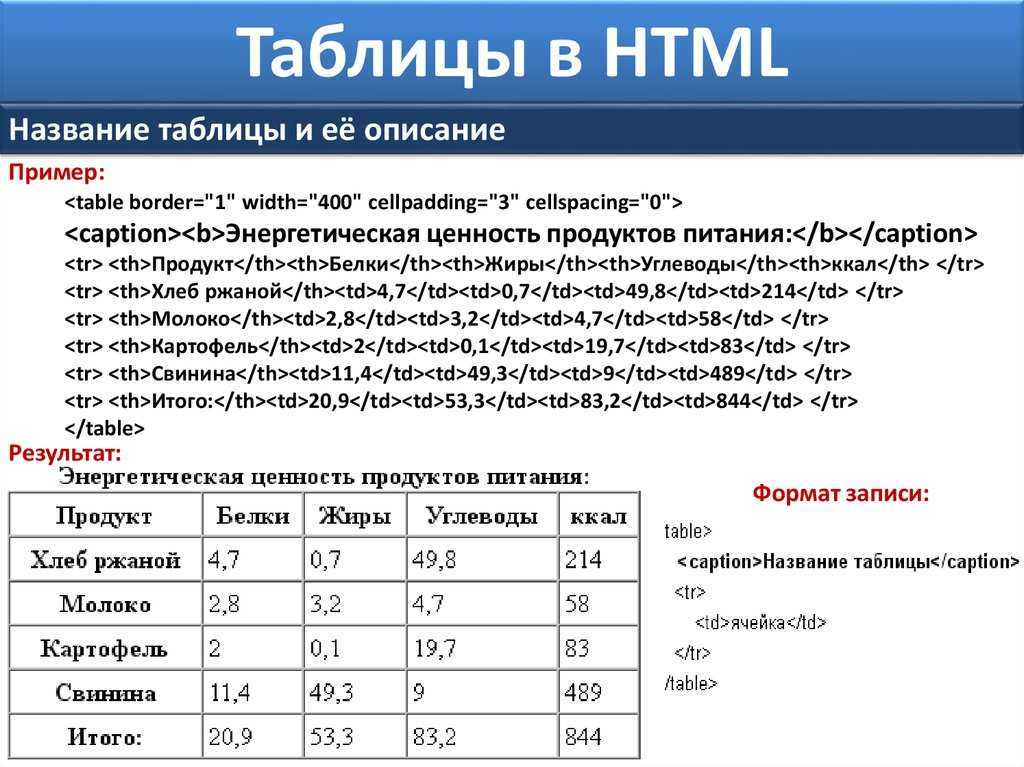
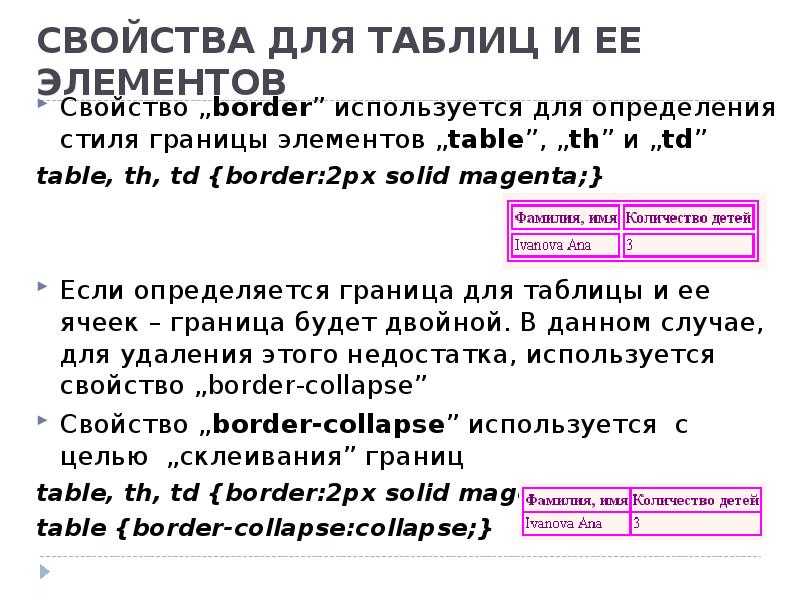
Границы и фон ячеек таблицы css-свойство empty-cells
Также имеется возможность регулировать отображение границ и фона ячеек, у которых отсутствует содержимое, т.е. пустых ячеек, при помощи наследуемого
свойства empty-cells (см. пример №3). Данное свойство может принимать следующие
значения:
- hide – фон и границы пустых ячеек не отображаются;
- show – фон и границы пустых ячеек отображаются (значение используется браузером по умолчанию).
Опять же, это возможно только, если значение свойства border-collapse
установлено, как separate. Отметим, что ячейка считается браузером пустой, если у нее отсутствуют любые символы, за
исключением пробельных, либо значение свойства visibility установлено, как
hidden (это свойство мы рассмотрим позже).
<!DOCTYPE html>
<html>
<head>
	<meta charset="utf-8">
	<title>Свойство empty-cells</title>

	<style>

		table{
		width: 45%;
		margin-top: 3em;
		border: 1px solid green;
		}

		td{
		width: 15%;
		border: 1px solid green;
		background-color: yellow;
		}

		/* Для ячеек в нечетных строках	*/
		tr:nth-child(odd) td{
		empty-cells: hide;
		}

	</style>

</head>
<body>

	<table>

		<tr>
			<td>Ячейка 1.1</td> <td></td> <td>Ячейка 1.3</td>
		</tr>

		<tr>
			<td>Ячейка 2.1</td> <td></td> <td>Ячейка 2.3</td>
		</tr>

		<tr>
			<td>Ячейка 3.1</td> <td></td> <td>Ячейка 3.3</td>
		</tr>

		<tr>
			<td>Ячейка 4.1</td> <td></td> <td>Ячейка 4.3</td>
		</tr>

	</table>

</body>
</html>
Пример №3. Использование свойства empty-cells
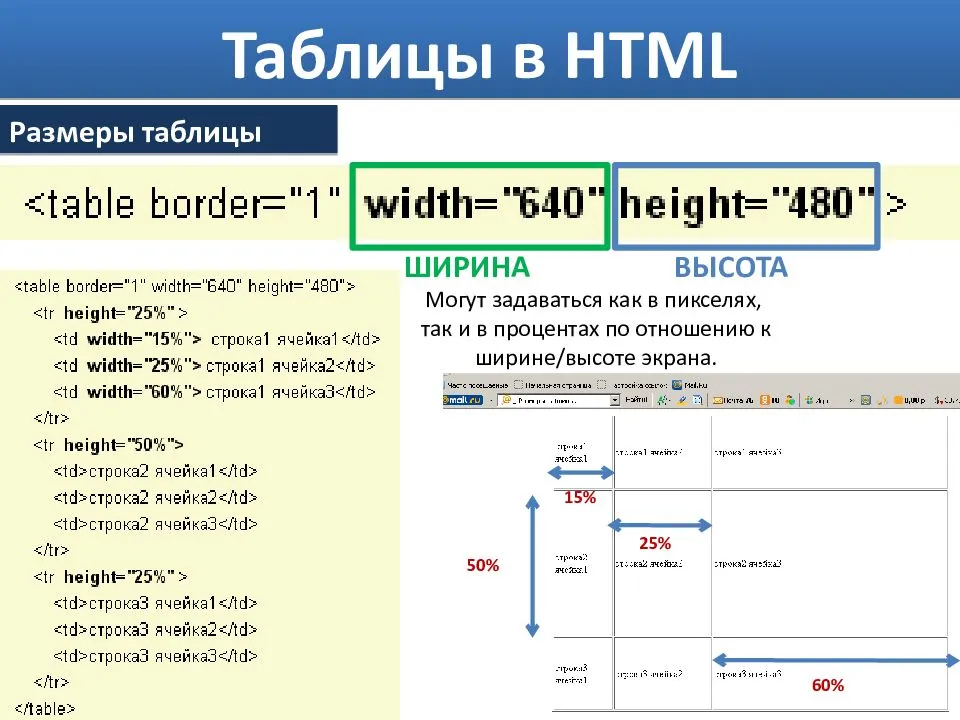
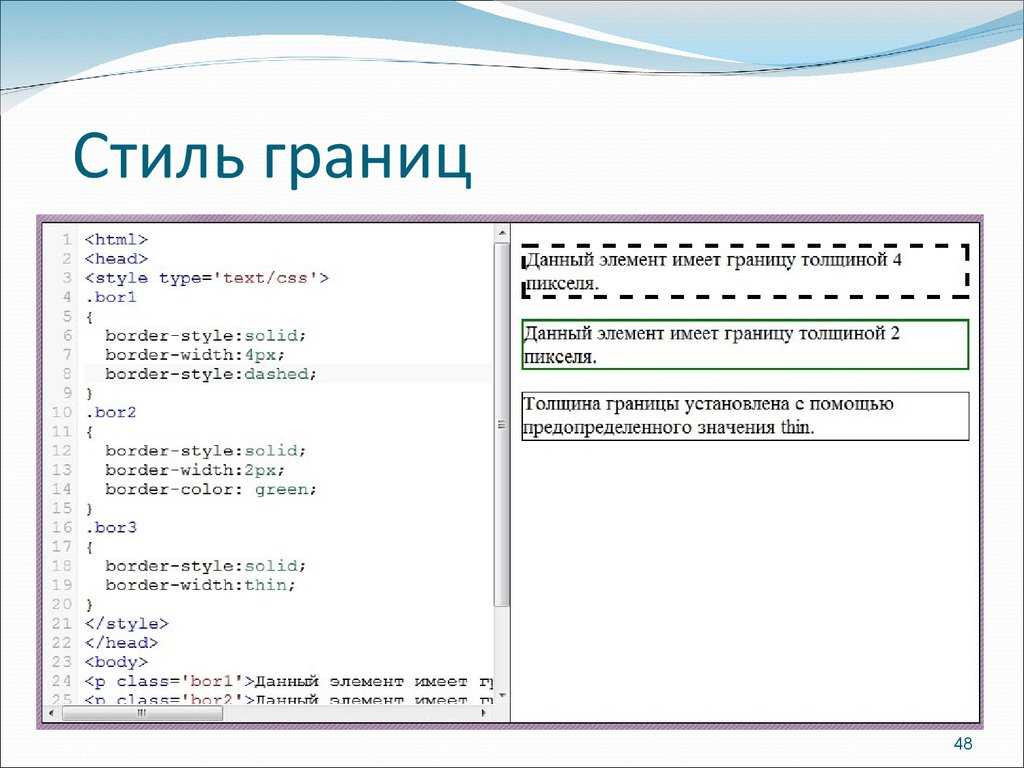
Поднимем руки над клавиатурой и да раздвинем строки!
На всякий случай начну главу с пояснения «что такое межстрочный интервал».
Для форматирования данного параметра каскадными стилевыми таблицами нужно знать всего лишь одно свойство – line-height.
line-height предусматривает два встроенных ключевых слова:
- normal – вычисление расстояния между строками абзацев происходит автоматически;
- inherit – наследуется форматирование объекта-родителя.
Помимо этого, можно самим устанавливать размер отступов. В свойстве поддерживаются любые существующие в css единицы измерений. Таким образом, вы можете указать интервал в процентах, пунктах, пикселах, em-ах и других.

Думаю, особо любопытные задались вопросом: «Как же работает такой механизм?». Ответ очень прост: при помощи умножения. Интерлиньяж устанавливается, начиная от базовой линии. Если значение свойства указывается цифрой, то она распознается как множитель, на который и идет умножение базового значения.
1 2 3 4 5 6 7 8 9 10 11 12 13 14 15 16 17 18 19 20 21 22 23 24 25 26 27 28 29 30 31 |
<!DOCTYPE html>
<html>
 <head>
  <meta charset="utf-8">
  <title>Пример 1</title>
   <style>
   h1 {
    line-height: 95%;
    border-bottom: 3px double #000;
     border-top: 1px solid #000;
     padding: 15px;
   }
   ol {
    line-height: 2.5;
   }
  body {
background: 	#EEE8AA;
 }
  </style>
 </head>
 <body>
  <h1>Позитивные аспекты глобализации</h1>
  <p>
<ol>
<li>Усиление и стимулирование свободной конкуренции для активного развития технологий;</li>
<li>Мировое разделение труда, которое способствует равномерному распределению важных ресурсов;</li>
<li>Повышение уровня жизни человечества.</li>
</ol>
</p>
 </body>
</html>
|
border-collapse, border-spacing, caption-side, empty-cells, and table-layout
Back to the index.
On this page I explain some of the new CSS declarations to be used with tables.
This is the default table with only a border defined for the TDs. Note the space between the TDs: as has been the case since the invention of tables, the default cellspacing is 1.
| First TD of first TR | Second TD of first TR | Third TD of first TR |
| First TD of second TR | Third TD of second TR |
The table has by default. It should display the border of the
empty cell, but doesn’t in IE7-.
empty-cells
This declaration takes two values:
- : show empty cells (with a border). This is the default.
- : hide empty cells.
<table style="empty-cells: show">
| First TD of first TR | Second TD of first TR | Third TD of first TR |
| First TD of second TR | Third TD of second TR |
<table style="empty-cells: hide">
| First TD of first TR | Second TD of first TR | Third TD of first TR |
| First TD of second TR | Third TD of second TR |
border-collapse
This declaration takes two values:
- : keep borders separate. This is the default.
- : merge borders of adjoining cells.
<table style="border-collapse: collapse">
| First TD of first TR | Second TD of first TR | Third TD of first TR |
| First TD of second TR | Third TD of second TR |
should overrule . The example below
should look the same as the previous one.
<table style="border-collapse: collapse;" cellspacing="10">
| First TD of first TR | Second TD of first TR | Third TD of first TR |
| First TD of second TR | Third TD of second TR |
border-spacing
is translated to CSS. Note that it needs a unit.
<table style="border-spacing: 10px;">
| First TD of first TR | Second TD of first TR | Third TD of first TR |
| First TD of second TR | Third TD of second TR |
You can use two values: the first is the horizontal cellspacing, the second the vertical one.
<table style="border-spacing: 40px 10px;">
| First TD of first TR | Second TD of first TR | Third TD of first TR |
| First TD of second TR | Third TD of second TR |
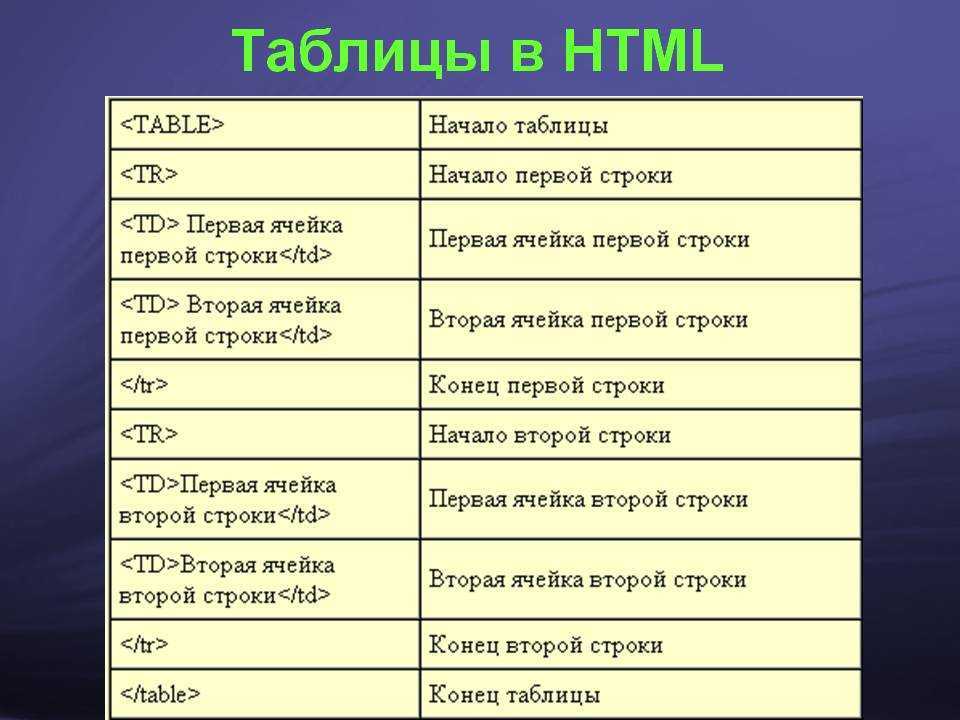
table-layout
takes two values:
- : the table is layed out normally (see below). This is the default value.
- : the table obeys the , even if it normally wouldn’t.
Let’s give the test table a . This width is far too narrow to normally show all content,
and therefore the table stretches up beyond the 100px. This is normal behaviour: s on tables
have always been more like a polite advice than a strict rule. If the table needs more space than the
allows, it takes more space.

<table style="width: 100px;">
| First TD of first TR | Second TD of first TR | Third TD of first TR |
| First TD of second TR | Third TD of second TR |
If we add , however, the table obeys the , even if that
results in unreadable content.
<table style="table-layout: fixed; width: 100px;">
| First TD of first TR | Second TD of first TR | Third TD of first TR |
| First TD of second TR | Third TD of second TR |
caption-side
takes four values, even though W3C specifies only the first two:
- . This is the default.
- . This is the other official value.
- . Mozilla extension.
- . Mozilla extension.
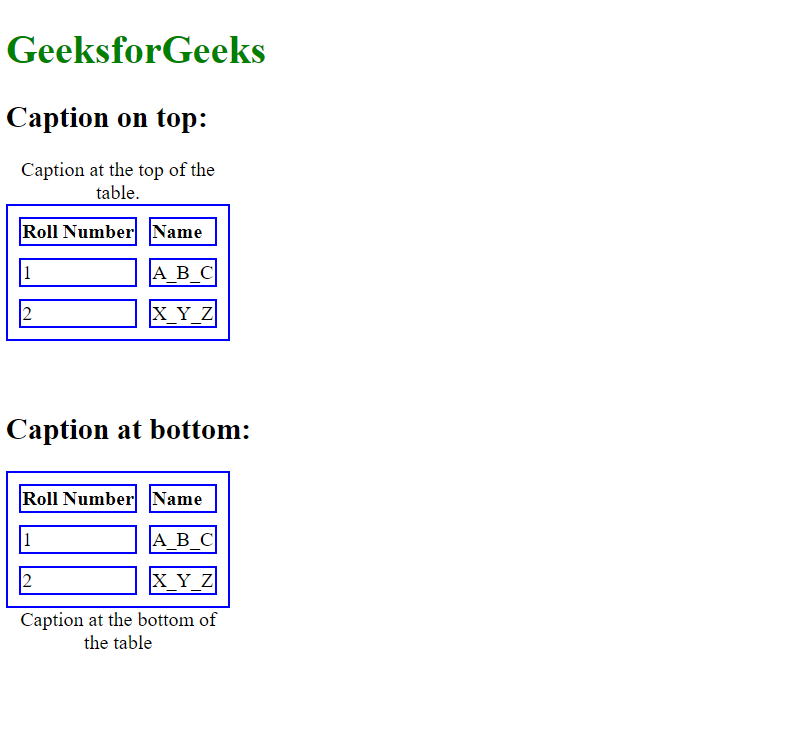
<caption style="caption-side: bottom">
| First TD of first TR | Second TD of first TR | Third TD of first TR |
| First TD of second TR | Third TD of second TR |
<caption style="caption-side: right">
| First TD of first TR | Second TD of first TR | Third TD of first TR |
| First TD of second TR | Third TD of second TR |
Home Sitemap
Cell Padding with cellpadding — Deprecated in HTML5
Okay, On previous section we saw how cellspacing can change the cells formatting on the table.
Now lets look how cellpadding changes the cell format of our HTML table. This attribute cellpadding has also been phased out from HTML5 and so it is also not supported on HTML5.
Now lets see the effect of cellpadding. On the same HTML code above. change the cellspacing to cellpadding like this in the tag:
Okay, Now lets see how that changes our table:
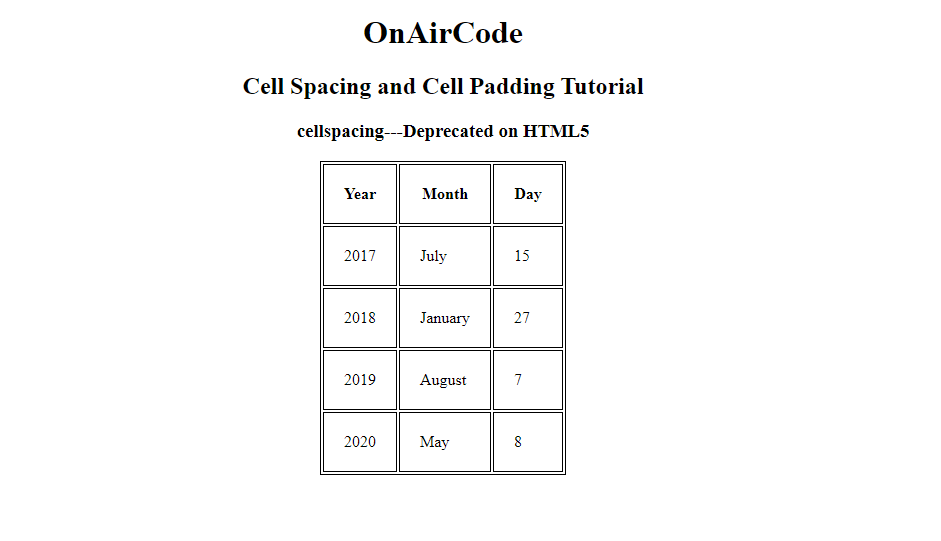 table with cellpadding
Now you can see that each cell has been expanded to surround the content with 20px padding. But the space between cell is default which is in my browser but may differ on your browser.
Nonetheless we can see that the space between the cell is almost to nothing.
Okay, Now lets use both attributes and see their effect.
Just change the table tag of the HTML with the above code.
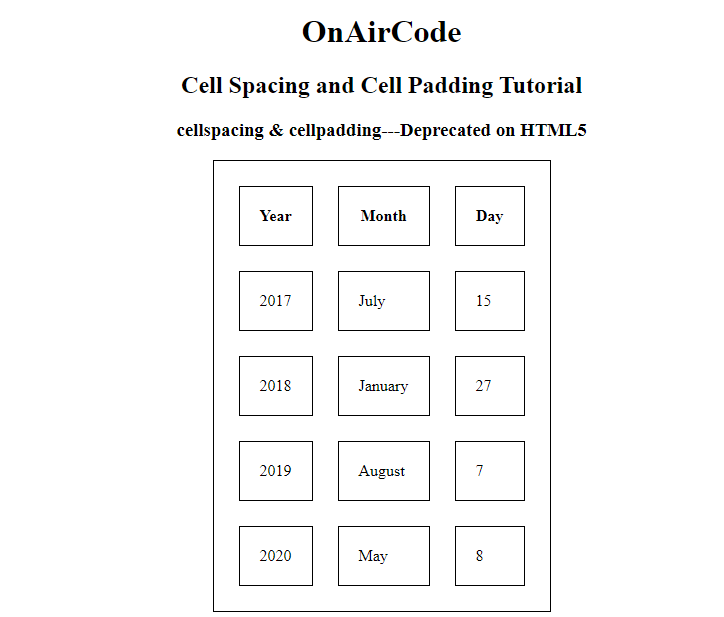 With cell spacing and cell padding
Спецификация
Каждая спецификация проходит несколько стадий одобрения.
- Recommendation ( Рекомендация ) — спецификация одобрена W3C и рекомендована как стандарт.
- Candidate Recommendation ( Возможная рекомендация ) — группа, отвечающая за стандарт, удовлетворена, как он соответствует своим целям, но требуется помощь сообщества разработчиков по реализации стандарта.
- Proposed Recommendation ( Предлагаемая рекомендация ) — на этом этапе документ представлен на рассмотрение Консультативного совета W3C для окончательного утверждения.
- Working Draft ( Рабочий проект ) — более зрелая версия черновика после обсуждения и внесения поправок для рассмотрения сообществом.
- Editor’s draft ( Редакторский черновик ) — черновая версия стандарта после внесения правок редакторами проекта.
- Draft ( Черновик спецификации ) — первая черновая версия стандарта.