CSS Border Gradient
Through CSS border-image property, web designers can use CSS gradient as a border. This is possible by setting the border-image to repeating-linear-gradient or linear-gradient. Inside the parentheses, include all the colors you want. The color can be a combination of hexadecimal color codes, HSL color values, color names, and RGB color codes.
As well, include a value that defines the border-image-slice property. Ensure you define the border property for the browser to render the gradient border.
– CSS Border Gradient Example
| #gradient {
border: 6px solid; padding: 8px; border-image: repeating–linear-gradient(to bottom right, #FF77CC, #0033CC, #33475B, rgb(250, 120, 90)) 20; } |
CSS Border Collapse
If you are creating a table in HTML and the table element as well as the table row and cell elements have a defined border, then you can keep the borders separate. Or, you can collapse them using the CSS border-collapse property.
Here’s how a simple table element would look like with the border-collapse property set to “separate.” Please note that since the default value of this property is separate, you can leave it out of your CSS.
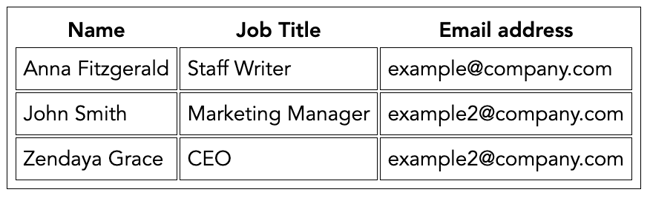
Here’s how that example would look if the border-collapse property were set to “collapse” instead.
See the Pen CSS Border Collapse by Christina Perricone (@hubspot) on CodePen.
It’s important to note that if the border-collapse property is set to “collapse,” then the border-radius property won’t render. You’ll need the border-collapse property to be set to “separate” to use the border-radius property.
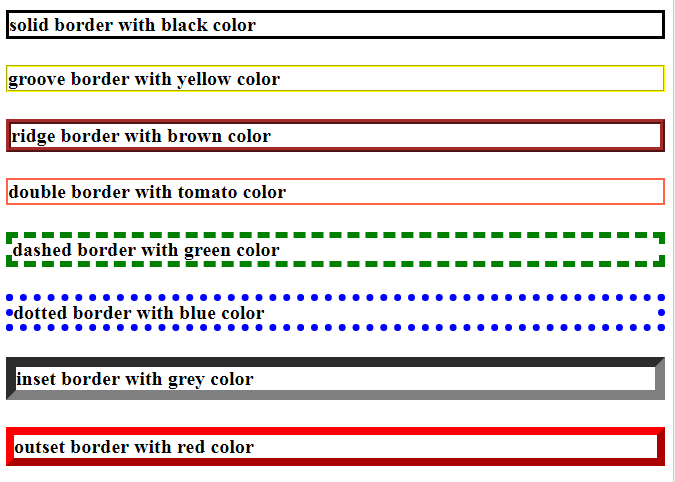
CSS Border Color
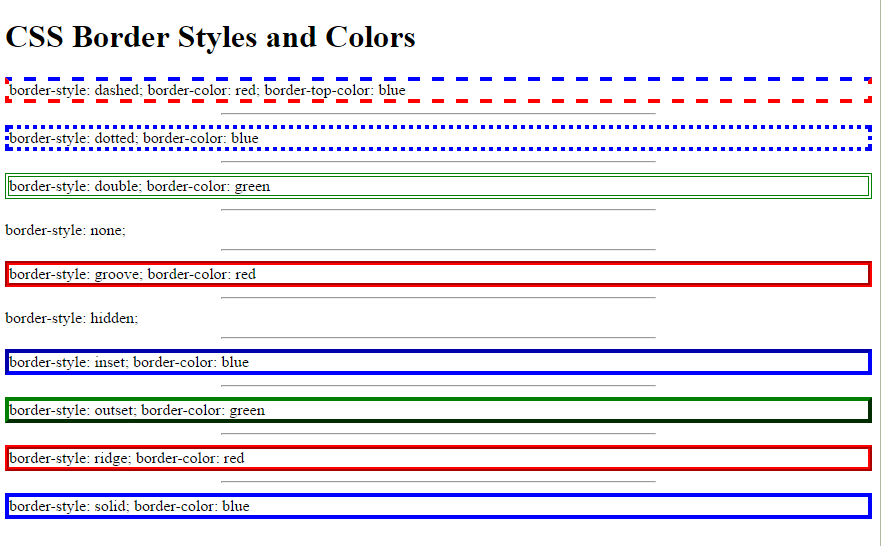
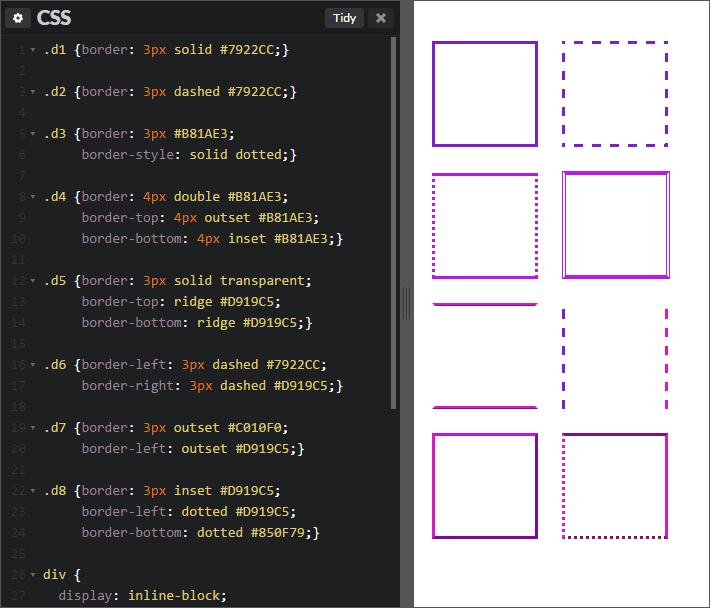
The CSS border-color property specifies the color of the border. You can set this property using color names, hex color codes, RGB or RGBA values, and HSL or HSLA values.
Like the border-style and border-width properties, the border-color property can have between one and four values. If only one value is defined, then it applies to all sides of the element. If two values are defined, then the first value represents the top and bottom border colors and the second represents the right and left border colors. If three values are defined, the first value represents the top border color, the second represents the left and right, and the fourth represents the bottom color. If four values are defined, they represent the top, right, bottom, and left, respectively.
Let’s take a look at examples defined by different border-color values below.
See the Pen CSS Border Color by Christina Perricone (@hubspot) on CodePen.
Basic usage
Use the , , , , or utilities to set the border width for all sides of an element.
border
border-2
border-4
border-8
Use the , , , , or utilities to set the border width for one side of an element.
border-t-4
border-r-4
border-b-4
border-l-4
Use the utilities to set the border width on two sides of an element at the same time.
border-x-4
border-y-4
You can also add borders between child elements using the and utilities.
01
02
03
Learn more in the Divide Width and Divide Color documentation.
Use the and utilities to set the and logical properties, which map to either the left or right border based on the text direction.
Left-to-right
Right-to-left
For more control, you can also use the to conditionally apply specific styles depending on the current text direction.
If you’ve in your project, you’ll need to include a border style utility any time you use one of the utilities for the border to actually take effect:
This is because browsers set the of most elements to by default, so adding a on its own isn’t enough to render a border.
Preflight applies a global that sets to and to , which is what makes it possible to add a border to an element using just a utility in projects using Preflight.
CSS Border Shorthand
With CSS shorthand, it is possible to set values for various CSS border properties simultaneously. Space separates these values. For example, the shorthand for the border-color, border-style, and border-width is as follows.


| #div {
border: 6px double #00A5BD; } |
It is the same as follows in the longhand form:
| #div {
border-width: 6px; border-style: double; border-color: #00A5BD; } |
Although the shorthand style saves time and makes the code sleek, it introduces room for error. There are various issues that you can come across when using the shorthand property; one issue is the border not appearing. It happens when you fail to define the border style.
Although you can omit the border color and border width values, you must define the border-style property. When you fail to define the border color and border width, the browser by default will render a black line approximately 3px wide.
Example
We will discuss the border-right property below, exploring examples of how to use this property in CSS.
For example:
In this CSS border-right example, we have set the line style of the right border of the <div> tag to solid. You must set the style or the right border will not appear.
Next, we’ll look at a CSS border-right example where we provide the border-right-width, border-right-style, and border-right-color values.
In this CSS border-right example, we have set the border-right-width to 3px, the border-right-style to solid, and the border-right-color to blue.
We could rewrite this example using the hexadecimal value for blue as follows:
Or we could rewrite this example using the rgb() value for blue as follows:
Использование пользовательских значений
Настройка вашей темы
По умолчанию Tailwind предоставляет пять утилит , и такое же количество утилит на каждую сторону (горизонтальную, вертикальную, верхнюю, правую, нижнюю и левую). Вы изменяете, добавляете или удаляете их, редактируя раздел в вашей конфигурации Tailwind.
tailwind.config.js
Дополнительные сведения о настройке темы по умолчанию смотрите в документации .
Произвольные значения
Если вам нужно использовать одноразовое value, которое не имеет смысла включать в вашу тему, используйте квадратные скобки, чтобы сгенерировать свойство на лету, используя любое произвольное значение.
Узнайте больше о поддержке произвольных значений в документации по .
Применяя условно
Наведение, фокус и другие состояния
Tailwind позволяет условно применять служебные классы в разных состояниях с помощью модификаторов вариантов. Например, используйте , чтобы применять утилиту только при hover.
Полный список всех доступных модификаторов состояния смотрите в документации Наведение, фокус и другие состояния.
Контрольные точки и медиа-запросы
Вы также можете использовать модификаторы вариантов для таргетинга на медиа-запросы, такие как реагирующие контрольные точки, темный режим, предпочтения с уменьшенным движением и многое другое. Например, используйте , чтобы применить утилиту только на экранах среднего размера и выше.
Чтобы узнать больше, ознакомьтесь с документацией по адаптивному дизайну, темному режиму и .
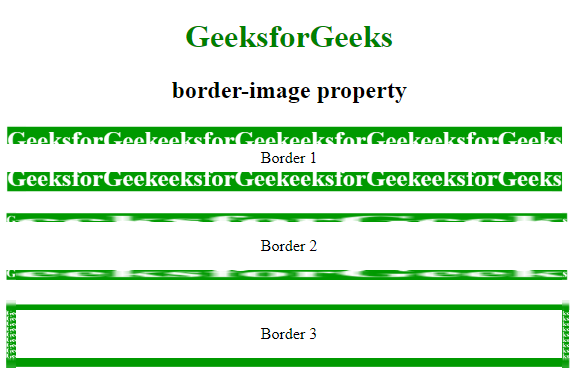
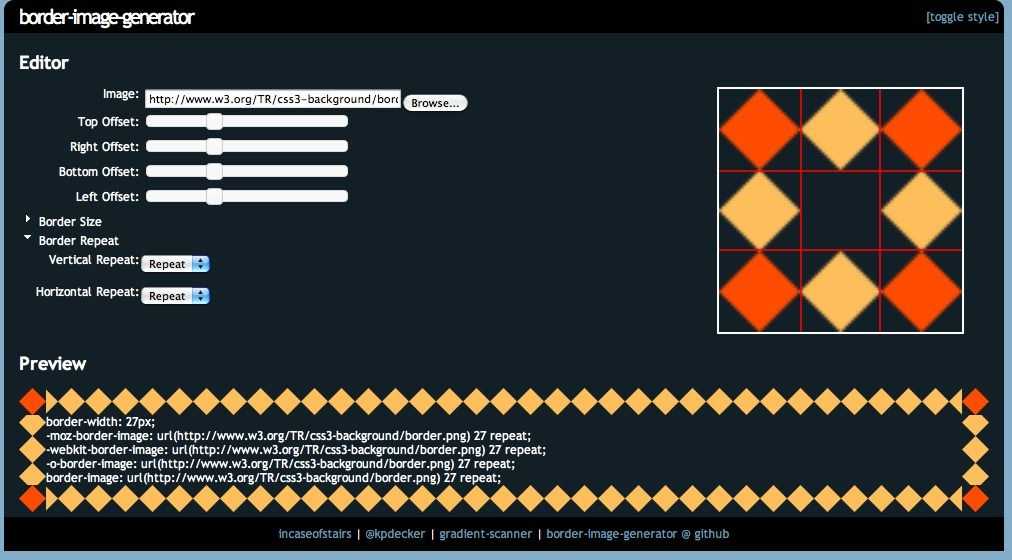
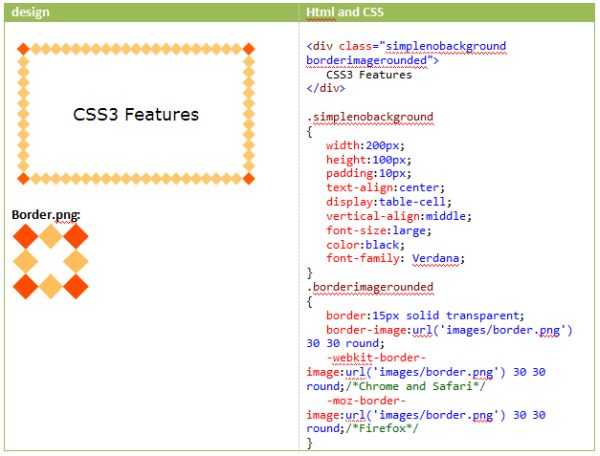
CSS Image Border
The CSS border-image property allows you to set an image as a border instead of a border line.
The property is shorthand for the border-image-source, border-image-slice, border-image-width, border-image-outset and border-image-repeat properties. Only three are required to be defined when using the shorthand property. These are:


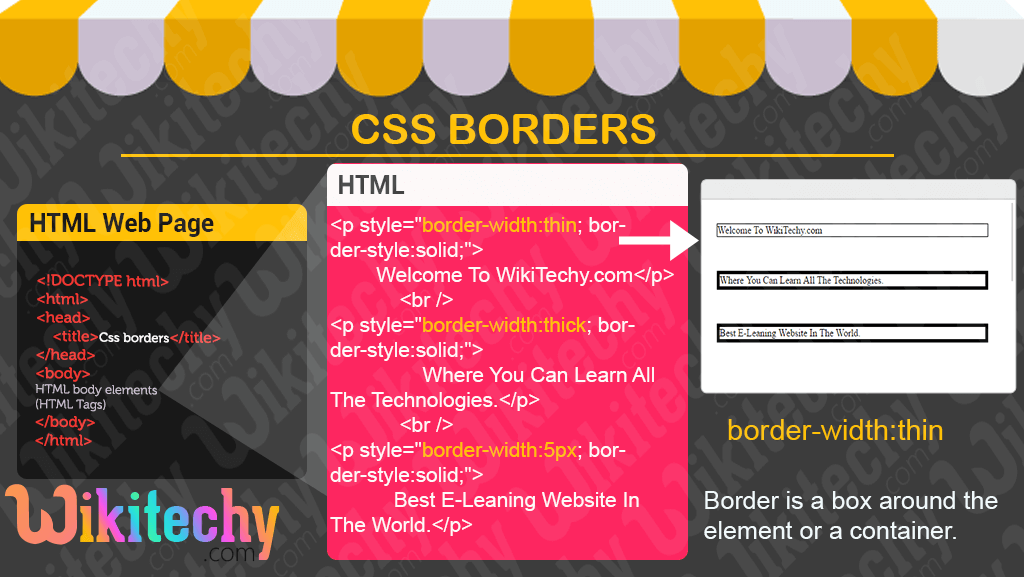

- border-image-source: specifies the image URL or file path
- border-image-slice: specifies how to slice the image
- border-image-repeat: specifies whether the border image should be stretched, repeated, or rounded
For an image border to render, the border property must be defined as well.
Let’s take a look at examples defined by different border-image values below.
See the Pen CSS Image Border by Christina Perricone (@hubspot) on CodePen.
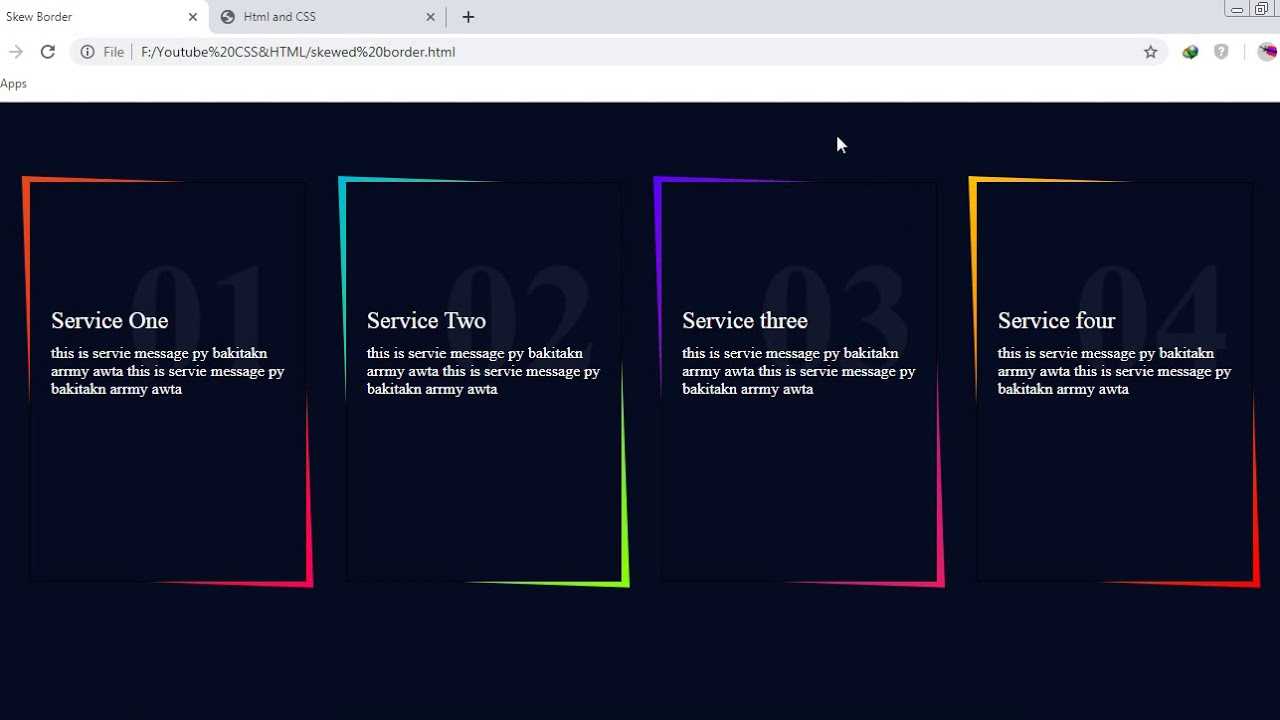
CSS Border Gradient
You can also use the CSS border-image property to set a CSS gradient as a border. To create the border gradient, set the border-image property to “linear-gradient” or “repeating-linear-gradient.” Then, in parentheses, add as many color stops as you want. You can use any combination of HTML color names, hex color codes, RGB color codes, and HSL color values. Then add a value to define the border-image-slice property.
For the gradient border to render, the border property must be defined as well.
Let’s take a look at some examples:
See the Pen CSS Border Gradient by Christina Perricone (@hubspot) on CodePen.
You can learn more about creating CSS color gradients in How to Add & Change Background Color in HTML.
8.4 Padding properties: ‘padding-top’, ‘padding-right’, ‘padding-bottom’, ‘padding-left’, and ‘padding’
The padding properties specify the width of the of a box. The shorthand property sets the
padding for all four sides while the other padding properties only set
their respective side.
The properties defined in this section refer to the <padding-width>
value type, which may take one of the following values:
- Specifies a fixed width.
- The percentage is calculated with
respect to the width of the generated box’s , even for
and .
If the containing block’s width depends on this element, then the
resulting layout is undefined in CSS 2.2.
Unlike margin properties, values for padding values cannot be
negative. Like margin properties, percentage values for padding
properties refer to the width of the generated box’s containing block.
| Name: | padding-top, padding-right, padding-bottom, padding-left |
|---|---|
| Value: | | |
| Initial: | |
| Applies to: | all elements except table-row-group, table-header-group, table-footer-group, table-row, table-column-group and table-column |
| Inherited: | no |
| Percentages: | refer to width of containing block |
| Media: | |
| Computed value: | the percentage as specified or the absolute length |
These properties set the top, right, bottom, and left padding of
a box.
blockquote { padding-top: 0.3em }
| Name: | padding |
|---|---|
| Value: | {1,4} | |
| Initial: | see individual properties |
| Applies to: | all elements except table-row-group, table-header-group, table-footer-group, table-row, table-column-group and table-column |
| Inherited: | no |
| Percentages: | refer to width of containing block |
| Media: | |
| Computed value: | see individual properties |
The property is a
shorthand property for setting , , , and at the same place
in the style sheet.
If there is only one component value, it applies to all
sides. If there are two values, the top and bottom paddings
are set to the first value and the right and left paddings are
set to the second. If there are three values, the top is
set to the first value, the left and right are set to the
second, and the bottom is set to the third. If there are
four values, they apply to the top, right, bottom, and left,
respectively.
The surface color or image of the padding area is specified via
the property:
h1 {
  background: white;
  padding: 1em 2em;
}
The example above specifies a ‘1em’ vertical padding ( and ) and a ‘2em’
horizontal padding ( and ). The ’em’ unit is
to the element’s font size: ‘1em’ is equal to the size of the
font in use.
Syntax
The syntax for the border-right CSS property is:
Parameters or Arguments
border-right-width is the right border width of a box and can be one of the following:
(If border-right-width is not provided, the default is medium)
| Value | Description |
|---|---|
| fixed | Fixed value expressed in px, em, … div { border-right: 3px; } |
| thin | Thin border-right width, which might be 1px or 2px depending on the browser div { border-right: thin; } |
| medium | Medium border-right width, which might be 3px or 4px depending on the browser div { border-right: medium; } |
| thick | Thick border-right width, which might be 5px or 6px depending on the browser div { border-right: thick; } |
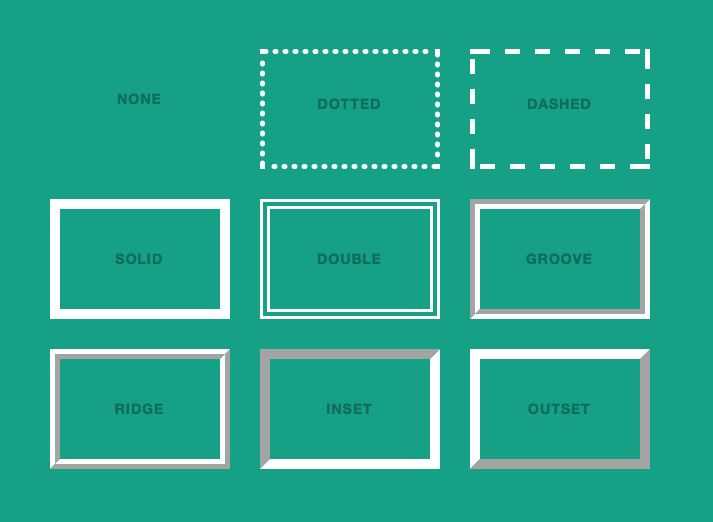
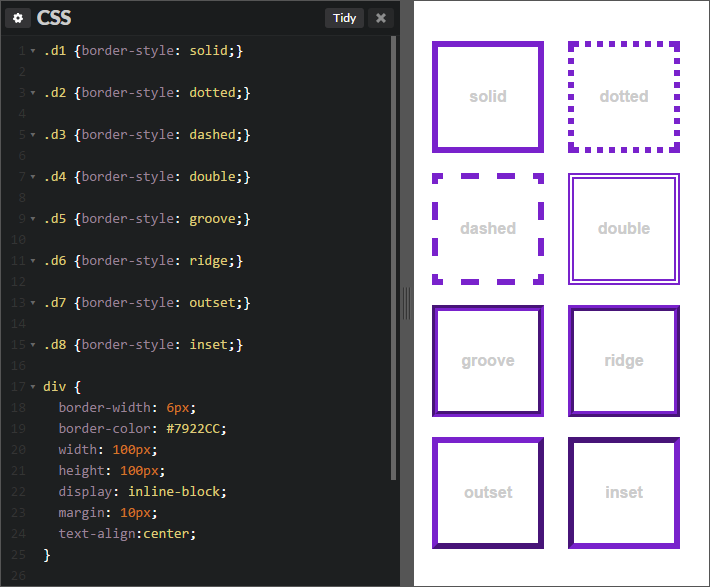
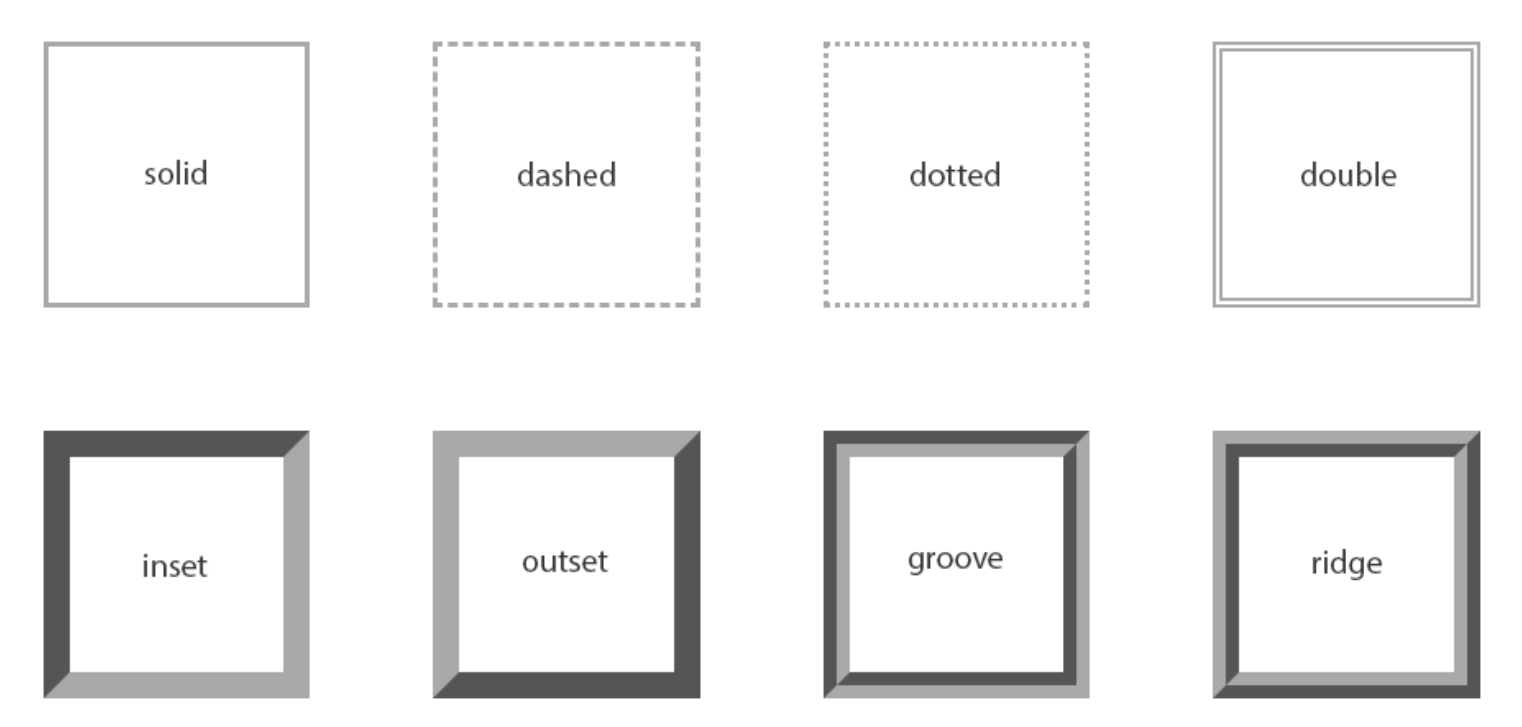
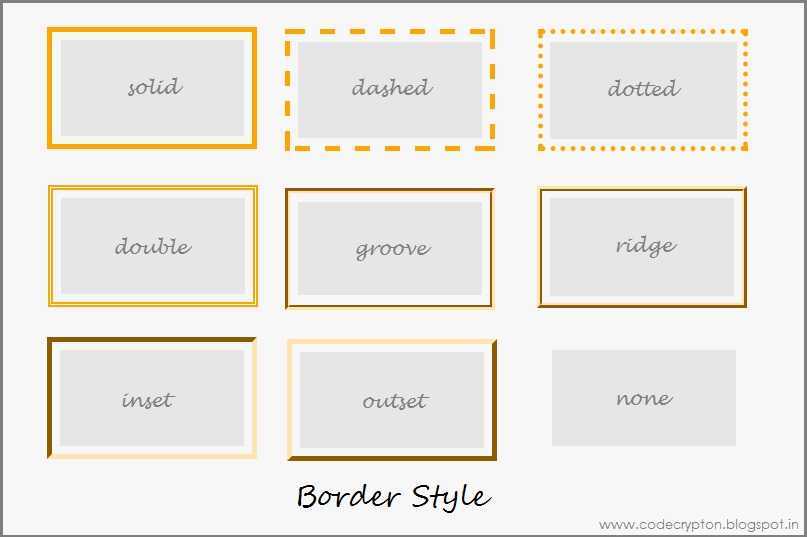
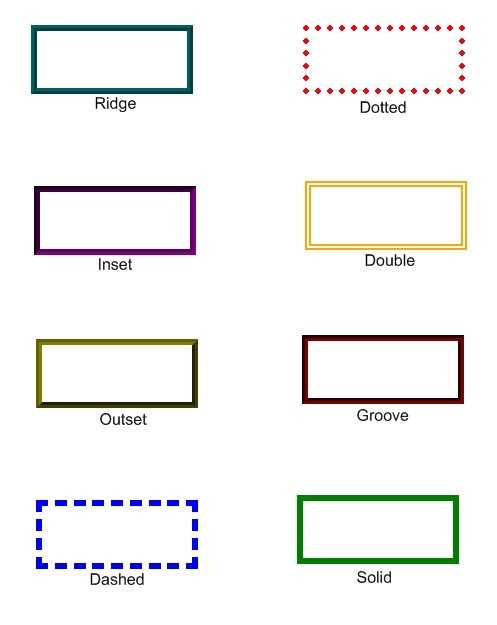
border-right-style is the line style of the right border of a box and can be one of the following:
(If border-right-style is not provided, the default is none)
| Value | Description |
|---|---|
| none | No border-right (This is the default) div { border-right: none; } |
| solid | Single, straight, solid line div { border-right: solid; } |
| dotted | Series of dots div { border-right: dotted; } |
| dashed | Series of short dashes div { border-right: dashed; } |
| double | Two straight lines that total the pixel amount defined by border-right-width div { border-right: double; } |
| groove | Carved effect div { border-right: groove; } |
| ridge | 3D appearance where border-right looks like it is «coming out» (opposite of groove) div { border-right: ridge; } |
| inset | Embedded appearance div { border-right: inset; } |
| outset | Embossed appearance (opposite of inset) div { border-right: outset; } |
| hidden | Border is hidden div { border-right: hidden; } |
| inherit | Element will inherit the border-right-style from its parent element div { border-right: inherit; } |
border-right-color is the color of the right border of a box and can be one of the following: