
# Тэг
-
Что такое тег и как с ним работать?
Можно подумать, что сделать подпись к полю очень просто. Пишем текст рядом с полем и всё готово:
На самом деле этого недостаточно — мы получили просто кусок текста и поле, которые расположены рядом друг с другом, но логически никак не связаны.
Есть специальный тег, который позволяет смело сказать: «Этот кусок текста действительно подпись к этому полю!». Это парный тег .
Он связывает текст и поле ввода логически. А ещё если нажать на текст в такой подписи, то курсор переместится в соответствующее поле.
Создавать подписи к полям с помощью — хороший приём. Используйте его.
Первый способ создать подпись — просто обернуть текст подписи и тег поля в тег , вот так:
Надо отметить, что при оборачивании текста в тег он визуально никак не меняется, ведь главная задача подписи — создать логическую связь.
Иногда обернуть поле и текст подписи в тег нельзя. Например, когда они размещены в разных ячейках таблицы.
В этом случае можно связать подпись с полем с помощью атрибута . Алгоритм такой:
-
Добавляем к полю ввода идентификатор с помощью атрибута .
-
Оборачиваем текст подписи в тег .
-
Добавляем тегу атрибут .
В атрибут for записываем такое же значение, что и в атрибуте у поля.
Например:
-
HTML Tags
<!—><!DOCTYPE><a><abbr><acronym><address><applet><area><article><aside><audio><b><base><basefont><bdi><bdo><big><blockquote><body><br><button><canvas><caption><center><cite><code><col><colgroup><data><datalist><dd><del><details><dfn><dialog><dir><div><dl><dt><em><embed><fieldset><figcaption><figure><font><footer><form><frame><frameset><h1> — <h6><head><header><hr><html><i><iframe><img><input><ins><kbd><label><legend><li><link><main><map><mark><meta><meter><nav><noframes><noscript><object><ol><optgroup><option><output><p><param><picture><pre><progress><q><rp><rt><ruby><s><samp><script><section><select><small><source><span><strike><strong><style><sub><summary><sup><svg><table><tbody><td><template><textarea><tfoot><th><thead><time><title><tr><track><tt><u><ul><var><video>
Introduction
Everyone has seen a form. Everyone has used one. But have you coded one?
Most areas where you can input information into web pages are created using HTML forms: entering text or numbers into a text box, ticking a check box, choosing a radio button, or selecting an option from a list. The form is then usually submitted to the website and the data is used in some way. Your customer details might be stored in a database for later use, or the website might be updated after you choose a product to view.
While it is easy to create a functional form, attractive and usable forms take a bit of work. In this article we’ll cover how to create elegant, accessible form structures with HTML, starting with the real basics and working up to some more complex features. We’ll then look at the new form capabilities of in HTML5 in the next article, HTML5 form features.
Step four: further structuring with fieldsets and legends
The final form example is identical to the last one, except that we have wrapped the different major parts of the form in elements, and given each one its own element. For example:
When rendered in a browser, these look like this:
Figure 4: More structuring with fieldset and legend.
Explaining fieldset and legend
and are not mandatory, but they are very useful for more complex forms and for presentation.
The element allows you to organize the form into semantic modules. In a more complex form, you could use different s to contain address information, billing information, customer preference information, and so on. The element allows you to add a label to each section.
A little bit of style…
We’ve also applied a bit of CSS to this form, to style the structural markup. This is applied to the third form example using an external stylesheet. The two most important tasks we want the CSS to do are to add margins to line up the labels and input boxes, and to get rid of the unordered list’s bullets. Here is the CSS that resides in the external stylesheet:
What does it do? The first line styles the fieldset border to not take up the whole page; you could also omit the border completely using . The second line puts a margin of 10 pixels on the elements to put a little visual room between each list item, and gets rid of the bullets. The third and fourth lines set a left margin on the and elements so that they don’t crowd the labels and line up better.
You can see that this little bit of CSS makes our form look better, but you could improve it even more. For more information on styling forms, see Nick Rigby’s article, Prettier Accessible Forms.
Примеры
Пример For
Три радиокнопки с надписями:
<form action=»/action_page.php»>
<label for=»male»>Мужчина</label>
<input type=»radio» name=»gender» id=»male» value=»мужчина»><br>
<label for=»female»>Женщина</label>
<input type=»radio» name=»gender» id=»female» value=»женщина»><br>
<input type=»submit» value=»Отправить»>
</form>
Пример Output
Выполните расчет и покажите результат в элементе <output>:
<form oninput=»x.value=parseInt(a.value)+parseInt(b.value)»>0
<input type=»range» id=»a» value=»50″>100
+<input type=»number» id=»b» value=»50″>
=<output name=»x» for=»a b»></output>
</form>
# Чекбоксы и радиокнопки
В чем заключаются отличие чекбокса от радио кнопок? Как связать радиокнопки в группу Чекбоксов всегда можно выбрать несколько, даже если они относятся к одному вопросу. Т.е. выбрать один, несколько, все или даже не выбрать ни одного. Семантически чекбокс спрашивает согласны ли вы конкретно с тем что в нём написано или нет. Если да — отмечайте галочкой. А радиобаттон, если он относится к одному вопросу/полю, всегда можно выбрать только один. (Их может быть несколько групп, но выбрать можно только один в каждой группе.) Семантически радиобаттон спрашивает с каким из вариантом в данной группе вы согласны больше всего. Код в HTML для radiobutton выглядит следующим образом
Обратите внимание, что для того, чтобы объединить элементы в группу им присвоен одинаковый name. Первый
Второй
Третий
Проверка состояния чуть отличается от checkbox, поскольку radiobutton обычно используется не один, а в группе
Таким образом, нам необходимо перебрать все элементы radiobutton и определить какой из них выбран. Пример:
Обратите внимание на запись
После выполнения команды getElementsByName переменная rad содержит массив элементов radiobutton. Именно поэтому дальнейшая работа с данной переменной должна вестись как с массивом. В следующих строках мы перебираем каждый элемент массива и проверяем, не выбран ли он. Если выбран — то выводим alert.
HTML Reference
HTML by AlphabetHTML by CategoryHTML AttributesHTML Global AttributesHTML EventsHTML ColorsHTML CanvasHTML Audio/VideoHTML Character SetsHTML DoctypesHTML URL EncodeHTML Language CodesHTML Country CodesHTTP MessagesHTTP MethodsPX to EM ConverterKeyboard Shortcuts
HTML Tags
<!—>
<!DOCTYPE>
<a>
<abbr>
<acronym>
<address>
<applet>
<area>
<article>
<aside>
<audio>
<b>
<base>
<basefont>
<bdi>
<bdo>
<big>
<blockquote>
<body>
<br>
<button>
<canvas>
<caption>
<center>
<cite>
<code>
<col>
<colgroup>
<data>
<datalist>
<dd>
<del>
<details>
<dfn>
<dialog>
<dir>
<div>
<dl>
<dt>
<em>
<embed>
<fieldset>
<figcaption>
<figure>
<font>
<footer>
<form>
<frame>
<frameset>
<h1> — <h6>
<head>
<header>
<hr>
<html>
<i>
<iframe>
<img>
<input>
<ins>
<kbd>
<label>
<legend>
<li>
<link>
<main>
<map>
<mark>
<meta>
<meter>
<nav>
<noframes>
<noscript>
<object>
<ol>
<optgroup>
<option>
<output>
<p>
<param>
<picture>
<pre>
<progress>
<q>
<rp>
<rt>
<ruby>
<s>
<samp>
<script>
<section>
<select>
<small>
<source>
<span>
<strike>
<strong>
<style>
<sub>
<summary>
<sup>
<svg>
<table>
<tbody>
<td>
<template>
<textarea>
<tfoot>
<th>
<thead>
<time>
<title>
<tr>
<track>
<tt>
<u>
<ul>
<var>
<video>
<wbr>
Числа
В HTML5 определяются два числовых типа данных. Тип number предназначен для обычных чисел.
Этот тип данных имеет очевидный потенциал. Обычные текстовые поля принимают буквально все: цифры, буквы, пробелы, знаки пунктуации и т.п. По этой причине одна из самых распространенных задач проверки — убедиться, что значение является числом в определенном диапазоне. Но при вводе данных в поле типа number браузер автоматически игнорирует все символы, кроме цифр. Далее показан пример кода для создания поля этого типа:
Конечно же, есть много чисел, которые не подходят для каждого типа числовых данных. Например, в приведенной выше разметке разрешается возраст наподобие 43 000 или -6 лет, что несколько не соответствует реальности. Эта проблема решается с помощью атрибутов min и max. В следующем коде представлен пример ограничения возраста разумным диапазоном:
Обычно поля типа number принимают только целые числа, а дроби, например 30.5 не разрешаются. (Более того, некоторые браузеры даже не позволят ввести десятичный знак.) Но это поведение также можно изменить с помощью атрибута step, который указывает шаг изменения числа (в большую или меньшую сторону). Например, установив значение step в 0.1, можно вводить такие значения, как 0.1, 0.2 0.3 и т. д. Но попробуйте отправить форму со значением 0.15 и вы получите знакомое всплывающее сообщение об ошибке. По умолчанию значение шага равно 1.
Атрибут step также влияет на работу кнопок поля со счетчиком:
Attributes
This element includes the global attributes.
The value of the for attribute must be a single id for a labelable form-related element in the same document as the element. So, any given label element can be associated with only one form control.
Note: To programmatically set the for attribute, use htmlFor .
The first element in the document with an id attribute matching the value of the for attribute is the labeled control for this label element — if the element with that id is actually a labelable element. If it is not a labelable element, then the for attribute has no effect. If there are other elements that also match the id value, later in the document, they are not considered.
Multiple label elements can be given the same value for their for attribute; doing so causes the associated form control (the form control that for value references) to have multiple labels.
Note: A element can have both a for attribute and a contained control element, as long as the for attribute points to the contained control element.
HTML Справочник
HTML Теги по алфавитуHTML Теги по категорииHTML ПоддержкаHTML АтрибутыHTML ГлобальныеHTML СобытияHTML Названия цветаHTML ХолстHTML Аудио/ВидеоHTML ДекларацииHTML Набор кодировокHTML URL кодHTML Коды языкаHTML Коды странHTTP СообщенияHTTP методыКовертер PX в EMКлавишные комбинации
HTML Теги
<!—…—>
<!DOCTYPE>
<a>
<abbr>
<acronym>
<address>
<applet>
<area>
<article>
<aside>
<audio>
<b>
<base>
<basefont>
<bdi>
<bdo>
<big>
<blockquote>
<body>
<br>
<button>
<canvas>
<caption>
<center>
<cite>
<code>
<col>
<colgroup>
<data>
<datalist>
<dd>
<del>
<details>
<dfn>
<dialog>
<dir>
<div>
<dl>
<dt>
<em>
<embed>
<fieldset>
<figcaption>
<figure>
<font>
<footer>
<form>
<frame>
<frameset>
<h1> — <h6>
<head>
<header>
<hr>
<html>
<i>
<iframe>
<img>
<input>
<ins>
<kbd>
<label>
<legend>
<li>
<link>
<main>
<map>
<mark>
<meta>
<meter>
<nav>
<noframes>
<noscript>
<object>
<ol>
<optgroup>
<option>
<output>
<p>
<param>
<picture>
<pre>
<progress>
<q>
<rp>
<rt>
<ruby>
<s>
<samp>
<script>
<section>
<select>
<small>
<source>
<span>
<strike>
<strong>
<style>
<sub>
<summary>
<sup>
<svg>
<table>
<tbody>
<td>
<template>
<textarea>
<tfoot>
<th>
<thead>
<time>
<title>
<tr>
<track>
<tt>
<u>
<ul>
<var>
<video>
<wbr>
Html label for value
Тег (от англ. label — метка, ярлык) устанавливает связь между определённой меткой, в качестве которой обычно выступает текст, и элементом формы ( , , ).
Такая связь необходима, чтобы изменять значения элементов формы при щелчке курсором мыши на текст. Кроме того, с помощью можно устанавливать горячие клавиши на клавиатуре и переходить на активный элемент подобно ссылкам.
Существует два способа связывания объекта и метки. Первый заключается в использовании идентификатора id внутри элемента формы и указании его имени в качестве атрибута for элемента . При втором способе элемент формы помещается внутрь контейнера .
Using data- attributes with JavaScript
Now that we understand what custom attributes are and when we can use them, we should probably take a look at how we can interact with them using JavaScript.
If we wanted to retrieve or update these attributes using existing, native JavaScript, then we can do so using the and methods as shown below:
This method will work in all modern browsers, but it is not how attributes are intended to be used. The second (new and improved) way to achieve the same thing is by accessing an element’s property. This property — part of the new HTML5 JavaScript APIs — will return a object of all the selected element’s attributes. When using this approach, rather than using the full attribute name, you can ditch the prefix and refer to the custom data directly using the name you have assigned to it. Data attribute names which contain hyphens will be stripped of their hyphens and converted to CamelCase.
If, at some point in your script, a specific attribute becomes redundant and is no longer needed, it is also possible to completely remove that attribute from the DOM element by setting it to a value of .
Unfortunately, the new property has not yet been implemented in any browser, so in the meantime it’s best to use and as demonstrated earlier.
While developing your application, you may find it useful to be able to select elements based on the presence of — or indeed the specific values of — their custom attributes. This can be achieved quickly and easily using as shown below:
HTML attributes
In HTML, tags may have attributes. When the browser parses the HTML to create DOM objects for tags, it recognizes standard attributes and creates DOM properties from them.
So when an element has or another standard attribute, the corresponding property gets created. But that doesn’t happen if the attribute is non-standard.
For instance:
Please note that a standard attribute for one element can be unknown for another one. For instance, is standard for (), but not for (). Standard attributes are described in the specification for the corresponding element class.
Here we can see it:
So, if an attribute is non-standard, there won’t be a DOM-property for it. Is there a way to access such attributes?
Sure. All attributes are accessible by using the following methods:
- – checks for existence.
- – gets the value.
- – sets the value.
- – removes the attribute.
These methods operate exactly with what’s written in HTML.
Also one can read all attributes using : a collection of objects that belong to a built-in class, with and properties.
Here’s a demo of reading a non-standard property:
HTML attributes have the following features:
- Their name is case-insensitive ( is same as ).
- Their values are always strings.
Here’s an extended demo of working with attributes:
Please note:
- – the first letter is uppercase here, and in HTML it’s all lowercase. But that doesn’t matter: attribute names are case-insensitive.
- We can assign anything to an attribute, but it becomes a string. So here we have as the value.
- All attributes including ones that we set are visible in .
- The collection is iterable and has all the attributes of the element (standard and non-standard) as objects with and properties.
Тег label
Тег label задает метку для поля ввода типа input , textarea , select и так далее.
Метка привязывается к определенному полю ввода с помощью атрибута for . В нем следует указывать значение атрибута id поля ввода, к которому привязана метка. Также метка привязывается к элементу, если этот элемент положить вовнутрь тега label. В этом случае атрибут for указывать не надо. Смотрите примеры для лучшего понимания.
По нажатию на метку привязанные к ней чекбоксы или радио кнопочки будут менять свое состояние с отмеченного на неотмеченное и наоборот. Метка в данном случае нужна для удобства: в мелкие элементы формы тяжело попасть курсором, а в длинную метку с текстом — на порядок легче.
Привязанное к метке текстовое поле ввода типа input и textarea будет получать фокус ввода. Фокус — это когда курсор моргает в поле ввода, в этом случае, если вы что-то будете писать на клавиатуре — текст попадет в это поле (см. псевдокласс focus для продвинутого понимания фокуса).
Метку label можно использовать для имитации чекбокса или радио кнопочки. Это нужно для того, чтобы сделать checkbox или radio со своим дизайном (что на CSS запрещено, но с помощью хитрых приемов возможно).
HTML Теги
<!—…—><!DOCTYPE><a><abbr><acronym><address><applet><area><article><aside><audio><b><base><basefont><bdi><bdo><big><blockquote><body><br><button><canvas><caption><center><cite><code><col><colgroup><data><datalist><dd><del><details><dfn><dialog><dir><div><dl><dt><em><embed><fieldset><figcaption><figure><font><footer><form><frame><frameset><h1> — <h6><head><header><hr><html><i><iframe><img><input><ins><kbd><label><legend><li><link><main><map><mark><meta><meter><nav><noframes><noscript><object><ol><optgroup><option><output><p><param><picture><pre><progress><q><rp><rt><ruby><s><samp><script><section><select><small><source><span><strike><strong><style><sub><summary><sup><svg><table><tbody><td><template><textarea><tfoot><th><thead><time><title><tr><track><tt><u><ul><var><video>
Boolean attributes #
If a boolean attribute is present, it is always true. Boolean attributes include , , , , , , , , , , , , and . If one (or more) of these attributes is present, the element is disabled, required, readonly, etc. If not present, it isn’t.
Boolean values can either be omitted, set to an empty string, or be the name of the attribute; but the value doesn’t have to actually be set to the string . All values, including , , and , while invalid, will resolve to true.
These three tags are equivalent:
If the attribute value is false, omit the attribute. If the attribute is true, include the attribute but don’t provide a value. For example, is not a valid value in HTML; but as is boolean, invalid values resolve to true. But as invalid enumerated attributes don’t necessarily resolve to the same value as missing values, it is easier to get into the habit of omitting values than it is to remember which attributes are boolean versus enumerated and potentially provide an invalid value.
When toggling between true and false, add and remove the attribute altogether with JavaScript rather than toggling the value.
Note that in XML languages, like SVG, all attributes need to include a value, including boolean attributes.
HTML для атрибута
❮ Предыдущий
Все атрибуты HTML
Далее ❯
Определение и использование
При использовании вместе с элементом элемент указывается, к какому элементу формы привязана метка.
При использовании вместе с элементом элемент
Атрибут можно использовать для следующих элементов:
| Элементы | Атрибут |
|---|---|
| на | |
| на |
Примеры
Три переключателя с метками:
Попробуйте сами »
Пример вывода
Выполните вычисление и отобразите результат в элементе

Попробуйте О себе »
Поддержка браузера
Атрибут имеет следующую поддержку браузера для каждого элемента:
| Элемент | |||||
|---|---|---|---|---|---|
| этикетка | Да | Да | Да | Да | Да |
| выход | 10,0 | Не поддерживается | 4,0 | 5.1 | 11,0 |
❮ Предыдущий
Все атрибуты HTML
Следующий ❯

9003 900
Справочник по HTML Справочник по CSS
Основные примеры
FORUM |
О
W3Schools оптимизирован для обучения и обучения. Примеры могут быть упрощены для улучшения чтения и обучения.
Учебники, ссылки и примеры постоянно пересматриваются, чтобы избежать ошибок, но мы не можем гарантировать полную правильность всего содержания.
Copyright 1999-2023 Refsnes Data. Все права защищены. W3Schools работает на основе W3.CSS.
Дополнительные элементы и атрибуты
- Label for:
- Для элементов управления radio и checkbox удобно использовать дополнительные элементы, которые, во-первых, делают привязку текста к самому элементу radio или checkbox, во-вторых, добавляют обводку при клике:
<input type="checkbox" id="book1"> <label for="book1">ASP<label> |
В примере создана надпись (тег ) для элемента . Привязка осуществляется через атрибут , значение которого указано в атрибуте надписи.
Результат:
Атрибут disabled:
Атрибут позволяет блокировать элемент, делая его недоступным для изменения пользователем:
<input type="text" name="login" size="20" value="Логин" maxlength="25" disabled="disabled"><br> <input type="checkbox" name="asp" value="yes">ASP<br> <input type="checkbox" name="js" value="yes" checked="checked" disabled="disabled">javascript<br> |

Результат:
Атрибут readonly:
Атрибут делает текстовые документы доступными только для чтения (вносить и изменять текст нельзя):
<input type="text" name="login" size="20" value="Логин" maxlength="25" readonly="readonly"> |

Результат:
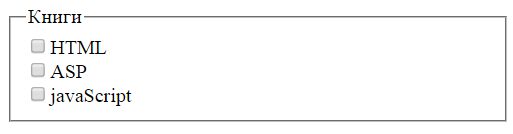
Элемент fieldset:
Для визуального оформления группы объектов можно использовать элемент :
<fieldset> <legend>Книги<legend> <input type="checkbox" value="html">HTML<br> <input type="checkbox" value="asp">ASP<br> <input type="checkbox" value="js">javaScript<br> <fieldset> |
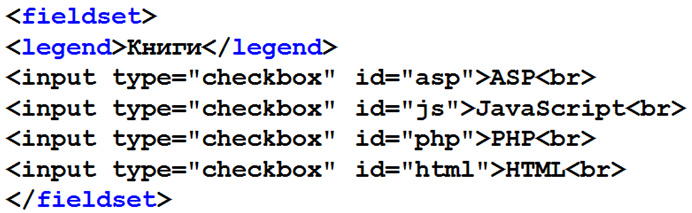
Результат:
Атрибут tabindex:
Можно задать очередность передвижения по элементам клавишей :
<элемент tabindex="1"> |
Элемент будет первым в очереди переходов.
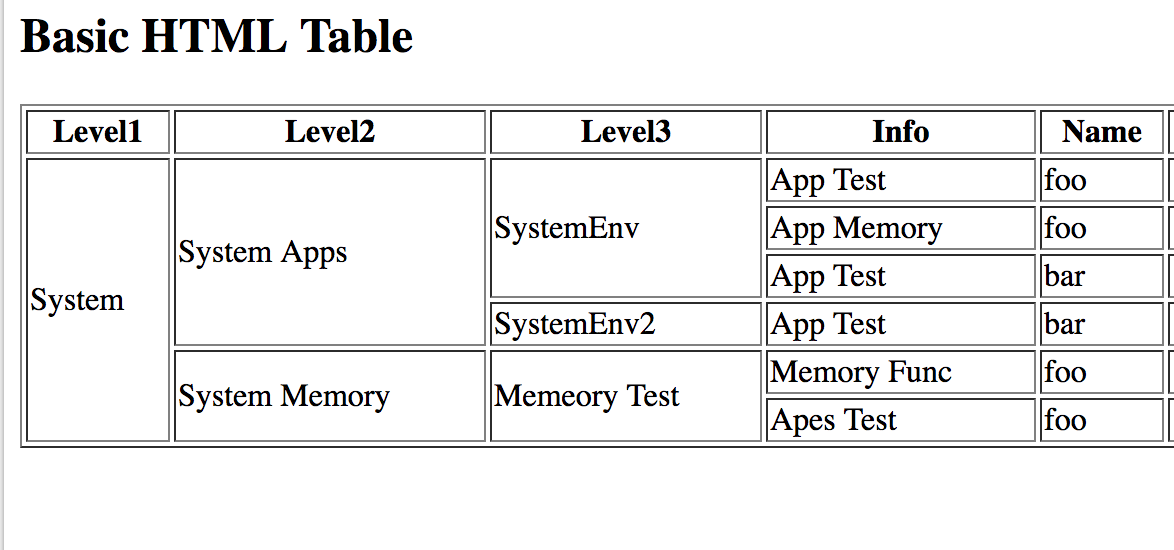
Задание: Необходимо создать анкету web-разработчика согласно изображению. Элементы располагать в табличном виде
What are Attributes
Attributes are small meta-data elements added for PHP classes, functions, closures, class properties, class methods, constants, and even on anonymous classes.
PHP DocBlock comments are probably the most familiar example.
These comments are somewhat structured with «annotations». These small bits are not executed, but PHP provides an API called «Reflection API» to conveniently retrieve these comments.
This approach is a little brittle because it is easy to make a typo and that will go unnoticed until these comments are pulled from somewhere else in the code.
The new approach added in PHP 8 is Attributes. Attributes provide a more pragmatic approach to declare and fetch these little bits of information.
Frameworks such as Drupal, Symfony, and Doctrine use annotations to provide auxiliary information for certain classes in an organized way.
Piggybacking on DocBlock comments, this annotation provides useful information about the class. From a framework, this can be turned into a router entry to route path to method.
Attributes in PHP 8 goes steps ahead of this, which brings a structured and engine-validated approach to annotations.
Instead of writing a separate definition in the form of an XML schema or a JSON schema, Attributes provide an easy and manageable way to organize this meta-data.
Many languages have similar features to PHP Attributes.
- Java is probably the most popular one, which has Annotations with a syntax similar to .
- Rust has Attributes with a syntax similar to , that is exactly the same as PHP’s implementation.
- Python annotations are called Decorators, and follow a similar syntax: .
PHP’s existing Doctrine-esque is widely used, but Attributes in PHP 8 uses the and brace syntax. This was debated and changed from the initial implementation to to the final syntax.
Attributes and Annotations provide the same functionality. The word «Annotations» is already being used widely in PHP libraries and frameworks, so the name Attributes help to minimize the confusion with Annotations.
There were two previous attempts at bringing this feature to PHP.
The first one is about 8 years ago, with a proposal named «annotations».
In 2016, the first Attributes RFC was proposed by Dmitry Stogov.
Neither of these attempts were quite fruitful. The first Attributes RFC in fact proposed the same syntax we have for PHP 8, but the second RFC which made the cut to PHP 8 was a bit more elaborate and Benjamin Eberlei put an amazing effort to address minor details and to have a healthy discussion with the community to agree to the syntax and functionality.
На практике
Скопировать ссылку «На практике» Скопировано
Денис Ежков советует
Скопировать ссылку «Денис Ежков советует» Скопировано
Обязательно связывайте с чекбоксами и радиокнопками. Это небольшие элементы интерфейса, в которые довольно сложно попасть курсором мыши или пальцем на мобильных устройствах. Если у них есть связанный , то пользователь может кликать по тексту подписи, а не целиться в сам чекбокс. Любите своих пользователей!
Алёна Батицкая советует
Скопировать ссылку «Алёна Батицкая советует» Скопировано
Даже если дизайнер нарисовал форму, в которой не предусмотрены явные лейблы для элементов, то вам нужно всё равно прописать их в разметке и скрыть через стили. В этом случае их будет не видно, но скринридер их прочитает.
При нажатии на лейбл, связанный с полем ввода или другим элементом формы, фокус будет перемещён на этот элемент.
Summary
- Attributes – is what’s written in HTML.
- Properties – is what’s in DOM objects.
A small comparison:
| Properties | Attributes | |
|---|---|---|
| Type | Any value, standard properties have types described in the spec | A string |
| Name | Name is case-sensitive | Name is not case-sensitive |
Methods to work with attributes are:
- – to check for existence.
- – to get the value.
- – to set the value.
- – to remove the attribute.
- is a collection of all attributes.
For most situations using DOM properties is preferable. We should refer to attributes only when DOM properties do not suit us, when we need exactly attributes, for instance:
- We need a non-standard attribute. But if it starts with , then we should use .
- We want to read the value “as written” in HTML. The value of the DOM property may be different, for instance the property is always a full URL, and we may want to get the “original” value.
Создание формы
Для отделения формы от остальных участков верстки используется специальный тег . Если его не использовать, то браузер не поймет, какие именно данные нужно отправить. Ведь на странице может быть не одна, а сразу несколько различных форм.
Сервер — удаленный компьютер, на котором хранится весь проект. Сейчас вы смотрите на страницу, которая сгенерирована на сервере и отдана вам по определенному адресу. Этот адрес указан сейчас в вашем браузере.
Примером взаимодействия с формой является любой сайт-поисковик. Например, Google или Yandex. Вы вводите поисковый запрос, который отправляется на сервер. Сервер обрабатывает результат и выдает вам подходящие сайты. Это взаимодействие происходит с помощью серверных языков программирования, таких как PHP, Ruby и так далее. В рамках верстки мы не можем влиять на то, как обработается результат. Результат верстки — набор тегов, с помощью которых браузер соберет данные и отправит их на сервер.
Тег может принимать несколько различных атрибутов. Они не являются обязательными, но их использование может серьезно повлиять на работу. Самым главным из них является атрибут . Этот атрибут позволяет указать директорию или файл на сервере, куда будут отправлены данные. Если этот атрибут не указан, то данные будут отправлены на ту же страницу, где форма и находится.
Смысл этого действия вы лучше поймете, если будете заниматься Backend разработкой. Например, на языке PHP или Python. Если сейчас вам кажется это сложным, то не отчаивайтесь. Разработчики всегда вам подскажут, куда стоит отправлять данные.
Property-attribute synchronization
When a standard attribute changes, the corresponding property is auto-updated, and (with some exceptions) vice versa.
In the example below is modified as an attribute, and we can see the property changed too. And then the same backwards:
But there are exclusions, for instance synchronizes only from attribute → property, but not back:
In the example above:
- Changing the attribute updates the property.
- But the property change does not affect the attribute.
That “feature” may actually come in handy, because the user actions may lead to changes, and then after them, if we want to recover the “original” value from HTML, it’s in the attribute.
Итого
- Атрибуты – это то, что написано в HTML.
- Свойство – это то, что находится внутри DOM-объекта.
Таблица сравнений для атрибутов и свойств:
| Свойства | Атрибуты |
|---|---|
| Любое значение | Строка |
| Названия регистрозависимы | Не чувствительны к регистру |
| Не видны в | Видны в |
Синхронизация между атрибутами и свойствами:
- Стандартные свойства и атрибуты синхронизируются: установка атрибута автоматически ставит свойство DOM. Некоторые свойства синхронизируются в обе стороны.
- Бывает так, что свойство не совсем соответствует атрибуту. Например, «логические» свойства вроде , всегда имеют значение , а в атрибут можно записать произвольную строку.Выше мы видели другие примеры на эту тему, например .
Нестандартные атрибуты:
- Нестандартный атрибут (если забыть глюки старых IE) никогда не попадёт в свойство, так что для кросс-браузерного доступа к нему нужно обязательно использовать .
- Атрибуты, название которых начинается с , можно прочитать через . Эта возможность не поддерживается IE10-.
Для того, чтобы избежать проблем со старыми IE, а также для более короткого и понятного кода старайтесь везде использовать свойства, а атрибуты – только там, где это действительно нужно.
А действительно нужны атрибуты очень редко – лишь в следующих трёх случаях:
- Когда нужно кросс-браузерно получить нестандартный HTML-атрибут.
- Когда нужно получить «оригинальное значение» стандартного HTML-атрибута, например, .
- Когда нужно получить список всех атрибутов, включая пользовательские. Для этого используется коллекция .
Если вы хотите использовать собственные атрибуты в HTML, то помните, что атрибуты с именем, начинающимся на валидны в HTML5 и современные браузеры поддерживают доступ к ним через свойство .