
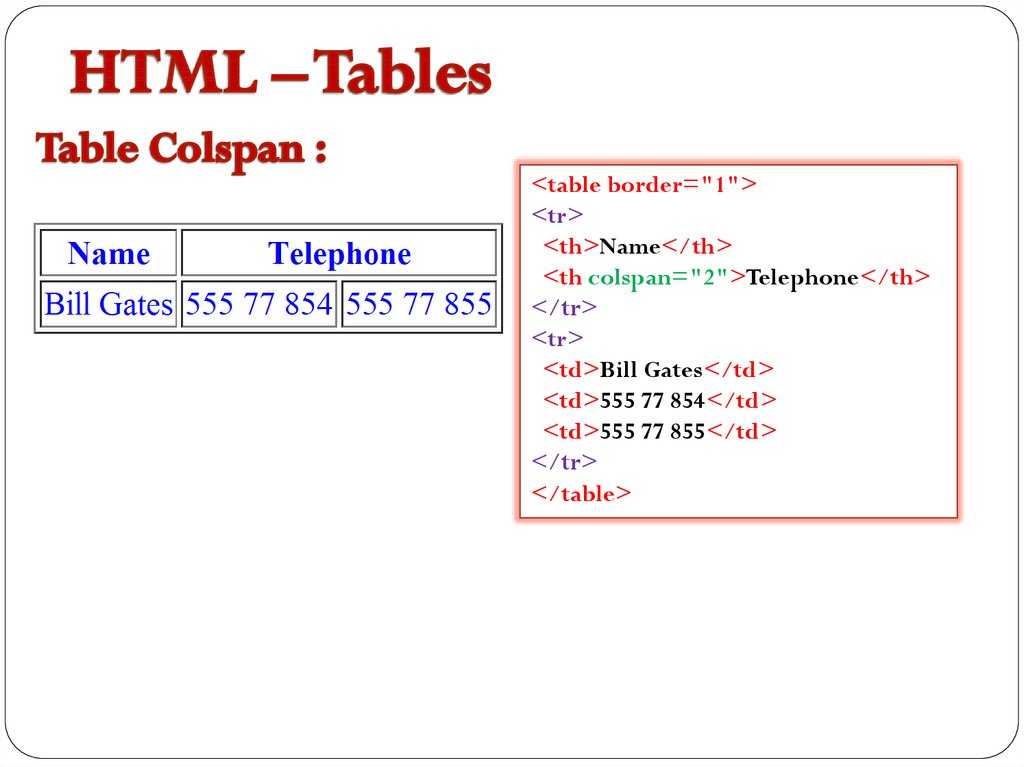
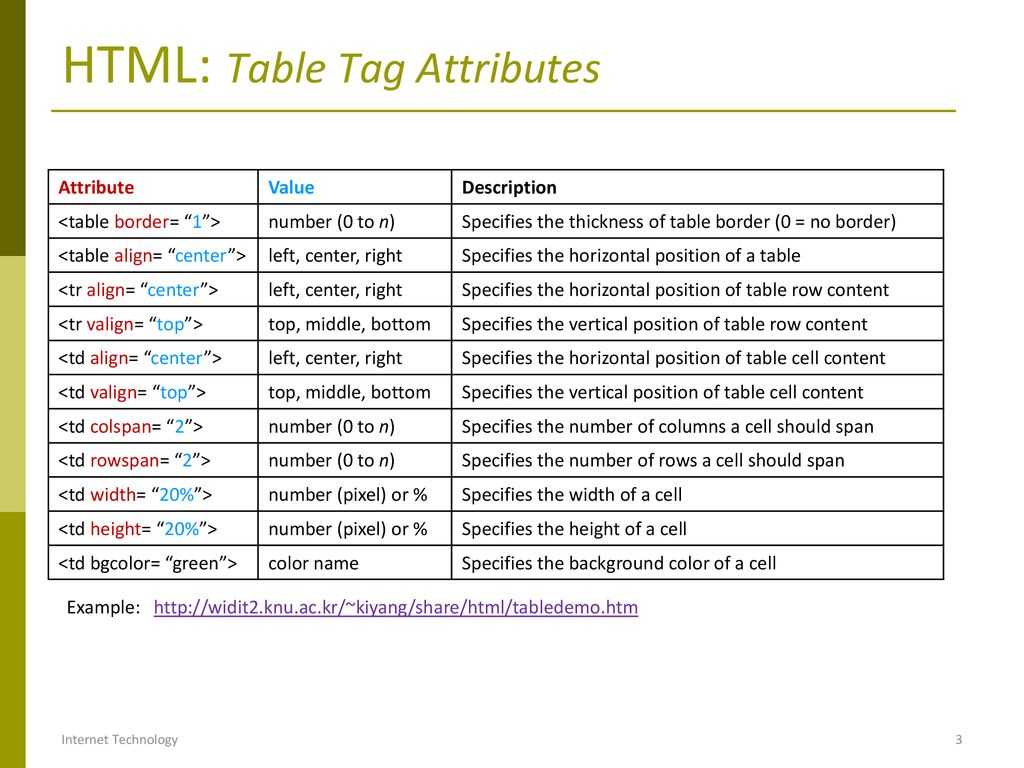
Colspan For Div Tables
The best way to extend table cells in a div table is to use nested tables, but each case might be different. We are going to present an increased colspan in a div table through an example.
Let’s say we have a 3×3 div table, where we need to push the highlighted E cell to the bottom to annex it to the H cell.
<div class="divTable">
  <div class="divTableBody">
    <div class="divTableRow">
      <div class="divTableCell">A</div>
      <div class="divTableCell">B</div>
      <div class="divTableCell">C</div>
    </div>
    <div class="divTableRow">
      <div class="divTableCell">D</div>
      <div class="divTableCell brick">E</div>
      <div class="divTableCell">F</div>
    </div>
    <div class="divTableRow">
      <div class="divTableCell">G</div>
      <div class="divTableCell">H</div>
      <div class="divTableCell">I</div>
    </div>
  </div>
</div>
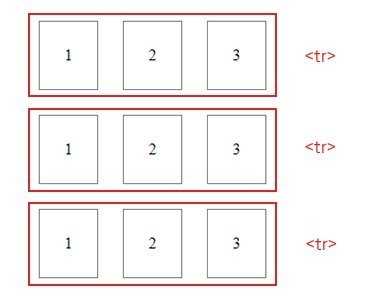
A
B
C
D
E
F
G
H
I
In the first step we make a 3×2 div table.
<div class="divTable">
  <div class="divTableBody">
    <div class="divTableRow">
      <div class="divTableCell">A</div>
      <div class="divTableCell">B</div>
      <div class="divTableCell">C</div>
    </div>
    <div class="divTableRow">
      <div class="divTableCell">D<br>G</div>
      <div class="divTableCell brick">E<br>H</div>
      <div class="divTableCell">F<br>I</div>
    </div>
  </div>
</div>
A
B
C
DG
EH
FI
Next, we add 1×2 small tables in the cells that share the same row with the hightlighted tall cell.There’s a small gap (2px) between the cells and the nested tables. Reducing this padding in the cells containing the smaller tables will make it invisible that there are in fact tables in the table.
<div class="divTable">
  <div class="divTableBody">
    <div class="divTableRow">
      <div class="divTableCell">A</div>
      <div class="divTableCell">B</div>
      <div class="divTableCell">C</div>
    </div>
    <div class="divTableRow">
      <div class="divTableCell">
    <div class="divTable">
      <div class="divTableBody">
      <div class="divTableRow">
        <div class="divTableCell">D</div>
      </div>
      <div class="divTableRow">
        <div class="divTableCell">G</div>
      </div>
      </div>
    </div>
      </div>
      <div class="divTableCell brick">E<br>H</div>
      <div class="divTableCell">
    <div class="divTable">
      <div class="divTableBody">
      <div class="divTableRow">
        <div class="divTableCell">F</div>
      </div>
      <div class="divTableRow">
        <div class="divTableCell">I</div>
      </div>
      </div>
    </div>
      </div>
    </div>
  </div>
</div>
A
B
C
D
G
EH
F
I
Using nested tables we can set rowspan in div tables using a similar strategy.
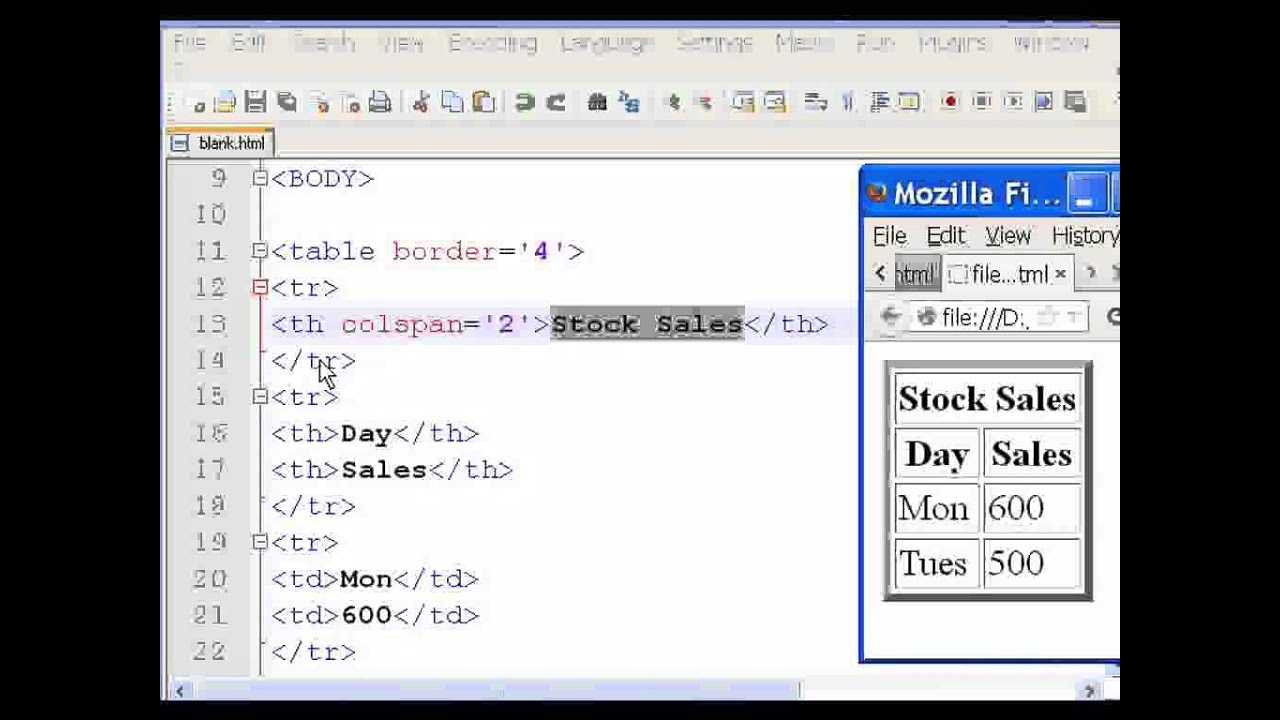
Adding Rowspan To An Existing Table
Most visual HTML table generators don’t support setting the rowspan easily. Usually you need to create the code for a plain X×Y table, then using some WYSIWYG HTML editor, you have to manually add the rowspan attribute, and remove the unwanted cells that are pushed out by the enlarged cell.
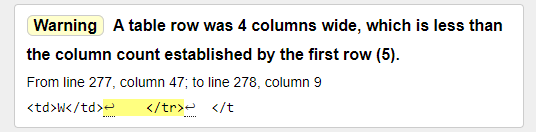
Warning thrown by W3 HTML Validator for incorrect rowspan declaration.
Dealing with rowspans is a little harder than adding colspans because increasing a colspan you just have to delete the next cell(s) in the same row. Adding rowspan however you need to calculate exactly which cell has to be removed in the next row.
Adding rowspan=»2″ to the E cell pushes out the I cell which has to be removed.
<table>
  <tr>
    <td>A</td><td>B</td><td>C</td>
  </tr>
  <tr>
    <td>D</td>
    <td rowspan="2">E</td>
    <td>F</td>
  </tr>
  <tr>
    <td>G</td>
    <td>H</td>
    <td class="brick">I</td>
  </tr>
  <tr>
    <td>J</td><td>K</td><td>L</td>
  </tr>
</table>
Which cell has to be removed exactly?
When we set the rowspan of a cell to 2, we have to delete a cell in the next row (demonstrated above)
When we set the rowspan of a cell to 3, we have to delete a cell in 2 rows below.
<table>
  <tr>
    <td>A</td><td>B</td><td>C</td>
  </tr>
  <tr>
    <td>D</td>
    <td rowspan="3">E</td>
    <td>F</td>
  </tr>
  <tr>
    <td>G</td>
    <td>H</td>
    <td class="brick">I</td>
  </tr>
  <tr>
    <td>J</td><td>K</td>
    <td class="brick">L</td>
  </tr>
</table>
Rowspan in the last row of the table
Increasing the rowspan of a table cell in the last row would push the bottom of the table down, making the cell to stick out. Doing this is incorrect and the W3 Validator throws the following error.

<table>
  <tr>
    <td>A</td>
    <td>B</td>
  </tr>
  <tr>
    <td rowspan="2">C</td>
    <td>D</td>
  </tr>
</table>
Объединение ячеек в таблице
В происходит при помощи двух атрибутов тега td: — объединение ячеек по горизонтали, — объединение ячеек по вертикали.
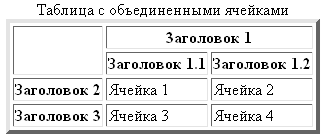
Пример: создать таблицу по образцу на картинке. Использовать слияние ячеек
Выполнение:
1 2 3 4 5 6 7 8 9 10 11 12 13 14 15 16 17 18 19 20 21 |
<table border="1"> <caption>Таблица с объединенными ячейками <caption> <tr> <th rowspan="2"> <th> <th colspan="2">3аголовок 1<th> <tr> <tr> <th> Заголовок 1.1<th> <th> Заголовок 1.2<th> <tr> <tr> <th> Заголовок 2<th> <td> Ячейка 1<td> <td> Ячейка 2<td> <tr> <tr> <th> Заголовок 3<th> <td> Ячейка 3<td> <td> Ячейка 4<td> <tr> <table> |
Лабораторная работа №2: создайте таблицы, с расположенными в их ячейках цифрами, точно по образцу: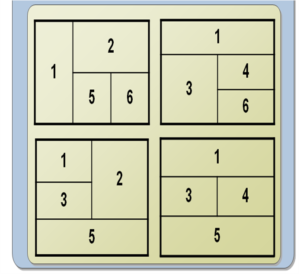
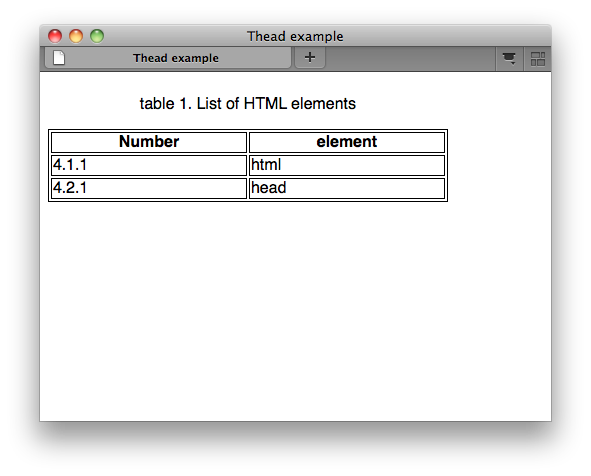
Rowspan Examples
<table>
  <thead>
    <tr>
      <th>A head</th>
      <th rowspan="2">B head</th>
    </tr>
    <tr>
      <th>C head</th>
    </tr>
  </thead>
  <tbody>
    <tr>
      <td rowspan="2">X</td>
      <td>Y</td>
    </tr>
    <tr>
      <td>Z</td>
    </tr>
  </tbody>
</table>
| A head | B head |
|---|---|
| C head | |
| X | Y |
| Z |
A table with 2 header and 2 tbody rows with two enlarged cells.
<table>
<thead>
<tr>
<th>⏰</th><th>Jeff</th>
<th>Elon</th><th>Bill</th>
<th>Warren</th>
</tr>
</thead>
<tbody>
<tr>
<td>1</td>
<td rowspan="5">1-5</td>
<td rowspan="3">1-3</td>
<td>1</td>
<td>1</td>
</tr>
<tr>
<td>2</td>
<td rowspan="3">2-4</td>
<td>2</td>
</tr>
<tr>
<td>3</td>
<td rowspan="3">3-5</td>
</tr>
<tr>
<td>4</td><td>4</td>
</tr>
<tr>
<td>5</td><td>5</td><td>5</td>
</tr>
</tbody>
</table>
| Elon | Jeff | Bill | Warren | |
|---|---|---|---|---|
| 1 | 1-5 | 1-3 | 1 | 1 |
| 2 | 2-4 | 2 | ||
| 3 | 3-5 | |||
| 4 | 4 | |||
| 5 | 5 | 5 |
A timetable visualizing work shifts with highlighted and enlarged cells.
На практике
Скопировать ссылку «На практике» Скопировано
Алёна Батицкая советует
Скопировать ссылку «Алёна Батицкая советует» Скопировано
Частый дизайнерский приём — подсветка строк таблицы через одну. Это помогает считывать длинные таблицы, глазу есть за что зацепиться.
Например, сделаем каждую вторую строку с коричневым фоном. Для этого понадобится всего одно CSS-правило с псевдоклассом :nth — child ( ) :
Скопировать Скопировано Не удалось скопировать
На всякий случай подстрахуемся и ограничим область раскрашивания только телом таблицы, исключим шапку и подвал.
Скопировать Скопировано Не удалось скопировать
Можно сделать так, чтобы строка с заголовками колонок прилипала при прокрутке длинной таблицы. Это удобно, если данных много и пользователь может просто забыть, в какой колонке какие данные.
Скопировать Скопировано Не удалось скопировать
Не забудьте добавить position : relative для родителя. Заодно подстрахуемся и сделаем прилипающими только заголовки в шапке таблицы.
Скопировать Скопировано Не удалось скопировать
Задайте фон заголовкам, чтобы текст ячеек не был виден при прокрутке. А чтобы избавиться от линий между ячейками, зададим для всей таблицы свойство border — collapse : collapse :
Скопировать Скопировано Не удалось скопировать
Хотя в целом поддержка хорошая, не во всех браузерах будет работать это позиционирование в таблицах. Подробнее смотрите на Can I use.
Подытожим
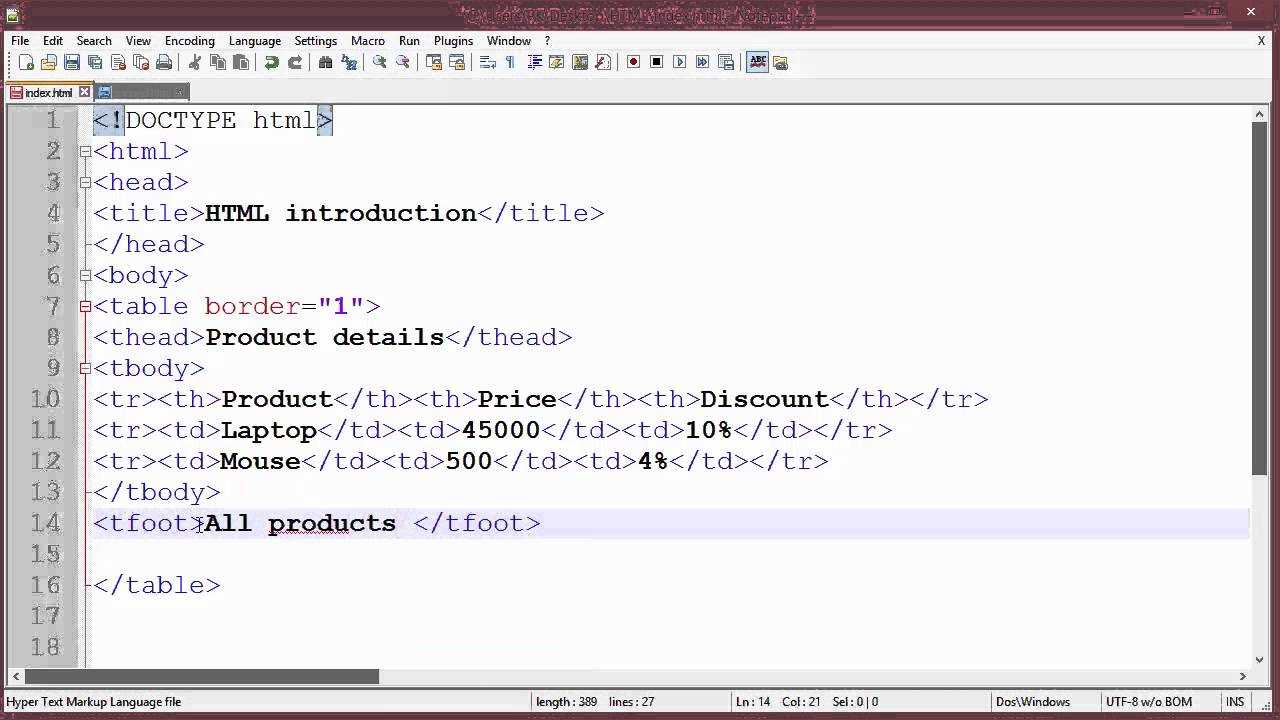
- Таблица состоит из строк <tr> и ячеек (<td> и <th>). Дочерними элементами строки <tr> могут быть только ячейки, но не наоборот.
- Таблице нужен заголовок <caption>. Он увеличивает доступность веб-содержимого. Если дизайнер не учёл этого, верстальщик сам придумывает заголовок и скрывает его с помощью CSS.
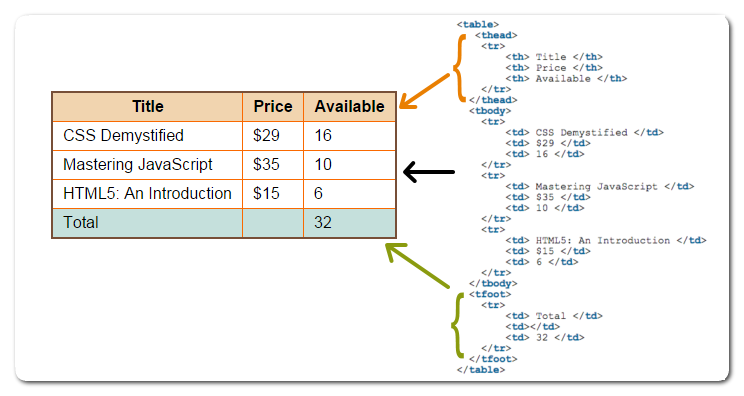
- За логическое структурирование таблицы, помимо заголовка <caption>, отвечают теги <thead>, <tbody> и <tfoot>. Также они полезны при стилизации секций таблицы.
- Внутри <thead> ячееки задают тегом <th> (он семантический), внутри <tfoot> — <td>, а внутри <tbody> допустимы оба.
- Для стилизации столбцов в таблице применяют тег <col>.
Rowspan in HTML table
Rowspan is an HTML table attribute that allows a single table cell to span across multiple rows vertically. It is used to merge two or more adjacent rows into a single cell.
The rowspan attribute is specified in the opening td tag of the cell to be merged, and the value of the attribute indicates the number of rows to span. For example, if you want to merge three adjacent rows into a single cell, you would set the rowspan attribute to 3:
<table border=»1″>
<tr>
<td rowspan=»3″>Merged cell spanning 3 rows</td>
<td>Column 2</td>
</tr>
<tr>
<td>Column 2</td>
</tr>
<tr>
<td>Column 2</td>
</tr>
</table>
Browser View
| Merged cell spanning 3 rows | Column 2 |
| Column 2 | |
| Column 2 |
In the above example, the first cell in the first column has a rowspan attribute of 3, which means it spans across three rows. As a result, it occupies the space of three cells, merging them into a single cell.
Following is another example that demonstrates the use of rowspan to create a table with a header column that spans multiple rows:
<table border=»1″>
<tr>
<th rowspan=»2″>Name</th>
<th>Age</th>
<th>Gender</th>
</tr>
<tr>
<td>25</td>
<td>Male</td>
</tr>
<tr>
<td>Jane</td>
<td>32</td>
<td>Female</td>
</tr>
</table>
Browser View
| Name | Age | Gender |
|---|---|---|
| 25 | Male | |
| Jane | 32 | Female |
In the above example, the first th element in the first column has a rowspan attribute of 2, which means it spans across two rows. This creates a merged cell that serves as the header for the «Name» column. The second row contains the «Age» and «Gender» columns, and the third row contains data for Jane.
Using rowspan can help you create tables with complex data or improve the visual layout of a table. By merging adjacent cells into a single cell, you can create a more compact and streamlined table that is easier to read and understand.
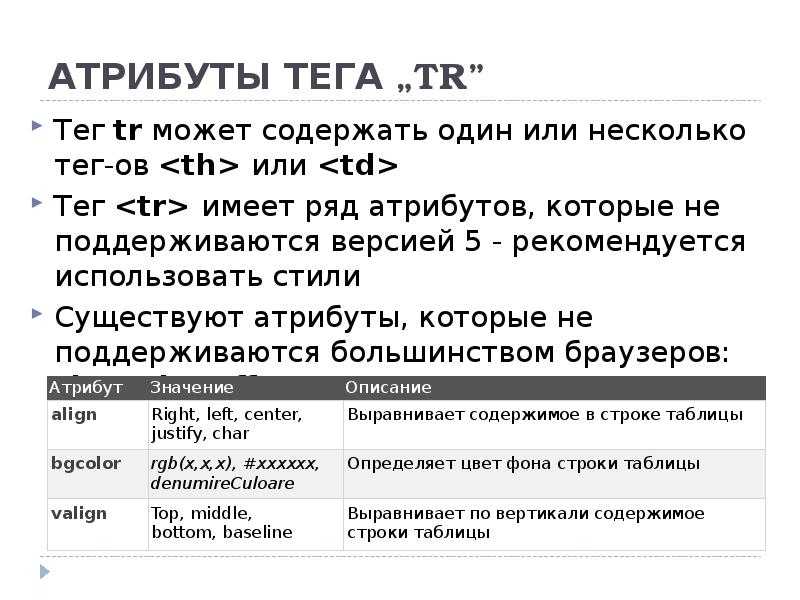
HTML вложенные таблицы
Таблицы со сложной структурой проще заменять на вложенные таблицы.
Пример: создайте вложенные таблицы по образцу: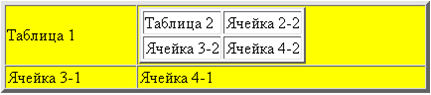
Выполнение:
1 2 3 4 5 6 7 8 9 10 11 12 13 14 |
<TABLE border="4" bgcolor="yellow">
<tr>
   <td>Таблица 1<td>
   <td>
      <TABLE>
      <tr>  <td>Таблица 2<td><td>Ячейка 2-2<td>  <tr>
      <tr>  <td>Ячейка 3-2<td><td>Ячейка 4-2<td> <tr>
      <TABLE>
   <td>
<tr>
   <td>Ячейка 3-1<td>
   <td>Ячeйкa 4-1<td>
<tr>
<TABLE>
|
Лабораторная работа №3:
- Создайте таблицу с фиксированными размерами, содержащую ячейки указанной на рисунке ширины
- Вставьте в левую нижнюю ячейку вложенную таблицу
- Фон ячеек вложенной таблицы сделайте серым
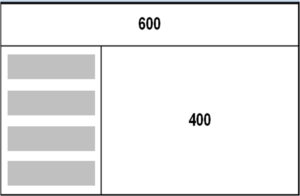
Лабораторная работа №4:
- Откройте задание, выполненное на прошлой лабораторной работе
- Добавьте в верхнюю ячейку еще одну вложенную таблицу
- Фон ячеек вложенной таблицы сделайте белым
Оформление таблиц с помощью CSS классов Bootstrap
Для придания таблицы базового оформления необходимо добавить класс к элементу :
Например:
Оформление таблиц по типу полос «зебры»
Для выделения нечётных строк основной части таблицы (…) с помощью тёмного фона добавьте дополнительно класс к классу .
Внимание: Для оформления таблиц по типу полос «зебры» в Twitter Bootstrap 3 используется селектор , который не поддерживается в браузере Internet Explorer 8.
Например:
Создание таблицы с границами
Также вы можете добавлять границы для всех ячеек таблицы, просто добавив дополнительный класс Bootstrap .table-bordered к базовому классу .table.
Выше приведенный пример будет выглядеть примерно так:
| № п/п | Имя | Фамилия | |
|---|---|---|---|
| 1 | Иван | Чмель | ivan@mail.ru |
| 2 | Петр | Щербаков | petr@mail.ru |
| 3 | Юрий | Голов | yuri@mail.ru |
Создание таблицы с интересным режимом (подсвечивание строк при наведении на них курсора)
Что бы включить подсвечивание строк таблицы, Вам необходимо добавить класс .table-hover к базовому классу .table элемента <table>.
Выше приведенный пример будет выглядеть примерно так:
| № п/п | Имя | Фамилия | |
|---|---|---|---|
| 1 | Иван | Чмель | ivan@mail.ru |
| 2 | Петр | Щербаков | petr@mail.ru |
| 3 | Юрий | Голов | yuri@mail.ru |
Создание сжатой или компактной таблицы
Вы можете также сделать свои таблицы более компактными посредством добавления дополнительного класса .table-condensed к базовому классу .table. Класс .table-condensed делает таблицу компактной за счет уменьшения отступов в ячейках наполовину.
Выше приведенный пример будет выглядеть примерно так:
Дополнительные акцентные классы для строк таблицы
Существуют вспомогательные классы, которые позволяют выделить строку или отдельные ячейки различным цветом посредством окраски их фона.
Вышеприведенный пример будет выглядеть примерно так:
Создание адаптивной таблицы с помощью Bootstrap
С помощью Twitter Bootstrap 3 Вы можете также создавать адаптивные таблицы, которые можно просматривать на маленьких устройствах (ширина экрана, у которых меньше 768px) с помощью полосы прокрутки. При просмотре адаптивных таблиц на других устройствах, имеющих экран шириной, больше чем 768px полоса прокрутки будет отсутствовать.
Строки и ячейки таблицы
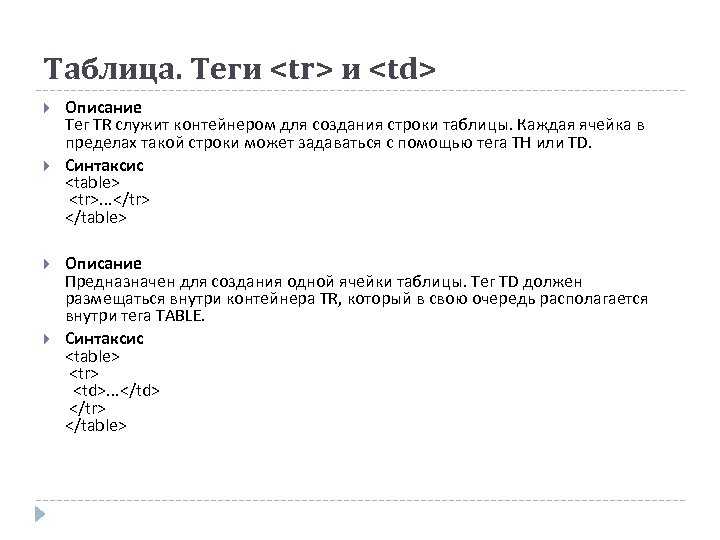
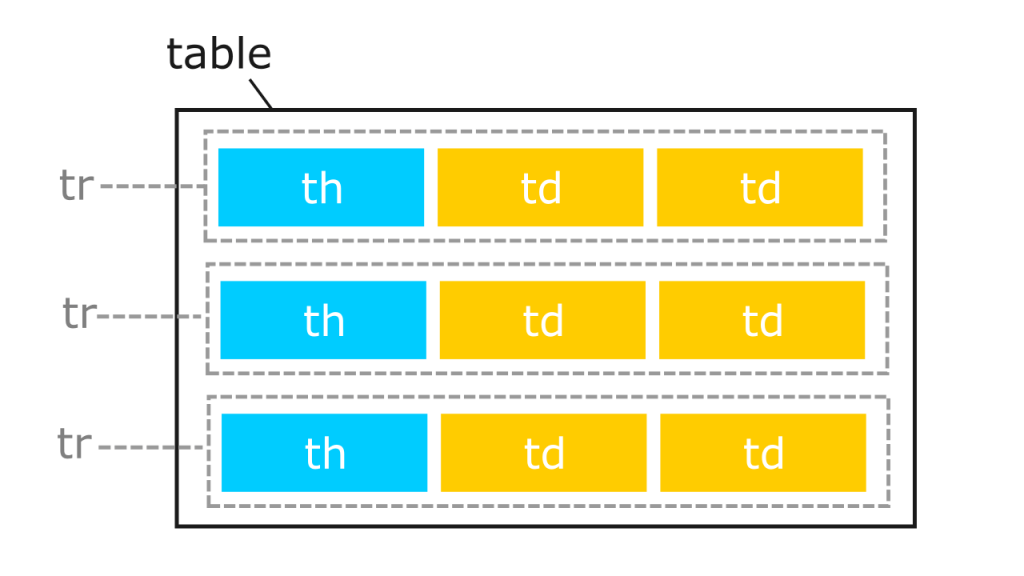
Каждая таблица состоит из строк и ячеек, а задаётся тегом <table> — это контейнер для остальных тегов таблицы.
Тег <tr> образует контейнер для создания строки таблицы. Каждая ячейка в такой строке устанавливается с помощью тега <td> (хотя первая может быть задана и тегом <th>).
Важно понимать. Дочерними элементами строки могут быть только ячейки (и заголовочная ячейка
)
А сама строка
Рассмотрим пример:
Мы видим три строки (элементы <tr>). В каждой из строк по три ячейки (<td>). Представим это HTML-кодом:
Объединение ячеек
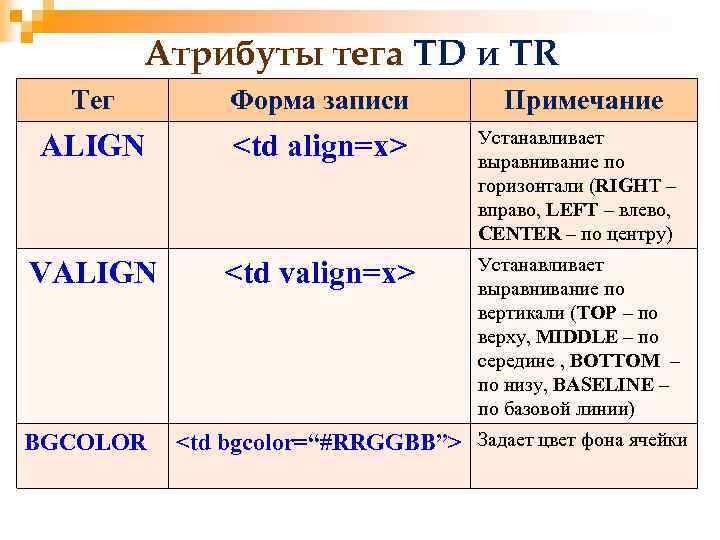
Ячейки можно объединять (растягивать по горизонтали и вертикали) с помощью специальных атрибутов. При этом поглощаемые ячейки задавать своими тегами уже не придётся.
Столбцы таблицы объединяются атрибутом colspan, а строки — атрибутом rowspan.
И тут важно не запутаться:
Атрибут colspan тегов <td> и <th> объединяет ячейки по горизонтали (то есть ячейки одной строки). Значение colspan указывает, сколько столбцов пересекает ячейка.
Атрибут rowspan тегов <td> и <th> объединяет ячейки по вертикали (то есть ячейки разных строк). Значение rowspan задаёт, через сколько строк проходит ячейка.
Рассмотрим пару примеров:
| 1 | 2 | |
|---|---|---|
| 1 | 2 | |
| 1 | 2 | 3 |
| 1 | 2 |
Вторая ячейка первой строки пересекает два столбца. То есть она растянулась по горизонтали и приняла в себя третью ячейку первой строки. Третья ячейка второй строки пересекает две строки, то есть растянулась по вертикали, заняв и третью ячейку третьей строки.
Поэтому третьи ячейки для первой и третьей строк задавать не нужно. Они уже поглощены другими. Теперь к коду:
Ещё один пример:
| 1 | 2 | 3 |
|---|---|---|
| 1 | 2 | 3 |
| 1 | 2 | |
| 1 |
Как такое сверстать:
Как создать строки таблицы
С помощью тега <tr> мы можем создать строку, в которой будут содержаться столбцы таблицы. Давайте добавим этот тег и посмотрим, что произойдет. Прописываем следующее:
<table>

      <tr>

         Моя первая таблица

      </tr>

</table>
В результате видим все ту же картину с маленькой точкой:
Так происходит, потому что каждая ячейка в такой строке устанавливается с помощью тега <td>. Если добавить его внутрь, то мы получим тот результат, к которому шли изначально – таблицу. Да, она еще не похожа на полноценную таблицу, но уже появляется рамка и есть первая строка с первым столбцом.
Пропишите следующий код:
<table>

       <tr>

                 <td>

                       Моя первая таблица

                 </td>

       </tr>

</table>
Получаем следующее:
Аналогичным образом давайте добавим еще несколько строк и столбцов. Для этого в теге <table> создадим 3 закрывающих тега <tr></tr> и внутрь добавим по 2 тега <td></td>:
<table>

                        <tr>

                                   <td>

                                               Моя первая таблица

                                   </td>

                                   <td>

                                               А вот и столбец

                                   </td>

                        </tr>

                        <tr>

                                   <td>

                                               А вот и новая строка

                                   </td>

                                   <td>

                                               И еще один столбец

                                   </td>

                        </tr>

                        <tr>

                                   <td>

                                               Третья строка!

                                   </td>

                                   <td>

                                               И последний столбец!

                                   </td>

                        </tr>

</table>
Получаем следующее:
Как видите, мы потихоньку идем к образованию полноценной таблицы, но не хватает внутренних границ. Для этого нам нужно добавить обводку к тегу <td>, чтобы были видны границы строк и столбцов.
Просто прописываем в теге <style> пару строчек кода:
td {

   border: 1px solid grey;

}
Получаем результат:
Чтобы получить ту таблицу, которую мы хотим видеть, необходимо совместить рамки. Для этого прописываем еще одну строчку кода в тег <style> для table:
table {

border-collapse: collapse;

}
И, вуаля, перед нами отображается полноценная таблица с привычными границами:
Для визуального удовлетворения давайте также растянем таблицу на всю ширину экрана – для этого необходимо задать width для тега <table>:
table {

   width: 100%;

}
Теперь наша таблица растянута:
Width со значением 100% растягивает таблицу на всю ширину страницы. Также вы можете указывать значения в пикселях, например width: 500px – в таком случае на любом экране таблица примет указанную ширину. Аналогичным образом можно присвоить и высоту – в пикселях или в процентах.
Style table cells that span multiple columns or rows using CSS
To style table cells that span multiple columns or rows using CSS, you can use the :nth-child() pseudo-class selector. This selector matches elements based on their position within a parent element.
For example, to style the first cell of a table row that spans two columns, you can use the following CSS:
tr:first-child td:first-child {
/* styles for the first cell */
}
tr:first-child td:first-child + td {
/* styles for the second cell */
}
In the above example, tr:first-child selects the first row of the table, and td:first-child selects the first cell in that row. td:first-child + td selects the second cell in the row. You can apply any desired CSS styles to these selectors to style the cells.


To style cells that span multiple rows or columns, you can use the :nth-child() selector with the n parameter. For example, to style the second cell of a row that spans three columns, you can use the following CSS:
tr:first-child td:nth-child(2n) {
/* styles for the second cell */
}
In the above example, tr:first-child selects the first row of the table, and td:nth-child(2n) selects every second cell in that row, including the second cell.
Note that the above examples assume that the table has a fixed number of columns and rows. If the table has a variable number of columns and rows, you may need to use a more complex CSS selector to target the desired cells.
What happens if I use colspan or rowspan with an invalid value?
If you use an invalid value with colspan or rowspan attribute, the browser will ignore the attribute and default to a value of 1.
For example, if you specify colspan=»0″ or rowspan=»-1″, the browser will ignore these invalid values and default to a value of 1.
It’s important to ensure that you specify valid values for colspan and rowspan attributes to avoid any unexpected behavior in your table layout.
How to use rowspan attribute
In the code below is a table with three rows and three columns. If we wanted to combine the first two cells in the first column into one cell, we could use the rowspan=»2″ attribute in the first <td> tag. The number represents how many cells to use for the <td> tag.
Example HTML table
<table> <tr> <td rowspan="2"> </td> <td> </td> <td> </td> </tr> <tr> <td> </td> <td> </td> </tr> <tr> <td> </td> <td> </td> <td> </td> </tr> </table>
The code above, rendered in a web browser, produces a table similar to the table below. As shown, the first cell spans the height of two rows.
To use all three cells in the first column, increase the rowspan value to 3 since there are three rows. Increasing the value to 3 gives you a table similar to the example below.
Note
Make sure that when you expand a <td> row, you remove <td> tags from the other <tr> (table rows). In the example above, because we are using all three rows, we have only two <td> tags in the other two <tr> tags.