
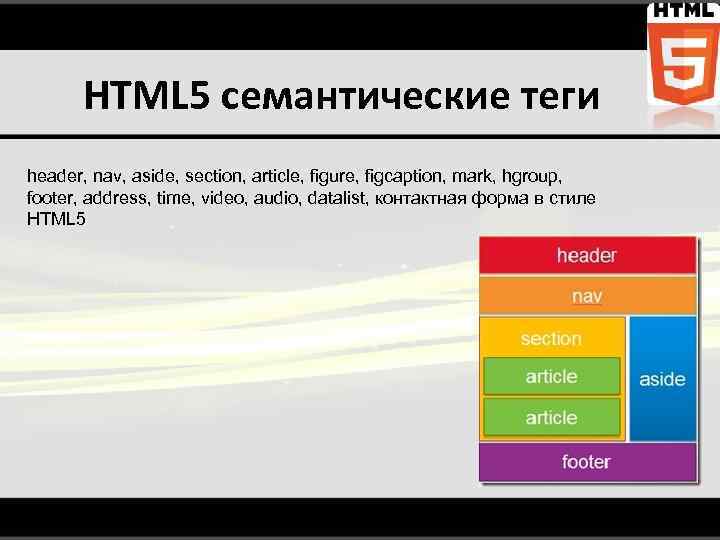
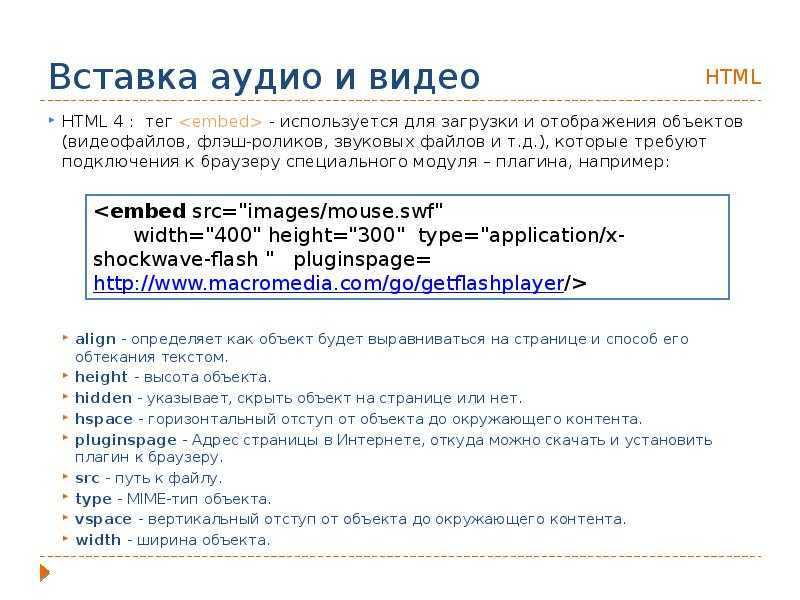
HTML/Элемент video
Описание
Элемент (от англ. «video» ‒ «видео») вставляет видео файл в HTML-документ.
Примечание
- Если браузер не поддерживает данный элемент, то вместо видео выводится всё содержимое элемента, кроме технических элементов (таких как , ). По этому на подобный случай рекомендуется вкладывать в данный элемент текст с соответствующей надписью, а так же можно вместе с текстом вложить ссылку для скачивания представленного видео файла.
- Данному элементу можно добавить субтитры с помощью элемента .
Условия использования
На данный момент существует три видео формата поддерживаемых данным элементом ‒ это «MP4», «WebM» и «Ogg».
Поддержка браузерами
Chrome
Поддерж.
Firefox
Поддерж.
Opera
Поддерж.
Maxthon
Поддерж.
IExplorer
Поддерж.
Safari
Поддерж.
iOS
Поддерж.
Android
Поддерж.
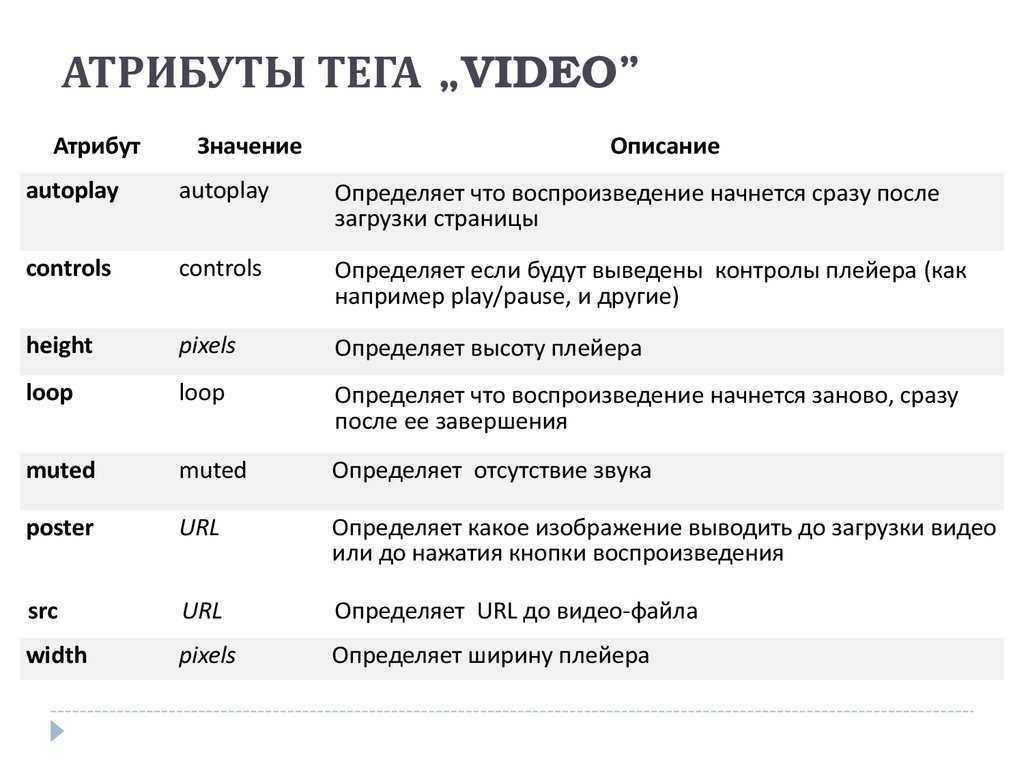
Атрибуты
- autoplay
- Задаёт автоматическое воспроизведение видео (сразу после полной загрузки страницы).
controls
Устанавливает «штатную» панель управления видео.
crossorigin
Определяет то как элемент обрабатывает crossorigin запросы.
height
Задаёт высоту области воспроизведения.
loop
Устанавливает автоповтор видео.
mediagroup
Группы медиа элементов вместе с неявной MediaController.
muted
Отключение звука видео.
poster
Устанавливает фоновое изображение для области воспроизведения.
preload
Указывает веб-браузеру, что видео файл необходимо загрузить вместе с документом.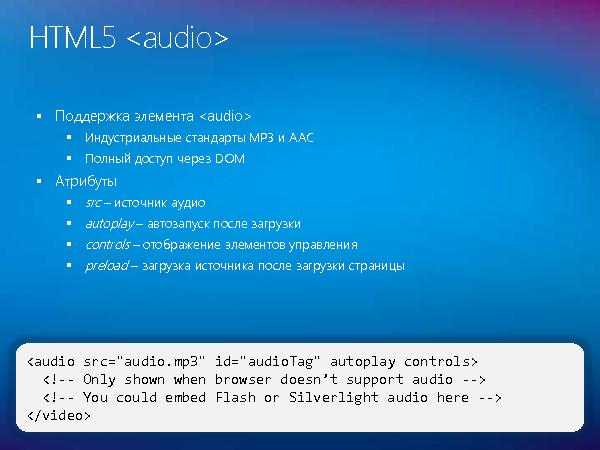
src
Указывает расположение видео файла.
width
Задаёт ширину области воспроизведения.
Глобальные атрибуты
accesskey, class, contenteditable, contextmenu, data-*, dir, draggable, dropzone, hidden, id, inert, lang, spellcheck, style, tabindex, title, translate, xml:lang
Пример использования
Листинг кода
<!DOCTYPE html><html><head><meta charset=»utf-8″><title>Элемент video</title></head><body><h2>Пример использования элемента «video»</h2><video poster=»/html/html-images/The_New_CLS.jpg» controls=»controls»><source src=»/examples/multimedia/video/The_New_CLS.mp4″ type=»video/mp4″><source src=»/examples/multimedia/video/The_New_CLS.webm» type=»video/webm»><source src=»/examples/multimedia/video/The_New_CLS.
Элемент video
Allowing reproducing multiple audio files
We may have the need of reproducing multiple audio files. This wouldn’t suppose many changes, taking as base the player we built in the previous section.
In the HTML, we have to change the way we specify the path to the audio files:
custom_player.html
<!-- ... -->
<audio>
    <source src="../bell.mp3">
    <source src="../bell2.mp3">
</audio>
<!-- ... -->
So, for these cases, we have to specify each audio in a tag, inside the tag.
Regarding to the JavaScript, we have to do the following changes:
controls.js
// ...
var audios = $('.audio-player audio source'),
    currentAudioIndex = 0;

function playNext() {
    currentAudioIndex++;

    if (currentAudioIndex >= audios.length) {
        currentAudioIndex = 0;
    }

    audioElement.src = audios.src;

    audioElement.play();
}

function updateProgressBar() {
    var progressPercentage = audioElement.currentTime / audioElement.duration;

    progress.value = progressPercentage;

    if (progressPercentage == 1) {
        playNext();
    }
}
That is, we have to retrieve all the audios, and have a counter for knowing which one is the one being currently played. Of course, we need a piece of code for jumping to the next audio, which just consists on updating the source value for the audio element. This function has to be called the same time the one for updating the progress bar is called, but just when the current audio it’s finished, i.e., when the value of the progress bar is 1.
3.1. Adding controls for switching between audios
With the previous code, the audio will automatically jump to the following one, but without option to switch between them manually. Now we will add controls for this.
We have to edit the HTML to add those buttons:
custom_player.html
<!-- ... -->
<div class="audio-player">
    <audio>
        <source src="../bell.mp3">
        <source src="../bell1.mp3">
    </audio>
    <button class="play controls button"></button>
    <button class="previous controls button"></button>
    <button class="next controls button"></button>
    <progress class="progress custom-progress" value="0" max="1"></progress>
    <progress class="volume custom-progress" value="0.5" max="1"></progress>
</div>
<!-- ... -->
About the JavaScript, we just have to define a function for playing the previous audio, because we already have the one for playing the next one:
controls.js
// ...

function playPrevious() {
    audioElement.pause();

    currentAudioIndex--;

    if (currentAudioIndex < 0) {
        currentAudioIndex = audios.length - 1;
    }

    console.log(currentAudioIndex);
    audioElement.src = audios.src;

    audioElement.play();
}

// ...
But, in this case, we also have to retrieve the buttons, and add the functions as click listeners:
controls.js
// ...

previous = $('.audio-player .previous'),
next = $('.audio-player .next'),

// ...

next.click(playNext);

previous.click(playPrevious);

// ...
To make it look properly, we also have to update the CSS:
styles.css
/* ... */
.audio-player .play,
.audio-player .previous,
.audio-player .next {
    color: #ffffff;
    background-color: #2b1e47;
    border: none;
    font-size: 20px;
}

.audio-player .play {
    left: 0;
    background:transparent;
}

.audio-player .previous {
    left: 24px;
}

.audio-player .next {
    left: 54px;
}

.audio-player .previous:after {
    content: '';
    font-size: 27px;
}

.audio-player .next:after {
    content: '';
    font-size: 27px;
}

.audio-player .progress {
    left: 95px;
    width: 45%;
}

.audio-player .volume {
    right: 10px;
    width: 19%;
}
Apart for the styles for the previous and next buttons, we also have to update the starting points of each element.
The result is the following:
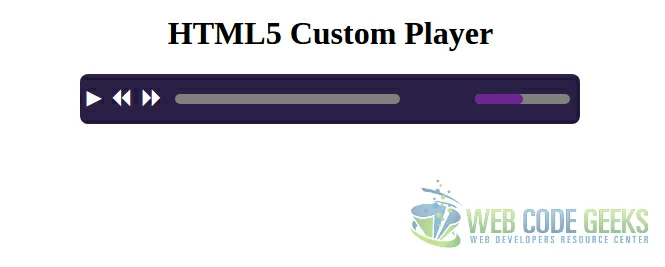
Fig5: Custom player with additional controls.
Examples
<video controls
  src="https://media.w3.org/2010/05/bunny/movie.ogv">
Your user agent does not support the HTML5 Video element.
</video>
<video controls>
 <source src="https://media.w3.org/2010/05/sintel/trailer.mp4"
         type='video/mp4; codecs="avc1, mp4a"'>
 <source src="https://media.w3.org/2010/05/sintel/trailer.ogv"
         type='video/ogg; codecs="theora, vorbis"'>
 <p>Your user agent does not support the HTML5 Video element.</p>
</video>
<video id="myVideo">
 <source src="https://media.w3.org/2010/05/sintel/trailer.mp4"
         type='video/mp4; codecs="avc1, mp4a"'>
 <source src="https://media.w3.org/2010/05/sintel/trailer.ogv"
         type='video/ogg; codecs="theora, vorbis"'>
 Your user agent does not support the HTML5 Video element.
</video>
<button type="button" onclick="vid_play_pause()">Play/Pause</button>
<script>
function vid_play_pause() {
  var myVideo = document.getElementById("myVideo");
  if (myVideo.paused) {
    myVideo.play();
  } else {
    myVideo.pause();
  }
}
</script>
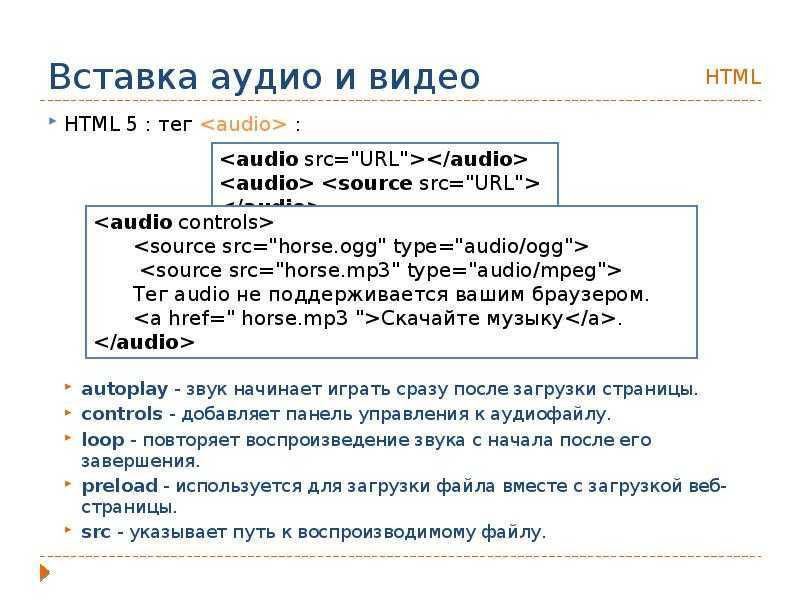
The audio element
Using the HTML5 audio tag is really simple. Actually, it’s just about adding the tag, and specifying the path to the audio file:
1_audio_element.html
<!DOCTYPE html>
<html>
<head>
    <meta charset="utf-8">
    <title>HTML5 Audio</title>
    <style>
        #wrapper {
            width: 60%;
            margin: 0 auto;
            text-align: center;
        }
    </style>
</head>

<body>
    <div id="wrapper">
        <h1>HTML5 Audio</h1>
        <p>Audio:</p>
        <audio src="../bell.mp3"></audio>
    </div>
</body>
</html>
This is enough to have ready the audio to be played. But not enough to be able to control it, because no controls are being displayed:

Fig1: Audio element, without rendering the controls.
When using the audio element, we should always add the attribute, in order to display the controls of the audio player:
1_audio_element.html
<!-- ... -->

<audio src="../bell.mp3" controls></audio>

<!-- ... -->
This attribute will make the browser render natively a control interface. The next image shows it for Chromium:
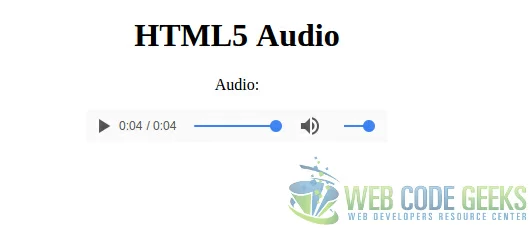
Fig2: Audio element, rendering the controls.
So, don’t forget to add the if you want to provide a real audio player (unless you want to create your own one with JavaScript!).
is not the only attribute for the tag. These are the other available attributes:
- : for playing the audio on page load. Use this attribute with caution, if you don’t want to disturb the user.
- : for replaying the audio file after it ends, indefinitely. This may be used in combination with for, for example, setting a background sound for the page. Again, this should be used carefully.
- : for specifiying if the file should be loaded on page load or not.
HTML-видео (с примерами)
Тег HTML используется для встраивания медиаплеера, поддерживающего воспроизведение видео, в HTML-страницу. Мы используем тег HTML используется для встраивания медиаплеера, поддерживающего воспроизведение видео, в HTML-страницу. Мы используем тег HTML и тег , чтобы показать видео. Например,

Вывод браузера
В приведенном выше коде
- video.mp4 — путь к видео, которое мы хотим отобразить
- video/mp4 — тип ресурса, который мы хотим отобразить
- — позволяет пользователю управлять видео
Файл video.mp4 в приведенном выше примере находится в том же каталоге, что и файл HTML.
Примечание . Рекомендуется включать и для видео, аналогичного HTML-тег изображения , чтобы предотвратить мерцание при начальной загрузке страницы.
HTML
с несколькими тегами
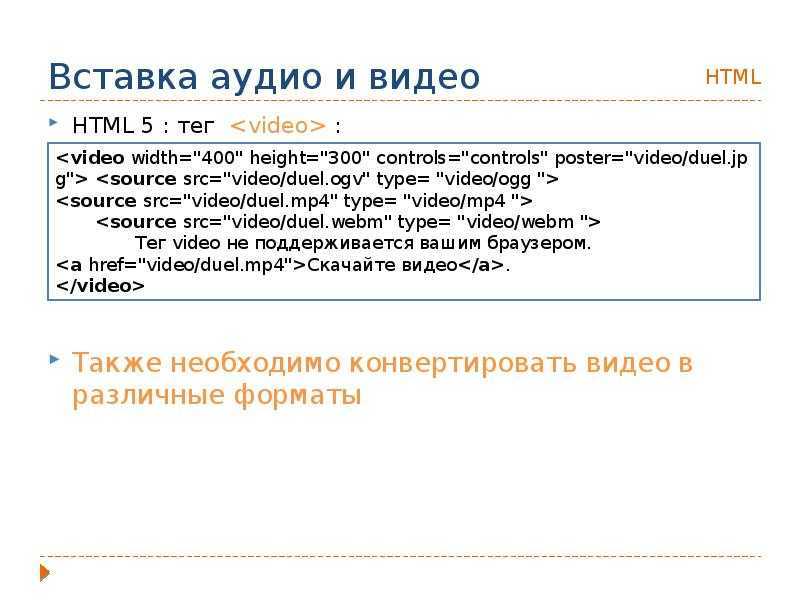
Мы можем указать несколько источников видео, используя тег . Например,
В приведенном выше примере браузер выбирает первый тег , ресурс которого поддерживается. Если браузер не поддерживает , он перейдет к следующему тегу и воспроизведет файл . Это помогает воспроизводить видео на самых разных устройствах.
Давайте посмотрим на атрибуты, поддерживаемые тегом HTML .
- и
Мы подробно узнаем о каждом из них.
autoplay
Атрибут autoplay автоматически воспроизводит видео. Например,
Вывод браузера
В приведенной выше программе мы использовали . Видео начнет воспроизводиться, как только оно будет готово, и пользователю не потребуется нажимать кнопку воспроизведения.
Примечание : Атрибут autoplay обычно считается плохим пользовательским интерфейсом, так как он может раздражать пользователей. Некоторые браузеры не разрешают автоматическое воспроизведение видео, если оно также не отключено.
управление
Атрибут позволяет пользователю управлять видео. Эти элементы управления могут включать такие элементы, как кнопка воспроизведения, кнопка паузы и регулятор громкости. Это может быть полезно для того, чтобы позволить пользователю управлять воспроизведением видео без необходимости использования какого-либо дополнительного программного обеспечения или инструментов.
Вывод браузера
Здесь мы видим элементы управления, предоставляемые браузером.
высота и ширина
Атрибуты и в элементе определяют размер видеопроигрывателя в пикселях. Например,
Вывод браузера
В приведенном выше примере и видеопроигрывателя установлены на 600 и 350 пикселей соответственно.
Мы также можем установить ширину или высоту видео с помощью CSS, применив свойство или к в таблице стилей или с атрибутом стиля .
Вывод браузера
Атрибуты и позволяют браузеру узнать, сколько места нужно выделить для видео. В противном случае окружающий контент будет двигаться при загрузке видео.
цикл
Атрибут указывает, что видео будет автоматически воспроизводиться с начала после его окончания. Например,
Вывод браузера
Атрибут muted устанавливает громкость видео на . Например,
Выходные данные браузера
постер
Атрибут указывает ссылку на изображение, которое будет отображаться, когда видео не воспроизводится или все еще загружается.
Это больше похоже на миниатюру к видео. Он отображается там, где будет отображаться видеоплеер, давая пользователю визуальное представление о том, о чем видео, прежде чем он решит его воспроизвести. Например,
Вывод браузера
Если вы не укажете кадр постера, вместо него будет отображаться первый кадр видео.
src
Атрибут указывает расположение видеофайла, который должен воспроизводиться в видеопроигрывателе. Например,
Здесь атрибут элемента используется для указания местоположения одного видеофайла, который должен воспроизводиться в видео. игрок. Это самый простой способ добавить видео на HTML-страницу.
Примечание : для HTML-видео требуется хотя бы один атрибут или тег .
preload
Атрибут указывает, как должен загружаться видеофайл после загрузки страницы для лучшего взаимодействия с пользователем. Может принимать одно из следующих значений:
1. : Указывает, что видео не должно быть предварительно загружено. Например,
2. : указывает, что извлекаются только метаданные видео. Например,
3. : указывает, что при загрузке страницы будет загружен весь видеофайл. Например,
Media Events
| Event name | Dispatched when… |
|---|---|
| The user agent begins looking for media data, as part of the resource selection algorithm. | |
| The user agent is fetching media data. | |
| The user agent is intentionally not currently fetching media data, but does not have the entire media resource downloaded. | |
| The user agent stops fetching the media data before it is completely downloaded, but not due to an error. | |
| An error occurs while fetching the media data. | |
| A media element whose was previously not in the state has just switched to that state (either because of a fatal error during load that’s about to be reported, or because the method was invoked while the resource selection algorithm was already running). | |
| The user agent is trying to fetch media data, but data is unexpectedly not forthcoming. | |
| Playback has begun. Fired after the method has returned, or when the attribute has caused playback to begin. | |
| Playback has been paused. Fired after the method has returned. | |
| The user agent has just determined the duration and dimensions of the media resource | |
| The user agent can render the media data at the current playback position for the first time. | |
| Playback has stopped because the next frame is not available, but the user agent expects that frame to become available in due course. | |
| Playback has started. | |
| The user agent can resume playback of the media data, but estimates that if playback were to be started now, the media resource could not be rendered at the current playback rate up to its end without having to stop for further buffering of content. | |
| The user agent estimates that if playback were to be started now, the media resource could be rendered at the current playback rate all the way to its end without having to stop for further buffering. | |
| The IDL attribute changed to true and the seek operation is taking long enough that the user agent has time to fire the event. | |
| The IDL attribute changed to false. | |
| The current playback position changed as part of normal playback or in an especially interesting way, for example discontinuously. | |
| Playback has stopped because the end of the media resource was reached. | |
| Either the or the attribute has just been updated. | |
| The attribute has just been updated. | |
| Either the attribute or the attribute has changed. Fired after the relevant attribute’s setter has returned. |
IDL Attributes and Methods
The following IDL attributes and methods are exposed to dynamic scripts.
           attribute DOMString width;
           attribute DOMString height;
  readonly attribute unsigned long videoWidth;
  readonly attribute unsigned long videoHeight;
           attribute DOMString poster;
           attribute DOMSettableTokenList audio;

  // error state
  readonly attribute MediaError error;

  // network state
           attribute DOMString src;
  readonly attribute DOMString currentSrc;
  const unsigned short NETWORK_EMPTY = 0;
  const unsigned short NETWORK_IDLE = 1;
  const unsigned short NETWORK_LOADING = 2;
  const unsigned short NETWORK_NO_SOURCE = 3;
  readonly attribute unsigned short networkState;
           attribute DOMString preload;
  readonly attribute TimeRanges buffered;
  void load();
  DOMString canPlayType(in DOMString type);

  // ready state
  const unsigned short HAVE_NOTHING = 0;
  const unsigned short HAVE_METADATA = 1;
  const unsigned short HAVE_CURRENT_DATA = 2;
  const unsigned short HAVE_FUTURE_DATA = 3;
  const unsigned short HAVE_ENOUGH_DATA = 4;
  readonly attribute unsigned short readyState;
  readonly attribute boolean seeking;

  // playback state
           attribute float currentTime;
  readonly attribute float startTime;
  readonly attribute float duration;
  readonly attribute boolean paused;
           attribute float defaultPlaybackRate;
           attribute float playbackRate;
  readonly attribute TimeRanges played;
  readonly attribute TimeRanges seekable;
  readonly attribute boolean ended;
           attribute boolean autoplay;
           attribute boolean loop;
  void play();
  void pause();

  // controls
           attribute boolean controls;
           attribute float volume;
           attribute boolean muted;
HTML Video Controls
HTML gives us the ability to add controls for the video.
The tag has a boolean attribute called . When it is mentioned will create controls for the video.
is a boolean attribute. It is necessary to use it, without it user will have no control over video.

Here is an example of HTML video with and without controls:
Example
Run the code
Output
Your browser doesn’t support video element. Your browser doesn’t support video element.
There are also other controls for the video like autoplay, loop, muted, controls, preload, poster, etc. These are all very useful for the video player.
autoplay
The attribute is a boolean attribute. When it is mentioned the video will start playing automatically.
Here is an example of HTML video with and without autoplay:
Example
Run the code
Output
Your browser doesn’t support video element. Your browser doesn’t support video element.
Note: Some browser like Chrome does not let video autoplay if it is not muted. So when using autoplay you need to mute the video.
Example
Run the code
Output
Your browser doesn’t support video element.
loop videos
The attribute is a boolean attribute. When it is mentioned the video will start playing again and again once played.
Here is an example of an HTML video with and without a loop:
Example
Run the code
Output
Your browser doesn’t support video element. Your browser doesn’t support video element.
HTML Video
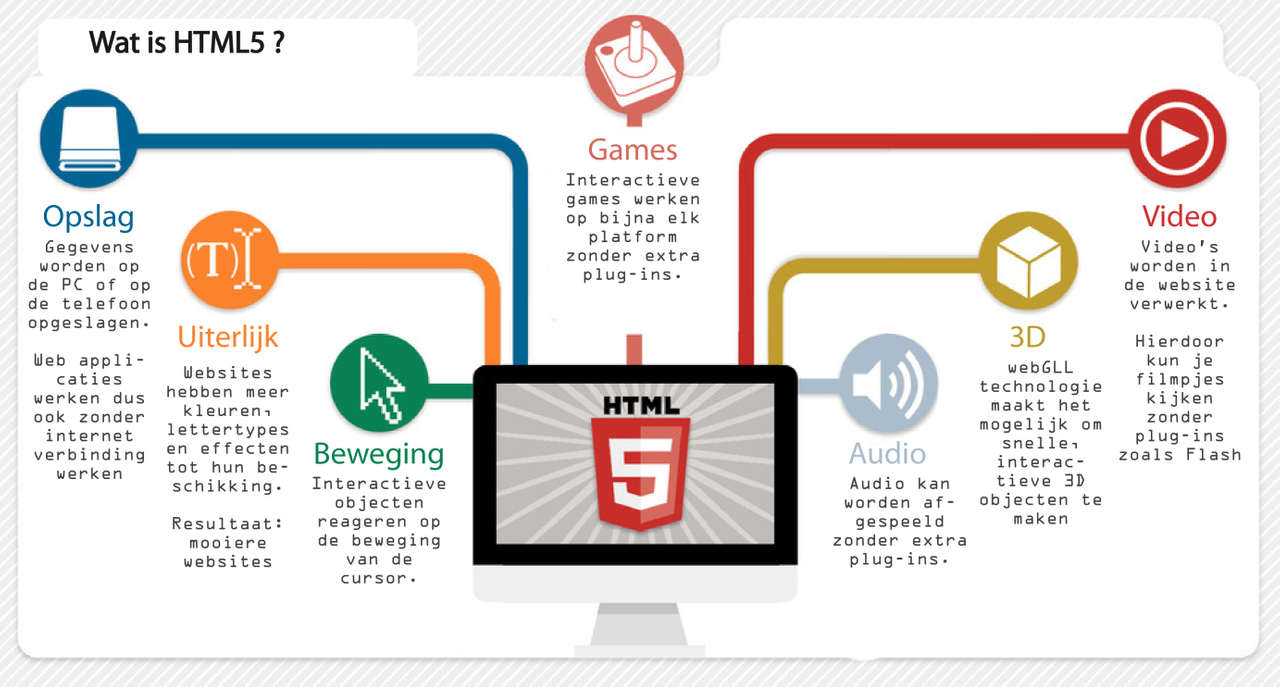
HTML5 gives us the power to embed video in any web page without using any plug-in.
Before HTML5 we needed to use plug-ins like Flash to embed video on web pages.
The tag is used to embed video in HTML pages. This embeds a video media player support for video playback.
The tag creates a container for the video content. It also supports audio content but for better control of audio content, use the <audio> tag.
Basic syntax:
Syntax explanation:
- src attribute — It is used to specify the source of the video.
- height attribute — It is used to define the height of the video.
- width attribute — It is used to define the width of the video.
- control attribute — It is a boolean attribute. If it is mentioned then it creates controls like play/pause, mute, etc for the video.
- The text written in between the video tag is displayed only when your browser doesn’t support the video element.
Let’s see an example:
Example
Run the code
Output
Your browser does not support video element.
HTML Attributes
- = «none» or «metadata» or «auto» or «» (empty string) or empty Represents a hint to the UA about whether optimistic downloading of the video itself or its metadata is considered worthwhile.
- «none»: Hints to the UA that the user is not expected to need the video, or that minimizing unnecessary traffic is desirable.
- «metadata»: Hints to the UA that the user is not expected to need the video, but that fetching its metadata (dimensions, first frame, track list, duration, and so on) is desirable.
- «auto»: Hints to the UA that optimistically downloading the entire video is considered desirable.Specifying the empty string is equivalent to specifying the value «auto».
controls = «controls» or «» (empty string) or emptyInstructs the UA to expose a user interface for controlling playback of the video.
loop = «loop» or «» (empty string) or emptyInstructs the UA to seek back to the start of the video upon reaching the end.
audio = «muted» or «» (empty string) or emptyInstructs the UA to default the video to muted.
poster = URL potentially surrounded by spacesThe address of an image file for the UA to show while no video data is available.
height = non-negative integerThe height of the video, in CSS pixels.
width = non-negative integerThe width of the video, in CSS pixels.
src = URL potentially surrounded by spacesThe URL for the video.
See also global attributes.
Видео | HTML | CodeBasics
Как и с аудио, ещё недавно в HTML-разметку нельзя было «комфортно» вставить видео-файл. Начиная с HTML5 появился элемент , который, как и , позволяет быстро добавить необходимое видео на страницу.
Тег парный, в котором, при отсутствии вложенных тегов , указывается путь к видео-файлу в атрибуте . С помощью атрибута можно вывести элементы управления для проигрывателя. Визуальное оформление управляющих элементов зависит от конкретного браузера.
<video src="https://example.com/our-video.mp4" controls></video>
С помощью специальных тегов возможно добавлять несколько форматов видео. Это необходимо по причине того, что каждый браузер умеет воспроизводить только определённые форматы видео. Единственный формат, который корректно обрабатывают все браузеры — .
<video controls>
    <source src="https://example.com/our-video.mp4" type="video/mp4">
    <source src="https://example.com/our-video.webm" type="video/webm">
    <source src="https://example.com/our-video.ogg" type="video/ogg">
</video>
Наличие трёх форматов файлов гарантирует работоспособность видео на любых устройствах. Также обязательным является наличие атрибута , который сообщит браузеру формат видео. Именно по этому атрибуту браузер примет решение, какой файл необходимо загрузить.


Тег имеет несколько важных атрибутов:
- — Добавляет элементы управления для видеоплеера
-
— Автоматическое воспроизведение после загрузки видео
- — Ширина видеоплеера
- — Высота видеоплеера
Атрибуты и принимают значения в пикселях, при этом указывать единицу измерения не нужно.
<video controls>
    <source src="https://example.com/our-video.mp4" type="video/mp4">
    <source src="https://example.com/our-video.webm" type="video/webm">
    <source src="https://example.com/our-video.ogg" type="video/ogg">
</video>
Задание
Добавьте видео в формате mp4 на страницу:
- Ссылка на видео: https://www.w3schools.com/html/movie.mp4
- У видеоплеера должны быть элементы управления
- Высота плеера: 240
- Ширина плеера: 320
- Путь к файлу укажите в теге
На всякий случай сделайте звук потише, в видео есть звук
Если вы зашли в тупик, то самое время задать вопрос в «Обсуждениях». Как правильно задать вопрос:
Обязательно приложите вывод тестов, без него практически невозможно понять что не так, даже если вы покажете свой код. Программисты плохо исполняют код в голове, но по полученной ошибке почти всегда понятно, куда смотреть.
(adsbygoogle=window.adsbygoogle||[]).push({});
Тесты устроены таким образом, что они проверяют решение разными способами и на разных данных. Часто решение работает с одними входными данными, но не работает с другими. Чтобы разобраться с этим моментом, изучите вкладку «Тесты» и внимательно посмотрите на вывод ошибок, в котором есть подсказки.
Это нормально , в программировании одну задачу можно выполнить множеством способов. Если ваш код прошел проверку, то он соответствует условиям задачи.
В редких случаях бывает, что решение подогнано под тесты, но это видно сразу.
Создавать обучающие материалы, понятные для всех без исключения, довольно сложно. Мы очень стараемся, но всегда есть что улучшать. Если вы встретили материал, который вам непонятен, опишите проблему в «Обсуждениях». Идеально, если вы сформулируете непонятные моменты в виде вопросов. Обычно нам нужно несколько дней для внесения правок.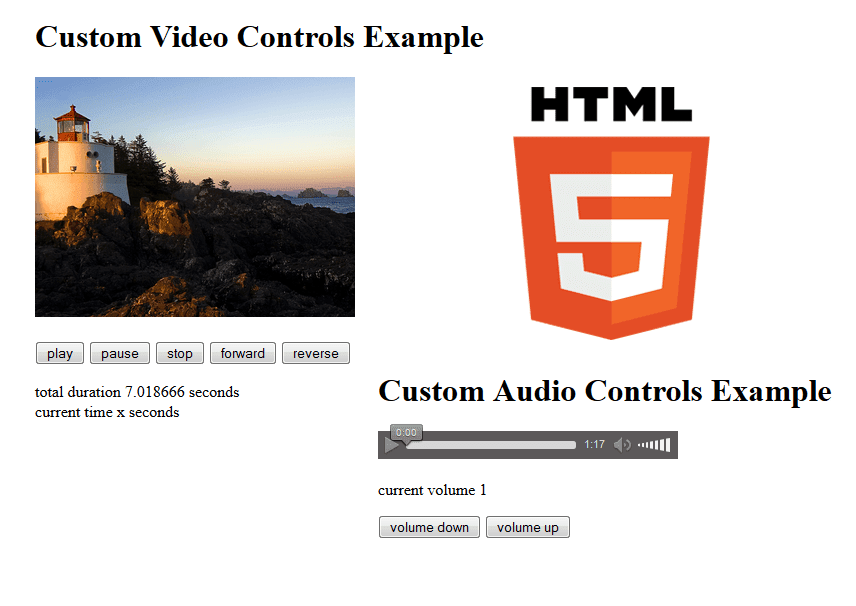
Кстати, вы тоже можете участвовать в улучшении курсов: внизу есть ссылка на исходный код уроков, который можно править прямо из браузера.
Полезное
-
Если используется один файл, то достаточно добавить атрибут для тега . В остальных случаях используйте теги
-
Формат корректно обрабатывается большинством браузеров. По возможности используйте именно его
←Предыдущий
Следующий→
Нашли ошибку? Есть что добавить? Пулреквесты приветствуются https://github.com/hexlet-basics