

Ещё один ромб
<div id=»diamond»></div>
| 1 | <div id=»diamond»><div> |
#diamond {
margin-bottom: 20px;
width: 0;
height: 0;
border: 50px solid transparent;
border-bottom: 70px solid #04A120;
position: relative;
top: -50px;
}
#diamond:after {
content: «»;
width: 0;
height: 0;
position: absolute;
left: -50px;
top: 70px;
border: 50px solid transparent;
border-top: 70px solid #47002D;
}
|
1 2 3 4 5 6 7 8 9 10 11 12 13 14 15 16 17 18 19 |
#diamond { margin-bottom20px; width; height; border50pxsolid transparent; border-bottom70pxsolid#04A120; positionrelative; top-50px; } content»»; width; height; positionabsolute; left-50px; top70px; border50pxsolid transparent; border-top70pxsolid#47002D; } |
Other special effects
WebKit, Firefox and Opera now support a number of other CSS3
features, including the following simple effects and transforms.
Thankfully, unlike rounded corners, for the shadows and transforms there
does seem to be agreement on a common syntax.
-webkit-box-shadow
Shadow Example
Clearly there are still some
anti-aliasing problems, but for corners and gentle curves it can look
pretty cool.
Then there are various -webkit-transform option that can be
used to create all kinds of wierd and wonderful shapes:
-webkit-transform: skew()
Skew Example
For the browser-impaired
here is a screenshot from Safari showing the effect of these CSS rules.
The same effects are now possible in Firefox, Opera and related
browsers. Just replace -webkit with -moz or
-o, except for border-radius and box-shadow
where Opera uses no prefix.
Also in Safari these and other transformations can be implemented as
animations using just CSS effects
triggered by hovering over an element — no JavaScript required.
Rounding The Outer Corners
Let’s next add a to get our rounded corners.
| Name | Department | Office |
|---|---|---|
| John | Admin | North |
| Smith | Logistics | South |
| David | Transport | East |
Whoa, the corners didn’t get rounded! Well, the corners of the background got rounded, but not the border. This is because the borders of the table cells didn’t get rounded — they stayed square. Lets take a look if we applied the border to the outside of the table, and removed it from the individual cells:
| Name | Department | Office |
|---|---|---|
| John | Admin | North |
| Smith | Logistics | South |
| David | Transport | East |
Now all we need to do is add back the internal borders, but not round the outside edges of the cells. If you take another look at the previous tables, you will also see that the interal borders are 2px wide. This is because we are using which means each cell has its own 1px border, which touches the 1px border from the next cell. Unfortunately we can’t just set the border width to 0.5px. However, we can rely on the to help us construct some funky selectors that will work for all tables. The following snippet will work for any well-structured table, including tables with captions, colgroups, tbody, no tbody etc.
| Name | Department | Office |
|---|---|---|
| John | Admin | North |
| Smith | Logistics | South |
| David | Transport | East |
This is starting to look good now. You could probably stop there if that’s all you need. If you want to style the backgrounds of individual cells or rows (e.g. alternating colors or highlighting rows on hover) then we’ll sort that out first. Lets just change the background color of our header row to something really nice to make it stand out:
| Name | Department | Office |
|---|---|---|
| John | Admin | North |
| Smith | Logistics | South |
| David | Transport | East |
And we just broke our nice rounded corners again… Remember we didn’t round the corners of the individual cells, just the table itself. Thankfully, although the fix was a little bit tricky for the borders, it’s much easier for the background. We can just set the on the whole table to to hide the bit that sticks out over the rounded corners. We’ve used a CSS variable here just to remove the duplication on the border style.
| Name | Department | Office |
|---|---|---|
| John | Admin | North |
| Smith | Logistics | South |
| David | Transport | East |
And there we have it. We now have our rounded table corners with an easy copy/paste snippet
Border Width
CSS Border Width Property is used to specify width of the border of an HTML Element.
If you put only one value to border-width than by default it will apply all four sides of border. But when you put 4 value than width will apply (top-border, right-border, bottom-border, left-border) respectively.
Example 4 – Border Width Syntax
<!DOCTYPE html>
<html>
  <head>
    <style>
    .first
    {
        border-style: solid;
        border-color: lime;
		border-width: 6px;
    }
    .second
    {
        border-style: solid;
        border-color: lime red yellow blue;
		border-width: 6px 7px 8px 9px;
    }
    </style>
  </head>
  <body>
    <div>
        <p class="first">This is a solid  border of width 6px with lime color.</p>
        <p class="second">This is a solid  border with 4 color and 4 width lime on top of width 6px, red on right of width 7px, yellow on bottom of width 8px, blue on left border of width 9px.</p>
    </div>
  </body>
</html>
The above syntax is used to apply width of border.
The second syntax shows that how can you apply different-different width on the border’s four side (top-border, right-border, bottom-border, left-border).
border-radius
The CSS property is new in CSS 3.0 . The CSS property
is used to create rounded corners of borders on HTML elements. Before rounded
corners on HTML elements was only possible using tables and images, and it was both heavy in HTML and
heavy to download for the browser. Luckily the CSS property saves us from that misery.
Here is a example:
#theDiv {
    border        : 1px solid #cccccc;
    border-radius : 10px;
    padding       : 10px;
}
Here is how the element looks with these CSS styles applied:
This element has rounded corners.
As you can see, the element now has rounded corners. The radius of the rounding is 10 pixels because
I set as radius (value) in the CSS property declaration.
The CSS property also works with background colors, even if the HTML element
has no border. Here is a and example:
#theDiv {
    background-color: #66ff66;
    border-radius : 20px;
    padding       : 10px;
}
And here is what and looks like when rendered:
This element has rounded corners.
You can specify the radius of the rounding both vertically and horizontally. That way you can make the corners of
the box elliptic instead of circular. Here is an example:


#theDiv {
    border        : 1px solid #cccccc;
    border-radius : 20px / 10px;
    padding       : 20px;
}
Here is what the border looks like when rendered:
This element has elliptic corners.
As you can see, the rounding is longer horizontally () than vertically ().
You can also set the rounding of each corner individually by specifying four values for the
CSS property. Here is an example:
#theDiv {
    border        : 1px solid #cccccc;
    border-radius : 20px 15px 10px 5px;
    padding       : 20px;
}
The order of the corners is: Top left, top right, bottom right, bottom left. It is similar to the order of the borders
in the CSS property (top, right, bottom, left).
Here is what the corners looks like when rendered:
This element has four circluar corners with different radius.
As you can see, each corner of the border has a different rounding radius.
You can also set the rounding horizontally and vertically for each corner like this:
#theDiv {
    border        : 1px solid #cccccc;
    border-radius : 40px 20px 10px 5px / 20px 10px 5px 2px;
    padding       : 20px;
}
To the left of the are the horizontal radii for each corner, and to the right of the
are the vertical radii of each corner.
Here is how the border looks when rendered:
This element has four elliptic corners with different radius.
Just like with the CSS property, the property has a set of
subproperties that can set the radius of each corner individually. These subproperties are:
The syntax for setting the rounding radius of a corner is the same as for . Here
are a few examples:
#theDiv {
    border                 : 1px solid #cccccc;
    border-top-left-radius  : 40px;
    border-top-right-radius : 40px / 20px;
}
As you can see, you can create both circular and elliptic corners with these subproperties too.
CSS Border Property
CSS Border is used to apply border to an HTML Elements. With the help of CSS Border we can provide box effect on an HTML Element. All the HTML Element by default displayed without Border.
With the help of Border Property we can change the color, width and style of an HTML Element Border.
Example 1 – Border Basic Code with p HTML tag.
<!DOCTYPE html>
<html>
  <head>
    <style>
	   p
		{
		 color:darkblack;
		 background-color:lightblue;
		 border:4px solid orange;
		}
	</style>
  </head>
  <body>
    <div>
		<p>
		 Lorem ipsum dolor sit amet, consectetur adipiscing elit, sed do eiusmod tempor incididunt ut labore et
		</p>
	</div>
  </body>
</html>
The above syntax shows that how can you apply the border to an HTML Element.
The bellow image shows the result of applying border and here a paragraph and has border of 4px and this border is showing by the color orange.
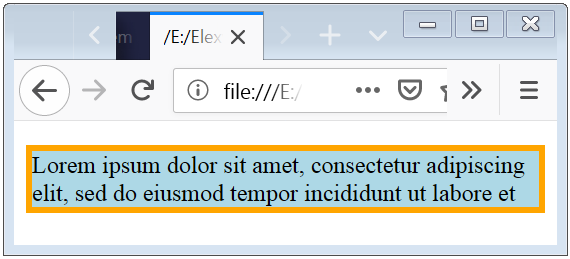 Fig.1 – Border Property Basic Example
Triangles
CSS triangles are useful to create arrows, for example, in a select element or inside buttons.
To make a triangle, create a box with zero width and height.
The actual width and height of the arrow are determined by the width of the border. In an up arrow, for example, the bottom border is colored while the left and right are transparent, which forms the triangle.
To make a right triangle (a right-angled triangle), make the top or bottom colored and leave the right or left border transparent.
Arrows
To create a simple arrow without a tail, make a box with a width and height, border, as well as zero left and top borders.
To make an up arrow, add the transform: rotate(225deg); property, and to make a down arrow, add the transform: rotate(45deg); property to rotate the arrow to 225 and 45 degrees respectively.
You can also make a curved arrow with a tail:
And below is an example of how to create an arrow-pointer:
Vendor Prefixes
For maximum browser compatibility many web developers add browser-specific properties by using extensions such as for Safari, Google Chrome, and Opera (newer versions), for Internet Explorer, for Firefox, for older versions of Opera etc. As with any CSS property, if a browser doesn’t support a proprietary extension, it will simply ignore it.


This practice is not recommended by the W3C, however in many cases, the only way you can test a property is to include the CSS extension that is compatible with your browser.
The major browser manufacturers generally strive to adhere to the W3C specifications, and when they support a non-prefixed property, they typically remove the prefixed version. Also, W3C advises vendors to remove their prefixes for properties that reach Candidate Recommendation status.
Many developers use Autoprefixer, which is a postprocessor for CSS. Autoprefixer automatically adds vendor prefixes to your CSS so that you don’t need to. It also removes old, unnecessary prefixes from your CSS.
You can also use Autoprefixer with preprocessors such as Less and Sass.
CSS Свойства
align-contentalign-itemsalign-selfallanimationanimation-delayanimation-directionanimation-durationanimation-fill-modeanimation-iteration-countanimation-nameanimation-play-stateanimation-timing-functionbackface-visibilitybackgroundbackground-attachmentbackground-blend-modebackground-clipbackground-colorbackground-imagebackground-originbackground-positionbackground-repeatbackground-sizeborderborder-bottomborder-bottom-colorborder-bottom-left-radiusborder-bottom-right-radiusborder-bottom-styleborder-bottom-widthborder-collapseborder-colorborder-imageborder-image-outsetborder-image-repeatborder-image-sliceborder-image-sourceborder-image-widthborder-leftborder-left-colorborder-left-styleborder-left-widthborder-radiusborder-rightborder-right-colorborder-right-styleborder-right-widthborder-spacingborder-styleborder-topborder-top-colorborder-top-left-radiusborder-top-right-radiusborder-top-styleborder-top-widthborder-widthbottombox-decoration-breakbox-shadowbox-sizingcaption-sidecaret-color@charsetclearclipcolorcolumn-countcolumn-fillcolumn-gapcolumn-rulecolumn-rule-colorcolumn-rule-stylecolumn-rule-widthcolumn-spancolumn-widthcolumnscontentcounter-incrementcounter-resetcursordirectiondisplayempty-cellsfilterflexflex-basisflex-directionflex-flowflex-growflex-shrinkflex-wrapfloatfont@font-facefont-familyfont-kerningfont-sizefont-size-adjustfont-stretchfont-stylefont-variantfont-weightgridgrid-areagrid-auto-columnsgrid-auto-flowgrid-auto-rowsgrid-columngrid-column-endgrid-column-gapgrid-column-startgrid-gapgrid-rowgrid-row-endgrid-row-gapgrid-row-startgrid-templategrid-template-areasgrid-template-columnsgrid-template-rowshanging-punctuationheighthyphens@importisolationjustify-content@keyframesleftletter-spacingline-heightlist-stylelist-style-imagelist-style-positionlist-style-typemarginmargin-bottommargin-leftmargin-rightmargin-topmax-heightmax-width@mediamin-heightmin-widthmix-blend-modeobject-fitobject-positionopacityorderoutlineoutline-coloroutline-offsetoutline-styleoutline-widthoverflowoverflow-xoverflow-ypaddingpadding-bottompadding-leftpadding-rightpadding-toppage-break-afterpage-break-beforepage-break-insideperspectiveperspective-originpointer-eventspositionquotesresizerighttab-sizetable-layouttext-aligntext-align-lasttext-decorationtext-decoration-colortext-decoration-linetext-decoration-styletext-indenttext-justifytext-overflowtext-shadowtext-transformtoptransformtransform-origintransform-styletransitiontransition-delaytransition-durationtransition-propertytransition-timing-functionunicode-bidiuser-selectvertical-alignvisibilitywhite-spacewidthword-breakword-spacingword-wrapwriting-modez-index
Конвертик или домик
Код HTML.
<div id=»envelope»></div>
| 1 | <div id=»envelope»><div> |
Код CSS.
#envelope {
height: 55px;
width: 100px;
margin: 45px 20px 0 0;
background: #C8EBFA;
position: relative;
}
#envelope:before {
content: «»;
height: 0;
width: 0;
position: absolute;
left: 0;
top: -35px;
border-bottom: 35px solid #B1BA5C;
border-left: 50px solid transparent;
border-right: 50px solid transparent;
}
|
1 2 3 4 5 6 7 8 9 10 11 12 13 14 15 16 17 18 |
#envelope { height55px; width100px; margin45px20px; background#C8EBFA; positionrelative; } content»»; height; width; positionabsolute; left; top-35px; border-bottom35pxsolid#B1BA5C; border-left50pxsolid transparent; border-right50pxsolid transparent; } |
Border properties #
The individual properties provide a way to style the various parts of a border.
Browser support
- Chrome 1, Supported 1
- Firefox 1, Supported 1
- Edge 12, Supported 12
- Safari 1, Supported 1
Style
For a border to appear, you have to define the . There’s a few options to choose from:
When using the , , and styles, the browser will darken the border color for the second shown color to provide contrast and depth. This behaviour can vary between browsers, especially for dark colors such as . In Chrome, these border styles will appear to be solid and in Firefox, they will be lightened to then provide a darker second color.
Browser behaviour can vary for other border styles too, so it’s important to test your site in different browsers. A common example of this difference is how each browser renders the and styles.
Borders displayed in Chrome, Firefox, and Safari.
To set border style on each side of your box, you can use , , , and .
Shorthand
As with and , you can use the shorthand property to define all the parts of your border in one declaration.
The order of values in the shorthand are , and then, .
Color
You can set color on all sides of your box or on each individual side with . By default, it uses the box’s current text color: . This means that if you only declare border properties, like width, the color will be that computed value unless you explicitly set it.
To set a border color on each side of your box, use , , and .
Width
The width of a border is how thick the line is, and is controlled by . The default border width is . This won’t be visible unless you define a style, though. You can use other named widths such as and .
The properties also accept a length unit such as , , or . To set border width on each side of your box, use , , and .
Border Right
Border Right Property is a shorthand property. Border Right Property is used to apply color, width, style and radius to the Right side of border
Example 9 – Border Right Syntax
<!DOCTYPE html>
<html>
  <head>
    <style>
    .first
    {
        border-right-style: solid;
       	border-right-color: green;
		border-right-width: 4px;
		border-bottom-right-radius: 10px;
		border-top-right-radius: 10px;
   }
    .second
    {
        border-right: 4px dotted blue;
       	border-bottom-right-radius: 15px;
		border-top-right-radius: 10px;
    }
    </style>
  </head>
  <body>
    <div>
        <p class="first">This is a yellow color  border .</p>
        <p class="second">This is a dotted blue color border.</p>
    </div>
  </body>
</html>
The above syntax is used to apply shorthand property for right of border.
CSS Box Examples
<!DOCTYPE html><html>
  <head>
    <style>
    .first
    {
        border-top-style: solid;
        border-top-color: yellow;
        border-top-width: 15px;

		border-bottom-style: solid;
        border-bottom-color: green;
        border-bottom-width: 25px;

		border-left-style: solid;
        border-left-color: red;
        border-left-width: 30px;

		border-right-style: solid;
        border-right-color: blue;
        border-right-width: 20px;

	}
	.second
	{
		border: 4px solid black;
		border-bottom-right-radius: 13px;
        border-top-right-radius: 25px;
		border-bottom-left-radius: 25px;
        border-top-left-radius: 13px;
		padding: 10px;

	}
	.third
	{
		border: 5px solid black;
		border-bottom-right-radius: 20px;
        border-top-right-radius: 4px;
		border-bottom-left-radius: 20px;
        border-top-left-radius: 4px;
		padding: 10px;
	}

    </style>
  </head>
  <body>
    <div>
        <p class="first">Lorem ipsum ute irure dolor in reprehenderit in voluptate velit esse cillum dolore eu fugiat nulla pariatur. Excepteur sint occaecat cupidatat non proident.</p>
		<p class="second">Lorem ipsum ute irure dolor in reprehenderit in voluptate velit esse cillum dolore eu fugiat nulla pariatur. Excepteur sint occaecat cupidatat non proident.</p>
		<p class="third">Lorem ipsum ute irure dolor in reprehenderit sunt in culpa qui officia deserunt mollit anim id est laborum.Lorem ipsum cillum dolore eu fugiat nulla pariatur.</p>
    </div>
	</body>
</html>
The above code shows the shorthand property for the border.
The second and third style is the best application of the Radius Border property. Means that how and where you can use this Border Properties.


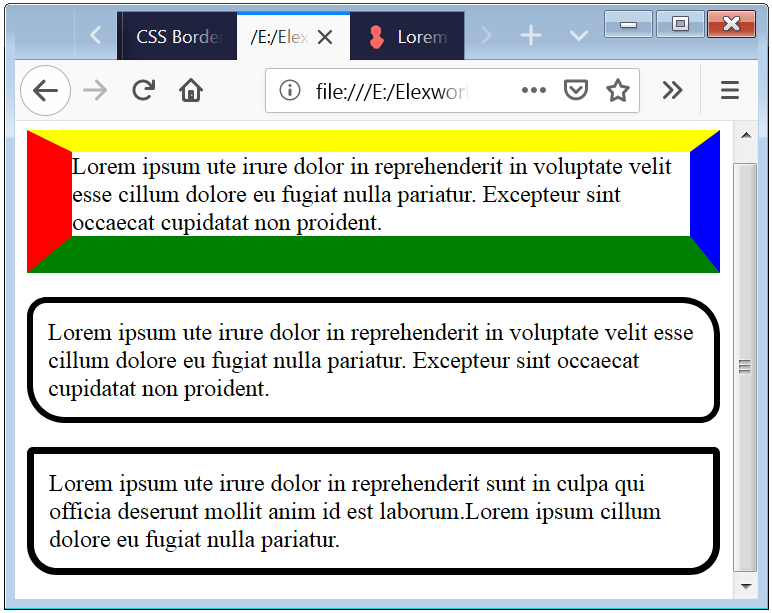 Fig.4 – Border Shorthand Property Syntax Example
CSS Border Style Color Radius Width
CSS Border Style is used to specify that, which type of border design should be displayed.
Border Style
| Border Style Designs | Description |
|---|---|
| solid | This shows a straight-line design. |
| dotted | This shows a dotted-line design. |
| dashed | This shows a dashed-line design. |
| double | This shows a double-line design. |
| groove | This shows a 3D groove-line design. |
| inset | This shows a 3D inset-line design. |
| ridge | This shows a 3D ridge-line design. |
| outset | This shows a 3D outset-line design. |
| none | This shows no line design. |
| hidden | This shows a hidden-line design. |
| mix | This shows a mix-line design. |
Example 2 – Different Border Style options and uses
<!DOCTYPE html>
<html>
  <head>
    <style>
		.solid
		{
		 border:1px solid olive;
		}
		.dotted
		{
		  border-style: dotted;
		}
		.dashed
		{
		  border-style: dashed;
		}
		.double
		{
		  border-style: double;
		}
		.groove
		{
		  border-style: groove;
		}
		.ridge
		{
		  border-style: ridge;
		}
		.inset
		{
		  border-style: inset;
		}
		.outset
		{
		  border-style: outset;
		}
		.none
		{
		  border-style: none;
		}
		.hidden
		{
		  border-style: hidden;
		}
		.mix
		{
		  border-style: solid dashed ridge dotted;
		}
	</style>
  </head>
  <body>
    <div>
		<p class="solid">This is a solid  border.</p>
		<p class="dotted">This is a dotted  border.</p>
		<p class="dashed">This is a dashed  border.</p>
		<p class="double">This is a double  border.</p>
		<p class="groove">This is a groove  border.</p>
		<p class="ridge">This is a ridge  border.</p>
		<p class="inset">This is a inset  border.</p>
		<p class="outset">This is a outset  border.</p>
		<p class="mix">This is a mix  border.</p>
		<p class="none">This is a none  border.</p>
		<p class="hidden">This is a hidden  border.</p>
	</div>
  </body>
</html>
The above code shows various designs of border. And bellow is the result of the upper code.
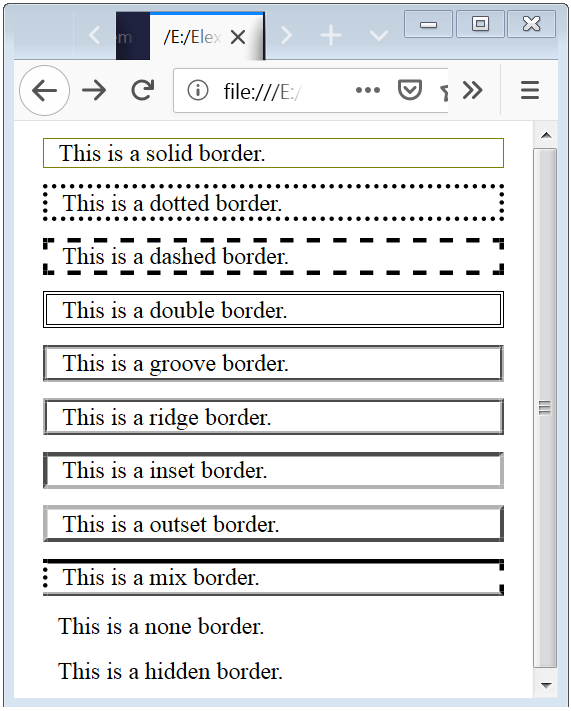
Fig.2 – CSS Border Style.
Caution: It is necessary to declare the border-style, because without declaration of border-style the border will not display, it remain transparent.