
CSS Containment #
The key and overarching goal of CSS containment is to enable rendering performance improvements of web content by providing predictable isolation of a DOM subtree from the rest of the page.
Basically a developer can tell a browser what parts of the page are encapsulated as a set of content, allowing the browsers to reason about the content without needing to consider state outside of the subtree. Knowing which bits of content (subtrees) contain isolated content means the browser can make optimization decisions for page rendering.
There are four types of CSS containment, each a potential value for the CSS property, which can be combined in a space-separated list of values:
- : Size containment on an element ensures that the element’s box can be laid out without needing to examine its descendants. This means we can potentially skip layout of the descendants if all we need is the size of the element.
- : Layout containment means that the descendants do not affect the external layout of other boxes on the page. This allows us to potentially skip layout of the descendants if all we want to do is lay out other boxes.
- : Style containment ensures that properties which can have effects on more than just its descendants don’t escape the element (e.g. counters). This allows us to potentially skip style computation for the descendants if all we want is to compute styles on other elements.
- : Paint containment ensures that the descendants of the containing box don’t display outside its bounds. Nothing can visibly overflow the element, and if an element is off-screen or otherwise not visible, its descendants will also not be visible. This allows us to potentially skip painting the descendants if the element is offscreen.
Examples
Infinite Scroll
As an alternative to pagination you can use to load content automatically when the bottom of a container is reached.
$(‘.infinite.example .demo.segment’)
.visibility({
once: false,
// update size when new content loads
observeChanges: true,
// load content on bottom edge visible
onBottomVisible: function() {
// loads a max of 5 times
window.loadFakeContent();
}
})
;
Infinite Scroll Example


Adding more content…
Lazy Loading Images
Visibility includes several shortcuts for setting up common visibility events. Using the setting will automatically attach events to an images to load the contents of as .
You can specify a placeholder image as the current to make sure content doesn’t jump when an image loads, or you can specify no placeholder and have the image appear.
By default images will appear without animation, however you can also specify a named transition, and a duration that should be used for animating the image into view
$(‘.demo.items .image img’)
.visibility({
type : ‘image’,
transition : ‘fade in’,
duration : 1000
})
;

Laura
Add Friend
View
Gradual Changes
Each callback receives all calculated values as its first parameter, allowing you to adjust an element using
$(‘.changing.example .demo.segment’)
.visibility({
once : false,
continuous : true,
onPassing : function(calculations) {
var newColor = ‘rgba(0, 0, 0, ‘ + calculations.percentagePassed +’)’;
$(this)
.css(‘background-color’, newColor)
;
}
})
;
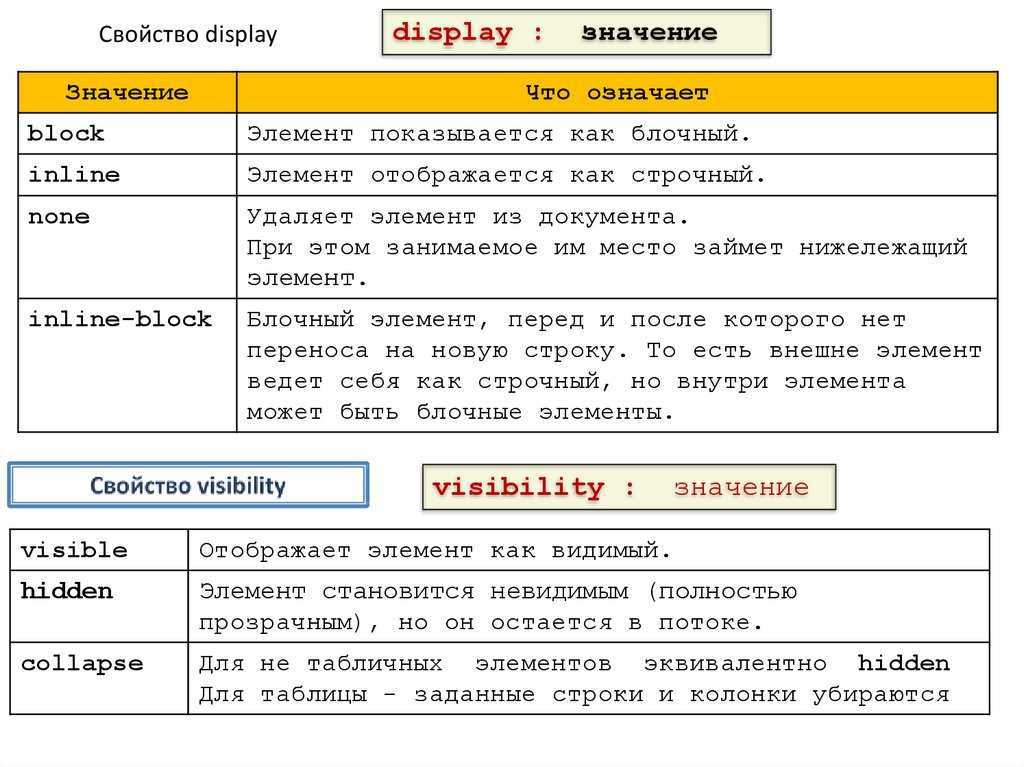
Различные значения видимости CSS
CSS visibility имеет пять возможных значений. Я буду подробно описывать их с помощью блоков кода и скриншотов. Если вы намерены следовать за мной,
- Создайте папку на вашей локальной машине.
- Добавьте два файла: index.html и styles.css.
- Откройте проект в вашем любимом редакторе кода (я использую VS Code).
Вы можете использовать эту команду:
Далее необходимо соединить файлы index.html и styles.css. В разделе <head> файла index.html добавьте следующее:
Теперь в вашем редакторе кода должно быть что-то похожее на это:

Visible
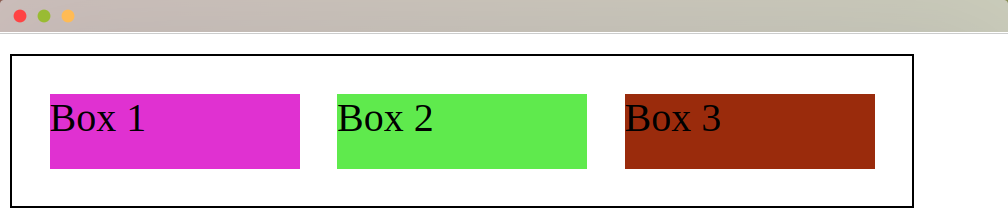
Когда вы устанавливаете значение элемента как visibility: visible, он будет отображаться на веб-странице. Эта видимость присутствует по умолчанию. Чтобы лучше понять эту концепцию, мы можем сделать три поля в нашем HTML-документе. В разделе <body> вашего index.html добавьте следующее:
Теперь мы можем стилизовать наши divs (поля) с помощью следующего кода CSS:
Когда конечная страница будет отображена, вы получите что-то вроде этого:
Если вы установите видимость для ящиков как visibility visible, это не будет иметь никакого эффекта, поскольку по умолчанию все ящики видимы. Однако мы можем продемонстрировать, как работает свойство visible, используя свойство display: none для одного из ящиков. В качестве примера мы можем выбрать box3. Измените CSS-код класса .box3 следующим образом:
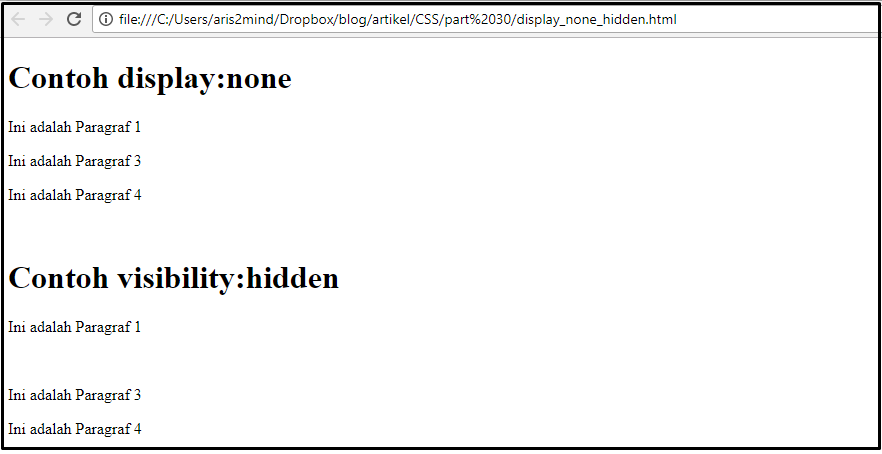
Когда вы повторно отобразите страницу, вы заметите, что у нас есть только два ящика, один и два.
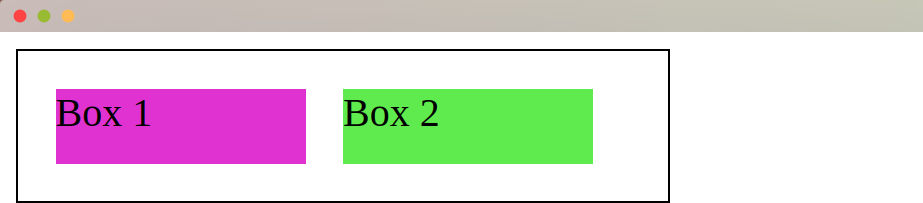
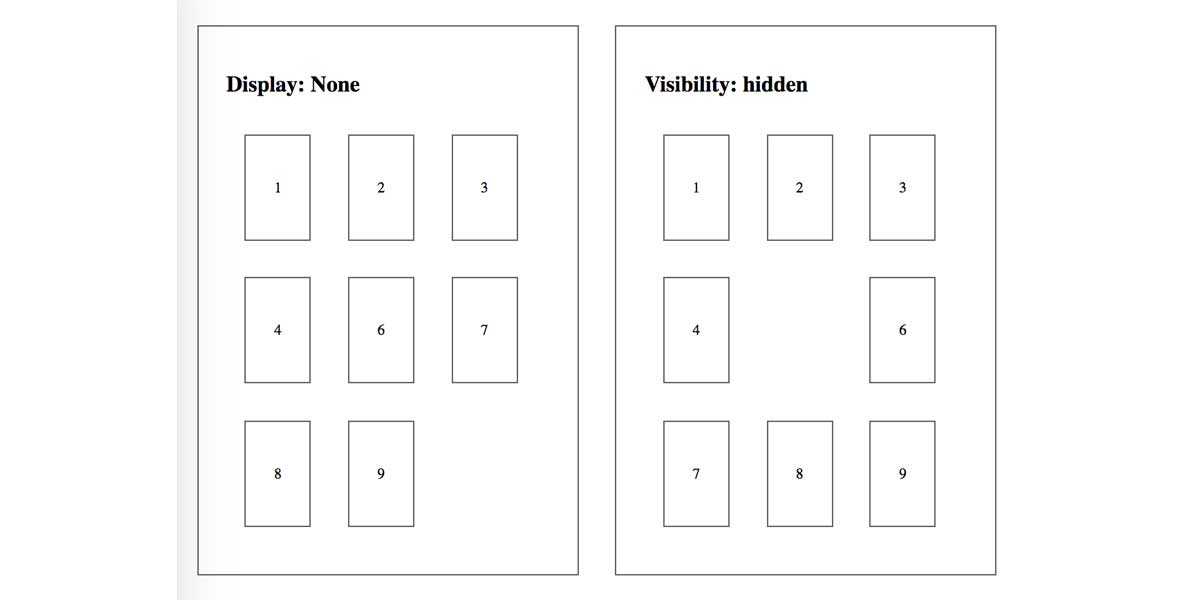
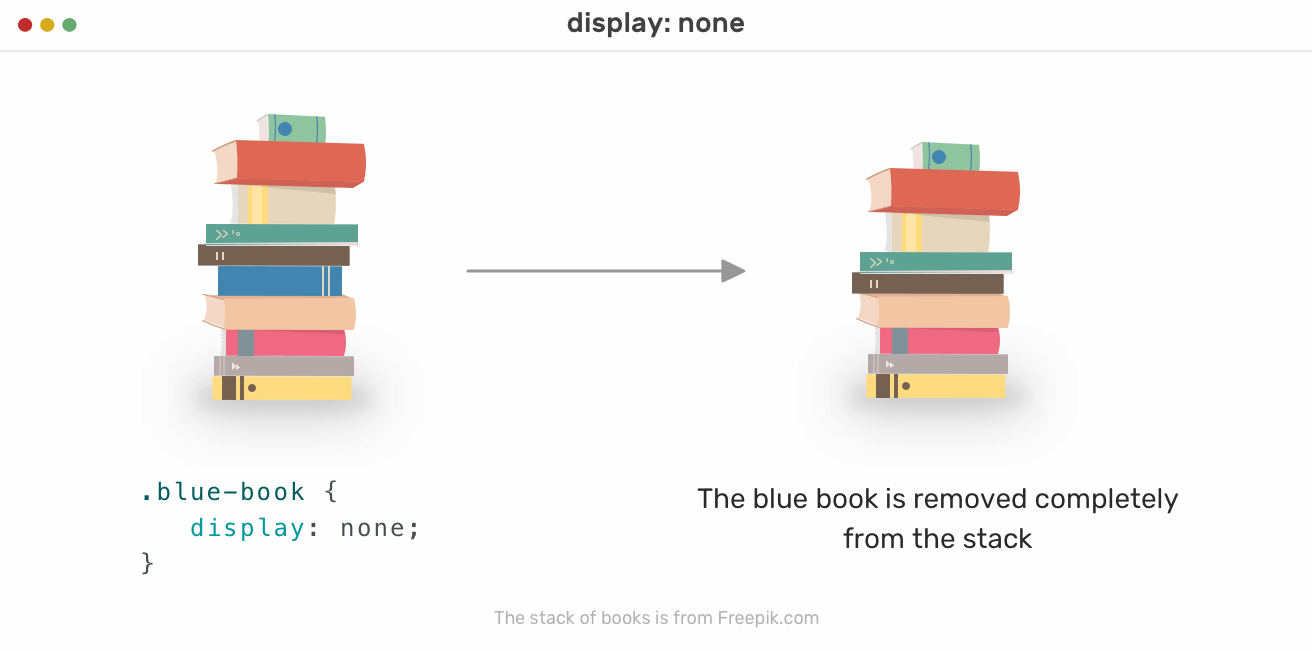
Если вы внимательны, то заметите, что наш элемент .container уменьшился в размерах. Когда вы используете свойство display: none, вставка 3 не отображается, и ее место в браузере становится свободным для других вставных элементов.
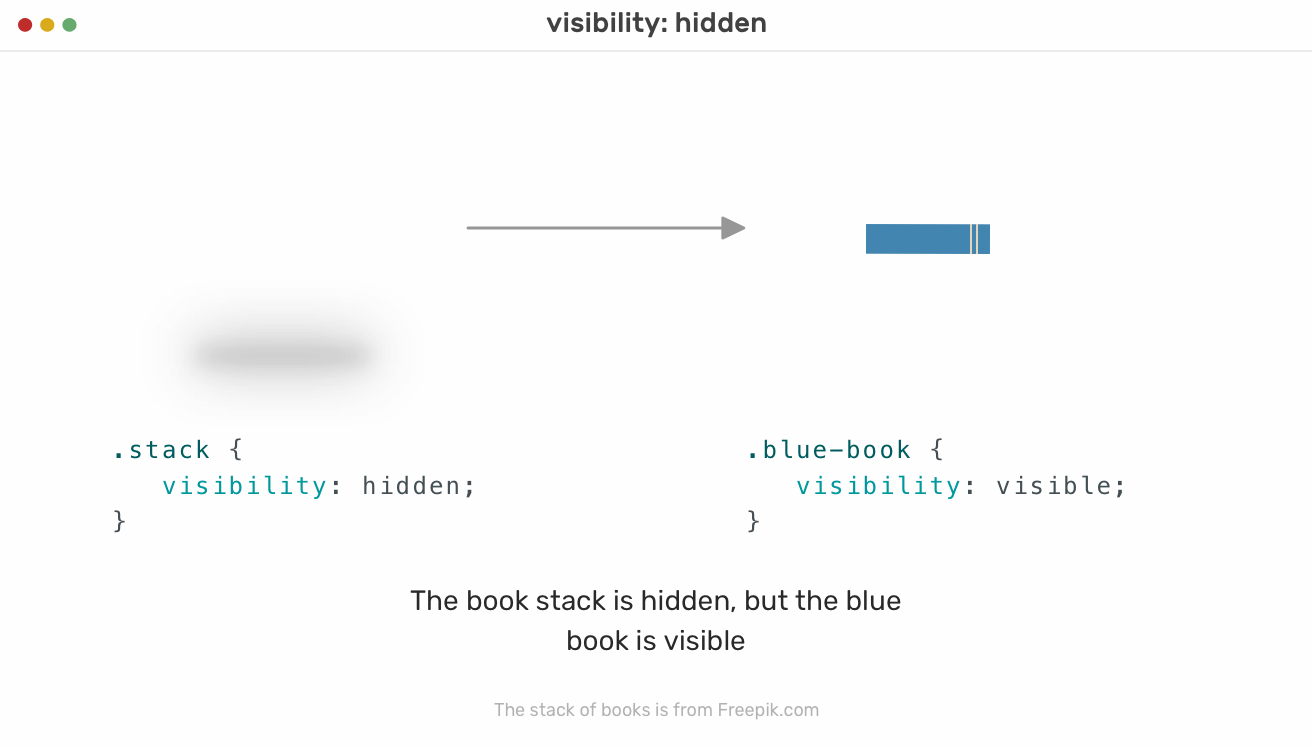
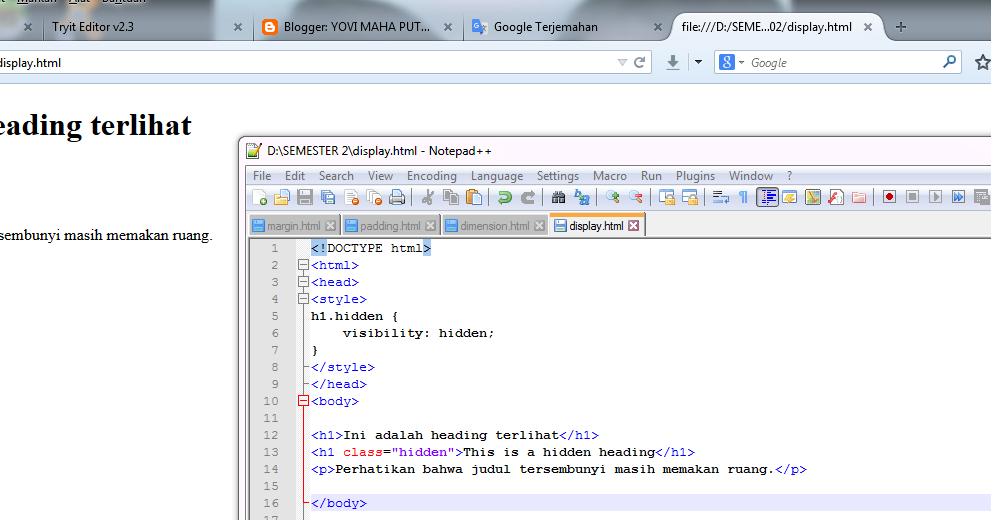
Hidden
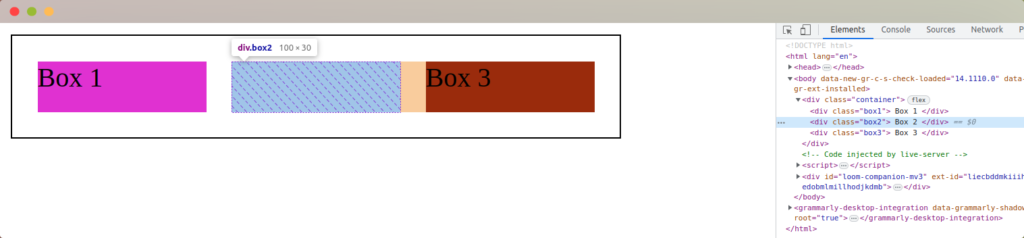
Когда мы применяем к элементу CSS свойство visibility: hidden, он будет скрыт от конечного пользователя. Однако он по-прежнему будет занимать место. Например, мы можем скрыть Box2 с помощью этого свойства.
Для этого измените CSS-код Box2 следующим образом:
Единственное изменение, которое мы внесли, это добавление этой строки:
Конечная страница будет выглядеть так, как показано на рисунке:
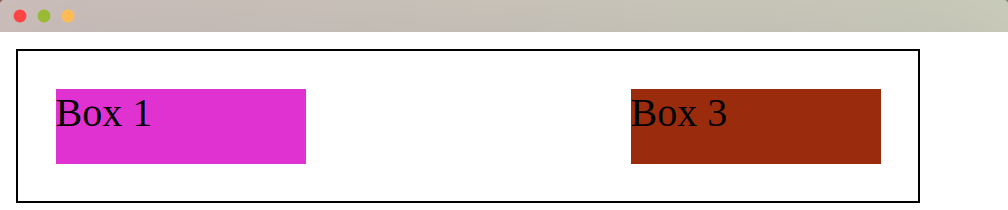
Мы видим пространство между вставкой 1 и вставкой 3, поскольку элемент вставки 2 только скрыт. Мы можем видеть, что Box 2 все еще находится в DOM, если проверим нашу отрендеренную страницу.
Collapse
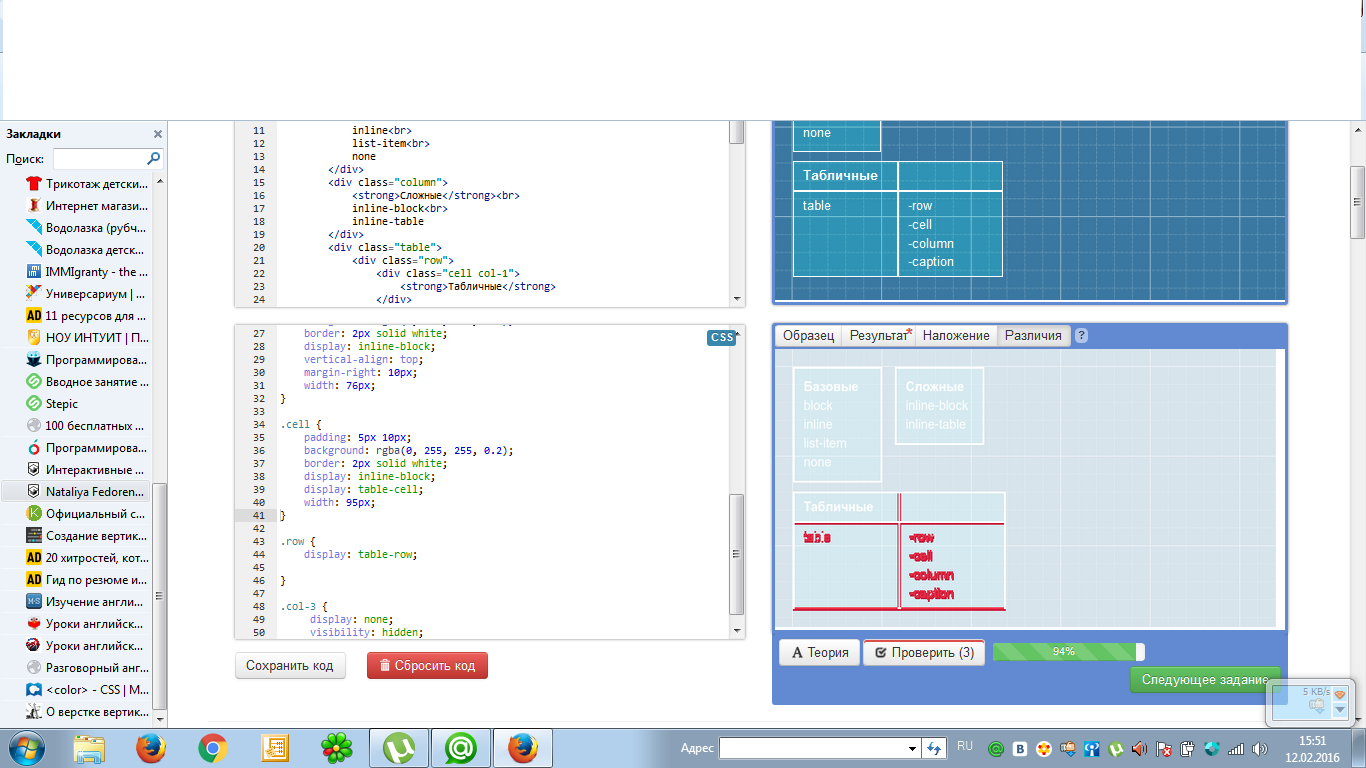
Collapse – это значение видимости, которое используется для вложенных элементов. HTML-таблицы – прекрасный пример того, где можно применить атрибут visibility:collapse.
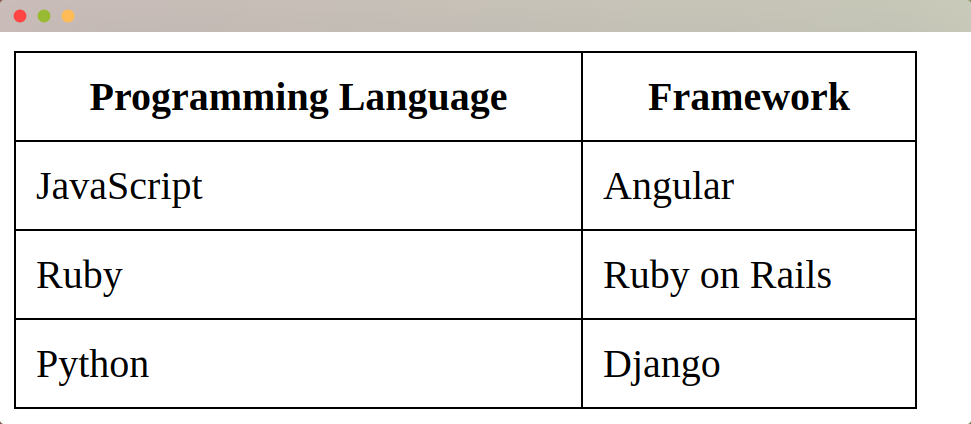
Мы можем добавить следующий код для создания таблицы в нашем HTML-файле:
Теперь мы можем стилизовать нашу таблицу с границей в 1px для всех ее ячеек. Добавьте это в ваш файл CSS:
Когда мы отобразим таблицу, мы получим следующее:
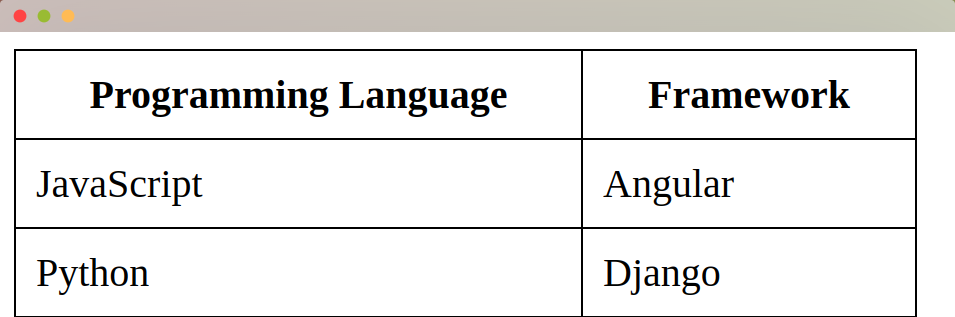
Теперь мы скроем второй ряд, чтобы продемонстрировать, как работает атрибут visibility: collapse. Добавьте это в свой код CSS:
Когда страница будет отображена, строка с Ruby и Ruby on Rails будет скрыта.
Initial
Свойство visibility: initial возвращает HTML-элемент к его начальному значению. Например:
- Мы начали с отображения всех строк нашей таблицы.
- Мы свернули значение строки 2, тем самым скрыв ее.
- Теперь мы можем вернуться к исходному значению (отобразить его).
Чтобы продемонстрировать это, мы добавим кнопку, которая переключается между отображением и сворачиванием значений.
Добавьте эту кликабельную кнопку в HTML-код:
Затем мы можем добавить функцию JavaScript, которая ищет класс .hidden-row и переключает на него класс .visible-row при нажатии на кнопку.
Значение видимости будет переключаться туда и обратно по мере нажатия на отображаемую кнопку.
Inherit
Свойство visibility : inherit позволяет дочернему элементу наследовать свойство display от родительского.
Для демонстрации работы этого свойства мы можем воспользоваться следующим простым кодом:
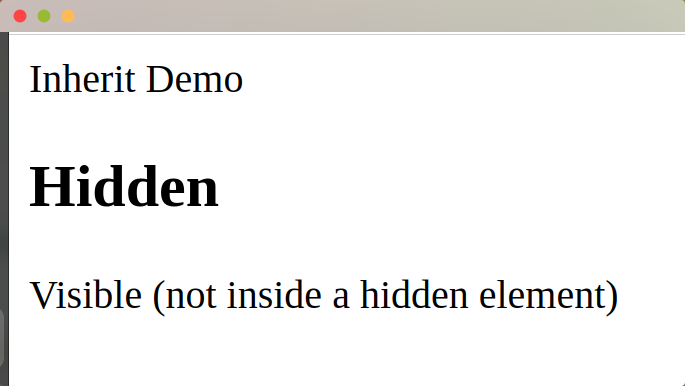
При рендеринге страницы будет отображаться только содержимое внутри тегов h1 и paragraph. Однако между тегами <h1> и <p> останется пространство, представляющее скрытые элементы. У нас есть один div, видимость которого мы установили как скрытую. Внутри div находится тег <h2>. Мы установили видимость <h2> как inherit, что означает, что он наследуется от своего родителя, div.
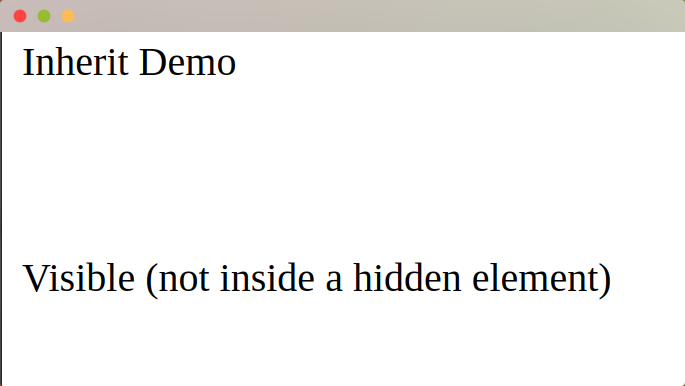
Однако если мы установим свойство div как visible, то <h2> (его дочерний элемент) также унаследует это свойство.
Advanced — On-Screen Duration
In this field, you can specify the total time in milliseconds the element must be visible in the viewport for the trigger to fire. Note that this is cumulative, so let’s say you have the following setting:
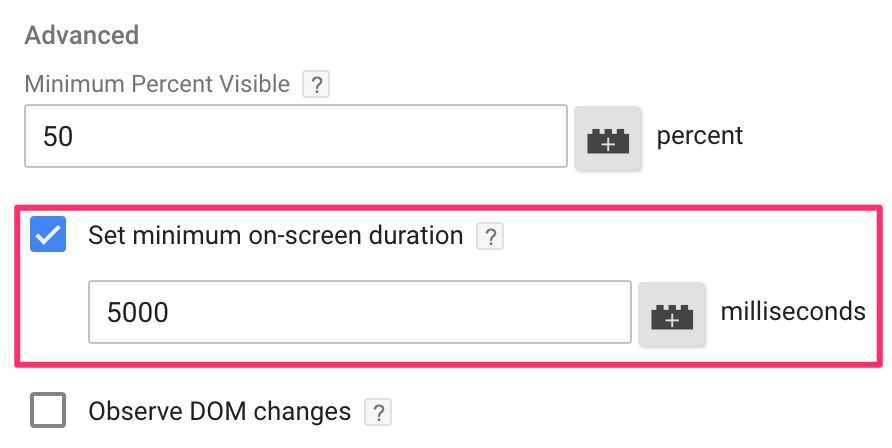
This would fire the trigger only after the matched element(s) have been visible in the viewport for a total of 5 seconds. In other words, the user could first scroll to the element, view it for one second, then scroll until the element disappears, then scroll back to the element, view it for four additional seconds, at which point the trigger fires.


Note that because GTM has to manage a timer for each element that you want to monitor, tracking a single element with the Element ID selection method performs better than a bunch of elements defined with CSS selectors.
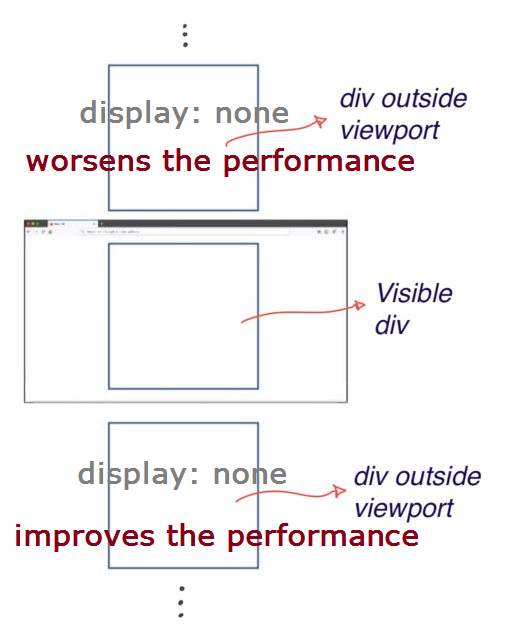
Effects on Interaction to Next Paint (INP) #
INP is a metric that evaluates a page’s ability to be reliably responsive to user input. Responsiveness can be affected by any excessive amount of work that occurs on the main thread, including rendering work.
Whenever you can reduce rendering work on any given page, you’re giving the main thread an opportunity to respond to user inputs more quickly. This includes rendering work, and using the CSS property where appropriate can reduce rendering work—especially during startup, when most rendering and layout work is done.
Reducing rendering work has a direct effect on INP. When users attempt to interact with a page that uses the property properly to defer layout and rendering of offscreen elements, you’re giving the main thread a chance to respond to critical user-visible work. This can improve your page’s INP in some situations.
Значения свойств
| Значение | Описание | Воспроизвести |
|---|---|---|
| visible | Значение по умолчанию. Элемент является видимым | Воспроизвести » |
| hidden | Элемент скрыт (но все равно занимает место) | Воспроизвести » |
| collapse | Только для строк таблицы (<tr>), групп строк (<tbody>), столбцов (<col>), группы столбцов (<colgroup>). Это значение удаляет строку или столбец, но это не влияет на макет таблицы. Пространство, занимаемое строкой или столбцом будет доступен для другого контента.
Если collapse используется для других элементов, он отображает как «hidden»; |
Воспроизвести » |
| initial | Устанавливает для этого свойства значение по умолчанию. Прочитать о initial | Воспроизвести » |
| inherit | Наследует это свойство от родительского элемента. Прочитать о inherit |
CSS Hide Element: visibility
The CSS visibility property is used to control whether an element is visible on the web page.
By default, the value of the
visibility
property is
visible
. However, if you want to make an image invisible, you can set the value of
visibility
to
hidden
.
The following style rule sets the visibility of an element to hidden:
visibility: hidden;
Let’s return to the cooking club example from earlier. Suppose we want to hide the image of the cake on our
About Us
web page. We could do so using this code:
<html>

<div>
<h1>About Us</h1>
<img src="https://images.unsplash.com/photo-1518047601542-79f18c655718?ixlib=rb-1.2.1&ixid=eyJhcHBfaWQiOjEyMDd9&auto=format&fit=crop&w=1350&q=80" height="200" width="200" />
<p>The Superstar Bakers Club, founded in 2014, is a community of passionate cookers and bakers from the Charleston, S.C. area. The club has over 100 members and meets each week to share ideas and experiment with new recipes.</p>
</div>

<style>

img {
	display: visibility;
}
<style>
Click the
button in the code editor above to see the output of our HTML/CSS code.
Our HTML code is the same in this example. In our CSS file, instead of using the
display
property, we used
visibility
to hide our element. As you can see above, our image has been hidden from the web page.
While our image is gone, there is now a space between our header and our paragraph where the image would have been placed. This is a feature of the
visibility: hidden;
style. The space of the original element is still kept by the web page. But, the element is hidden.
Usage
How To Use
Visibility provides a set of callbacks which can be used to attach events to an element’s position on screen.
Each scroll change will trigger an animation frame request that will fire callbacks for an element.
The following examples use sticky columns to help display data alongside each example. Please consult the sticky documentation for usage examples.
// some example callbacks
$(‘.demo.segment’)
.visibility({
onTopVisible: function(calculations) {
// top is on screen
},
onTopPassed: function(calculations) {
// top of element passed
},
onUpdate: function(calculations) {
// do something whenever calculations adjust
updateTable(calculations);
}
})
;
| pixelsPassed | |
| percentagePassed | |
| fits | |
| width | |
| height | |
| onScreen | |
| offScreen | |
| passing | |
| topVisible | |
| topPassed |
Changing Callback Frequency
Visibility’s default settings will only have each callback occur the first time which the conditions are met. On subsequent occurences the event will not fire.
Setting will make the callback fire anytime the callback conditions are met. So for example if you set a «top visible» callback, this callback will fire with each change in scroll when the top is visible on the page.
Setting will make the callback fire each time a callback becomes true. So, using the same «top visible» example, the callback will fire each time the top of an element is passed. Even if you scroll back up and pass the element again
Clear
Once
Continuous
Event Log
When to fire this trigger
This is where you’ll govern what this trigger actually is. Is it a check to see if a certain element is in the viewport when the page is loaded, or is it an advanced scroll trigger?

-
Once per page — this trigger will only fire once on the current page. The moment is when the first element that matches the ID or the selector string enters the viewport. Thus if you’ve specified multiple selectors or there are multiple elements with the same ID, this trigger setting will make the trigger fire only once — when the first matched element enters the viewport.
-
Once per element — this trigger will fire just once if an element with a specific ID appears in the viewport (even if multiple elements share the same ID, in which case it will fire just for the first one). However, when using CSS selectors, this setting will fire once for each element matched by the selector(s). In other words, this would be the setting to use if you wanted to create a trigger that fires when different parts of the page enter the viewport!
-
Every time an element appears on-screen — this trigger fires whenever any matched element appears in the viewport, and will do so each time the element reappears.
Of these, I wager the first two will be most used. Tracking if an element is visible is very useful for e.g. true view impression tracking, and tracking when multiple different elements appear can be used to create an advanced scroll trigger. There might be use cases for the last option too, though.
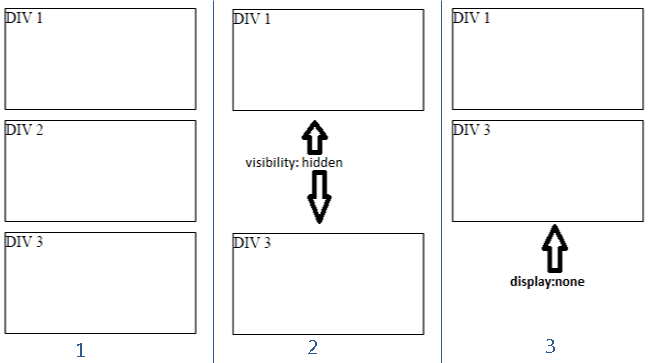
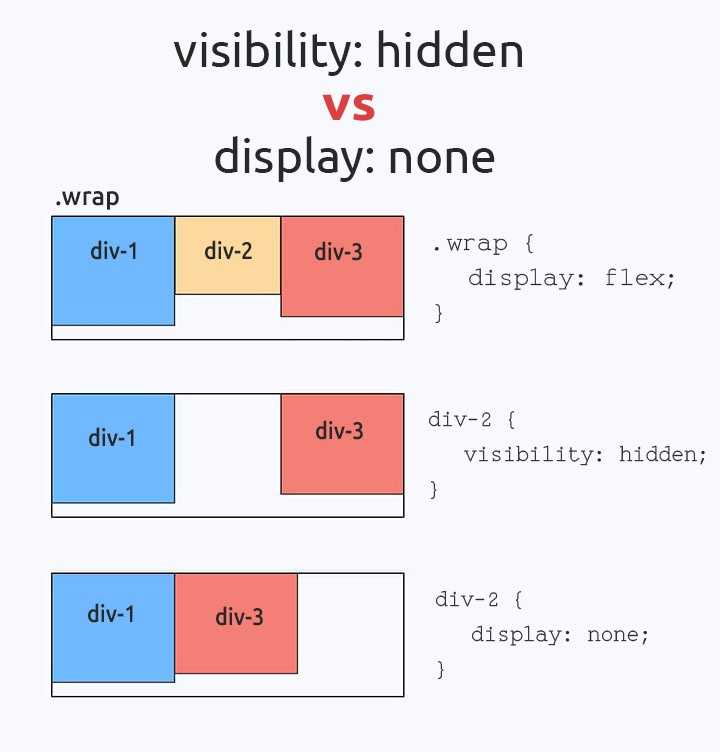
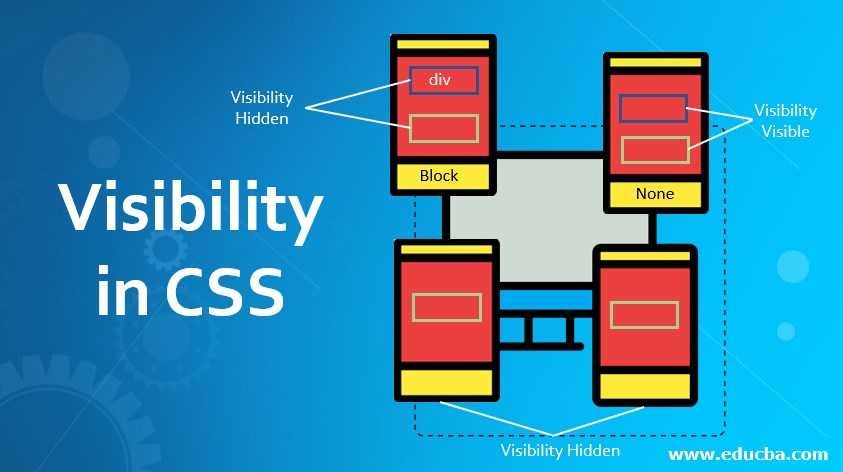
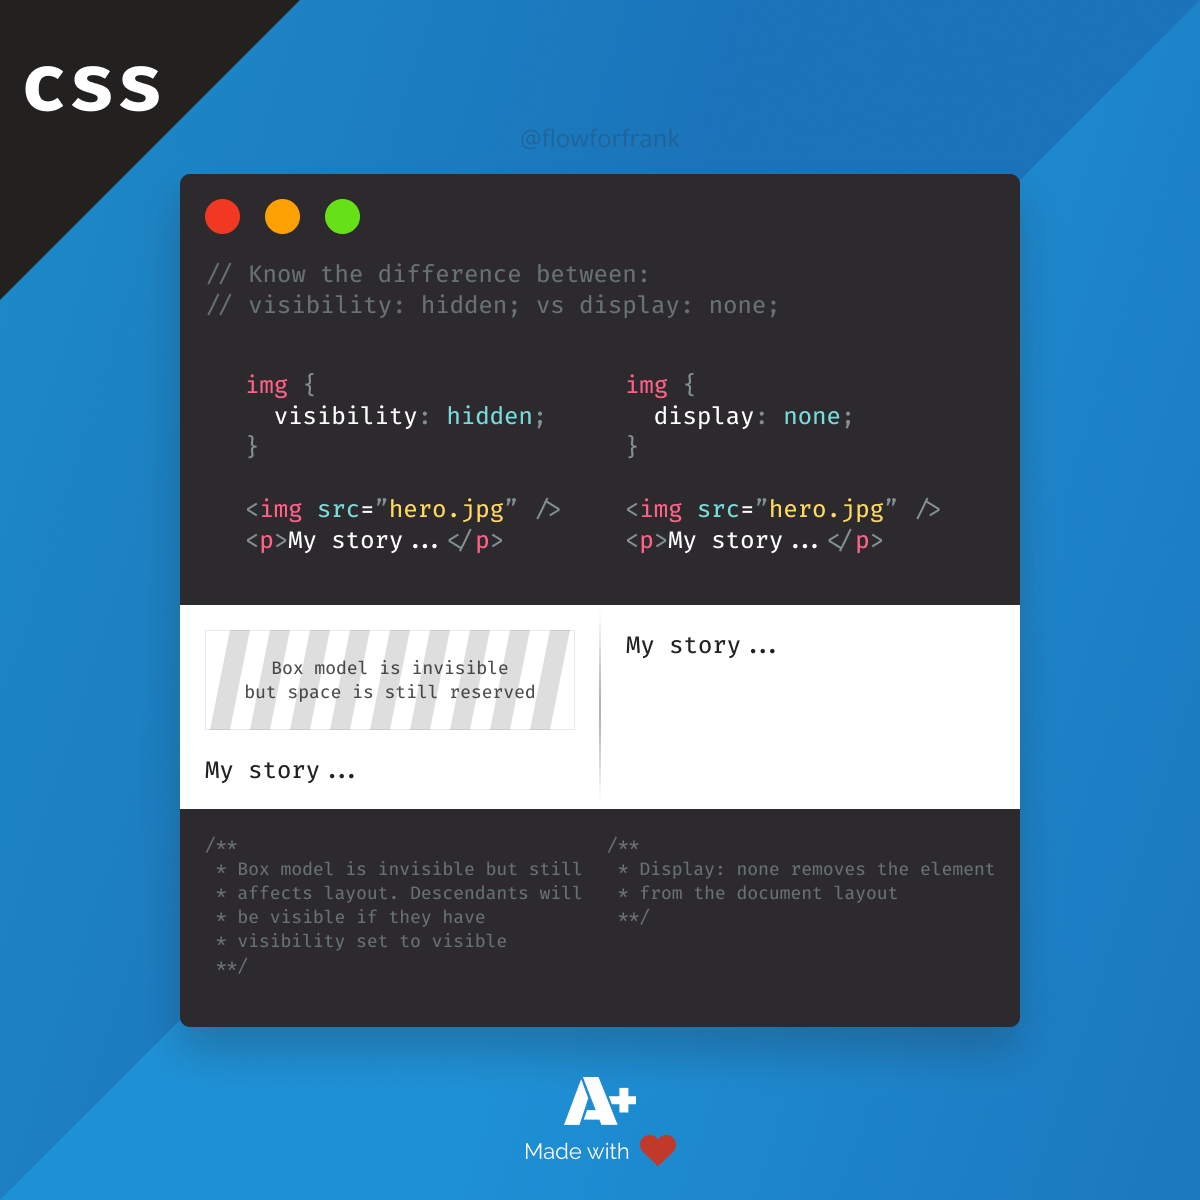
CSS visibility: hidden vs. display: none
The major difference between and is that the former removes an element from the layout entirely while the latter hides an element but still takes up space.
We can use this code to demonstrate the difference between the two;
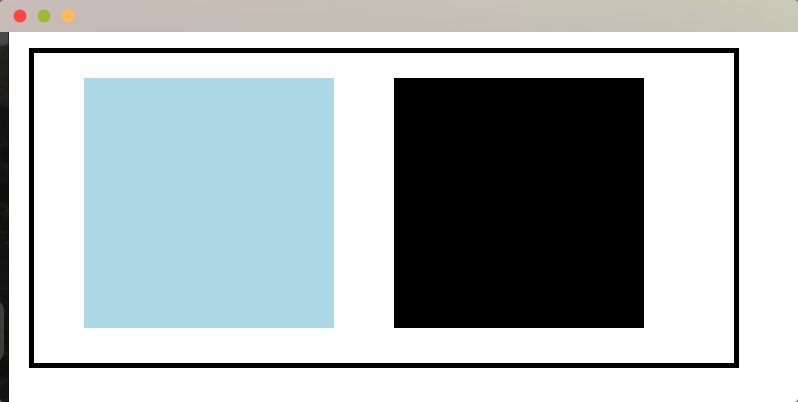
If we render our page, we will have two boxes side by side;
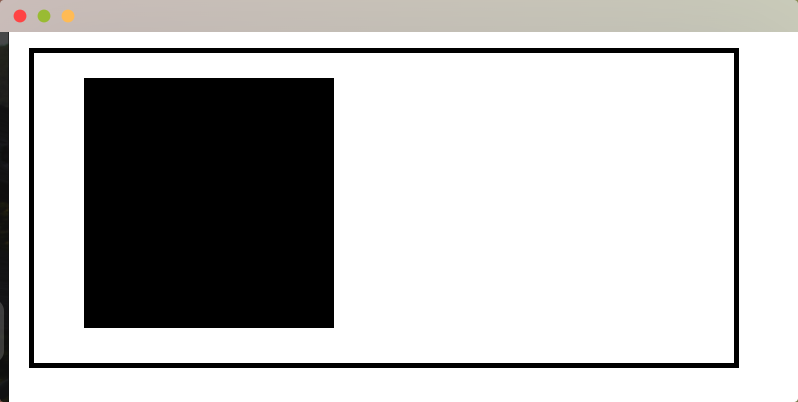
The display: none demo
Add this to .box1 class;
When you render the page, you will note that .box1 will no longer be displayed. The second box (black) also moves to the left to occupy the space previously occupied by the lightblue box.
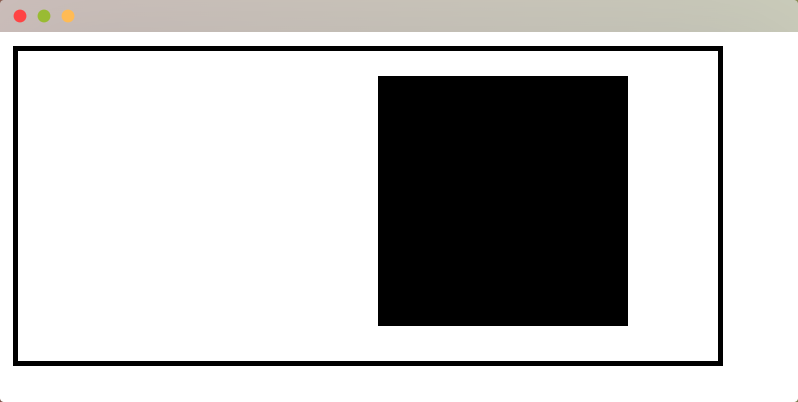
The visibility: hidden demo
Instead of , add this .box1 class;
This property leaves some space for box1 but does not display it. On the other hand, box2 remains in its place.
| display:none | visibility:hidden |
| Removes an element from the web page entirely | Hides an HTML element but still takes up space on the web page |
| You can style an element whose display is set to none | You can position and style an element whose visibility is hidden |
| Not accessible by screen readers | You can access an element whose visibility is set as hidden using screen readers |
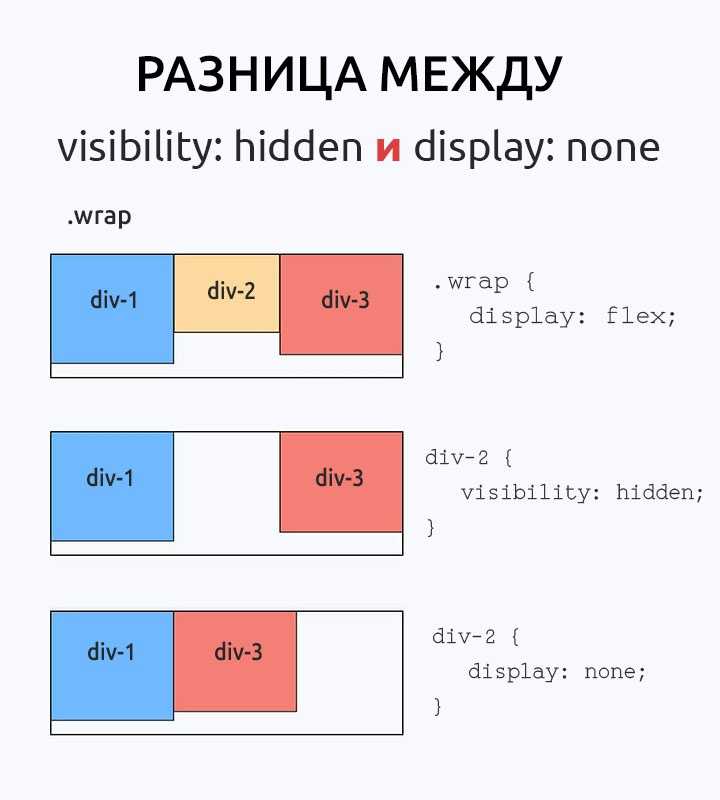
CSS visibility: hidden в сравнении с display: none
Основное различие между display:none и visibility:hidden заключается в том, что первый полностью удаляет элемент из макета, а второй скрывает элемент, но при этом занимает место.
Мы можем использовать этот код, чтобы продемонстрировать разницу между ними:
Если мы отобразим нашу страницу, то получим два поля рядом друг с другом:
Демонстрация display: none
Добавьте это в класс .box1:
Когда вы отобразите страницу, вы заметите, что .box1 больше не отображается. Второй бокс (черный) также перемещается влево и занимает место, ранее занимаемое светло-голубым боксом.
Демонстрация visibility: hidden
Вместо display: none добавьте этот класс .box1:
Это свойство оставляет место для box1, но не отображает его. С другой стороны, box2 остается на своем месте.
| display:none | visibility:hidden |
| Полностью удаляет элемент с веб-страницы | Скрывает элемент HTML, но при этом занимает место на веб-странице |
| Вы можете придать стиль элементу, для которого установлено значение none | Вы можете расположить и придать стиль элементу, видимость которого скрыта |
| Недоступно для чтения с экрана | Вы можете получить доступ к элементу, видимость которого установлена как скрытая, с помощью устройств чтения с экрана |
# How to hide elements visually
We may need to provide invisible content in order to make sure the structures presented in the accessibility tree make sense. The following CSS is taken from , which is based on Hiding Content for Accessibility:
The CSS property is supported in every browser, but was deprecated in . Instead we’re supposed to use , which yet. To support this swap of CSS properties — whenever that may happen — we would add to cover the deprecated style.
While Internet Explorer 9 — 11 make overflowing containers focusable, the makes sure the drawn by is not visible and the element cannot be clicked on.
Speaking of focusable elements, we are likely using the style for skip links, in which case we need a way to undo the visual hiding. The HTML5 Boilerplate provides the following styles for that:
This approach poses a couple of problems, though. First of all we need to declare elements compatible by adding the class . Second — and much more importantly — we’re resetting styles to values that are likely not what we intend to render. Instead we could use , which is .
According to the above snippet of CSS might pose a problem to some screen readers. It seems that (in some situations) separate words might be concatenated and thus spoken weirdly. Luckily we can prevent the undesired collapse of whitespace by adding .
2017 edition of
Putting all of this together we get the following styles to visually hide content:
- It works in all modern browsers including Internet Explorer 9 — 11.
- It side-steps the need to re-style everything for focusable elements such as skip-links.
- It accounts for the deprecated property.
Оформление списков в CSS
Для оформления списков используются следующие свойства:
list-style-type
Возможные значения:
- (отмена маркера или нумерации)
Пример:
ul.none{
	list-style-type none;
}
ul.disc{
	list-style-type disc;
}
...
ol.decimal{
	list-style-type decimal;
}
ol.decimal-leading-zero{
	list-style-type decimal-leading-zero;
}
|
Результат:
- none
- none
- disc
- disc
- circle
- circle
- square
- square
- decimal
- decimal
- decimal-leading-zero
- decimal-leading-zero
- armenian
- armenian
- georgian
- georgian
- lower-alpha
- lower-alpha
- upper-alpha
- upper-alpha
- lower-greek
- lower-greek
- lower-latin
- lower-latin
- upper-latin
- upper-latin
- lower-roman
- lower-roman
- upper-roman
- upper-roman
list-style-image
Возможные значения:
url(‘путь к файлу’) (установка своего изображения)
Пример:
ul{ list-style-imageurl('1.png'); } |
Результат:
- пункт 1
- пункт 1
list-style-position (положение маркера или номера)
Возможные значения:
- (Маркер является частью текстового блока и отображается в элементе списка)
- (Текст выравнивается по левому краю, а маркеры размещаются за пределами текстового блока)
Пример:
ul.inside{
  list-style-positioninside;
}
ul.outside{
  list-style-positionoutside;
}
|
Результат:
inside:
- пункт 1 пункт 1 пункт 1 пункт 1 пункт 1 пункт 1 пункт 1 пункт 1 пункт 1 пункт 1 пункт 1 пункт 1 пункт 1 пункт 1
- пункт 2 пункт 2 пункт 2 пункт 2 пункт 2 пункт 2 пункт 2 пункт 2 пункт 2 пункт 2 пункт 2 пункт 2 пункт 2 пункт 2
outside:
- пункт 1 пункт 1 пункт 1 пункт 1 пункт 1 пункт 1 пункт 1 пункт 1 пункт 1 пункт 1 пункт 1 пункт 1 пункт 1 пункт 1
- пункт 2 пункт 2 пункт 2 пункт 2 пункт 2 пункт 2 пункт 2 пункт 2 пункт 2 пункт 2 пункт 2 пункт 2 пункт 2 пункт 2
Задание: Создать маркированный список, вместо маркеров установить изображение.
Примерный результат: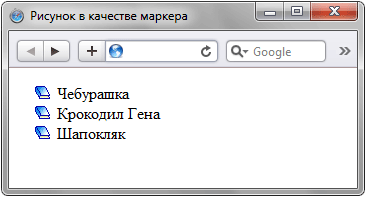
The event object contents
When the visibility trigger fires, an event with the name is pushed into Data Layer. The object has a number of variables you can refer to using Built-in Variables (or Data Layer Variables if you want to configure them manually).
-
— the element that became visible. You can capture this with the Click / Form Element Built-in Variable.
-
— the class name string of the element that became visible. You can capture this with the Click / Form Classes Built-in Variable.
-
— the ID value of the element that became visible. You can capture this with the Click / Form ID Built-in Variable.
-
— the target attribute value of the element that became visible. You can capture this with the Click / Form Target Built-in Variable.
-
— the href or action attribute value of the element that became visible. You can capture this with the Click / Form URL Built-in Variable.
-
— a decimal number between 0 and 100, telling you how much of the element was visible in the viewport when the trigger fired in percentages. You can capture this with the Percent Visibile Built-in Variable.
-
— the total cumulative time the element has been in the viewport when the trigger fires. The number is in milliseconds. You will only see a value larger than 0 if you’ve set the “On-Screen Duration” in your trigger (because without a minimum on-screen duration, the trigger will always fire immediately when the element appears). You can capture this with the On-Screen Duration Built-in Variable.
-
— the time in milliseconds when the element first became visible in the viewport. This time is calculated as the delta from the moment the browser started rendering the Google Tag Manager container snippet to the moment the trigger fired.
-
— the time in milliseconds when the element most recently became visible in the viewport. The calculation is similar to , except this time each time the trigger fires for the given element, the value is updated.
You can use these variables (preferable as Built-in Variables) to create even more advanced configurations in your other tags, triggers, and variables.
# How to hide elements completely
Completely hiding elements can be done in 3 ways:
- via the CSS property , e.g.
- via the CSS property , e.g.
- via the HTML5 attribute , e.g.
While each of these techniques has the same end result, i.e. content is not rendered and not exposed in the accessibility tree, they have different behaviors.
The CSS properties and
will cause the element to completely vanish, it won’t take any space and it won’t be animatable. allows animation and preserves the space the element would occupy on screen, but simply leave it blank. Unlike every other method to hide content, has the ability to unhide nested content:
Unless unhiding nested content is specifically what we intend to do, we should refrain from using in our style sheets, and use instead. By inheriting the state from the parent element by default, we make sure that nested content does not become visible by accident, in case the an ancestor has set.
The HTML5 attribute
The HTML5 attribute provides a convenient API, as it can be toggled simply by setting . The element itself does not hide the content, but browser’s internal style sheets contain the following CSS rule:
Safely overwriting the attribute
We absolutely must not revert the hiding effects of the attribute. However, we can swap for in certain situations, for example to allow us to animate the element:
Sadly we cannot use the values , or to simply undo the . and would translate to , and simply «imports» the value of the parent element. We can use extended selectors to get around duplicate definitions:
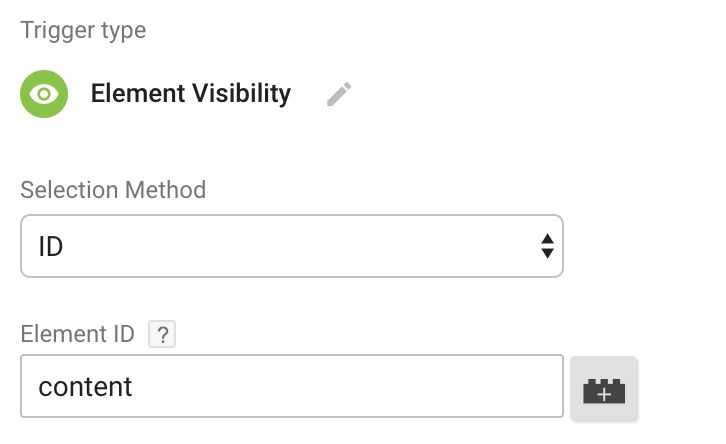
Selection method
You have two options here — element ID and CSS Selector. The former uses to match the first element in the page with the given ID. The latter uses CSS Selectors to match the element or a group of elements on the page.

At this point I really recommend you read up on CSS selectors (see also my article on the topic). They really make Google Tag Manager more than just the sum of its parts.
-
ID — the trigger waits for an element with a specific attribute to appear in the viewport.
-
CSS Selector — the trigger waits for elements that match the CSS selector string to enter the viewport.
The obvious difference between the two is that you can add multiple element selectors into the CSS selector string. For example, if I want to track when the header, the article title, the article body, and the article footer enter the viewport, I could use something like this as the selector:
The trigger could then fire when each one of these enters the viewport (see below).
The ID selector, on the other hand, performs better if you have only one element to track.
Different CSS visibility values
CSS visibility has five possible values. I will go into detail through code blocks and screenshots. If you intend to follow along,
- Create a folder on your local machine.
- Add two files; and .
- Open the project in your favourite code editor (I am using VS Code)
You can use this command;
The next is to connect and files. On the section of the index.html file, add this;
You should now have something similar to this on your code editor;
Visible
When you set the value of an element as visibility: visible, it will appear on the web page. This visibility is there by default. We can have three boxes in our HTML document to understand this concept better. In the section of your , add the following;
We can now style our divs (boxes) using the following CSS code;
When the final page is rendered, you will have something like this;
If you set the visibility on of the boxes as , It won’t have any effect as all boxes are visible by default.
However, we can demonstrate how visible property works using the display: none property on one of the boxes. We can select box3 as our example. Change the CSS code on class .box3 as follows;


When you re-render the page, you will note we only have two boxes, one and two.
If you are keen, you will note that our .container element has reduced size. When you use the display: none property, Box 3 is not rendered, and its space on our browser becomes vacant for other boxes to occupy.
Hidden
When we apply the visibility: hidden CSS property on an element, it will be hidden from the end user. However, it will still occupy space. For instance, we can hide Box2 using this property.
To achieve this, modify the Box2 CSS code as follows;
The only change we have made is adding this line;
The final page will be as displayed;
We can see a space between Box 1 and Box 3 as the Box 2 element is only hidden.
We can see that Box 2 is still on the DOM if we inspect our rendered page.
Collapse
Collapse is a visibility value that is used on sub-elements. HTML tables are a perfect example of where we can apply the attribute.
We can add the following code to create a table in our HTML file;
We can now style our table with a border of 1px on all its cells. Add this to your CSS file;
When we display the table, we will have the following;
We will now hide the second row to demonstrate how the attribute works. Add this to your CSS code;
When the page is rendered, the row with Ruby and Ruby on Rails will be hidden.
Initial
The visibility: initial property resets an HTML element to its initial value. For instance;
- We started with all the rows in our table being displayed.
- We collapsed the value of row 2, thus hiding it.
- We can now go back to the initial value (display it)
We will add a button that switches between display and collapse values to demonstrate this.
Add this clickable button to your HTML code;
We can then add a JavaScript function that looks up for .hidden-row class and toggles the class .visible-row on it when the button is clicked.
The visibility value will switch back and forth as you click the button displayed;
Inherit
The property allows a child element to inherit the display property from the parent.
We can have this simple code to demonstrate how this property works;
Only the content inside the h1 and paragraph tags will be displayed if you render the page. However, a space representing the hidden elements between the <h1> and <p> tags will exist.
We have one div whose visibility we have set as hidden. We have <h2> tag inside the div. We have set the visibility of the <h2> as inherit, which means it inherits from its parent, the div.
However, if we set the property of the div as visible, the <h2> (its child) will also inherit that.