
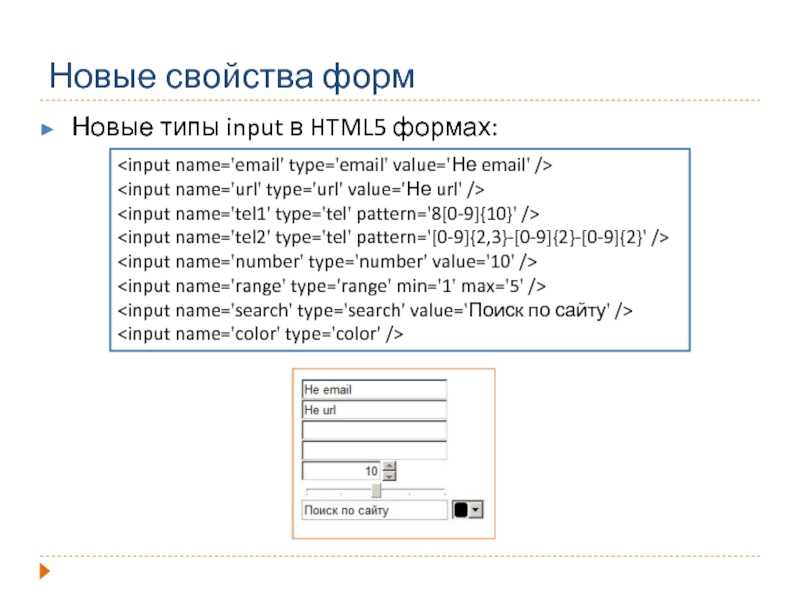
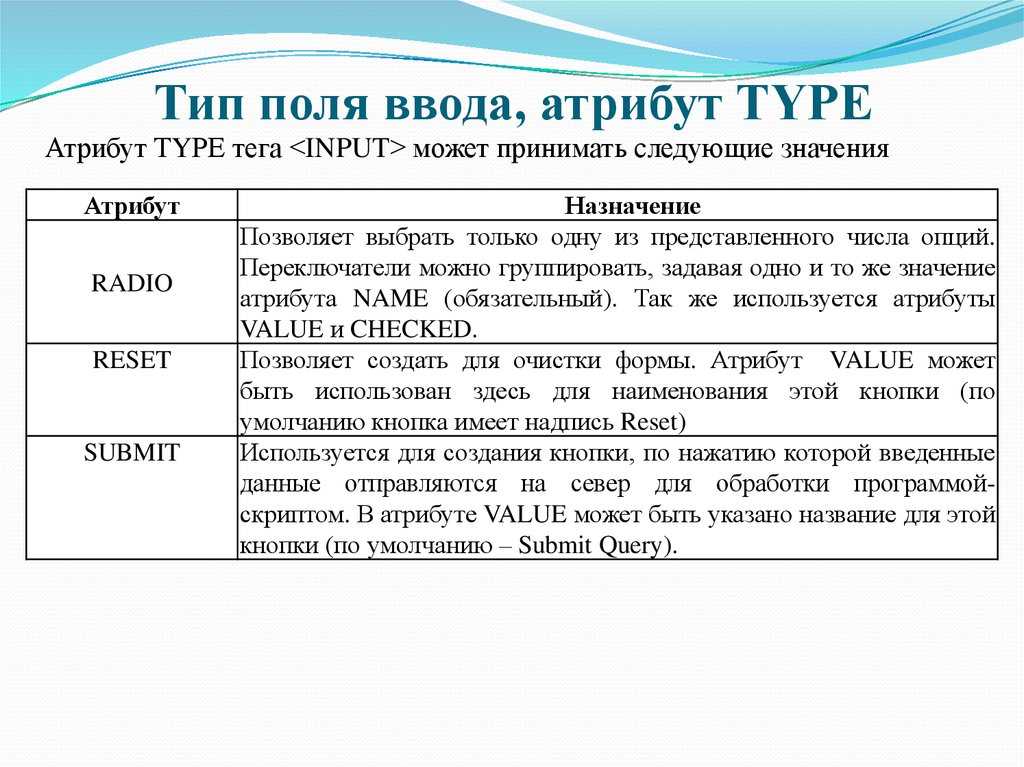
Телефонные номера
Тип данных tel применяется с целью обозначения полей для ввода телефонных номеров, которые могут быть представлены в самых разных форматах. В одних случаях используются только цифры, в других применяются пробелы, тире, знак «плюс» и круглые скобки. Возможно, это отсутствие единого формата и есть причина того, что стандарт HTML5 не требует от браузеров выполнения проверки телефонных номеров. Вместе с тем, не понятно, почему поле типа tel не отклоняет по крайней мере, буквы.
В настоящее время единственная польза от применения поля типа tel состоит в предоставлении специализированной виртуальной клавиатуры для ввода телефонных номеров на мобильных браузерах, которая содержит цифры, но не буквы.
Autofocus Attribute
When the page loads, the input autofocus attribute ensures that the input field proactively gains focus.
Once the page loads, the “Owner first name:” input field will automatically gain focus:
Example
Execute
<!DOCTYPE html>
<html>
<body>
<form>
<label for=»fname»>Owner first name:</label><br>
<input type=»text» id=»fname» name=»fname» autofocus><br>
<label for=»lname»>Last name:</label><br>
<input type=»text» id=»lname» name=»lname»>
</form>
</body>
</html>
Here is a complete example of the autofocus attribute in a form:
Example: 
Execute
<!DOCTYPE html>
<html>
<body>
<h2>Total Marks</h2>
<form action=»» accept-charset=»utf-8″>
<label for=»id»>ID:</label>
<input type=»text» name=»id»><br>
<label for=»course»>Course:</label>
<input type=»text» name=»course» autofocus><br>
<label for=»grade»>Grade:</label>
<input type=»text» name=»grade»><br>
<label for=»marks»>Marks:</label>
<input type=»number» name=»marks»><br><br>
<input type=»submit»>
</form>
</body>
</html>
The formmethod Attribute
The formmethod attribute defines the HTTP method for sending form-data to the action URL.
The formmethod attribute overrides the method attribute of the <form> element.
The formmethod attribute can be used with type=»submit» and type=»image».
Example
The second submit button overrides the HTTP method of the form:
<form action=»action_page.php» method=»get»>
First name: <input type=»text» name=»fname»><br>
Last name: <input type=»text» name=»lname»><br>
<input type=»submit» value=»Submit»>
<input type=»submit» formmethod=»post» formaction=»demo_post.asp»
value=»Submit using POST»>
</form>
The autocomplete Attribute
The input attribute specifies whether a form or an input field should have autocomplete on or off.
Autocomplete allows the browser to predict the value. When a user starts to type in a field, the browser should display options to fill in the field, based on earlier typed values.
<form action="/action_page.php" autocomplete="on">
  <label for="fname">First name:</label>
  <input type="text" id="fname" name="fname"><br><br>
  <label for="lname">Last name:</label>
  <input type="text" id="lname" name="lname"><br><br>
  <label for="email">Email:</label>
  <input type="email" id="email" name="email" autocomplete="off"><br><br>
  <input type="submit" value="Submit">
</form>
Tip: In some browsers you may need to activate an autocomplete function for this to work (Look under “Preferences” in the browser’s menu).
Try this example by your self, here is the editor
See the Pen
try example by Arpit (@soniarpit)
on CodePen.
hope you like it. happy coding
previous: #24 HTML Input types
next: #26 HTML Input form* Attributes
reference: w3schools, javatpoint
2) Input Attributes «min and max»
I am using the above (1st) example understand min and max attributes. While input type «number» will allow you to choose numbers (positive or negative number), you can limit or set a range. For example, we want our users to choose or enter numbers between 5 and 15, all positive numbers. However, if they mistaken or intentionally enter a value, which is less or more than the specified range, it will show a message and will not accept further commands.
<form method="get" action="">
Choose numbers between 5 and 15
<input type="number" min="5" max="15" />
<input type="submit" value="Submit" />
</form>
Try it
image
Browser Support: Chrome — Yes | Edge — Yes | FireFox — Yes | Internet Explorer 10 — Yes
HTML attribute: min
The
attribute specifies the minimum acceptable and valid value for the input with the attribute. The element fails constraint validation if its
is below this value. The value of the
attribute must not exceed the
attribute value.
For certain
Input type
, there exists a pre-set minimum value. However, if the input lacks a pre-set minimum and the value assigned to
is invalid or no minimum value is specified, then the input will not have a minimum value.
The acceptable input types are date, month, week, local
time, datetime
, number, range, and the
element.
Specifications
| Specification |
|---|
| The HTML Standard includes information about the «min» and «max» attributes. |
| The HTML standard includes a section called «attr-meter-max». |
html.elements.meter.min
To view data on the browser, JavaScript must be enabled as BCD tables cannot load without it.
Find max and min values in a column which is a result of summary, I can technically use the take operation after ordering the column (asc or desc) to get either min or max value but it doesn’t seem to be
Tags:
find max and min values in a column
javascript how to find minmax values without math functions
Determine if a quadratic has a max or min value then find it (mistake)
Learn about the parts of a parabola. A parabola is the shape of the graph of a quadratic equation
Duration: 4:54
Finding a min/max value of a parabola in standard form
College Algebra Unit 2: Analyze Linear and Quadratic Functions. Finding a min/max value of a
Duration: 2:17
11) Input Type «tel»
This is one input type designed exclusively for smart phones, but not for regular browsers. Add this type on the web page and check it on a smart phone. When focus is set on the field (with type tel), the mobile browser shows a phone keypad for entering phone numbers. A phone keypad usually has numbers and «+» sign.


<form method="get" action="">
<input type="tel" name="telephone" />
</form>
However, we have checked type tel on a regular browser, we did not see any visible difference between Input Type tel and text.
Do not forget to add the required attribute, if you think it is necessary for your users to add the phone number. It will definitely check for the number, at least.
formmethod Атрибут
formmethod атрибут определяет метод HTTP для отправки form-data в URL действия.
formmethod атрибут переопределяет method атрибут <form> элемента.
formmethod атрибут может использоваться с type=»submit» и type=»image» .
пример
Кнопка второго представить переопределяет метод HTTP формы:
<form action=»action_page.php» method=»get»> First name: <input type=»text» name=»fname»><br> Last name: <input type=»text» name=»lname»><br> <input type=»submit» value=»Submit»> <input type=»submit» formmethod=»post» formaction=»demo_post.asp» value=»Submit using POST»> </form>
# DateTime (Global)
The input element with a type attribute whose value is «datetime» represents a control for setting the element’s value to a string representing a global date and time (with timezone information).
Permitted attributes:
- global attributes
- name
- disabled
- form
- type
- autocomplete
- autofocus
- list
- min & max
- step (float)
- readonly
- required value
Parameters
| Parameter | Details |
|---|---|
| class | Indicates the Class of the input |
| id | Indicates the ID of the input |
| type | Identifies the type of input control to display. Acceptable values are , , , , , , , , , , , , , , , , , and . Defaults to if not specified, if the value is invalid, or if the browser does not support the type specified. |
| name | Indicates the name of the input |
| disabled | Boolean value that indicates the input should be disabled. Disabled controls cannot be edited, are not sent on form submission, and cannot receive focus. |
| checked | When the value of the type attribute is radio or checkbox, the presence of this Boolean attribute indicates that the control is selected by default; otherwise it is ignored. |
| multiple | HTML5 Indicates multiple files or values can be passed (Applies only to and type inputs ) |
| placeholder | HTML5 A hint to the user of what can be entered in the control . The placeholder text must not contain carriage returns or line-feeds |
| autocomplete | HTML5 Indicates whether the value of the control can be automatically completed by the browser. |
| readonly | Boolean value that indicates the input is not editable. Readonly controls are still sent on form submission, but will not receive focus. HTML5: This attribute is ignored when the value of attribute is either set to , , , , , or . |
| required | HTML5 Indicates a value must be present or the element must be checked in order for the form to be submitted |
| alt | An alternative text for images, in case they are not displayed. |
| autofocus | The element should get the focus when page loads. |
| value | Specifies the value of element. |
| step | The attribute specifies the legal number intervals. It works with the following input types: , , , , , and . |
Remarks
As with other HTML5 void elements, is self-closing and may be written . HTML5 does not require this slash.
The following are valid input types in HTML:
- (default value)
The following are newly introduced input types as a part of HTML 5 standard. Some of these types are not supported by all web browsers. In the case where a type is not supported, the input element will default to the type.
- (Deprecated and Obsolete)
To check which browsers support which types, you can go to .
Числовые поля
Текстовые поля могут использоваться для ввода чисел при установке значения number атрибута type. Этот тип используется для ввода только чисел. Другие символы не разрешены и будут проигнорированны при попытке ввода. В дополнении появляются стрелки после текстового поля для циклического изменения значения.
Как и с другими текстовыми полями, значение по умолчанию может быть указано через атрибут value. Конечно, значение должно быть числом. Однако, минимально и максимально значения могут еще указываться атрибутами min и max. Если они установлены, то Вы сможете управлять диапазоном значение, которые могут быть введены в текстовое поле. Если пользователь вводит значение меньше или больше этого диапазона, то оно будет заменено на минимальное или максимально соответственно. Для примера следующее числовое поле может принять значение из диапазона от 1 до 20.
<textbox type="number" min="1" max="20"/>
Значение по умолчанию не установлено, значит по умолчанию примется 1(минимально значение). Атрибут min, установленный в 1, показывает, что минимально возможное значение равно 1, а атрибут max, установленный в 20, показывает, что максимально возможное значение — 20. Если минимально значение не установлено, то значение по умолчанию будет 0. Для максимального значение по умолчанию установлено специальное значение бесконечности, т.е. предел не установлен.
Другие атрибуты числовых полей
Атрибут increment используется для установки шага изменения значения в поле при нажатии на стрелки вверх/вниз. По умолчанию это значение равно 1, но установка разных значений позволяет изменять числа с большим шагом. В следующием примере изменение происходит с шагом 10.
<textbox type="number" increment="10" max="100"/>
Шаг этого текстового поля — 10, изменения происходят от 0 до 100. Атрибут min не установлен, поэтому принимает значение по умолчанию — 0. Заметим, что пользователь может как и прежде ввести другие значения, если он наберет его на клавиатуре. Атрибут increment оказывает действия только на кнопки со стрелками. Пользователь может еще увеличивать или уменьшать значение, используя курсорные клавиши вверх/вниз пока фокус находится в текстовом поле.
Атрибут decimalplaces показывает сколько цифр будет помещаться в поле после точки. Значение по умолчанию 0, которое значит, что будут показаны только целые числа. Как бы то ни было, различные значения могут использоваться для показа дробных значений.
<textbox type="number" decimalplaces="2"/>
В этом примере показывается две цифры после десятичной точки. Все дробные значения будут округляться до двух цифр.
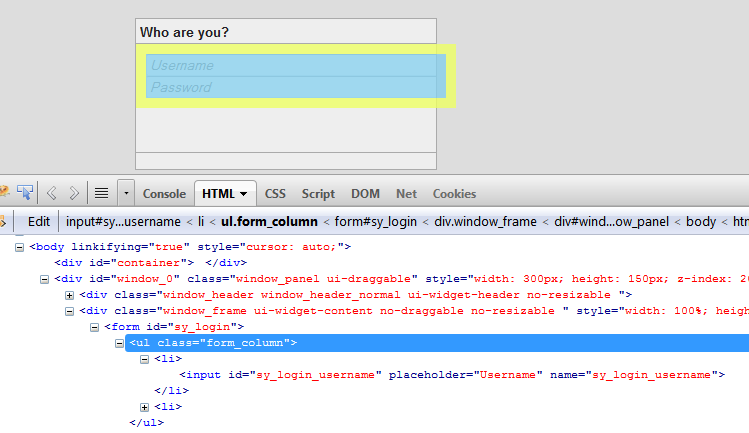
7) Input Attribute «placeholder»
The placeholder attribute shows a small message inside the input box, describing the type of value the user must enter. This attribute has many advantages. If you are a web developer, then you do not have to add an extra label to show messages, it saves space on the web page. From a user’s point of view, a single glance at the input field the user gets a clear message about the field and the expected value.
For example, we have an input box, and the character limit is set to 5.
<form method="get" action="">
<input type="text" maxlength="5" placeholder="Five char limit" name="city-code" />
</form>
The maxlength is set to 5 and the placeholder clearly has a message for the user, which spares them from guessing.
Browser Support: Chrome — Yes | Edge — Yes | FireFox — Yes
Атрибут maxlength
Ввод атрибута задает максимальное количество символов, разрешенных в поле ввода.
Примечание: Когда задано , то поле ввода не будет принимать больше указанного количества символов.
Однако этот атрибут не дает никакой обратной связи. Поэтому, если вы хотите предупредить пользователя, вы должны написать код JavaScript.
Пример
Установите максимальную длину для поля ввода:
<form> <label for=»fname»>Имя:</label><br>
<input type=»text» id=»fname» name=»fname» size=»50″><br>
<label for=»pin»>ПИН:</label><br>
<input type=»text» id=»pin» name=»pin»
maxlength=»4″ size=»4″></form>
Browser compatibility & Fallbacks
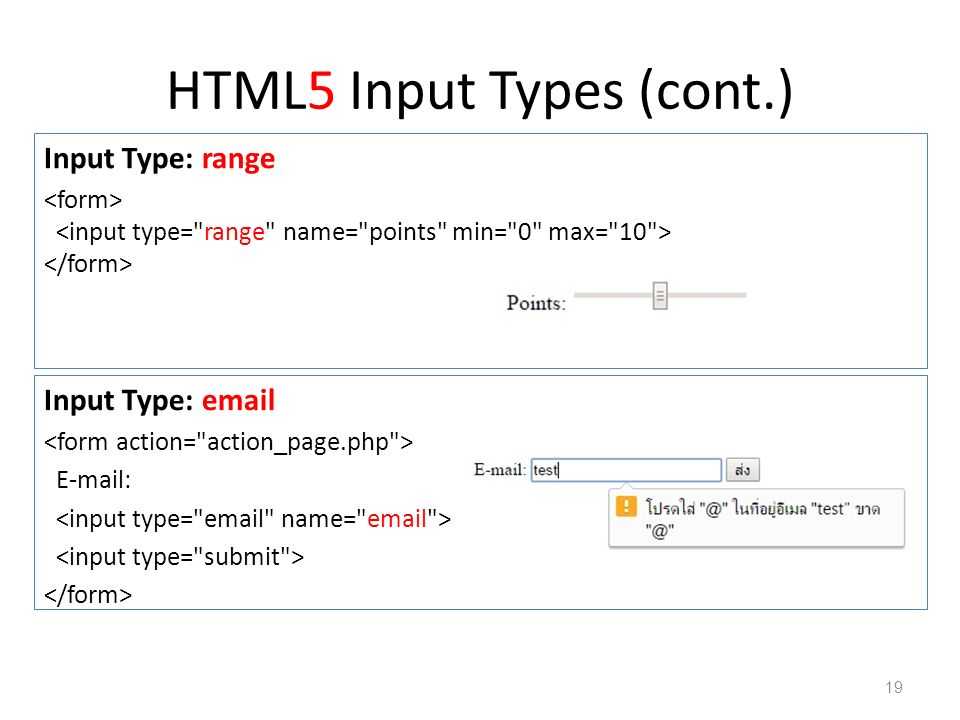
Mobile browser support for the new input types is not widely consistent. The examples throughout this article illustrate the differences across a small sample of current mobile browsers. Input type range appears to be both the most widely, and the most consistently supported.
At worst, any unsupported type will be implemented as a text field, so this can serve as the ultimate fallback, requiring those less motivated among us to do absolutely nothing for unsupported browsers. However, you can usually do a little bit better by making broad device categories and sending different markup to each device category.
Given the generally higher user effort involved in providing input on a mobile device, it’s definitely worth exploiting these new input types where possible.
Combo Box Fields
The combo box field is really just a text field where you can associate a list
of options to. Here is how you write it:
<input type="text" name="comboBoxField" list="comboBoxList">

<datalist id="comboBoxList">
    <option label="Anna">
    <option label="John">
    <option label="Xavier">
</datalist>
Notice the attribute of the field. The value of
the attribute is the of the
element. This way, the browser knows that the element should
be associated with the field, and used as options for auto completion
of the text written in the text field.
The element contains a list of elements which
each contain a attribute. The attribute is the value of
that option used in auto completion option when the user types text into the text field.
Here is the example code from above as a live example. Try typing in one of the
names Anna, John or Xavier, and see what happens as you type.
The maxlength Attribute
The maxlength attribute specifies the maximum allowed length
for the input field:
Example
<form action=»»>
First name:<br><input type=»text» name=»firstname»
maxlength=»10″><br>
Last name:<br><input type=»text» name=»lastname»>
</form>
With a maxlength attribute, the input control will not accept more than the
allowed number of characters.
The attribute does not provide any feedback. If you want to alert the user,
you must write JavaScript code.
|
Input restrictions are not foolproof. JavaScript provides many ways to add illegal input. To safely restrict input, restrictions must be checked by the receiver (the server) as well. |
Поля ввода даты и времени
Элементы datepicker и timepicker могут использоваться для ввода даты и времени пользователем. При использовании они показывают набор числовых полей для каждого компонента даты или времени.
<datepicker value="2004-03-24"/>
<timepicker value="15:30:00"/>
Атрибут value используется для установки значения по умолчанию; если этот атрибут не установлен, то поле инициализируется текущими значениями времени и даты. Атрибут format точно описывает форму записи даты и времени. Для даты форма выглядит как YYYY/MM/DD, для времени — HH:MM:SS (хотя секунды и соответствующее двоеточие может быть опущено).
Эти два элемента гарантируют, что пользователь введет дату или время. Поэтому Вы можете не проверять дату и время на правильность, гарантируется, что количество дней не превысит значения для текущего месяца, управляется так же переход по годам вперед.
Пока элемент timepicker включает только один стиль, элемент datepicker же имеет три разных варианта. По умолчанию три текстовых поля для ввода года, месяца и дня. Атрибут type может использоваться для установки еще двух других типов. Значение атрибута grid используется для вывода сетки календаря, подобного тому, который показан на рисунке.
Вы можете так же указать значение popup, которое создаст комбинацию двух других типов. Этот тип имеет три поля для ввода года, месяца и дня, а так же кнопку для показа выпадающей сетки календаря для выбора дня.
<datepicker type="popup"/>
Атрибут step
Ввод атрибута задает допустимые интервалы чисел для поля ввода.
Пример: Если step=»3″, законными числами могут быть -3, 0, 3, 6 и т.д.
Совет: Этот атрибут можно использовать вместе с атрибутами max и min для создания диапазона допустимых значений.
Атрибут работает со следующими типами входных данных: number, range, date, datetime-local, month, time и week.
Пример
Поле ввода с заданными интервалами законных номеров:
<form> <label for=»points»>Точки:</label>
<input type=»number» id=»points» name=»points» step=»3″>
</form>
Примечание: Ограничения ввода не являются надежными, и JavaScript предоставляет множество способов добавления незаконных входных данных.
Чтобы безопасно ограничить ввод, он также должен быть проверен получателем (сервером)!
Дата и время
В HTML5 определяется несколько типов данных, связанных со временем. Браузеры, которые поддерживают типы дат, могут выводить удобный выпадающий календарь, в котором пользователь может выбрать требуемую дату и/или время. Это не только устраняет неопределенность относительно правильного формата даты, но также запрещает случайно (или нарочно) установить несуществующую дату. Интеллектуальные браузеры могут делать еще больше, например поддерживать интеграцию с персональным календарем.
Ниже показан пример использования дат:
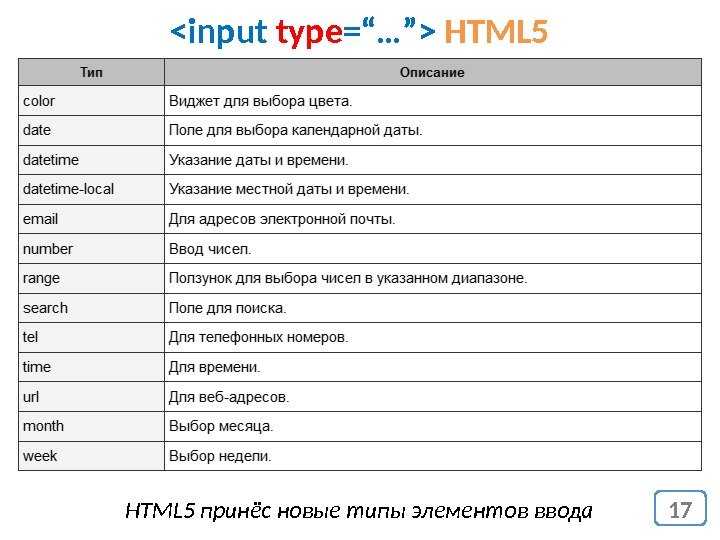
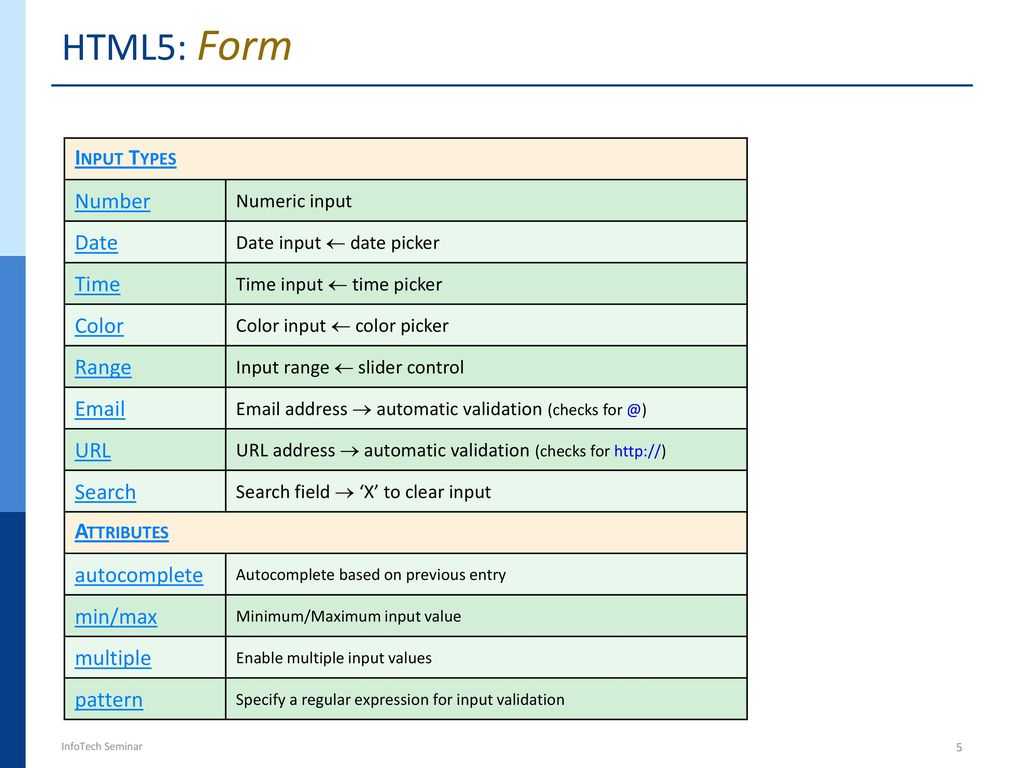
В таблице ниже перечислены шесть новых форматов HTML5 для дат и времени, дано их краткое описание:
| Тип данных | Описание |
|---|---|
| date | Дата по шаблону ГГГГ-ММ-ДД |
| time | Время в 24-часовом формате с необязательными секундами, по шаблону чч:мм:сс.сс |
| datetime-local | Дата и время, разделенные прописной английской буквой T (по шаблону ГГГГ-ММ-ДДTчч:мм:сс) |
| datetime | Дата и время, как и для типа datetime-local, но со смещением временного пояса. Используется такой же шаблон (ГГГГ-ММ-ДДTчч:мм:сс-чч:мм), как и для элемента <time> |
| month | Год и номер месяца по шаблону ГГГГ-ММ |
| week | Год и номер недели по шаблону ГГГГ-Номер недели |
Браузеры, которые поддерживают типы данных для дат и времени, также поддерживают атрибуты min и max для них, что позволяет устанавливать минимальные и максимальные даты при условии использования правильного формата даты. Это продемонстрировано в примере выше.
Closing Words
We always use the HTML date input to create and develop interactive fields on your web page where users can enter a specific date format. This article thoroughly taught you how to include a date format in your web page but it also covered the following important points:
- There are numerous functions the HTML date input can offer
- You cannot create a profile on any social media without the date input
- The basic HTML date input syntax is easy to create
- You can style the syntax using specific CSS styling properties
- There are five common attributes for the date input value
- It is important to include validation for your date format interface
- The HTML date input syntax can become quite complex

date input in their HTML documents
12) Input Type «date»
The type date will allow us select a date from a Datepicker control. Before HTML5, web developers would usually add two different controls, an input box and Datepicker, to accomplish this task. However, HTML5 date type has simplified this process.
<form method="get" action="">
<input type="date" name="joining-date" />
<input type="submit" value="Submit" />
</form>
When you first load the page, the input box with type date, will show the date format mm/dd/yyyy in the box. Set focus on the element (or hover the mouse over the element), it will show a spinner and a drop down icon at the right corner of the element. To choose the desired date either you need to click the spinner buttons, up or down arrow, or simple click the drop down icon to view the Datepicker.
You can show a default value in the input box instead of the format. All you have to do is, add the value attribute to the element.
<form method="get" action="">
<input type="date" value="2014-12-04" name="joining-date" />
</form>
Browser Support: Chrome — Yes | Edge — Yes | FireFox — Yes
JavaScript: How to Find Min/Max Values Without Math Functions?
This article will discuss alternative ways to identify the minimum and maximum values in an array without relying on Math functions such as Math.min() and Math.max().
Approach
The loop can be utilized to implement the Math functions’ functionality again.
Using a for loop, the array elements will be iterated through and compared to a variable to update the minimum and maximum element.
We will update the max variable when we come across a value that surpasses the current max value, and do the same for the min value.
Example
The following example demonstrates how to obtain the maximum and minimum values from an array without utilizing any Math functions.
The name of the file is index.html.
Find Min and Max
Welcome to Tutorials Point
Output
Upon the program’s successful execution, the result will be displayed by the browser as follows —
Welcome To Tutorials Point
The console displays the results, as shown in the accompanying screenshot.
SQL MIN() and MAX() Functions, The MIN() function returns the smallest value of the selected column. The MAX() function returns the largest value of the selected column. MIN() Syntax. SELECT
Browser compatibility
| Desktop | Mobile | |||||||||||
|---|---|---|---|---|---|---|---|---|---|---|---|---|
| Chrome | Edge | Firefox | Internet Explorer | Opera | Safari | WebView Android | Chrome Android | Firefox for Android | Opera Android | Safari on IOS | Samsung Internet | |
| 4 | 12 | 23 | 10 | 11 | 3.1 |
4.4 2-4.4 Pre-Chromium Android WebView recognizes the type, but doesn’t implement a range-specific control. |
57 | 52 | Yes | 5 | 7.0 | |
| Yes | ≤79 |
No See bug 841942. |
No | Yes | No | Yes | Yes |
No See bug 841942. |
Yes | No | Yes | |
|
Yes The slider can be oriented vertically by setting the non-standard style on the element. You shouldn’t use this, since it’s proprietary, unless you include appropriate fallbacks for users of other browsers. |
12 The slider can be oriented vertically by setting the style on the element. |
No See bug 840820 and bug 981916. |
10 The slider can be oriented vertically by setting the style on the element. |
Yes The slider can be oriented vertically by setting the non-standard style on the element. You shouldn’t use this, since it’s proprietary, unless you include appropriate fallbacks for users of other browsers. |
Yes The slider can be oriented vertically by setting the non-standard style on the element. You shouldn’t use this, since it’s proprietary, unless you include appropriate fallbacks for users of other browsers. |
Yes The slider can be oriented vertically by setting the non-standard style on the element. You shouldn’t use this, since it’s proprietary, unless you include appropriate fallbacks for users of other browsers. |
Yes The slider can be oriented vertically by setting the non-standard style on the element. You shouldn’t use this, since it’s proprietary, unless you include appropriate fallbacks for users of other browsers. |
No See bug 840820 and bug 981916. |
Yes The slider can be oriented vertically by setting the non-standard style on the element. You shouldn’t use this, since it’s proprietary, unless you include appropriate fallbacks for users of other browsers. |
Yes The slider can be oriented vertically by setting the non-standard style on the element. You shouldn’t use this, since it’s proprietary, unless you include appropriate fallbacks for users of other browsers. |
Yes The slider can be oriented vertically by setting the non-standard style on the element. You shouldn’t use this, since it’s proprietary, unless you include appropriate fallbacks for users of other browsers. |
Валидация форм
Последнее обновление: 08.04.2016
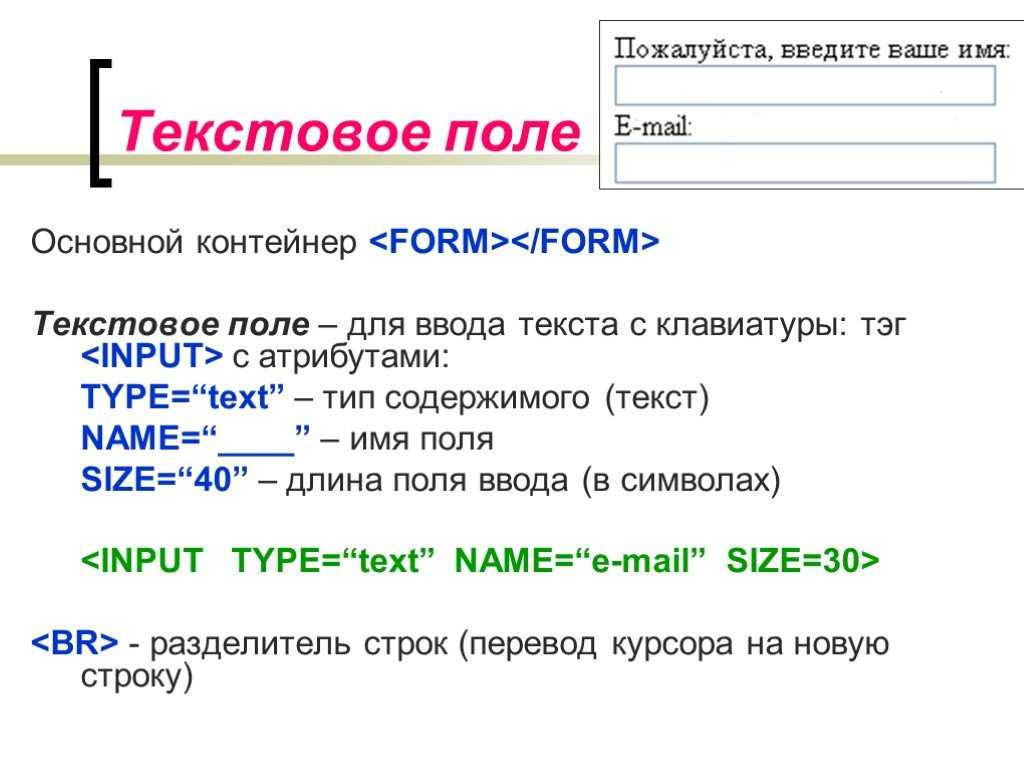
Итак, в нашем распоряжении имеются различные элементы, которые мы можем использовать на форме. Мы можем вводить в них различные значения. Однако нередко
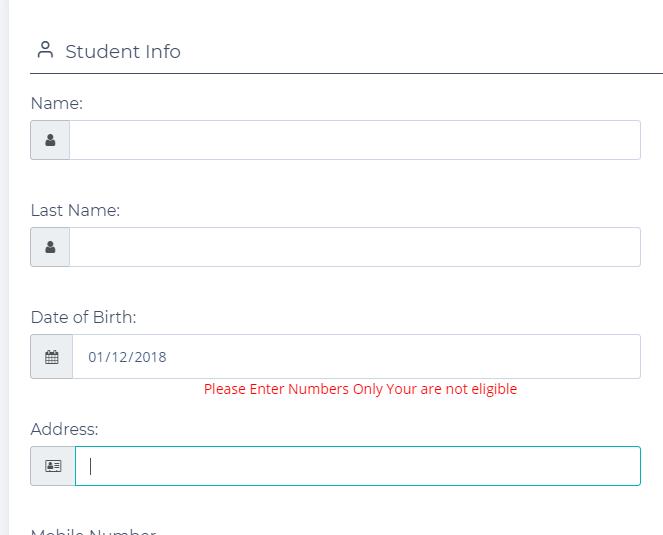
пользователи вводят не совсем корректные значения: например, ожидается ввод чисел, а пользователь вводит буквы и т.д. И для предупреждения и проверки некорректного
ввода в HTML5 существует механизм валидации.
Преимущество использования валидации в HTML5 заключается в том, что пользователь после некорректного ввода может сразу получить сообщение об ошибке и внести
соответствующие изменения в введенные данные.
Для создания валидации у элементов форм HTML5 используется ряд атрибутов:
-
min и max: минимально и максимально допустимые значения. Для элемента input с типом datetime-local,
date, month, time, week, number, range
Атрибут required
Атрибут required требует обязательного наличия значения:
<!DOCTYPE html>
<html>
	<head>
		<meta charset="utf-8">
		<title>Валидация в HTML5</title>
	</head>
	<body>
		<form method="get">
			<p>
				<label for="login">Логин:</label>
				<input type="text" required id="login" name="login" />
			</p>
			<p>
				<label for="password">Пароль:</label>
				<input type="password" required id="password" name="password" />
			</p>
			<p>
				<input type="submit" value="Отправить" />
			</p>
		</form>
	</body>
</html>
Если мы не введем в эти поля никаких данных, оставив их пустыми, и нажмем на кнопку отправки, то браузер высветит нам сообщения об ошибке, а данные не будут отправлены на сервер:
В зависимости от браузера визуализация сообщения может несколько отличаться. Также границы некорректного поля ввода могут окрашиваться в красный цвет. Например, поведение при отправке
пустых сообщений в Firefox:
Атрибуты max и min
Для ограничения диапазона вводимых значений применяются атрибуты max и min:
<!DOCTYPE html>
<html>
	<head>
		<meta charset="utf-8">
		<title>Валидация в HTML5</title>
	</head>
	<body>
		<form method="get">
			<p>
				<label for="age">Возраст:</label>
				<input type="number" min="1" max="100" value="18" id="age" name="age"/>
			</p>
			<p>
				<input type="submit" value="Отправить" />
			</p>
		</form>
	</body>
</html>
Атрибут pattern
Атрибут pattern задает шаблон, которому должны соответствовать данные. Для определения шаблона используется язык так называемых
регулярных выражений. Рассмотрим самые простейшие примеры:

<!DOCTYPE html>
<html>
<head>
<meta charset="utf-8">
<title>Валидация в HTML5</title>
</head>
<body>
<form method="get">
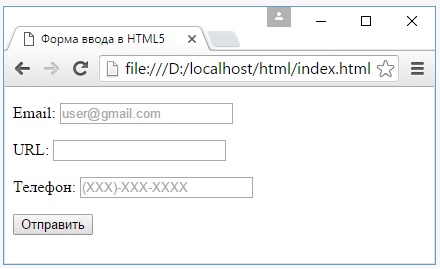
<p>
<label for="phone">Телефон:</label>
<input type="text" placeholder="+1-234-567-8901"
pattern="\+\d-\d{3}-\d{3}-\d{4}" id="phone" name="phone" />
</p>
<p>
<input type="submit" value="Отправить" />
</p>
</form>
</body>
</html>
Здесь для ввода номера телефона используется регулярное выражение . Оно означает, что первым элементом в номере
должен идти знак плюс +. Выражение \d представляет любую цифру от 0 до 9. Выражение означает три подряд идущих цифры, а
— четыре цифры подряд. То есть это выражение будет соответствовать номеру телефона в формате «+1-234-567-8901».
Если мы введем данные, которые не соответствуют этому шаблону, и нажмем на отправку, то браузер отобразит ошибку:
Отключение валидации
Не всегда валидация является желаемой, иногда требуется ее отключить. И в этом случае мы можем использовать либо у элемента формы атрибут novalidate,
либо у кнопки отправки атрибут formnovalidate:
<!DOCTYPE html>
<html>
	<head>
		<meta charset="utf-8">
		<title>Валидация в HTML5</title>
	</head>
	<body>
		<form novalidate method="get">
			<p>
				<label for="phone">Телефон:</label>
				<input type="text" placeholder="+1-234-567-8901"
						pattern="\+\d-\d{3}-\d{3}-\d{4}" id="phone" name="phone" />
			</p>
			<p>
				<input type="submit" value="Отправить" formnovalidate />
			</p>
		</form>
	</body>
</html>
НазадВперед
Min and Max Attributes
HTML input attributes input Min and Max indicate the minimum and maximum values for input fields.
Input types for the min and max attributes consist of number, range, date, datetime-local, month, time, and week.
You can create a range of legal values by using the max and min attributes in conjunction with each other.
You can set a maximum date, a minimum date, and a range of legal values in order to achieve this:
Example
Execute
<!DOCTYPE html>
<html>
<body>
</body></html>
Here is another example of the max and min attribute on the text field:
Example: 
Execute
<!DOCTYPE html>
<html>
<body>
<form>
<div>
<label for=»choose»>Which book you prefer a Ulysses or a lolita?</label>
<input type=»text» id=»choose» name=»fav» required minlength=»7″ maxlength=»7″>
</div>
<div>
<button>Submit</button>
</div>
</form>
</body>
</html>
formenctype Атрибут
formenctype атрибут указывает , как форма-данные должны быть закодированы при подаче его на сервер (only for forms with method=»post» ) .
formenctype атрибут переопределяет enctype атрибут <form> элемента.
formenctype атрибут используется с type=»submit» и type=»image» .
пример
Отправить form-data , которые по умолчанию закодированных (the first submit button) , и кодируются как «multipart/form-data» (the second submit button) :
<form action=»demo_post_enctype.asp» method=»post»> First name: <input type=»text» name=»fname»><br> <input type=»submit» value=»Submit»> <input type=»submit» formenctype=»multipart/form-data» value=»Submit as Multipart/form-data»> </form>
Размер контролов
Установите высоту, используя свойство на или для малых или больших соответственно.
Чтобы контролировать ширину, поместите ввод внутри стандартного столбца сетки Bootstrap.
<b-container fluid>
  <b-row class="my-1">
    <b-col sm="2">
      <label for="input-small">Маленький:</label>
    </b-col>
    <b-col sm="10">
      <b-form-input id="input-small" size="sm" placeholder="Введите ваше имя"></b-form-input>
    </b-col>
  </b-row>

  <b-row class="my-1">
    <b-col sm="2">
      <label for="input-default">По умолчанию:</label>
    </b-col>
    <b-col sm="10">
      <b-form-input id="input-default" placeholder="Введите ваше имя"></b-form-input>
    </b-col>
  </b-row>

  <b-row class="my-1">
    <b-col sm="2">
      <label for="input-large">Большой:</label>
    </b-col>
    <b-col sm="10">
      <b-form-input id="input-large" size="lg" placeholder="Введите ваше имя"></b-form-input>
    </b-col>
  </b-row>
</b-container>
Примечание: Тип ввода в настоящее время не поддерживает изменение размера элемента управления, если он не помещен в , у которого установлено его свойство .
Примечание: Нативный атрибут HTML поля ввода (который устанавливает горизонтальную ширину для в символах) не поддерживается. Используйте стили, служебные классы или строки макета () и столбцы (), чтобы установить желаемую ширину.
5 последних уроков рубрики «HTML5»
-
В этом уроке я покажу процесс создания собственных HTML тегов. Пользовательские теги решают множество задач: HTML документы становятся проще, а строк кода становится меньше.
-
Сегодня мы посмотрим, как можно организовать проверку доступности атрибута HTML5 с помощью JavaScript. Проверять будем работу элементов details и summary.
-
HTML5 — глоток свежего воздуха в современном вебе. Она повлиял не только на классический веб, каким мы знаем его сейчас. HTML5 предоставляет разработчикам ряд API для создания и улучшения сайтов с ориентацией на мобильные устройства. В этой статье мы рассмотрим API для работы с вибрацией.
-
Веб дизайнеры частенько сталкиваются с необходимостью создания форм. Данная задача не простая, и может вызвать головную боль (особенно если вы делаете что-то не стандартное, к примеру, много-страничную форму). Для упрощения жизни можно воспользоваться фрэймворком. В этой статье я покажу вам несколько практических приёмов для создания форм с помощью фрэймворка Webix.
-
Знакомство с фрэймворком Webix
В этой статье мы бы хотели познакомить вас с фрэймворком Webix. Для демонстрации возможностей данного инструмента мы создадим интерфейс online аудио плеера. Не обольщайтесь — это всего лишь модель интерфейса. Исходный код доступен в демо и на странице GitHub.