
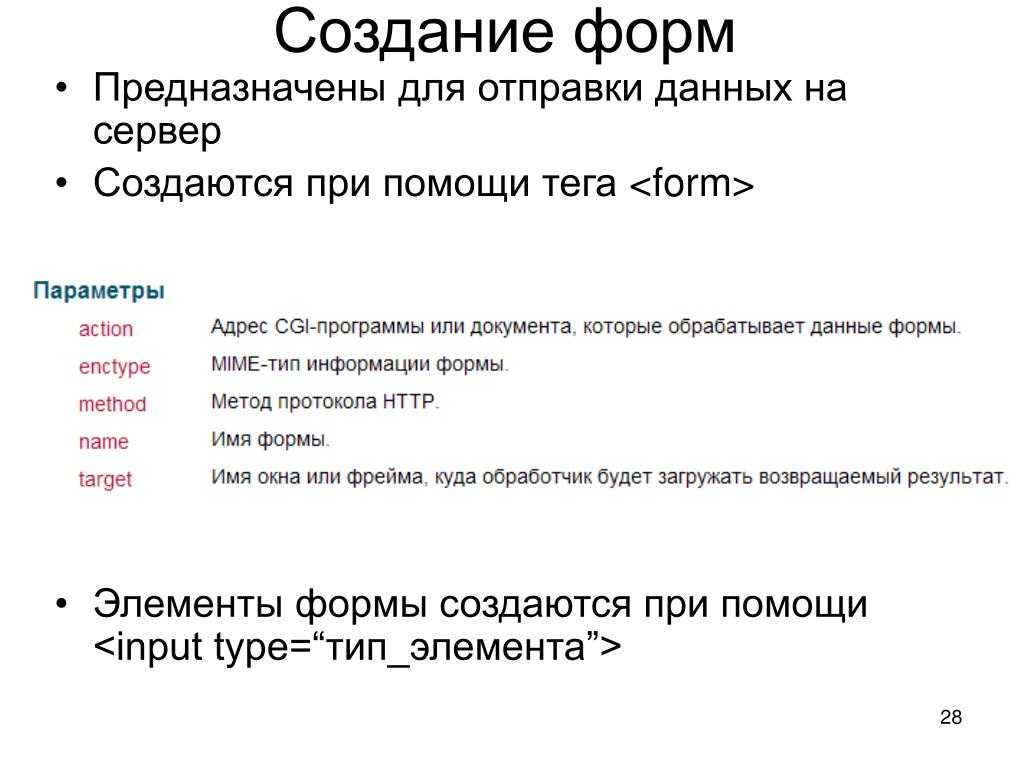
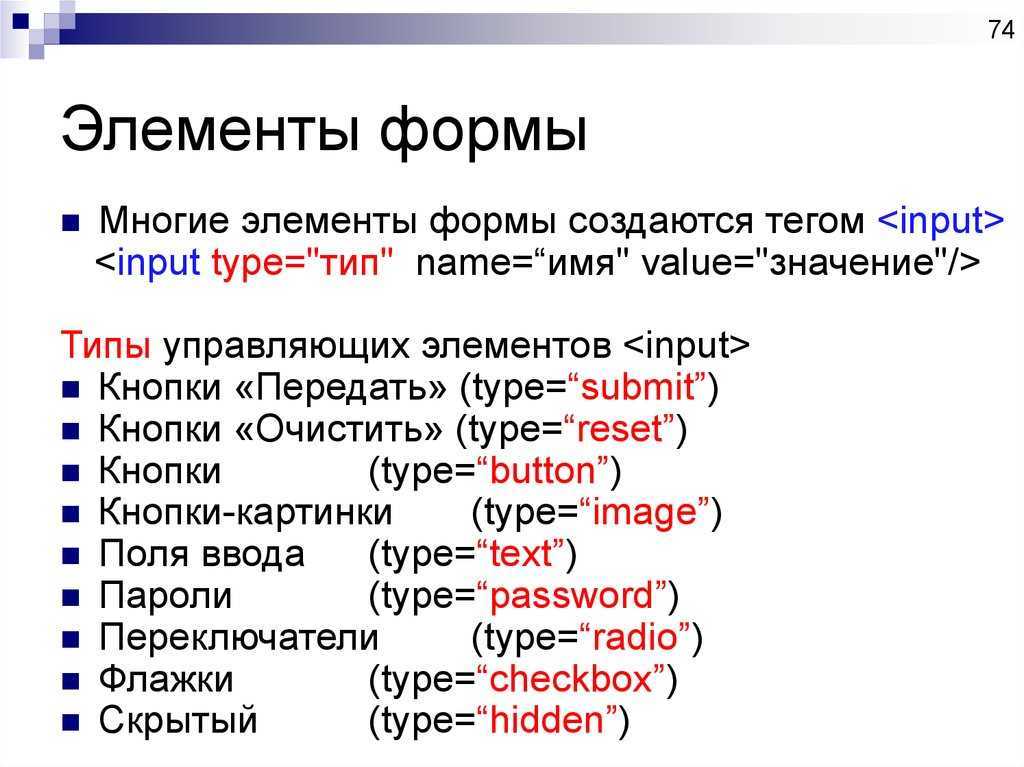
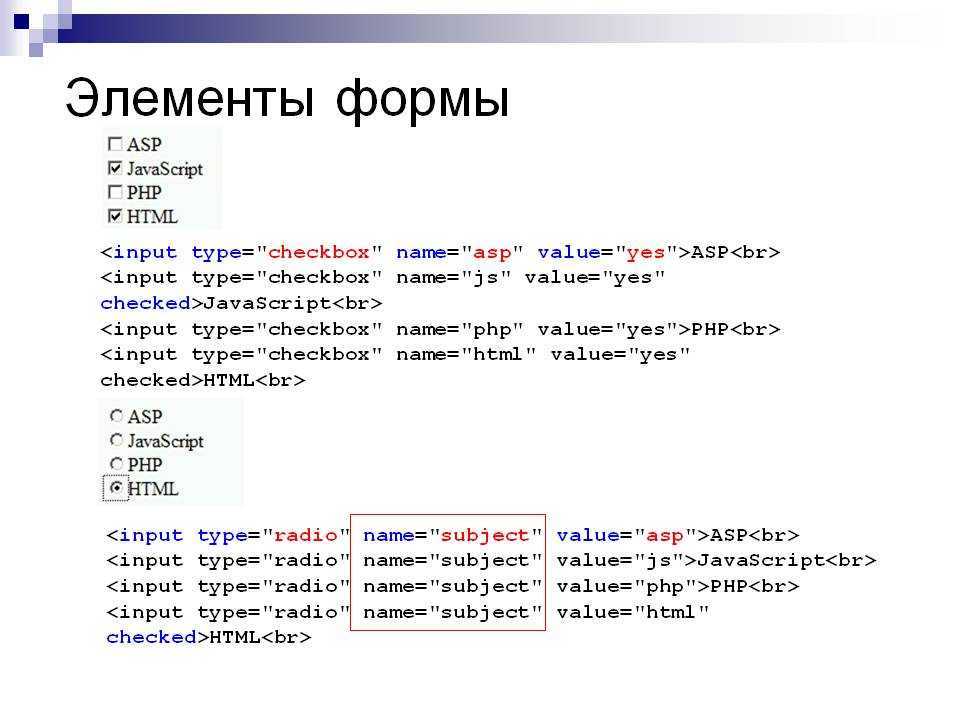
Attributes
This element includes the global attributes.
Comma-separated content types the server accepts.
Note: This attribute has been deprecated and should not be used. Instead, use the accept attribute on elements.
Space-separated character encodings the server accepts. The browser uses them in the order in which they are listed. The default value means the same encoding as the page. (In previous versions of HTML, character encodings could also be delimited by commas.)
A nonstandard attribute used by iOS Safari that controls how textual form elements should be automatically capitalized. autocapitalize attributes on a form elements override it on . Possible values:
- none : No automatic capitalization.
- sentences (default): Capitalize the first letter of each sentence.
- words : Capitalize the first letter of each word.
- characters : Capitalize all characters — that is, uppercase.
Indicates whether input elements can by default have their values automatically completed by the browser. autocomplete attributes on form elements override it on . Possible values:
- off : The browser may not automatically complete entries. (Browsers tend to ignore this for suspected login forms; see The autocomplete attribute and login fields.)
- on : The browser may automatically complete entries.
The name of the form. The value must not be the empty string, and must be unique among the form elements in the forms collection that it is in, if any.
Controls the annotations and what kinds of links the form creates. Annotations include external , nofollow , opener , noopener , and noreferrer . Link types include help , prev , next , search , and license . The rel value is a space-separated list of these enumerated values.
Attributes for form submission
The following attributes control behavior during form submission.
The URL that processes the form submission. This value can be overridden by a formaction attribute on a , , or element. This attribute is ignored when method=»dialog» is set.
If the value of the method attribute is post , enctype is the MIME type of the form submission. Possible values:
- application/x-www-form-urlencoded : The default value.
- multipart/form-data : Use this if the form contains elements with type=file .
- text/plain : Useful for debugging purposes.
This value can be overridden by formenctype attributes on , , or elements.
The HTTP method to submit the form with. The only allowed methods/values are (case insensitive):
- post : The POST method; form data sent as the request body.
- get (default): The GET ; form data appended to the action URL with a ? separator. Use this method when the form has no side effects.
- dialog : When the form is inside a , closes the dialog and causes a submit event to be fired on submission, without submitting data or clearing the form.
This value is overridden by formmethod attributes on , , or elements.
This Boolean attribute indicates that the form shouldn’t be validated when submitted. If this attribute is not set (and therefore the form is validated), it can be overridden by a formnovalidate attribute on a , , or element belonging to the form.
Indicates where to display the response after submitting the form. It is a name/keyword for a browsing context (for example, tab, window, or iframe). The following keywords have special meanings:
- _self (default): Load into the same browsing context as the current one.
- _blank : Load into a new unnamed browsing context. This provides the same behavior as setting rel=»noopener» which does not set window.opener .
- _parent : Load into the parent browsing context of the current one. If no parent, behaves the same as _self .
- _top : Load into the top-level browsing context (i.e., the browsing context that is an ancestor of the current one and has no parent). If no parent, behaves the same as _self .
This value can be overridden by a formtarget attribute on a , , or element.
Content versus IDL attributes
In HTML, most attributes have two faces: the content attribute and the IDL (Interface Definition Language) attribute.
The content attribute is the attribute as you set it from the content (the HTML code) and you can set it or get it via or . The content attribute is always a string even when the expected value should be an integer. For example, to set an element’s to 42 using the content attribute, you have to call on that element.
The IDL attribute is also known as a JavaScript property. These are the attributes you can read or set using JavaScript properties like . The IDL attribute is always going to use (but might transform) the underlying content attribute to return a value when you get it and is going to save something in the content attribute when you set it. In other words, the IDL attributes, in essence, reflect the content attributes.
Most of the time, IDL attributes will return their values as they are really used. For example, the default for elements is «text», so if you set , the element will be of type text (in the appearance and the behavior) but the «type» content attribute’s value will be «foobar». However, the IDL attribute will return the string «text».
IDL attributes are not always strings; for example, is a number (a signed long). When using IDL attributes, you read or set values of the desired type, so is always going to return a number and when you set , it wants a number. If you pass another type, it is automatically converted to a number as specified by the standard JavaScript rules for type conversion.
IDL attributes can such as unsigned long, URLs, booleans, etc. Unfortunately, there are no clear rules and the way IDL attributes behave in conjunction with their corresponding content attributes depends on the attribute. Most of the time, it will follow , but sometimes it doesn’t. HTML specifications try to make this as developer-friendly as possible, but for various reasons (mostly historical), some attributes behave oddly (, for example) and you should read the specifications to understand how exactly they behave.
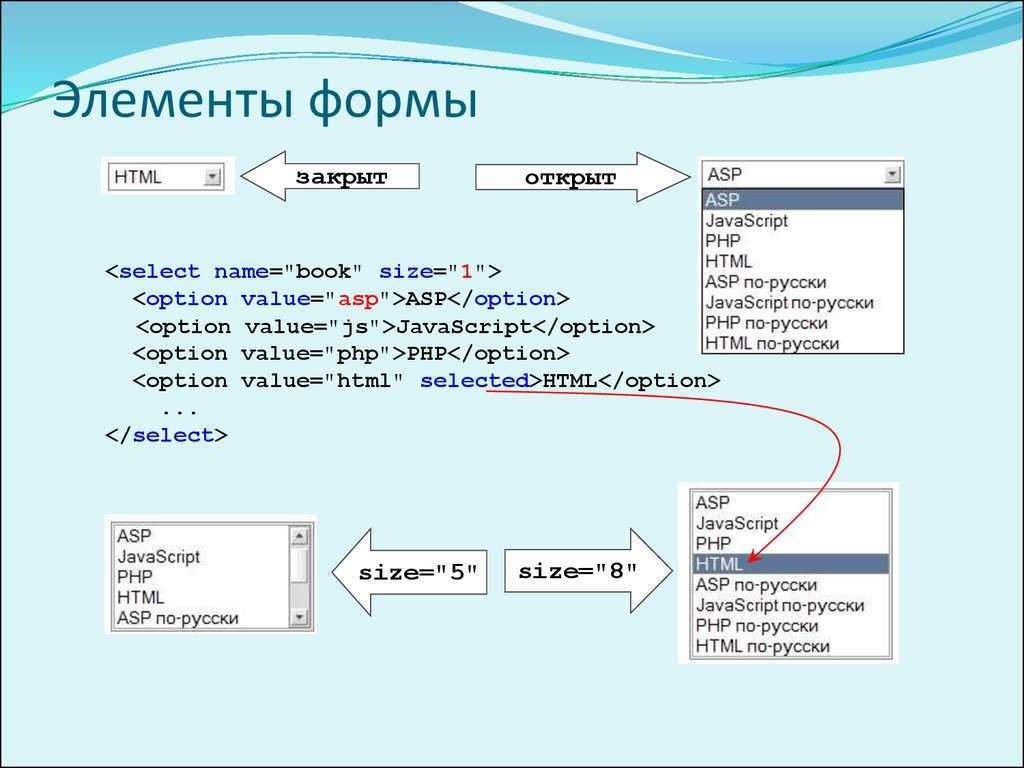
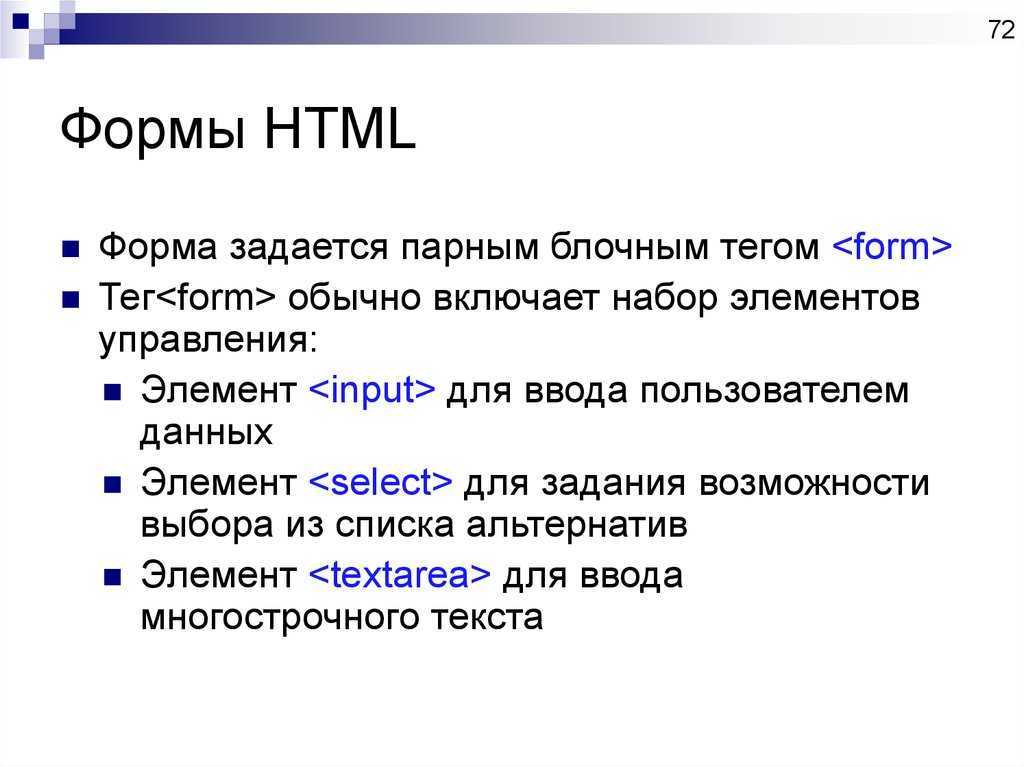
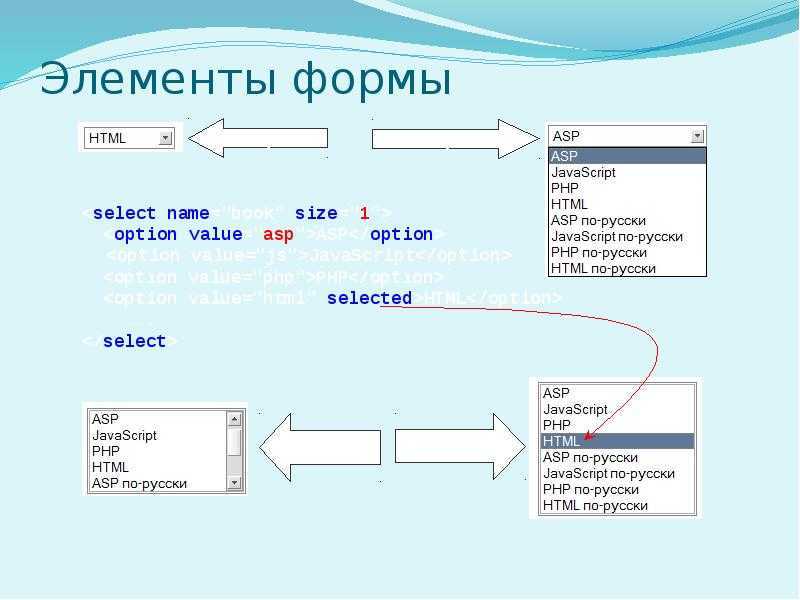
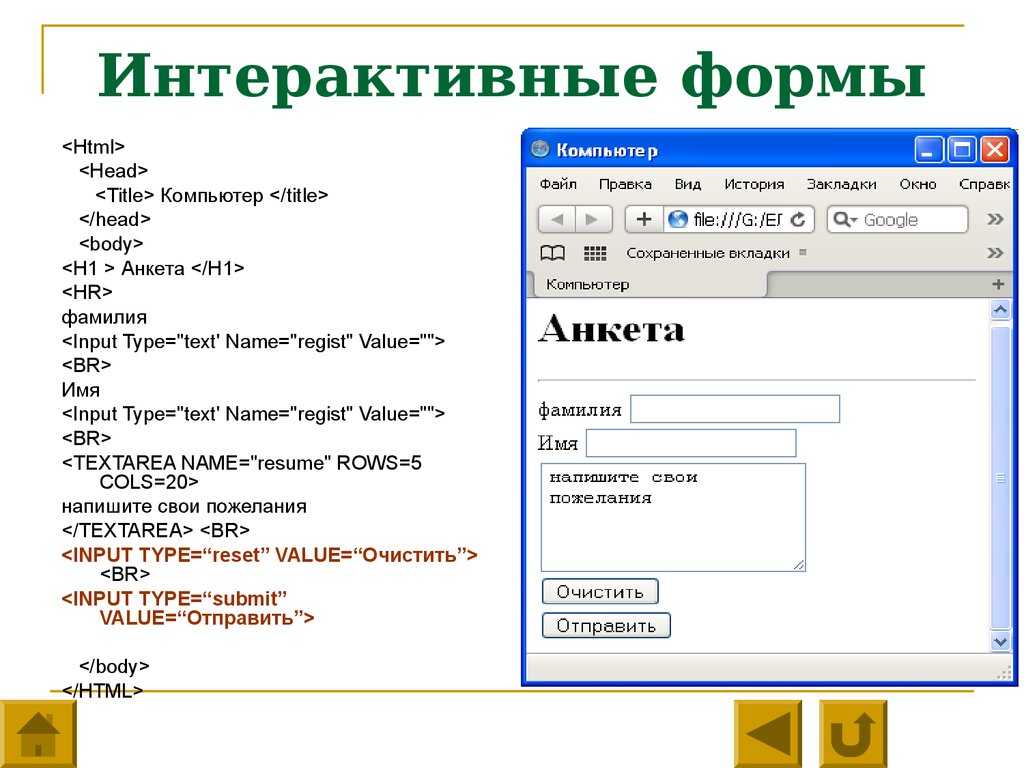
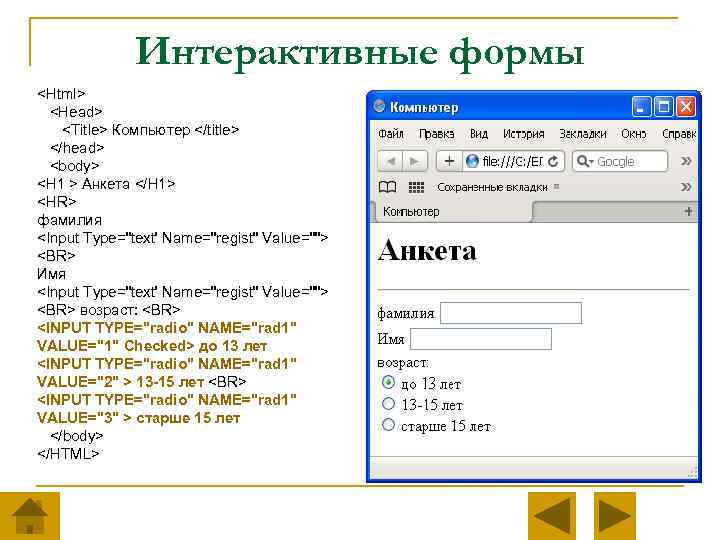
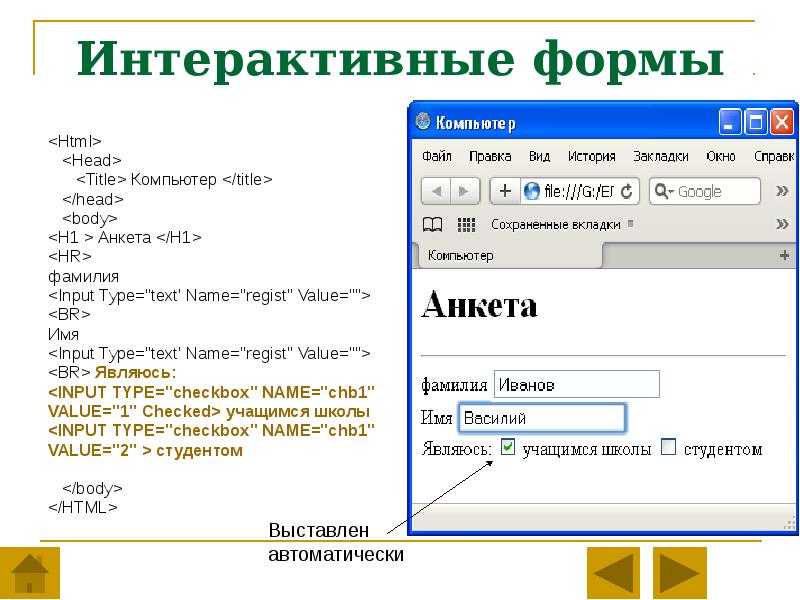
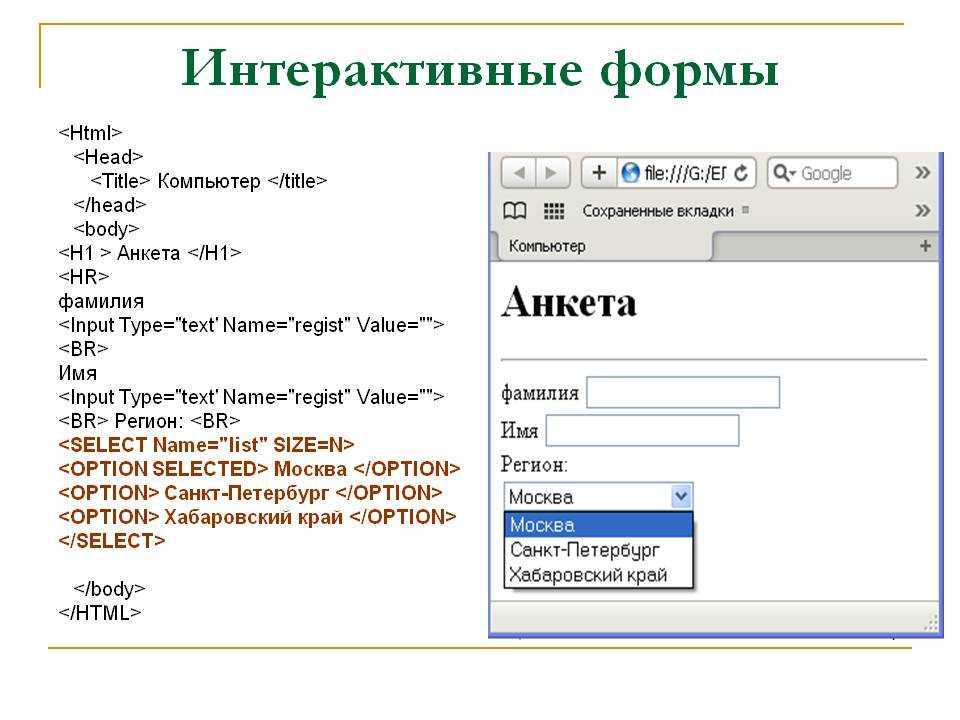
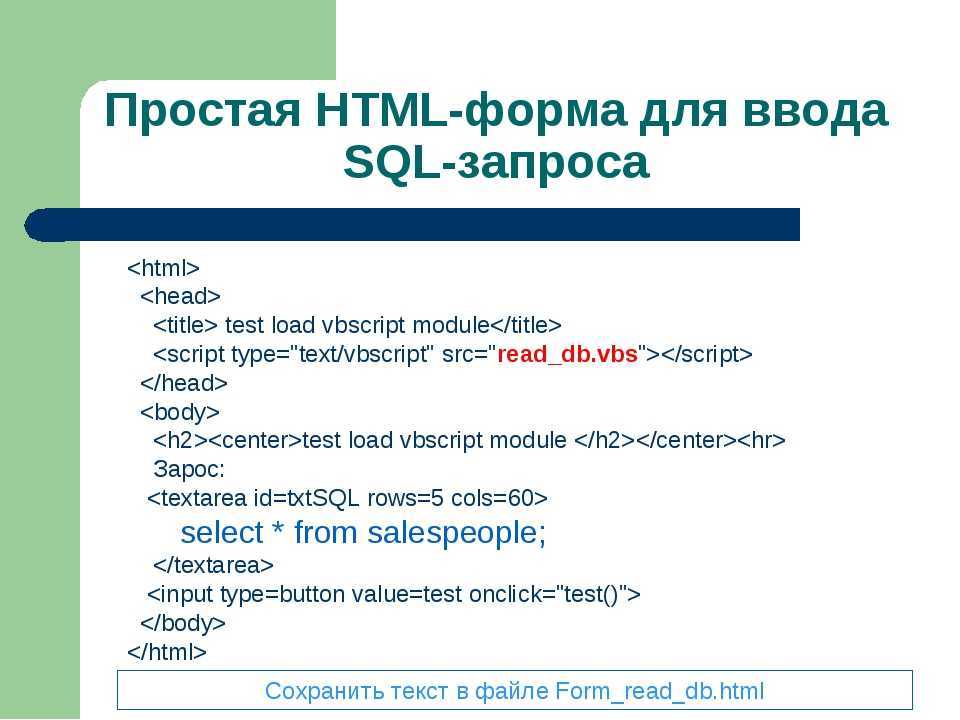
Создание формы HTML
После того, как вы настроили параметры PHP, вы готовы испытать возможности загрузки файлов PHP.
В нашем репозитории GitHub есть пример кода, который я собираюсь обсудить в этой статье. Итак, если вы хотите следовать ему, загрузите его из GitHub.
Мы собираемся создать два файла PHP: index.php и upload.php. Файл index.php содержит код, который отвечает за отображение формы загрузки файла. С другой стороны, файл upload.php отвечает за загрузку файла на сервер.
Кроме того, файл будет загружен в каталог uploaded_files, поэтому вам нужно убедиться, что эта папка существует и доступна для записи пользователем .
В этом разделе мы рассмотрим ключевые части файла index.php.
Давайте посмотрим на файл index.php на GitHub:
1 |
<?php |
2 |
session_start(); |
3 |
?> |
4 |
<!DOCTYPE html> |
5 |
<html> |
6 |
<head> |
7 |
<title>PHP File Upload</title> |
8 |
</head> |
9 |
<body> |
10 |
<?php |
11 |
if (isset($_SESSION'message']) && $_SESSION'message']) |
12 |
{
|
13 |
printf('<b>%s</b>', $_SESSION'message']);
|
14 |
unset($_SESSION'message']); |
15 |
} |
16 |
?> |
17 |
<form method="POST" action="upload.php" enctype="multipart/form-data"> |
18 |
<div> |
19 |
<span>Upload a File:</span> |
20 |
<input type="file" name="uploadedFile" /> |
21 |
</div> |
22 |
|
23 |
<input type="submit" name="uploadBtn" value="Upload" /> |
24 |
</form> |
25 |
</body> |
26 |
</html> |
Хотя это может показаться типичной формой PHP, существует важное различие в значении атрибута тега. Он должен быть установлен в , так как форма содержит поле файла
Атрибут указывает тип кодировки, который должен использоваться при отправке формы, и он принимает одно из следующих трех значений:
- : Это значение по умолчанию, когда вы не устанавливаете значение атрибута явно. В этом случае символы кодируются перед отправкой на сервер. Если у вас нет поля файла в вашей форме, вы должны использовать это значение для атрибута .
- : Когда вы используете значение для атрибута , оно позволяет загружать файлы с использованием метода POST. Кроме того, он гарантирует, что символы не кодируются при отправке формы.
- : Обычно это не используется. С помощью этой настройки данные отправляются без кодирования.
Затем мы выводим поле файла, которое позволяет вам выбрать файл с вашего компьютера.
1 |
<input type="file" name="uploadedFile" /> |
Кроме того, мы отобразили сообщение в верхней части формы. Это сообщение показывает статус загрузки файла, и оно будет установлено в переменной сессии скриптом upload.php. Мы рассмотрим это в следующем разделе.
1 |
<?php |
2 |
if (isset($_SESSION'message']) && $_SESSION'message']) |
3 |
{
|
4 |
printf('<b>%s</b>', $_SESSION'message']);
|
5 |
unset($_SESSION'message']); |
6 |
} |
7 |
?> |
Итак, это был файл index.php. В следующем разделе мы рассмотрим, как обрабатывать загруженный файл на стороне сервера.
сравнение
Загрузки файлов часто содержат много непечатаемых символов (например, изображений), в то время как текстовые формы почти никогда не делают.
Из примеров мы видели, что:
-
: добавляет к сообщению несколько байтов служебных данных границы и должен потратить некоторое время на его вычисление, но отправляет каждый байт одним байтом.
-
: имеет одну байтовую границу для каждого поля (), но добавляет линейный коэффициент издержек 3x для каждого непечатаемого символа.
Поэтому, даже если бы мы могли отправлять файлы с , мы бы этого не хотели, потому что это неэффективно.
Но для печатаемых символов, найденных в текстовых полях, это не имеет значения и создает меньше накладных расходов, поэтому мы просто используем их.
HTML Атрибуты
acceptaccept-charsetaccesskeyactionaltasyncautocompleteautofocusautoplaycharsetcheckedciteclasscolscolspancontentcontenteditablecontextmenucontrolscoordsdatadata-dirdraggabledropzoneformformactionheadersheighthiddenhighhrefhreflanghttp-equividitemiditempropitemrefitemscopeitemtypeismapkeytypekindlabellanglistlooplowmanifestmaxmaxlengthmediamethodminminlengthmultiplemutednamenovalidateonabortonafterprintonbeforeprintonbeforeunloadonbluroncanplayoncanplaythroughonchangeonclickoncopyoncutondblclickondragondragendondragenterondragleaveondragoverondragstartondropondurationchangeonemptiedonerroronfocusonhashchangeoninputoninvalidonkeydownonkeypressonkeyuponloadonloadeddataonloadedmetadataonloadstartonmousedownonmousemoveonmouseoutonmouseoveronmouseuponmousewheelonofflineononlineonpagehideonpageshowonpasteonpauseonplayonplayingonprogressonratechangeonresetonresizeonscrollonsearchonseekedonseekingonselectonshowonstalledonsubmitonsuspendontimeupdateontoggleonunloadonvolumechangeonwaitingonwheelopenoptimumpatternplaceholderposterpreloadreadonlyrelrequiredreversedrowsrowspansandboxscopescopedselectedshapesizesizesspanspellchecksrcsrcdocscrlangsrcsetstartstepstyletabindextargettitletranslatetypeusemapvaluewidth
Логика загрузки
В предыдущем разделе мы создали форму HTML, которая отображается на стороне клиента и позволяет загружать файл с вашего компьютера. В этом разделе мы увидим серверную часть кода, которая позволяет обрабатывать загруженный файл.
Загрузите код из файла upload.php на GitHub. Мы рассмотрим важные части этого файла.
В файле upload.php мы проверили, действительно ли это валидный запрос POST.
1 |
if (isset($_POST'uploadBtn']) && $_POST'uploadBtn' == 'Upload') {
|
2 |
... |
3 |
} |
В PHP, когда файл загружается, суперглобальная переменная заполняется всей информацией о загруженном файле. Она инициализируется как массив и может содержать следующую информацию для успешной загрузки файла.
- : Временный путь, в который загружается файл, сохраняется в этой переменной.
- : Фактическое имя файла сохраняется в этой переменной.
- : Указывает размер загруженного файла в байтах.
- : Содержит mime тип загруженного файла.
- : Если во время загрузки файла была ошибка, эта переменная заполняется соответствующим сообщением об ошибке. В случае успешной загрузки файла она содержит значение 0, которое можно сравнить с помощью константы .
После проверки запроса POST мы проверяем, что загрузка файла прошла успешно.
1 |
if (isset($_FILES'uploadedFile']) && $_FILES'uploadedFile']['error' === UPLOAD_ERR_OK) {
|
2 |
... |
3 |
} |
Вы можете видеть, что переменная является многомерным массивом, первый элемент — это имя поля файла, а второй элемент содержит информацию о загруженном файле, как мы уже говорили выше.
Если загрузка файла прошла успешно, мы инициализируем несколько переменных с информацией о загруженном файле.
1 |
// get details of the uploaded file |
2 |
$fileTmpPath = $_FILES'uploadedFile']; |
3 |
$fileName = $_FILES'uploadedFile']; |
4 |
$fileSize = $_FILES'uploadedFile']; |
5 |
$fileType = $_FILES'uploadedFile']; |
6 |
$fileNameCmps = explode(".", $fileName);
|
7 |
$fileExtension = strtolower(end($fileNameCmps)); |
В приведенном выше коде мы также выяснили расширение загруженного файла и сохранили его в переменной .
Поскольку загруженный файл может содержать пробелы и другие специальные символы, лучше очистить имя файла, и это именно то, что мы сделали в следующем шаге.
1 |
$newFileName = md5(time() . $fileName) . '.' . $fileExtension; |
Важно, чтобы вы ограничивали тип файла, который может быть загружен на определенные расширения, и не разрешали все. Мы это сделали, проверив расширение загруженного файла с помощью набора расширений, который мы хотим разрешить для загрузки
1 |
$allowedfileExtensions = array('jpg', 'gif', 'png', 'zip', 'txt', 'xls', 'doc');
|
2 |
if (in_array($fileExtension, $allowedfileExtensions)) {
|
3 |
... |
4 |
} |
Наконец, мы используем функцию для перемещения загруженного файла в определенное место по нашему выбору.
1 |
// directory in which the uploaded file will be moved |
2 |
$uploadFileDir = './uploaded_files/'; |
3 |
$dest_path = $uploadFileDir . $newFileName; |
4 |
|
5 |
if(move_uploaded_file($fileTmpPath, $dest_path)) |
6 |
{
|
7 |
$message ='File is successfully uploaded.'; |
8 |
} |
9 |
else |
10 |
{
|
11 |
$message = 'There was some error moving the file to upload directory. Please make sure the upload directory is writable by web server.'; |
12 |
} |
Функция принимает два аргумента. Первым аргументом является имя файла загруженного файла, а второй аргумент — путь назначения, в который вы хотите переместить файл.
Наконец, мы перенаправляем пользователя в файл index.php. Кроме того, мы устанавливаем соответствующее сообщение в переменной сессии, которое будет отображаться пользователям после перенаправления в файле index.php.
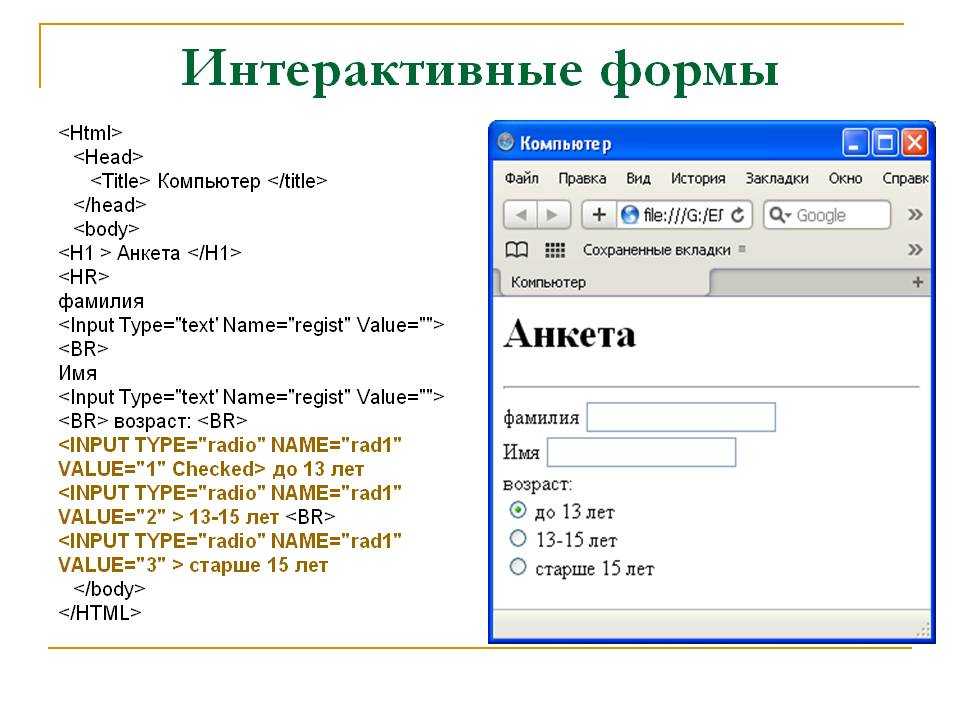
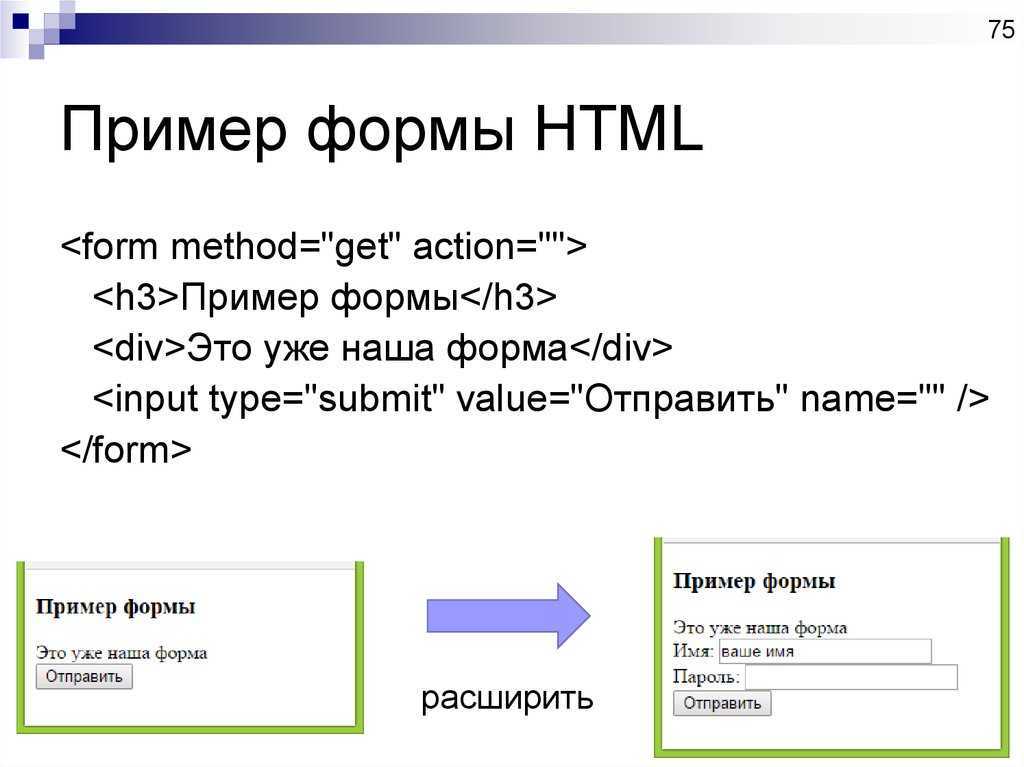
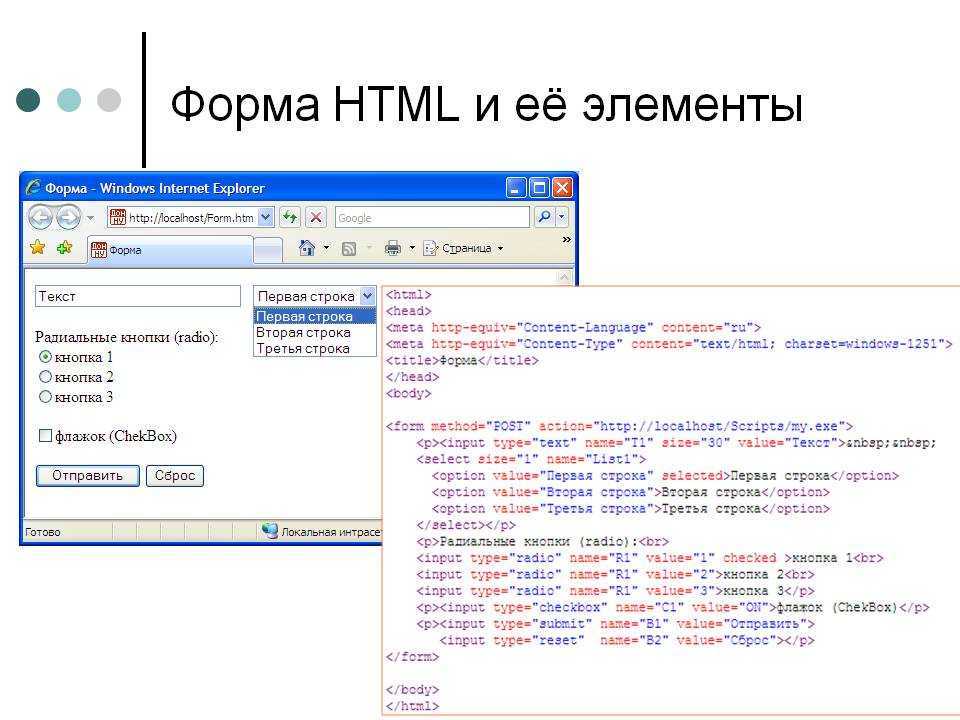
Формы
Последнее обновление: 08.04.2016
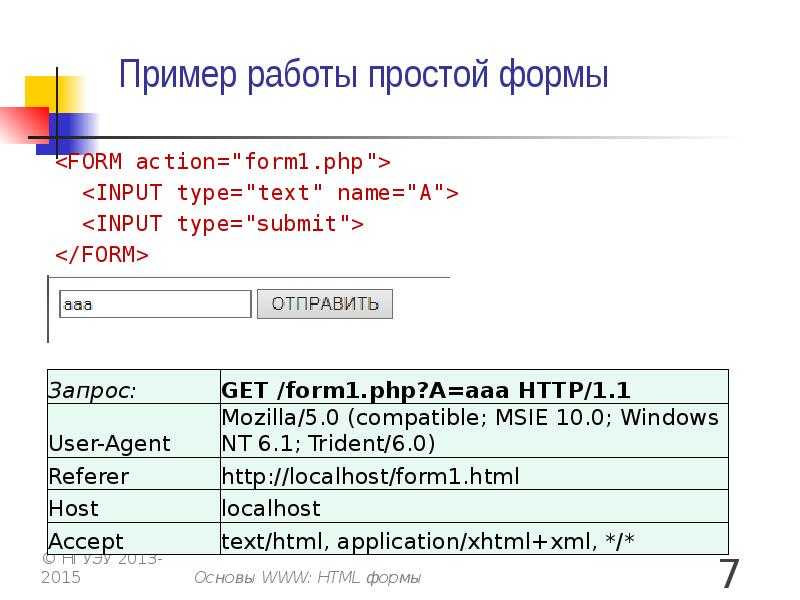
Формы в html представляют один из способов для ввода и отправки данных. Все поля формы помещаются между тегами <form>
и </form>. Например, создадим простейшую форму:
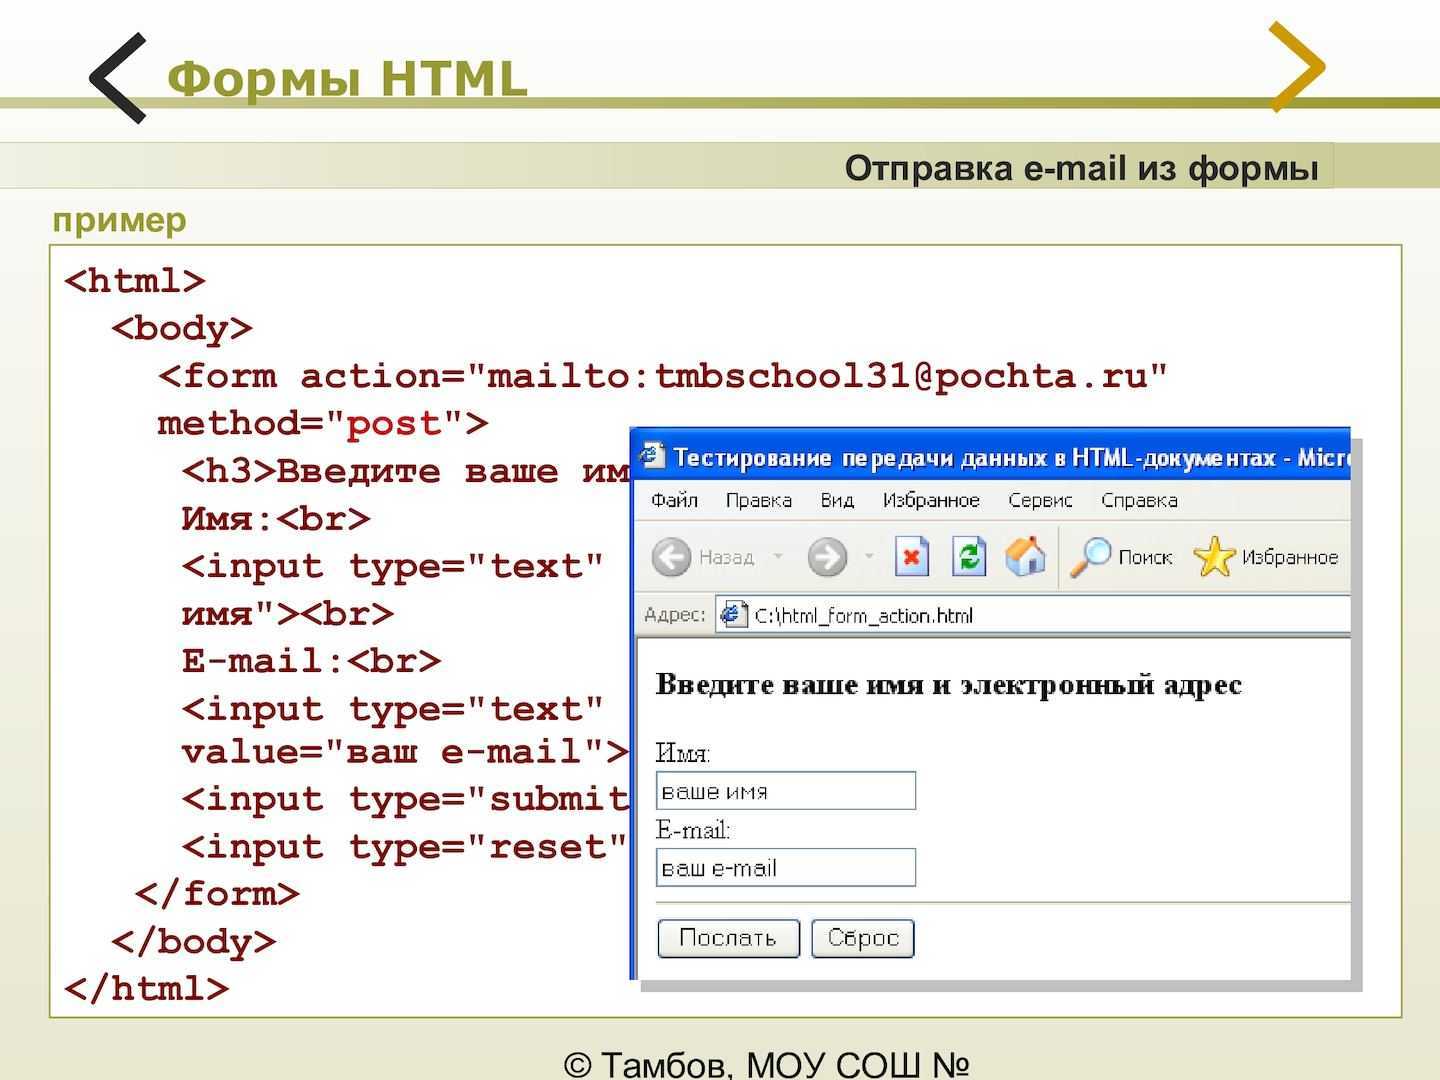
<!DOCTYPE html>
<html>
	<head>
		<meta charset="utf-8">
		<title>Формы в HTML5</title>
	</head>
	<body>
		<form method="post" action="http://localhost:8080/login.php">
			<input name="login"/>
			<input type="submit" value="Войти" />
		</form>
	</body>
</html>
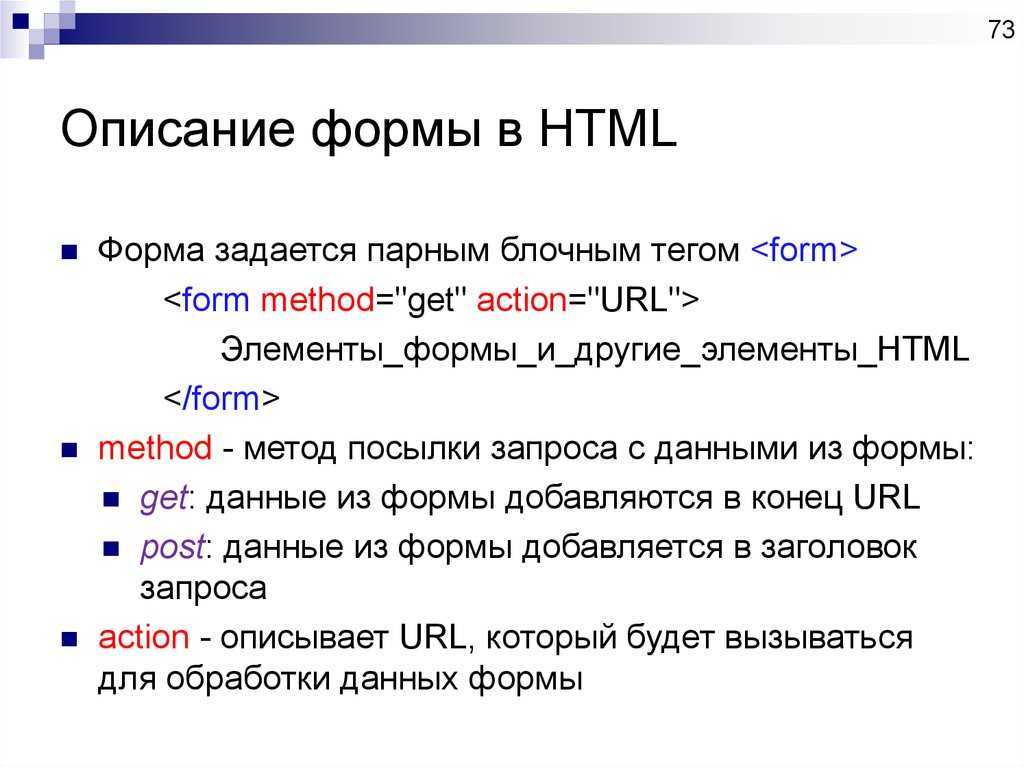
Для настройки форм у элемента form определены следующие атрибуты:
-
: устанавливает метод отправки данных на сервер. Допустимы два значения: и .
Значение позволяет передать данные на веб-сервер через специальные заголовки. А значение позволяет
передать данные через строку запроса. -
: устанавливает адрес, на который передаются данные формы
-
: устанавливает тип передаваемых данных. Он свою очередь может принимать следующие значения:
-
: кодировка отправляемых данных по умолчанию
-
: эта кодировка применяется при отправке файлов
-
: эта кодировка применяется при отправке простой текстовой информации
-
В выше использованном примере:
<form method="post" action="http://localhost:8080/login.php">
	<input name="login"/>
	<input type="submit" value="Войти" />
</form>
у формы установлен метод «post», то есть все значения формы отправляются в теле запроса, а адресом служит строка
http://localhost:8080/login.php. Адрес здесь указан случайным образом.

Как правило, по указанному адресу работает веб-сервер, который, используя одну из технологий серверной стороны (PHP, NodeJS, ASP.NET и т.д.), может
получать запросы и возвращать ответ
В данном же случае мы не будем акцентировать внимание на технологиях серверной стороны, сосредоточимся лишь на тех средствах HTML,
которые позволяют отправлять данные на сервер
Автодополнение
Часто веб-браузеры запоминают вводимые данные, и при вводе браузеры могут выдавать список подсказок из ранее введенных слов:
Это может быть не всегда удобно, и с помощью атрибута autocomplete можно отключить автодополнение:
<form method="post" autocomplete="off" action="http://localhost:8080/login.php">
	<input name="login" />
	<input name="password" />
	<input type="submit" value="Войти" />
</form>
Если нам надо включить автодополнение только для каких-то определенных полей, то мы можем применить к ним атрибут :
<form method="post" autocomplete="off" action="http://localhost:8080/login.php">
	<input name="login" />
	<input name="password" autocomplete="on" />
	<input type="submit" value="Войти" />
</form>
Теперь для всей формы, кроме второго поля, будет отключено автодополнение.
НазадВперед
Спасибо Вам за то, что помогаете!
Ваше сообщение было отправлено в SchoolsW3.
Получить сертификат
SchoolsW3 оптимизирован для бесплатного обучения, проверки и подготовки знаний. Примеры в редакторе упрощают и улучшают чтение и базовое понимание. Учебники, ссылки, примеры постоянно пересматриваются, чтобы избежать ошибок, но не возможно гарантировать полную правильность всего содержания. Некоторые страницы сайта могут быть не переведены на РУССКИЙ язык, можно отправить страницу как ошибку, так же можете самостоятельно заняться переводом. Используя данный сайт, вы соглашаетесь прочитать и принять Условия к использованию, Cookies и политика конфиденциальности.
многочастному/форм-данных,
Firefox отправил:
Для двоичного файла и текстового поля байты ( в UTF-8) отправляются буквально. Вы можете проверить это с помощью , который говорит, что байты:
были отправлены ( == ‘a’ и == ‘b’).
Поэтому ясно, что:
-
устанавливает тип содержимого и говорит, что поля разделены заданной строкой.
-
каждое поле получает несколько подзаголовков перед своими данными: , поля, , а затем данные.
Сервер читает данные до следующей граничной строки. Браузер должен выбрать границу, которая не будет отображаться ни в одном из полей, поэтому эта граница может варьироваться между запросами.
Поскольку у нас есть уникальная граница, кодирование данных не требуется: двоичные данные отправляются как есть.
TODO: каков оптимальный размер границы ( я ставлю), и название/время работы алгоритма, который его находит? На вопрос: https://cs.stackexchange.com/questions/39687/find-the-shortest-sequence-that-is-not-a-sub-sequence-of-a-set-of-sequence
-
автоматически определяется браузером.
Как именно это определяется, было задано по адресу: Как браузер определяет тип mime загруженного файла?
Description
The element inserts a component designed to contain controls that users can interact with to send information back to the server. This element is commonly used to gather information from the visitors of a website, like preferences, comments, opinions and a lot more. It’s also very important in the process of login some websites provide.
Of all its attributes, two have greater importance and are usually employed: and . The attribute indicates the location of the script that will process the information sent by the browser, when the form is submitted. This script is written in any server-side language and is supposed to be prepared to receive and process the form’s data.
In the other hand, the attribute indicates how the browser should attach the form’s data to the request. It’s recommended to use the POST method because it conceals the information sent and allows binary data to be transmitted. Nevertheless, some specific situations may require the use of the GET method.
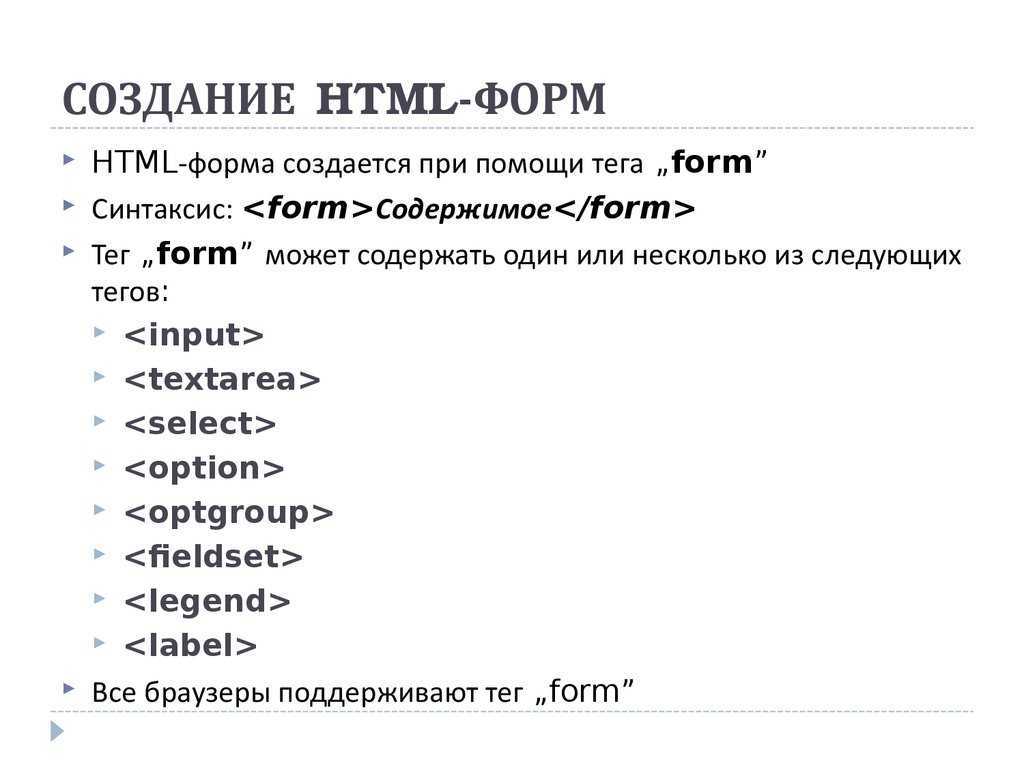
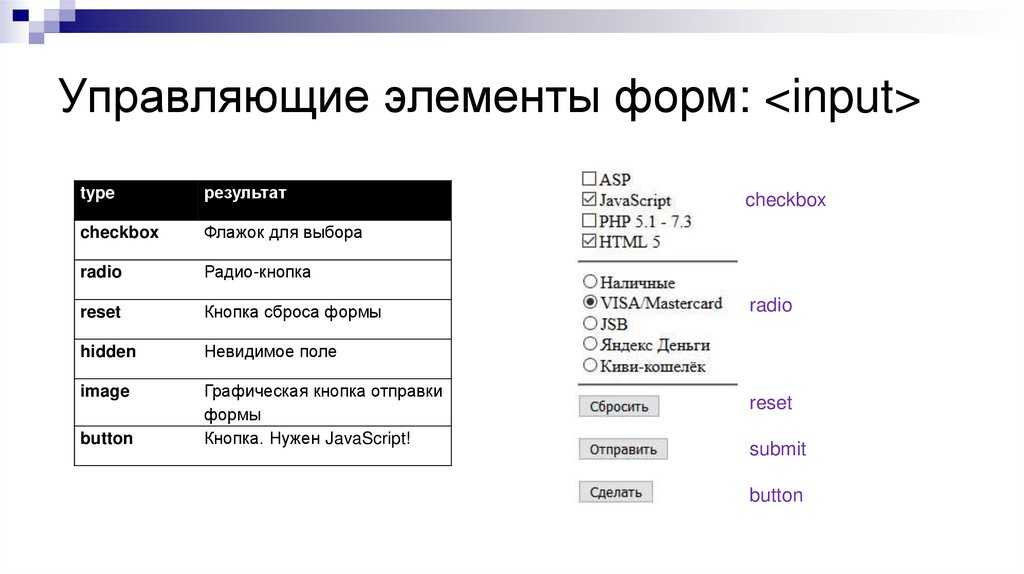
Apart from this and a few other attributes, is just a container for many other elements, most of them representing a wide variety of controls. These elements are listed below:
-
: a button that, when pressed, can perform different actions depending on its attribute. Its variants are:
- : submits the form to the processing agent.
- : resets all the controls in the form to their default values.
- : performs no action.
- : shows a menu.
- : groups thematically a set of controls.
-
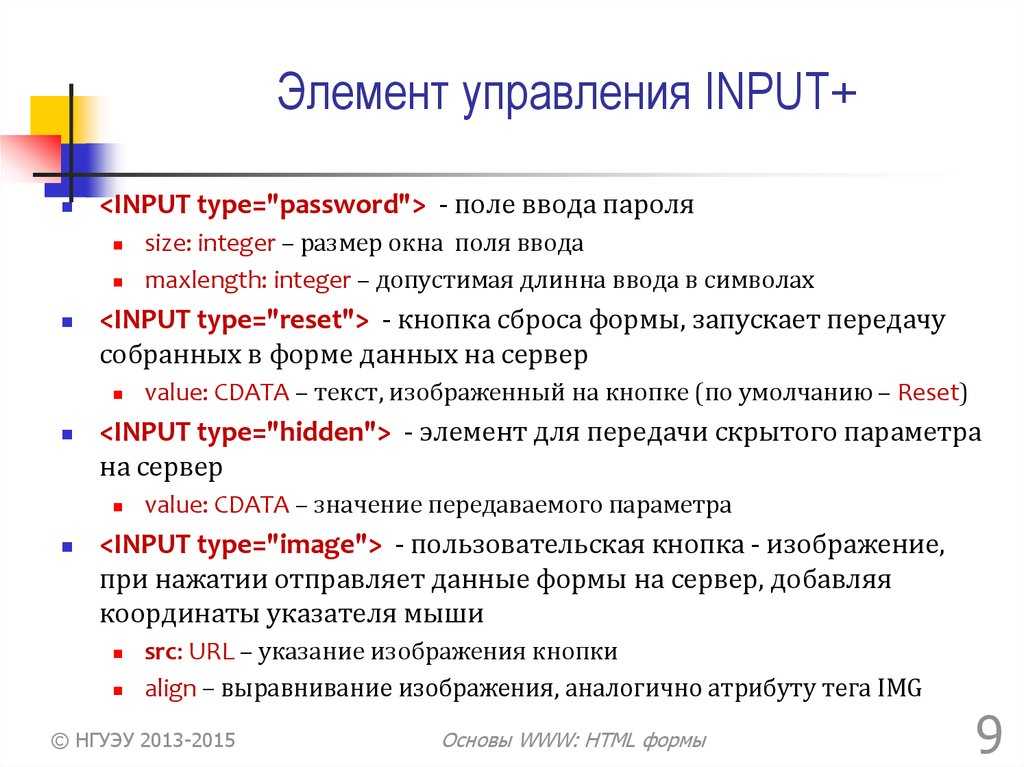
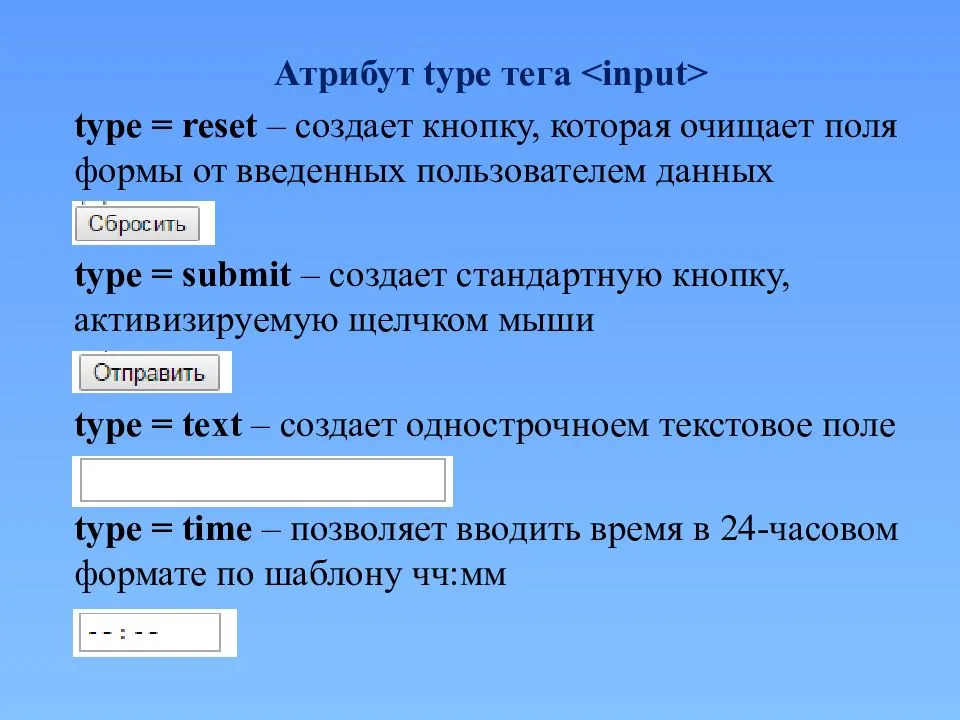
: one of many controls according to the value of the attribute . These are:
- hidden: a hidden control used to send information to the server, typically managed by scripts.
- text: a control used to input a single-line piece of text.
- search: same as text but for search purposes.
- tel: a control used to provide a telephone number.
- url: a text box used to input a single and absolute URL.
- email: a control designed to edit one or more e-mail addresses.
- password: a text box for editing passwords, where the characters are represented by dots.
- datetime: a control to input a specific global date and time.
- date: a control to input a specific date.
- month: a control to input a specific month.
- week: a control to input a specific week.
- time: a control to input a specific time.
- number: a control to input a number.
- range: a control to input one or two numbers inside a range.
- color: a control to input a color.
- checkbox: a control to input a boolean value (true/false).
- radio: a control used to choose one single option among many.
- file: a control used to upload files to the server.
- submit: a button used to submit the form.
- image: same as submit but with the ability to be shown as an image instead of using the default button appearance.
- reset: a button used to reset the form’s controls to their default values.
- button: a button with no default action associated.
- : a control used to generate a public/private key pair.
- : an element used to provide a caption for controls in the form.
- : an object representing and image, that can be used as a client side image map.
- : an element used display the result of a calculation performed by the page, or the result of a user action, based on the controls of the form.
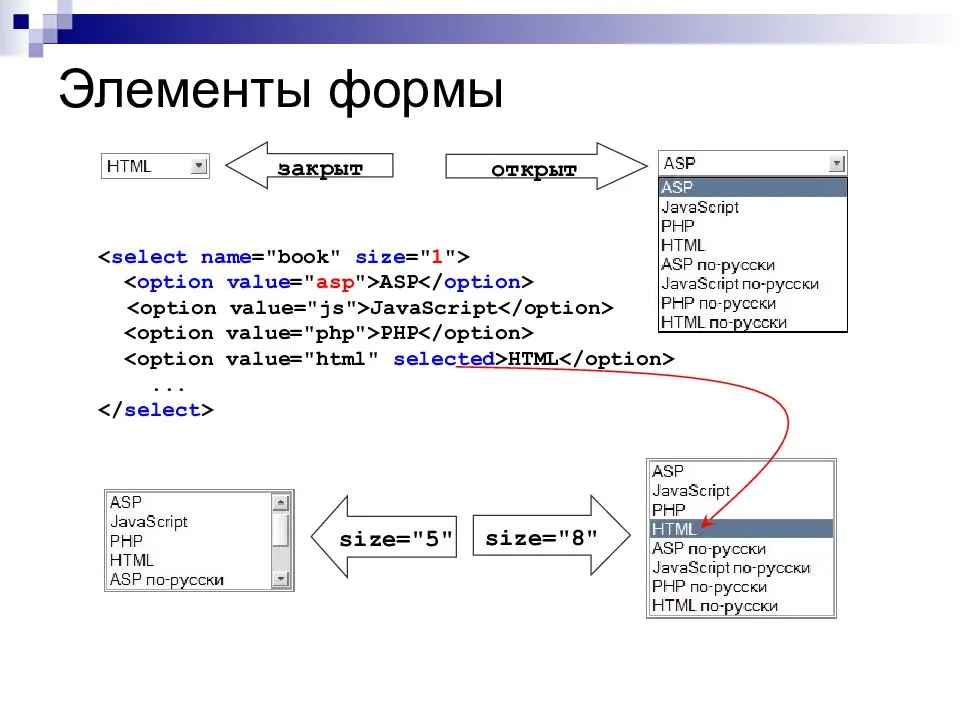
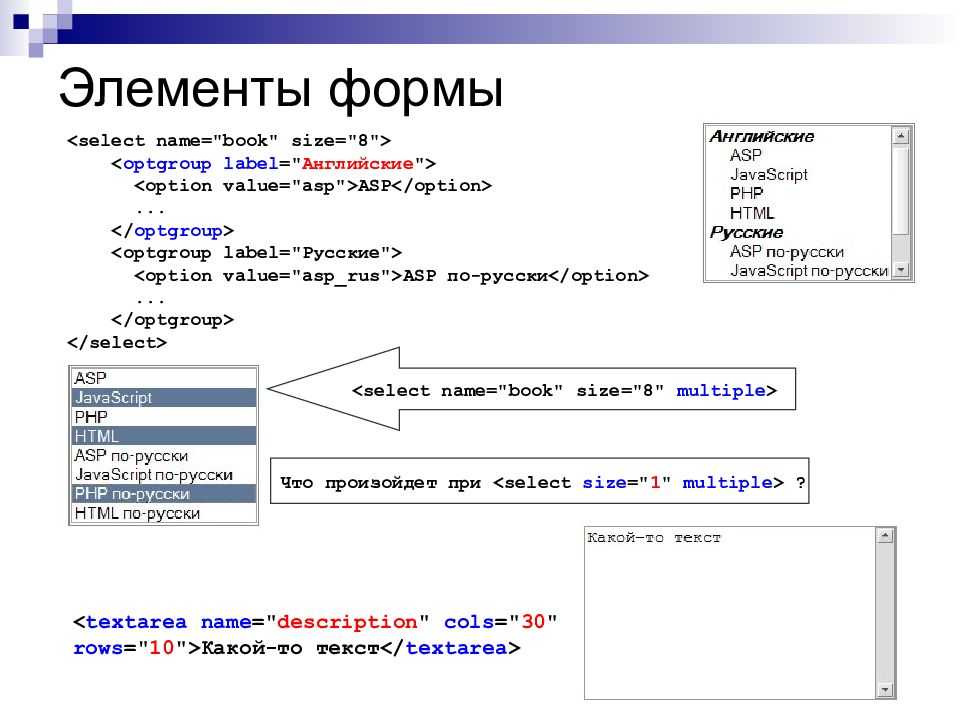
- : a control used to select one or more options from a list.
- : a control used to input a piece of text consisting of one or more lines.
- : an image that can be used as a client side image map.
When used properly, specially since HTML5 begun to be adopted, forms are a powerful tool that enable authors not only to collect very valuable information from the users, but also to develop complex applications, capable of recollecting and processing very specific information in many different ways.
The attribute of this element has been removed from previous versions of the standard. HTML5 has reinstated it to let authors reference the form by its name within the forms collection.
enctype
The ENCTYPE attribute of the form specifies how the HTTP request should be encoded. All GET requests are submitted as application/x-www-form-urlencoded. The value of multipart/form-data is required (with a POST request) to submit a file to the server. The value of text/plain forces the request to be POST. Windows Internet Explorer 8 and later. In IE8 Standards mode, the enctype Document Object Model (DOM) attribute is now supported and reflects the ENCTYPE content attribute. For more information, see Attribute Differences in Internet Explorer 8. The enctype property was introduced in Internet Explorer 8. If backward compatibility is required, use the encoding property.
POST
HTTP POST requests supply additional data from the client (browser) to the server in the message body.
- Appends form-data inside the body of the HTTP request (data is not shown is in URL).
- The POST method does not have any restriction on data size to be sent.
- Form submissions with POST cannot be bookmarked.
- The POST method can be used to send ASCII as well as binary data. Ex:- image and word documents etc.
- The data sent by POST method goes through HTTP header so security depends on HTTP protocol. By using Secure HTTP you can make sure that your information is secure.
- POST is a little safer than GET because the parameters are not stored in browser history or in web server logs.
| GET | POST | |
| BACK button/Reload | Harmless | Data will be re-submitted (the browser should alert the user that the data are about to be re-submitted) |
| Bookmarked | Can be bookmarked | Cannot be bookmarked |
| Cached | Can be cached | Not cached |
| Encoding type | application/x-www-form-urlencoded | application/x-www-form-urlencoded or multipart/form-data. Use multipart encoding for binary data |
| History | Parameters remain in browser history | Parameters are not saved in browser history |
| Restrictions on data type | Only ASCII characters allowed | No restrictions. Binary data is also allowed |
| Visibility | Data is visible to everyone in the URL | Data is not displayed in the URL |
GET-запрос
Формируя XMLHttpRequest, мы должны формировать запрос «руками», кодируя поля функцией .
Например, для посылки GET-запроса с параметрами и , аналогично форме выше, их необходимо закодировать так:
Прочие заголовки
Браузер автоматически добавит к запросу важнейшие HTTP-заголовки, такие как и .
По спецификации браузер запрещает их явную установку, как и некоторых других низкоуровневых HTTP-заголовков, которые могли бы ввести в заблуждение сервер относительно того, кто и сколько данных ему прислал, например . Это сделано в целях контроля правильности запроса и для безопасности.

Сообщаем про AJAX
Запрос, отправленный кодом выше через , никак не отличается от обычной отправки формы. Сервер не в состоянии их отличить.
Поэтому в некоторых фреймворках, чтобы сказать серверу, что это AJAX, добавляют специальный заголовок, например такой:
Значения
- application/x-www-form-urlencoded
- Кодирует данные формы, отправляемые на сервер. Перед отправкой данных на сервер браузер кодирует все данные формы и объединяет их в одну строку, после чего полученную строку отправляет на сервер.
Символы кодируемые браузером:- пробелы преобразуются в символы + ПЛЮС ;
- символы (кроме цифр и латинских букв) преобразуются в сочетание % ЗНАКА ПРОЦЕНТА и соответствующего ASCII кода символа;
- разрыв строки преобразуется в символы «%0D%0A».
- multipart/form-data
- Из данных формы формируется документ (соответствующий MIME стандарту) в котором для каждого поля формы создаётся отдельный раздел (сегмент, часть документа). Данные документа не кодируются.
- text/plain
- Отправляет данные на сервер практически в незакодированном виде (кодируются только знаки перевода строки и возврата коретки). Перед отправкой данных на сервер браузер объединяет все данные формы; каждый элемент формы помещается на отдельную строку, а имя и значение элемента формы разделяются = ЗНАКОМ РАВНО .