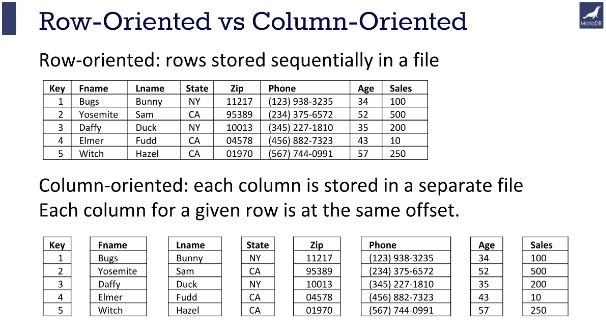
Select Columns With Missing Values
You can select columns with missing values by using the df.isnull().any() in the df.columns[] attribute.
This will return the list of columns which has a missing value in it to . Then, it’ll return the columns with the missing value.
You can use it to print columns with missing values or impute values for the missing values.
Snippet
In the sample dataframe, all the columns except Product_Name is having missing values. Hence, all those columns will be printed as shown below.
DataFrame Will Look Like
| Unit_Price | No_Of_Units | Available_Quantity | Available_Since_Date | Buffer Column | |
|---|---|---|---|---|---|
| 500.000 | 5 | 5 | 11/5/2021 | NaT | |
| 1 | 200.000 | 5 | 6 | 4/23/2021 | NaT |
| 2 | 5000.235 | 10 | 10 | 08/21/2021 | NaT |
| 3 | 10000.550 | 20 | Not Available | 09/18/2021 | NaT |
| 4 | 10000.550 | 20 | Not Available | 09/18/2021 | NaT |
| 5 | 250.500 | 8 | NaT | 01/05/2021 | NaT |
| 6 | NaN | NaT | NaT | NaT | NaT |
This is how you can get columns with missing values to impute new values to them.
How to split a column
Python regular expressions provide more finetuned column splitting. The following example uses the commands for column splitting and transformation with xd/puzzles.tsv.
- adds new columns derived from splitting the current column at positions defined by a regex pattern. (default: 100) rows around the cursor will be used to determine the number of columns that will be created.
- adds new columns derived from pulling the contents of the current column which match the regex within capture groups. The new columns are named using the capture group index, or if named capture groups are used, the capture group names. This command uses the (default:100) rows around the cursor as sample rows.
- followed by regexsubstring replaces the text which matches the capture groups in regex with the contents of substring. substring may include backreferences (\1 etc).
Sample Dataframe
This is the sample dataframe used throughout the tutorial.
It contains,
- Rows with values for all columns
- Rows with Empty or Missing Data for each column
- One Duplicate row
- One column in the sample dataframe is of type
- One Empty column which will be used to select the empty columns
Snippet
The sample dataframe will look like follows.
DataFrame Will Look Like
| Product_Name | Unit_Price | No_Of_Units | Available_Quantity | Available_Since_Date | Buffer Column | |
|---|---|---|---|---|---|---|
| Keyboard | 500.000 | 5 | 5 | 11/5/2021 | NaT | |
| 1 | Mouse | 200.000 | 5 | 6 | 4/23/2021 | NaT |
| 2 | Monitor | 5000.235 | 10 | 10 | 08/21/2021 | NaT |
| 3 | CPU | 10000.550 | 20 | Not Available | 09/18/2021 | NaT |
| 4 | CPU | 10000.550 | 20 | Not Available | 09/18/2021 | NaT |
| 5 | Speakers | 250.500 | 8 | NaT | 01/05/2021 | NaT |
| 6 | Headset | NaN | NaT | NaT | NaT | NaT |
Now, you’ll learn how to select columns from the dataframe using different methods.
Example Code
Basic CSS
/*
These are all valid CSS declarations for the <code>columns</code> property.
Omitted values are set to their initial values.
Also, the order of the values isn’t important.
*/
columns: 220px; /* column-width: 220 pixels; column-count: auto */
columns: auto 220px; /* column-width: 220 pixels; column-count: auto */
columns: 3; /* column-width: auto; column-count: 3 */
columns: 3 auto; /* column-width: auto; column-count: 3 */
columns: auto; /* column-width: auto; column-count: auto */
columns: auto auto; /* column-width: auto; column-count: auto */
Working Example within an HTML Document
<!doctype html>
<title>Example</title>
<style>
.multicol {
background: beige;
padding: 10px;
-webkit-columns: 3; /* Safari and Chrome */
-moz-columns: 3; /* Firefox */
columns: 3; /* CSS3 */
}
</style>
<div class=»multicol»>
<h3>Columns Example</h3>
<p>The CSS columns property is a shorthand property for setting multiple column-related properties in one place. Specifically, it sets the column-width and column-count properties.</p>
<p>This is an efficient way of coding your multi-column layouts.</p>
<p>Try changing the values to see the effect it has on this example.</p>
</div>
This example uses vendor prefixes for the multi-column layout due to lack of browser support for the official standard at the time of writing.
How to specify column types
| Command | Type |
|---|---|
| string | |
| int | |
| float | |
| currency | |
| date | |
| vlen | |
| anytype |
Columns usually begin as untyped (). Errors when working with numerical or datetime data is often due to values being considered as strings, and the problem is solved by setting the correct type.
The type uses Python’s builtin constructor to parse the string, and it parses by using the decimal separator.
The type is a bit of a misnomer. It filters out any non-numeric characters, and then parses the remainder of the cell value as a float. The reasons to prefer using over , is performance (it is quite a bit slower than native parsing with ), or if any non-float characters should get reported as an error.
The type parses dates into ISO8601 format. Those columns can then be used in mathematical calculations, and the calculations are interpreted for dates. E.g. 2020-01-01 + 1, is 2020-01-02.
The type formats the cell value to the length of the content. For example, if the cell content is a list of length 3, then when typed it will display a value of 3.
There is also the type, which uses Python’s to parse the Column values. With , you can set the environment variable appropriately (before launching VisiData), such that will parse the number based on your locale setting. There is a command, which is unbound by default, because parsing this way is significantly slower than using the builtin float type.
If you need locale-specific float parsing regularly, you may want to rebind or (or maybe some other keystroke) to instead.
The following example uses the file sample.tsv.
How to batch specify column types for more than one column
- Press to open the Columns sheet.
- Press or to select the rows referencing the columns you wish to type.
- Type followed by the any of the above typing keystrokes to set the type for all selected columns on the source sheet.
Select Columns by Condition
You can select columns by condition by using the attribute and specifying the condition for selecting the columns.
Use the below snippet to select columns that have a value in any row.
evaluates each cell and finds the columns which have a value in any of the cells.
Snippet
Since the two columns, No_Of_Units and Available_Quantity have value 5 in them, it is displayed as follows.
You can also assign it to a dataframe if you want this subset to be saved for later use.
DataFrame Will Look Like
| No_Of_Units | Available_Quantity | |
|---|---|---|
| 5 | 5 | |
| 1 | 5 | 6 |
| 2 | 10 | 10 |
| 3 | 20 | Not Available |
| 4 | 20 | Not Available |
| 5 | 8 | NaT |
| 6 | NaT | NaT |
This is how you can select columns based on a condition.
Possible Values
- <‘column-width’>
- Defines the width that each column should be. Value can be either or a fixed length (e.g. ). For more information on this value, see the property.
- <‘column-count’>
- Defines the number of columns in the multi-column element. For more information on this value, see the property.
In addition, all CSS properties also accept the following CSS-wide keyword values as the sole component of their property value:
- Represents the value specified as the property’s initial value.
- Represents the computed value of the property on the element’s parent.
- This value acts as either or , depending on whether the property is inherited or not. In other words, it sets all properties to their parent value if they are inheritable or to their initial value if not inheritable.
How to hide (remove) and unhide (return) columns
How to hide columns
Press — (hyphen) to hide the current column.
or
- Press on the source sheet to open its Columns sheet.
- Move the cursor right to the width column.
- Move the cursor down to the row which represents the column you wish to hide.
- Press followed by to set the width for that column to .
- Press to return to the source sheet.
How to unhide columns
- Press to unhide all columns on current sheet.
or
- Press on the source sheet to open its Columns sheet.
- Move the cursor right to the width column.
- Move the cursor down to the row which represents the column you wish to unhide. Currently, that cell should contain the value .
- Press followed by a positive number to set the width.
- Press to return to the source sheet.
How To Create Columns in HTML Files Using the Tag
In the introduction of this article, we said that the second way you can create columns and tables in HTML documents is by using the <div> tag. This allows you to create as many columns as you like, and then you can style each <div> element using specific CSS properties. The <div> element is not considered as an empty element, meaning it has an opening and a closing tag. There are several common column types you can create.


– Two Column Layout
HTML columns can come in all shapes and sizes but, as we previously mentioned, the most common one is the HTML two columns layout. The process and code it takes to create two columns in HTML documents is simple and does not require a complex syntax.
First of all, let us add the HTML elements, as shown in the following example:
| <div class=”row”><div class=”column”> The content of the first column </div><div class=”column”> The content of the second column </div></div> |
The two <div> elements you are supposed to create for the columns are contained in the first <div> element, which has the class of “row”. The two nested <div> elements have the class value of “column”. From this point on, you are supposed to include specific CSS properties and adequately style your columns.
In this example, we show how to create equal columns using CSS properties:
| .column { float: left; width: 50%; } /* Clear floats after the columns */ .row:after { content: “What you want to include in your columns”; display: table; clear: both; } |
A lot of properties and attributes can be changed in this example, but for this article, we kept the CSS syntax fairly simple. Columns do not always have to be equal. There are times when one of the columns in the two-column layout needs to be bigger than the other.
In the following example, we have assigned different size values to the columns.
| .column { float: left; } .left { width: 20%; } .right { width: 80%; } |
Based on your needs, columns can have different sizes. In this example, the one on the left takes 20 percent of the width, whereas the one on the right takes 80 percent of the width.
– Two Column Responsive Layout
There is also a way you can make a 2 column responsive layout, which is going to be perfect for the needs of different screen sizes. This means that when the screen is going to be smaller than the value you included, instead of showing the columns next to each other, it is going to stack them one over the other.
The following example is going to show us how to write the syntax:
| /* below is what we call a “responsive layout – when the screen is less than 750px wide, make the two columns stack on top of each other instead of next to each other” */ @media screen and (max-width: 750px) { .column { width: 100%; } } |
– Three Column Layout
We said that the second most common layout is the HTML three-column layout. The only difference between the two-column layout and this one is the number of
tags you are going to include
in your HTML syntax. All you have to do is to include one more such tag and you are done.
Let us closely observe the following example and notice the difference.
| <div class=”row”><div class=”column”> The content of the first column </div><div class=”column”> The content of the second column </div><div class=”column”> The content of the third column </div></div> |
Again, if there are three columns, it does not mean they cannot be equal. The syntax stays the same as in the two-column layout.
It becomes clear from following example:
| .column { float: left; width: 33.33%; } /* Clear floats after the columns */ .row:after { display: table; clear: both; } |
As you can see, the way to make them equal is by specifying the width in percentage value. Moreover, use the same example we gave previously if you want to make them unequal. The difference between the two-column and three-column layouts is minimal.
Vendor Prefixes
For maximum browser compatibility many web developers add browser-specific properties by using extensions such as for Safari, Google Chrome, and Opera (newer versions), for Internet Explorer, for Firefox, for older versions of Opera etc. As with any CSS property, if a browser doesn’t support a proprietary extension, it will simply ignore it.
This practice is not recommended by the W3C, however in many cases, the only way you can test a property is to include the CSS extension that is compatible with your browser.
The major browser manufacturers generally strive to adhere to the W3C specifications, and when they support a non-prefixed property, they typically remove the prefixed version. Also, W3C advises vendors to remove their prefixes for properties that reach Candidate Recommendation status.
Many developers use Autoprefixer, which is a postprocessor for CSS. Autoprefixer automatically adds vendor prefixes to your CSS so that you don’t need to. It also removes old, unnecessary prefixes from your CSS.
You can also use Autoprefixer with preprocessors such as Less and Sass.
How to create derivative columns
The command takes a Python expression as input and creates a new column, where each cell evaluates the expression in the context of its row.
These variables and functions are available in the scope of an expression:
- Column names evaluate to the typed value of the cell in the named column for the same row.
- attributes and methods; use to view the vd object, or see the API.
- attributes and methods; use to view the sheet object (or see the API).
- Global functions and variables (add your own in your .visidatarc).
- modules that have been ed in Python
- : the current sheet (a TableSheet object)
- : the current column (as a Column object; use for Column metadata)
- : the current row (a Python object of the internal rowtype)
- curcol: evaluate to the typed value of this row in the column that the cursor was on at the time that the expression column was added.
- cursorCol: evaluate to the typed value of this row for the column the cursor is on. Changes as the cursor moves for . Uses the column from the time the calculation was made for , , and .
Additional attributes can be added to sheets and columns.
deliberately returns a Column object, but any other Column object is interpreted as the value within that column for the same row. For example, both and return values, not the object itself.
For example, this customizes addcol-expr to set the attribute on the new ExprColumn to a snapshot of the current cursor column (at the time the expression column is added):
Then, an expression can use as though it referred to the value in the saved column.
autocompletion when inputting an expression will cycle through valid column names only.
The following examples use the file sample.tsv.
Question On which days have we sold more than 10 Items?
- Scroll to the Units column. Set the type of the Units column by pressing (int).
- Type followed by . A new column will be created. The cells in this column will contain the value True in rows where the number of Units are greater than 10 and False otherwise.
- Move to the new derived column.
- Type followed by to select all rows where there were more than 10 Units sold.
- Press to open a duplicate sheet with only those selected rows.
Question I have a dataset with separate columns for Year, Month and Day. How can I concatenate them into a single date column?
- Type followed by .
- Set the type of the new derived column by pressing (date).
- Type followed by to rename the column to Date.
Question I have a dataset with Date column that is missing a prefix of ‘2020-‘. How do I add it to the Date column?
When using , and wanting to reference the current column, we recommend using . When using , , and , we recommend cursorCol. , unlike the others, is dynamic and changes with adjustment of underlying values, which means it will change along with the movement of the cursor (tracked by ). is a special attribute of a new ExprColumn, which remembers the cursorCol at the time of creation.

- Move the cursor to Date.
- Type followed by f»2020-{cursorCol}».
Question I have a dataset with file names. How do I create a new column with the file names lower cased?
- Move the cursor to file names column.
- Type followed by curcol.casefold().
- Move to the newly created column, and rename it with , followed by the desired name.
Определение и использование
Свойство — это сокращенное свойство для:
- column-width
- column-count
Свойство column-width определяет минимальную ширину для каждого столбца, в то время как column-count определяет максимальное количество столбцов. С помощью этого свойства multi-column автоматически разбивается на один столбец при узкой ширине браузера, без необходимости запросов мультимедиа или других правил.
| Значение по умолчанию: | auto auto |
|---|---|
| Унаследованный: | нет |
| Анимируемый: | да, см. раздел отдельные свойства. Прочитайте о animatable Попробовать |
| Версия: | CSS3 |
| JavaScript синтаксис: |
object.style.columns=»100px 3″ Попробовать |
How to expand columns that contain nested data
If a column includes container data such as JSON objects or arrays, the family of commands can expand the child values into top-level columns:
| Command | Operation |
|---|---|
| expand current column | |
| expand all visible columns fully | |
| expand current column to a specific depth (prompt for input) | |
| expand all visible columns to a specific depth (prompt for input) | |
| contract (unexpand) the current column |
The following demo shows commands applied to this data:
Note that by default the expansion logic will look for nested columns in up to (Default: 100) rows surrounding the cursor. This behavior can be controlled by adjusting in the Options Sheet, or setting in the file.
Select Range of Columns Using Name
You can select a range of columns using the name by passing the columns range separated by in the loc attribute.
Use the below snippet to select columns from No_Of_Units to Available_Since_Date.
Snippet
There are three columns in the specified range. Hence, those three columns will be selected as a subset from the dataframe.
DataFrame Will Look Like
| No_Of_Units | Available_Quantity | Available_Since_Date | |
|---|---|---|---|
| 5 | 5 | 11/5/2021 | |
| 1 | 5 | 6 | 4/23/2021 |
| 2 | 10 | 10 | 08/21/2021 |
| 3 | 20 | Not Available | 09/18/2021 |
| 4 | 20 | Not Available | 09/18/2021 |
| 5 | 8 | NaT | 01/05/2021 |
| 6 | NaT | NaT | NaT |
This is how you can get a range of columns using names.
CSS Свойства
align-contentalign-itemsalign-selfallanimationanimation-delayanimation-directionanimation-durationanimation-fill-modeanimation-iteration-countanimation-nameanimation-play-stateanimation-timing-functionbackface-visibilitybackgroundbackground-attachmentbackground-blend-modebackground-clipbackground-colorbackground-imagebackground-originbackground-positionbackground-repeatbackground-sizeborderborder-bottomborder-bottom-colorborder-bottom-left-radiusborder-bottom-right-radiusborder-bottom-styleborder-bottom-widthborder-collapseborder-colorborder-imageborder-image-outsetborder-image-repeatborder-image-sliceborder-image-sourceborder-image-widthborder-leftborder-left-colorborder-left-styleborder-left-widthborder-radiusborder-rightborder-right-colorborder-right-styleborder-right-widthborder-spacingborder-styleborder-topborder-top-colorborder-top-left-radiusborder-top-right-radiusborder-top-styleborder-top-widthborder-widthbottombox-decoration-breakbox-shadowbox-sizingcaption-sidecaret-color@charsetclearclipcolorcolumn-countcolumn-fillcolumn-gapcolumn-rulecolumn-rule-colorcolumn-rule-stylecolumn-rule-widthcolumn-spancolumn-widthcolumnscontentcounter-incrementcounter-resetcursordirectiondisplayempty-cellsfilterflexflex-basisflex-directionflex-flowflex-growflex-shrinkflex-wrapfloatfont@font-facefont-familyfont-kerningfont-sizefont-size-adjustfont-stretchfont-stylefont-variantfont-weightgridgrid-areagrid-auto-columnsgrid-auto-flowgrid-auto-rowsgrid-columngrid-column-endgrid-column-gapgrid-column-startgrid-gapgrid-rowgrid-row-endgrid-row-gapgrid-row-startgrid-templategrid-template-areasgrid-template-columnsgrid-template-rowshanging-punctuationheighthyphens@importisolationjustify-content@keyframesleftletter-spacingline-heightlist-stylelist-style-imagelist-style-positionlist-style-typemarginmargin-bottommargin-leftmargin-rightmargin-topmax-heightmax-width@mediamin-heightmin-widthmix-blend-modeobject-fitobject-positionopacityorderoutlineoutline-coloroutline-offsetoutline-styleoutline-widthoverflowoverflow-xoverflow-ypaddingpadding-bottompadding-leftpadding-rightpadding-toppage-break-afterpage-break-beforepage-break-insideperspectiveperspective-originpointer-eventspositionquotesresizerighttab-sizetable-layouttext-aligntext-align-lasttext-decorationtext-decoration-colortext-decoration-linetext-decoration-styletext-indenttext-justifytext-overflowtext-shadowtext-transformtoptransformtransform-origintransform-styletransitiontransition-delaytransition-durationtransition-propertytransition-timing-functionunicode-bidiuser-selectvertical-alignvisibilitywhite-spacewidthword-breakword-spacingword-wrapwriting-modez-index
Select Columns Without Missing Values
You can select columns without missing values using the in the attribute.
In this way, you can select all columns without NaN or missing values.
The tilde symbol inverses the flag which is returned after checking if any of the values is null.
If any of the value is , returns . The tilde symbol inverses this and makes it . Hence columns with missing values will not be added.
Snippet
The Product_Name is the only column that doesn’t have any missing value of null value. Hence that column will be displayed as shown below.
DataFrame Will Look Like
| Product_Name | |
|---|---|
| Keyboard | |
| 1 | Mouse |
| 2 | Monitor |
| 3 | CPU |
| 4 | CPU |
| 5 | Speakers |
| 6 | Headset |
This is how you can get columns without any missing values.
How to configure multiple columns
Properties of columns on the source sheet can be changed by using on its Columns sheet (accessed with ). In particular, it facilitates the selection of multiple columns, followed by utilising one of the -prefixed commands to modify all of them.
For a full list of available commands, see the . Some example workflows follow.
The following examples use the file sample.tsv.
How to set multiple statistical aggregators
Question What is the average daily revenue from sales of each Item?
- Set the type of the Units column by pressing (int).
- Set the type of the Total column by pressing (float).
- Press to open the Columns sheet.
- Press or on the rows referencing the source sheet Units column and the Total column to select them.
- Type followed by to add a avg statistical aggregator to the selected rows.
- Press to exit and return to the source sheet.
- Scroll to the Item column. Press to open the Frequency table.
Question What are the daily average and sum total number of Units sold for each Item?
-
Press to open the Columns sheet.
-
Move the cursor to the row referencing the source sheet Units column.
a. Press or to select it.
b. Set the type for the source sheet Units columns by pressing (int).
c. Move the cursor to the aggregators column.
d. Type to enter edit mode, followed by sum avg.
-
-
Press to exit and return to the source sheet.
-
Move the cursor to the Item column. Press to open the Frequency table.