
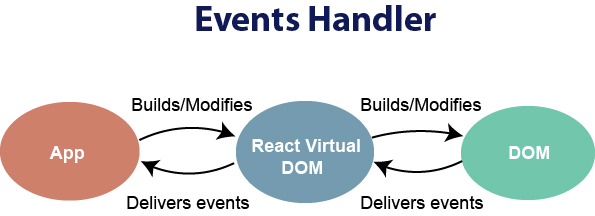
События mouseenter и mouseleave
События похожи на . Они тоже генерируются, когда курсор мыши переходит на элемент или покидает его.
Но есть и пара важных отличий:
- Переходы внутри элемента, на его потомки и с них, не считаются.
- События не всплывают.
События предельно просты и понятны.
Когда указатель появляется над элементом – генерируется , причём не имеет значения, где именно указатель: на самом элементе или на его потомке.
Событие происходит, когда курсор покидает элемент.
Вот тот же пример, что и выше, но на этот раз на верхнем элементе стоят обработчики вместо .
Как вы сами можете увидеть, генерируются только события, связанные с движением курсора относительно верхнего . Ничего не произойдёт при переходе на внутренний и обратно. Переходы на потомки игнорируются.
Результат
script.js
style.css
index.html
Событие mouseout при переходе на потомка
Важная особенность события – оно генерируется в том числе, когда указатель переходит с элемента на его потомка.
То есть, визуально указатель всё ещё на элементе, но мы получим !
Это выглядит странно, но легко объясняется.
По логике браузера, курсор мыши может быть только над одним элементом в любой момент времени – над самым глубоко вложенным и верхним по z-index.
Таким образом, если курсор переходит на другой элемент (пусть даже дочерний), то он покидает предыдущий.
Обратите внимание на важную деталь. Событие , происходящее на потомке, всплывает
Поэтому если на родительском элементе есть такой обработчик, то оно его вызовет
Событие , происходящее на потомке, всплывает. Поэтому если на родительском элементе есть такой обработчик, то оно его вызовет.
Вы можете наглядно увидеть это в примере ниже: находится внутри . На родителе определены обработчики событий , которые выводят информацию о них в текстовое поле.
При переходе мышью с внешнего элемента на внутренний, вы увидите сразу два события: (ушли с родителя) и (перешли на потомка, событие всплыло).
Результат
script.js
style.css
index.html
При переходе с родителя элемента на потомка – на родителе сработают два обработчика: и и :
Если код внутри обработчиков не смотрит на , то он подумает, что мышь ушла с элемента и вернулась на него обратно. Но это не так! Мышь никуда не уходила, она просто перешла на потомка.
Если при уходе с элемента что-то происходит, например, запускается анимация, то такая интерпретация происходящего может давать нежелательные побочные эффекты.
Чтобы этого избежать, можно смотреть на и, если мышь всё ещё внутри элемента, то игнорировать такие события.
Или же можно использовать другие события: и , которые мы сейчас изучим, с ними такая проблема не возникает.
Events mouseover/mouseout, relatedTarget
The event occurs when a mouse pointer comes over an element, and – when it leaves.
These events are special, because they have property . This property complements . When a mouse leaves one element for another, one of them becomes , and the other one – .
For :
- – is the element where the mouse came over.
- – is the element from which the mouse came ( → ).
For the reverse:
- – is the element that the mouse left.
- – is the new under-the-pointer element, that mouse left for ( → ).
In the example below each face and its features are separate elements. When you move the mouse, you can see mouse events in the text area.
Each event has the information about both and :
Result
script.js
style.css
index.html

can be
The property can be .
That’s normal and just means that the mouse came not from another element, but from out of the window. Or that it left the window.
We should keep that possibility in mind when using in our code. If we access , then there will be an error.
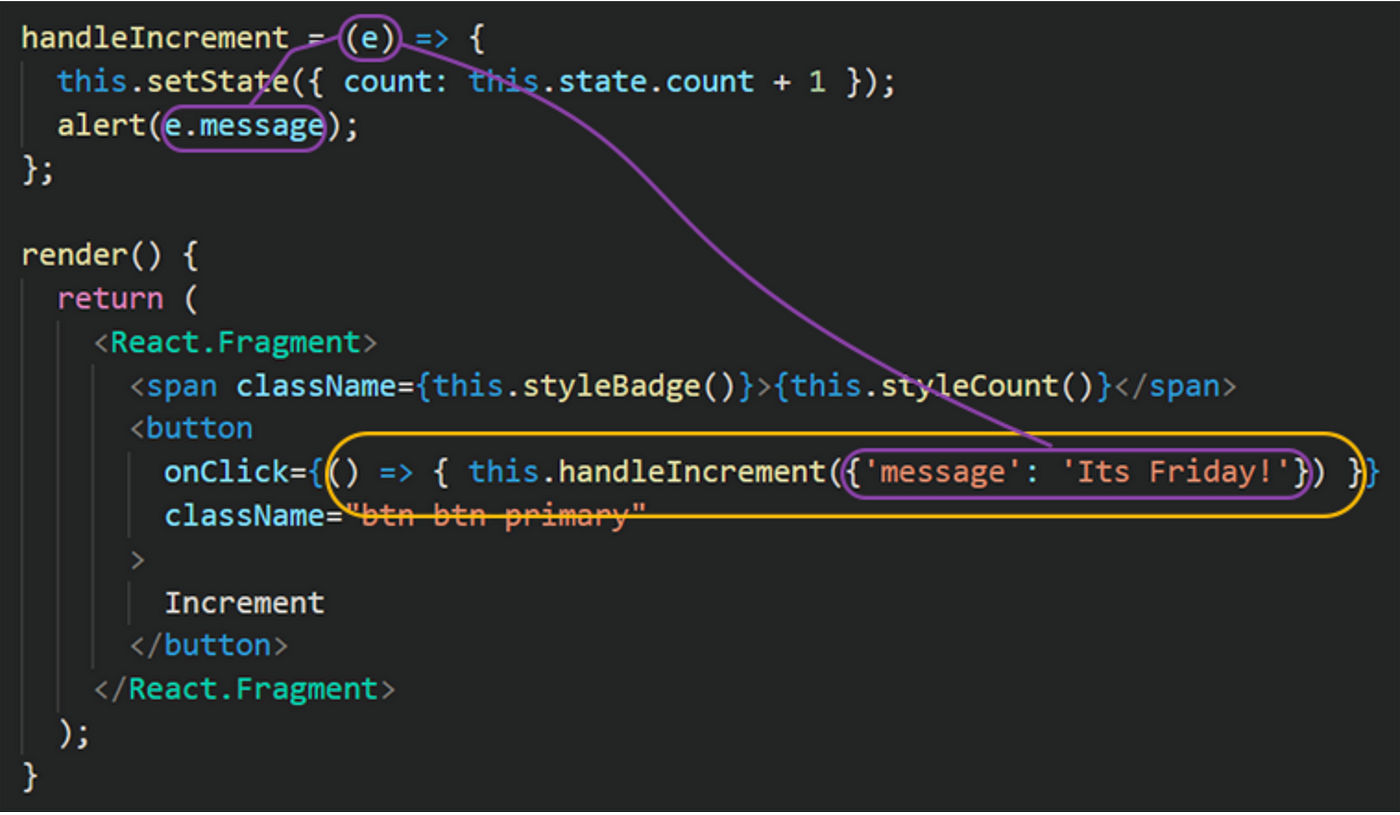
Displaying a text when the button is hovered
If you want to display a text when the button is hovered,
you can do so by introducing a state and by setting it to when the button is hovered and by setting it to when the mouse is moved out:
App.js
1import{ useState }from"react"

2

3functionApp(){

4constshowText, setShowText=useState(false)

5consthandleMouseEnter=e=>{

6    e.target.style.background="grey"

7setShowText(true)

8}

9consthandleMouseLeave=e=>{

10    e.target.style.background="maroon"

11setShowText(false)

12}

13

14return(

15<divclassName="App">

16<button

17onMouseEnter={handleMouseEnter}

18onMouseLeave={handleMouseLeave}

19className="button"

20>

21        Hover over me

22</button>

23{showText &&<pclassName="message">Now you can see me!</p>}

24</div>

25)

26}

27

28exportdefaultApp
onMouseOver and onMouseOut events
There are a couple of other events which can accomplish the same goal, they are and events.
The key difference between these events and the ones we discussed earlier ( and ) is that
and propagate (bubbles) up the DOM hierarchy.
For better understanding, let’s see the difference with the help of an example:
App.js
1functionApp(){

2consthoverHandler=()=>{

3console.log("onMouseEnter")

4}

5constoutHandler=()=>{

6console.log("onMouseLeave")

7}

8return(

9<divclassName="App">

10<div

11className="outer-box"

12onMouseEnter={hoverHandler}

13onMouseLeave={outHandler}

14>

15<divclassName="inner-box"></div>

16</div>

17</div>

18)

19}

20

21exportdefaultApp
Here we have 2 boxes, one inside the other.
As you could see from the below animation,
and are trigged only once, even though we hover between the parent and child div multiple times.
Let’s update the code with onMouseOver and onMouseOut:
App.js
1functionApp(){

2consthoverHandler=()=>{

3console.log("onMouseEnter")

4}

5constoutHandler=()=>{

6console.log("onMouseLeave")

7}

8return(

9<divclassName="App">

10<div

11className="outer-box"

12onMouseOver={hoverHandler}

13onMouseOut={outHandler}

14>

15<divclassName="inner-box"></div>

16</div>

17</div>

18)

19}

20

21exportdefaultApp
As you could see below, is triggered as we move from the outer div and is triggered as we enter the inner div.
The same thing happens when we move out from the child div to the parent one as well.
If there is only 1 element, to which you need to bind the mouse hover events, then you can choose either of the options.
If there are multiple items in the hierarchy, you can choose an option based on your need.
Do follow me on where I post developer insights more often!
Events mouseenter and mouseleave
Other events, such as mouseenter and mouseleave are similar to mouseover and mouseout. They also trigger at the moment the mouse pointer enters or leaves the element.
But, they are not the same as the events above. At least two essential differences can be pointed out:
- The transitions inside the element are not counted.
- These events (mouseenter, mouseleave) never bubble.
These events are simpler than the previous ones.
At the moment the pointer enters an element, the mouseenter event triggers. The specific location of the pointer or its descendant doesn’t matter. As for the mouseleave, it triggers when the pointer leaves an element.
So, the only generated events are the ones connected to moving to moving the pointer in and out of the top element. Nothing will happen in case the pointer moves to the child and back. Any transitions between descendants will be dismissed:
Try it Yourself »
Использование «onmouseout» внутри тега.
способов использования onmouseout
Для того, чтобы продемонстрировать использование «onmouseout» нам понадобится элемент Dom — пусть это будет div, и добавим ему class=»onmouseout» :
Также туда добавим событие «onmouseout» с функцией myFunction:
<div onmouseout=»myFunction(event)» class=»onmouseout»></div>
Css:
Немного стилей для нашего блока:
.onmouseout{
background: #e9e9e9;
width: 300px;
height: 100px;
margin: auto;
border: 1px solid;
}
javascript
Напишем нашу функцию:
<script>
function myFunction() {
document.getElementById(«demo»).innerHTML = «Вы покинули блок»;
}
</script>
Summary
In this chapter, we dived deeper into the events in JavaScript. We explored the events such as mousemove, mouseover, mouseout, mouseenter and mouseleave.
The following things are especially handy:
- A fast mouse move skips intermediate elements.
- The mouseover/out and mouseenter/leave events include an additional useful property called relatedTarget.
The mouseover/mouseout events can trigger even when moving from the parent element to a child. Your browser assumes that the mouse may only be over a single element at one time.
In that aspect, the mouseenter/mouseleave events differ from the events above. They can trigger only when the mouse moves in and out of the element as a whole. Another significant thing to remember: the mouseenter/mouseleave events don’t bubble.
События mouseover/mouseout, relatedTarget
Событие происходит в момент, когда курсор оказывается над элементом, а событие – в момент, когда курсор уходит с элемента.
Эти события являются особенными, потому что у них имеется свойство . Оно «дополняет» . Когда мышь переходит с одного элемента на другой, то один из них будет , а другой .
Для события :
- – это элемент, на который курсор перешёл.
- – это элемент, с которого курсор ушёл ( → ).
Для события наоборот:
- – это элемент, с которого курсор ушёл.
- – это элемент, на который курсор перешёл ( → ).
В примере ниже каждое лицо и его черты – отдельные элементы. При движении указателя по этим элементам в текстовом поле отображаются происходящие события.
Каждое из них содержит информацию о и :
Результат
script.js
style.css
index.html
Свойство может быть
Свойство может быть .
Это нормально и означает, что указатель мыши перешёл не с другого элемента, а из-за пределов окна браузера. Или же, наоборот, ушёл за пределы окна.
Следует держать в уме такую возможность при использовании в своём коде. Если, например, написать , то при отсутствии будет ошибка.
Window
Window Object
addeventlistener()
alert()
atob()
blur()
btoa()
clearInterval()
clearTimeout()
close()
closed
confirm()
console
defaultStatus
document
focus()
frameElement
frames
history
getComputedStyle()
innerHeight
innerWidth
length
localStorage
location
matchMedia()
moveBy()
moveTo()
name
navigator
open()
opener
outerHeight
outerWidth
pageXOffset
pageYOffset
parent
print()
prompt()
removeEventlistener()
resizeBy()
resizeTo()
screen
screenLeft
screenTop
screenX
screenY
scrollBy()
scrollTo()
scrollX
scrollY
sessionStorage
self
setInterval()
setTimeout()
status
stop()
top
Window Console
assert()
clear()
count()
error()
group()
groupCollapsed()
groupEnd()
info()
log()
table()
time()
timeEnd()
trace()
warn()
Window History
back()
forward()
go()
length
Window Location
assign()
hash
host
hostname
href
origin
pathname
port
protocol
reload()
replace()
search
Window Navigator
appCodeName
appName
appVersion
cookieEnabled
geolocation
javaEnabled()
language
onLine
platform
product
taintEnabled()
userAgent
Window Screen
availHeight
availWidth
colorDepth
height
pixelDepth
width
What are the Hover Event Handlers?
You’d think that the onHover event handler exists in React.
Well, I’ve got news for you.
When it comes to React event handlers and onHover: The onHover event handler does not exist in React.
It’s fairly common to assume that there is an onHover event handler in React, especially when you consider the naming conventions of the other event handlers, such as onClick, onSubmit, and onDrag.
Why wouldn’t there be an onHover event in React? Well, it wouldn’t give us much control or flexibility to handle the hover state for an element.
When hovering an element, we want to detect the following states for an HTML element:
- Beginning to hover over an element
- Leaving a hovered element
Therefore, React has provided the following event handlers for detecting the hover state for an element:
- onMouseEnter
- onMouseLeave
События onmouseover и onmouseout
Эти два типа событий помогут вам создавать приятные эффекты с изображениями или даже с текстом. событие срабатывает, когда вы наводите указатель мыши на любой элемент и срабатывает при перемещении мыши из этого элемента. Попробуйте следующий пример.
<html>
   <head>

      <script type="text/javascript">
         <!--
            function over() {
               document.write ("Mouse Over");
            }

            function out() {
               document.write ("Mouse Out");
            }

         //-->
      </script>

   </head>
   <body>
      <p>Bring your mouse inside the division to see the result:</p>

      <div onmouseover="over()" onmouseout="out()">
         <h2> This is inside the division </h2>
      </div>

   </body>
</html>
Changing styles when a button is hovered
Let’s add a button and change its color when the user hovers over it:
App.js
1functionApp(){

2consthandleMouseEnter=e=>{

3    e.target.style.background="grey"

4}

5consthandleMouseLeave=e=>{

6    e.target.style.background="maroon"

7}

8

9return(

10<divclassName="App">

11<button

12onMouseEnter={handleMouseEnter}

13onMouseLeave={handleMouseLeave}

14className="button"

15>

16        Hover over me

17</button>

18</div>

19)

20}

21

22exportdefaultApp
As you may see, we are using event to know when the mouse is hovered over the button and to change the color of the button.
Also, we are using event to identify when the user has hovered out of the button so that we can change the color of the button to the original one.
События с курсором мышки
Очень часто используются события с мышкой. Например, посетитель кликает на объект веб-страницы или наводит курсор мышки на изображение, которое благодаря JavaScript, будет меняться, или кликает на кнопку, после чего будет происходить проверка веденных данных в текстовые поля формы и т.д.
Событие onclick
Событие onclick вызывается с помощью клика мышки, например на изображение, кнопку, блок или другой элемент веб-страницы. Пример:
<input type=»button» value=»Кликните пожалуйста»
onclick=»alert(‘вызывается с помощью клика мышки по кнопке.’)»>
В данном случае событие просто заключено в кнопку, без подключения внешнего файла JavaScript, без тегов script, что иногда очень удобно.
Событие ondblclick
Событие ondblclick (on duble click) работает в точности как и onclick, за исключением того, что для запуска понадобиться двойной клик мышкой. Пример:
<img src=»http://phantomx5.ucoz.ru/3.jpeg» width=»150″ height=»75″
ondblclick=»alert(‘Событие ondblclick выполняется при двойном клике.’)»>
Попробуйте сделать двойной клик по изображению ниже.
События onmouseove и onmouseout
Событие onmouseover активируется при наведении курсора мышки на определенный элемент. В то время как событие onmouseout активируется когда курсор мышки не наведен на элемент. Данные события широко применяются при создании дизайнерских эффектов для сайта, часто используются для создания графического меню. Пример:
<img src=»http://cdn6.picsart.com/6840325137.jpeg?r1024x1024″ width=»300″ height=»200″ border=»1″
onmouseover=»this.src=’http://www.zerofansub.net/images/news/on-va-vous-bouffer.jpg'»
onmouseout=»this.src=’http://cdn6.picsart.com/6840325137.jpeg?r1024x1024′» alt=»События onmouseove и onmouseout» >
Попробуйте навести курсор мышки на изображение ниже
Существует еще одно свойство — onmousemove, которое работает аналогично onmouseover и onmouseout. В случае с onmousemove изображение будет меняться только когда курсор мышки в движении, поэтому данное событие не пользуется особой популярностью.
Событие onclick javaScript и три способа обработки событий
Событие происходит во время одинарного щелчка кнопкой мышиобработчик
Пример: По щелчку на кнопке вывести диалоговое окно с сообщением «Ура!»
- Через свойство объекта с использованием пользовательской функции:Скрипт:
function message() {
		alert("Ура!");
	}
|
html-код:
<body> <form> <input type="button" name= "myButton" onclick="message()" value="Щелкни!"> <form> |
В данном примере в html-коде мы видим кнопку. У кнопки присутствует атрибут («по щелчку»), в значении которого стоит вызов функции с названием . Это пользовательская функция, описанная выше в скрипте. В самой функции выводится диалоговое окно, что и задано согласно заданию.

Скрипт при такой обработке события обычно находится в области документа
Через атрибут тега:
<body>
<form name="myForm">
<input type="button" name="myButton"
    value="Щелкни!" onclick="javascript: alert('Ура!')">
<form>
|
Это упрощенный вариант обработки события, он подходит только для небольшого кода, когда необходимо выполнить один-два оператора. Иначе код будет плохочитаемым.
В качестве атрибута кнопки указывается («по щелчку»), а в качестве значения пишется скрипт из операторов с указанием на каком языке он написан (). В нашем случае оператор для вывода модального окна со словом «Ура!»
Через регистрацию функции-обработчика в качестве свойства элемента:
html-код:
<form name="myForm"> <input type="button" value="Щелкни!" id="myButton"> <form> |
Скрипт:
// document.myForm.myButton.onclick = message; // через дерево элементов
myButton.onclick = message; // так короче, через id
function message() {
	alert('Ура!');
}
|
В html-коде здесь присутствует кнопка с атрибутом , который необходим для обращения к кнопке через скрипт.
В скрипте, который обязательно находится ниже дерева элементов (можно перед закрытием тега ), находится обращение к кнопке (), для которой назначается обработчик события со значением ссылки на функцию. Обращение к кнопке может быть организовано через атрибут ()
Скобки после названия функции не ставятся. В данном случае это именно ссылка на функцию, иначе, при использовании скобок, функция была бы вызвана, а не назначена в качестве обработчика событий.
Именно такой способ обработки событий максимально приближен к тому, который происходит, например, в ОС windows
Как лучше выводить результаты примеров?
Важно: При вызове после окончания загрузки страницы (при обработке событий onclick, oninput, …), страница перезапишется, поэтому вызывать этот метод не рекомендуется. Для примеров лучше использовать метод .
добавляет html во время построения DOM
блокируют выполнение JS, пока пользователь не нажмёт OK
Рассмотрим все простые способы вывода отладочной информации:
-
alert('str'); // показывает окошко -
document.write('htmlstr'); // пишет на страницу -
document.innerHTML += 'htmlstr'; // добавляет на страницу
-
console.log('str'); // выводит в консоль браузерах
Задание Js8_5. Выполните задание по инструкции:
- Создайте веб-страницу и расположите в ней тег с изображением грустного смайлика.
- Щелчок на изображении () вызывает заданный метод (пользовательская функция):
<img id="smileImg" src="smile1.jpg" onclick="sayHello()" > |
В скрипте опишите метод (функция ), который «спрашивает», как зовут пользователя, а затем приветствует его по имени, и меняет изображение на улыбающийся смайлик (свойство тега ):
function sayHello() {
	let userName=prompt("Как вас зовут?");
	if(userName){
		alert(...);
		document.getElementById("smileImg"). ...=...;
	}
}
|
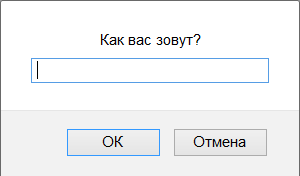 =>>
=>> 
Skipping Elements
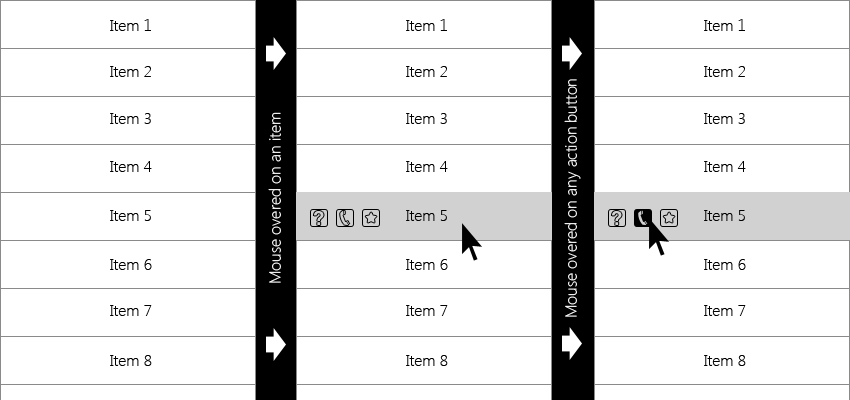
The mouseover element gets activated when the mouse moves. But it doesn’t mean that each pixel will lead to an event. Time to time the mouse position is checked by the browser. As a result, whenever a change is noticed, events are triggered. It also means that if the visitor moves the mouse very fast, several DOM-elements might be skipped, like this:
In the picture above, if the mouse moves too fast from “FROM” to “TO”, then the intermediate <div> elements might be skipped. The mouseout event will trigger on “FROM” and then directly on “TO”. In practice, it is quite handy because there may be too many intermediate elements that you don’t wish to go through.
Please, take into consideration the mouse pointer doesn’t always go through all the elements on the way. That is possible that the pointer jumps right inside the middle of the page from the outside of the window. In a case like this, relatedTarget is null, as it’s not known where exactly it came from, like here:
You can easily check it out here:
Try it Yourself »
An important note: One thing is sure that if the pointer has entered an element (mouseover), the mouseout will also be implemented.