

Выпадающий список
Элемент создает раскрывающееся меню, из которого пользователь может выбрать пункт.
ОдинДваТриЧетыре
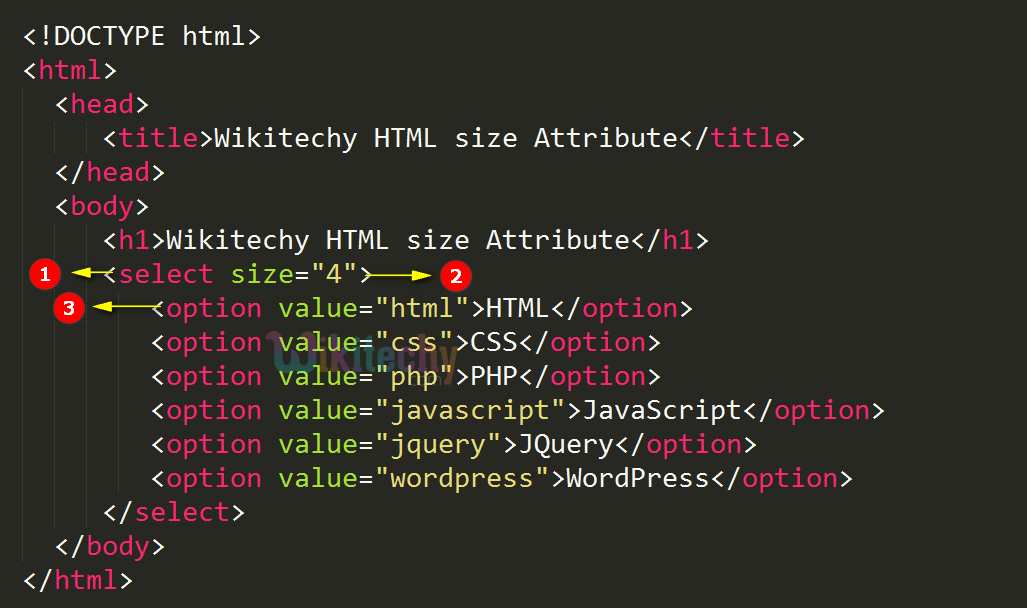
Вы можете изменить количество отображаемых пунктов меню с помощью атрибута . Значение этого атрибута равное 0 или 1 отображает стандартное раскрывающийся список. Если же атрибут превышает 1, то список отображается как поле, отображающее несколько строк, с одним значением на строку и полосой прокрутки для выбора доступных пунктов.
ОдинДваТриЧетыре
По умолчанию пользователи могут выбирать только одно значение. Добавление атрибута позволяет пользователям одновременно выбирать несколько элементов списка и отправлять все выбранные значения в форме. Использование атрибута автоматически преобразует раскрывающийся список в поле, как если бы он имел определенный размер. Размер по умолчанию этого поля определяется конкретным браузером, который вы используете, и его невозможно вернуть в в вид обычного раскрывающегося списка.
ОдинДваТриЧетыре
При использовании атрибута существует разница между использованием значений 0 и 1 для атрибута . Использование 0 приведет к тому, что браузер будет вести себя по умолчанию, как будто атрибута вообще нет. Использование значения равного 1 будет явно задавать размер получаемого поля только в одну строку.
ОдинДваТриЧетыре
Unsupporting Browsers
At the time of this writing, datalists for text inputs are supported in Internet Explorer 10, Firefox 4+, Chrome 20+, and Opera, which unfortunately leaves out a large number of users.
Unlike with many new HTML5 features, for most use cases, no extra work needs to be done in browsers that do not support datalists. By default, the list of options you provide are merely suggestions; therefore, users with browsers that lack support will simply need to fill in the text field without any suggestions.
However, some fallback options can be used to provide a fuller experience to users running unsupporting browsers.
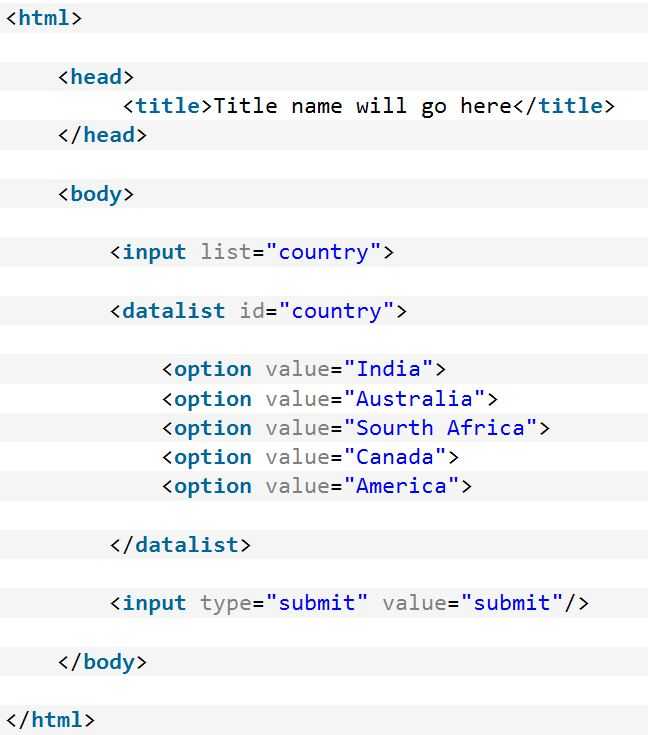
How the Datalist Actually Works?
The Datalist has some similarities with the SELECT element. You will assign a pre-defined set of values to a Datalist as we have assigned data to the Select element. Except that, the former (Datalist) is not a stand-alone control. The Datalist element works in accord with an Input box. The Input elements “list” attribute will bind both the controls together. Let us see how we can do this.
The Markup
<!doctype html>
<html>
<head>
<title>HTML5 Datalist Example</title>
</head>
<body>
<p>Set focus on the Input box and type a letter of your choice!</p>
<div>
<label style="padding:0 10px;">List of Books</label>
<input type="text" list="books" />
<datalist id="books">
<option value="Advanced Composite Materials">
<option value="Asp.Net 4 Blue Book">
<option value="Teaching Science">
<option value="Circuit Bending">
<option value="ADOBE Premiere">
</datalist>
</div>
</body>
</html>
Try it
See how the input’s list attribute binds the controls. The attribute simply refers to the id of the Datalist.
<input type="text" list="books" />
Browser Support: Chrome 39.0 — Yes | FireFox 34.0 — Yes | Internet Explorer 10 — Yes | Safari — No
How to Bind Data Dynamically to an HTML5 Datalist using Asp.Net DataTable
Conclusion
If you are using a Widget for AutoComplete, you will need an input box, a JavaScript framework and few lines of code to make it all work. However, with the DataList element it is very simple. Just hook it with the input element and you are ready to work with it.
However, with simplicity it has its own share of drawbacks. If you look at the code carefully, I have placed the controls inside a DIV element, in which I have defined a font and a size. The style property has zero affect on the Datalist element.
It has another drawback. When you enter a letter in the input box, it will look for a match with the “first” character of the words in the list. Now, that’s very annoying. If I enter the letter “b” and even though the list has words with “b” in between, it won’t return any value.
In my opinion, sometimes it is good to write your own code, so you can have full control on the element and its features. As of now, we will have to wait for a new version of this element (if at all) with some much-needed enhanced features.
See this demo
Thanks for reading.
← PreviousNext →
Группировка пунктов
Вы можете группировать свои пункты в раскрывающимся списке, чтобы обеспечить более структурированный макет в длинном списке параметров, с помощью элемента .
Синтаксис очень простой, просто используя элемент с атрибутом для идентификации заголовка для группы и содержащий ноль или более пунктов, которые должны быть внутри этой группы.
МолокоБананыКлубникаМорковьЦуккини
При использовании группировки пунктов не обязательно все их группировать. Кроме того, при отключении группы будут отключены все пункты внутри этой группы, и невозможно вручную включить один пункт в отключенной группе.
Browser Support and Fallbacks
The element is well supported in modern browsers as well as Internet Explorer 10 and 11:
There are several implementation notes, but they won’t affect most usage. The worst that could happen is a field reverts to a standard text input.
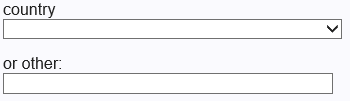
If you absolutely must support IE9 and below, there’s a fallback pattern which uses a standard in conjunction with a text input when the fails. Adapting the country example:
See the Pen
HTML5 <datalist> autocomplete fallback by SitePoint (@SitePoint)
on CodePen.
In modern browsers, the elements become part of the and the “or other” label is not shown. It looks identical to the , but a form value will be set to an empty string.
In IE9 and below, both the (very long) and text input fields are active:
Both values could be entered in old IEs. Your application must either:
- decide which is most valid, or
- use a small JavaScript function to reset one when the other is changed
Enforcing a Value
While datalists do not natively allow you to require that an option be selected, you can easily add validation that does so. For example, the following code makes use of the to add such validation:
var inputs = document.querySelectorAll('input');
for (var i = ; i < inputs.length; i++) {

  inputs.addEventListener('change', function() {
    var optionFound = false,
      datalist = this.list;

    for (var j = ; j < datalist.options.length; j++) {
        if (this.value == datalist.options.value) {
            optionFound = true;
            break;
        }
    }


    if (optionFound) {
      this.setCustomValidity('');
    } else {
      this.setCustomValidity('Please select a valid value.');
    }
  });
}
The constraint validation API is implemented in all browsers that support datalists, so if the datalist works, the validation should work as well. Now, when the user attempts to submit a form with an input that has a datalist (and they have not selected an option), they will see the error shown in Figure 8.
Figure 8. Constraint Validation API Error (Internet Explorer 10)
It’s important to note that the constraint validation API does not remove the need for server-side validation. Users working with older browsers will not have the constraint validation API available, and malicious users can easily subvert client-side scripts.
While this approach works in modern browsers, it presents an unusable UI to users running browsers that lack support. Users are told that they must select a valid value, but if their browser doesn’t support datalists, they cannot see the options. Therefore, if you plan on using this approach, it’s essential to provide a UI that works in all browsers. This can be accomplished by detecting whether the browser supports datalists and then polyfilling appropriately.
Polyfilling
One feature the select fallback doesn’t provide is the autocomplete behavior that datalists offer natively. If that is important for the datalists you’re adding, a second fallback option is to polyfill a datalist implementation.
To start, you first need to determine whether the user’s browser supports datalists. The popular feature detection library Modernizr provides such a test, as shown here:
JavaScript
if (Modernizr.input.list) {

  } else {

  }
}
Using this approach, you can now polyfill a datalist implementation for users in unsupporting browsers. While several polyfills are available for datalists, I prefer using jQuery UI’s autocomplete widget. The following code shows a polyfill implementation:
JavaScript
var datalist,
  listAttribute,
  options = [];

if (!Modernizr.input.list) {

  $('input').each(function() {


    listAttribute = $(this).attr('list');
    datalist = $('#' + listAttribute);

    if (datalist.length > ) {
      options = [];

      datalist.find('option').each(function() {
        options.push({ label: this.innerHTML, value: this.value });
      });

      $(this).autocomplete({ source: options });
    }
  });

  $('datalist').remove();
}
Figure 10 shows the display of the country list example in Safari with the jQuery UI autocomplete polyfill.
Figure 10. Country Datalist Polyfilled Using jQuery UI’s Autocomplete Widget(Safari)
You may have noticed that by default, jQuery UI’s autocomplete widget matches characters anywhere in the options, whereas datalists match options only at the beginning of the string. Unlike the native datalist, the autocomplete widget allows you to customize this to match options however you’d like.
The following example shows how you can build an autocomplete feature that matches options only at the beginning of the string:
HTML
<inputtype="text"id="autocomplete">
<script>
var options = ;
$('#autocomplete').autocomplete({


  source: function (req, responseFn) {


    var term = $.ui.autocomplete.escapeRegex(req.term),


      matcher = new RegExp('^' + term, 'i'),

      matches = $.grep(options, function (item) {
        return matcher.test(item);
      });

    responseFn(matches);
  }
});
<script>
as a React component
A reusable React datalist needs to
- work as multiple instances on the page
- render options from a list
- return values with a callback
No. 3 is optional. You can do that using form machinery like react-hook-form.
You end up with a component like this:
constDatalist=({ name, options, onChange })=>{


const id =newDate().getTime()


return(

<>

<input name={name} list={id} onChange={onChange}>

<datalist id={id}>

{options.map((o)=>(

<option value={o}>

))}

<datalist>

<>

)

}
We use a poor man’s unique identifier – the current time in milliseconds. It’s okay, but you’ll want to use when React 18 comes out and find a more robust solution until then.
We call for every input change. This may be annoying for consumers of our component.
A nice option would be to check the value against your list of options on every change and call an callback when there’s a match. That way you can catch when the user makes an explicit selection. Probably.
If you have too many options to list or need richer search behavior, you could expand this component with a dynamic search. Like this:
constDynamicDatalist=({ name, api, onChange })=>{


const id =newDate().getTime()

constoptions, setOptions=useState()

asyncfunctionrunSearch(event){

const value = event.currentTarget.value


const data =awaitfetchFrom(`${api}?search=${value}`)

setOptions(data.suggestions)

}

return(

<>

<input name={name} list={id} onChange={runSearch}>

<datalist id={id}>

{options.map((o)=>(

<option value={o}>

))}

<datalist>

<>

)

}
Assume this is pseudocode.
You watch for changes, run API requests, and use those to populate the options list dynamically. Be careful about blindly running requests on every keystroke.
Creating Datalists
To show how a datalist works, let’s start with a traditional text input:
HTML
<labelfor="favorite_team">Favorite Team:</label>
<inputtype="text"name="team"id="favorite_team">
This field asks a user to provide his or her favorite sports team. By default, the user will be given no additional help to complete the field. But by using a datalist, you can provide a list of options the user can select from to complete the field. To do this, define a datalist with an option element for each suggestion:
HTML
<datalist>
  <option>Detroit Lions</option>
  <option>Detroit Pistons</option>
  <option>Detroit Red Wings</option>
  <option>Detroit Tigers</option>
  <!--
</datalist>
To tie a datalist to an input element, give the input element a list attribute and the datalist an id attribute that match. Here’s an example:
HTML
<labelfor="favorite_team">Favorite Team:</label>
<inputtype="text"name="team"id="favorite_team"list="team_list">
<datalistid="team_list">
  <option>Detroit Lions</option>
  <option>Detroit Pistons</option>
  <option>Detroit Red Wings</option>
  <option>Detroit Tigers</option>
  <!--
</datalist>
Notice that the list attribute of the input and the id attribute of the datalist contain the same value, «team_list». This provides the link between the two.
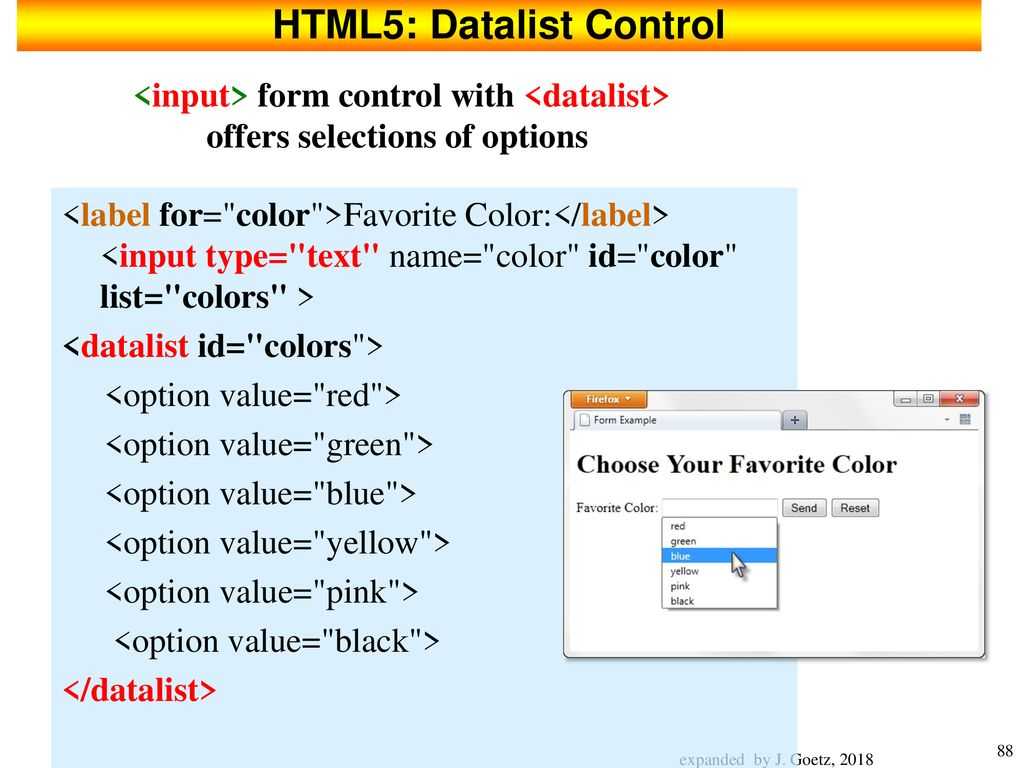

That’s it. No JavaScript is required to make a datalist work. Figure 1 shows what the user will see in supporting browsers after typing a D.
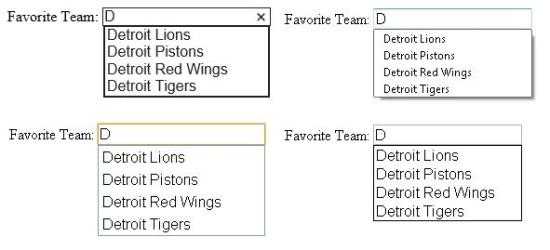
Figure 1. Datalist Display (top left: Internet Explorer 10; top right: Firefox 18; bottom left: Chrome 24; bottom right: Opera 12)
Note: Internet Explorer 10 and Opera do not require the user to type a character before seeing suggestions, whereas Firefox and Chrome do.
Option elements can also have a attribute. This is useful when a user might not know the code associated with a given option. Consider the following U.S. state input:
HTML
<labelfor="state">State:</label>
<inputtype="text"name="state"id="state"list="state_list">
<datalistid="state_list">
  <optionvalue="AL">Alabama</option>
  <optionvalue="AK">Alaska</option>
  <optionvalue="AZ">Arizona</option>
  <optionvalue="AR">Arkansas</option>
  <!--
</datalist>
Here, the user will see a list of full state names, but when the user makes a selection, the text input will be filled with the state’s code rather than the full name. An example is shown in Figure 2.
Figure 2. Selecting a Datalist Option with a Corresponding Value (Firefox 18)
Attributes
HTML tags can contain one or more attributes. Attributes are added to a tag to provide the browser with more information about how the tag should appear or behave. Attributes consist of a name and a value separated by an equals (=) sign, with the value surrounded by double quotes. Here’s an example, .
There are 3 kinds of attributes that you can add to your HTML tags: Element-specific, global, and event handler content attributes.
The attributes that you can add to this tag are listed below.
The following table shows the attributes that are specific to this tag/element.
| Attribute | Description |
|---|---|
| None |
Global Attributes
The following attributes are standard across all HTML 5 tags.
- accesskey
- class
- contenteditable
- contextmenu
- dir
- draggable
- dropzone
- hidden
- id
- itemid
- itemprop
- itemref
- itemscope
- itemtype
- lang
- spellcheck
- style
- tabindex
- title
- translate
For a full explanation of these attributes, see HTML 5 global attributes.
Event Handler Content Attributes
Event handler content attributes enable you to invoke a script from within your HTML. The script is invoked when a certain «event» occurs. Each event handler content attribute deals with a different event.
Here are the standard HTML 5 event handler content attributes.
- onabort
- oncancel
- onblur
- oncanplay
- oncanplaythrough
- onchange
- onclick
- oncontextmenu
- ondblclick
- ondrag
- ondragend
- ondragenter
- ondragexit
- ondragleave
- ondragover
- ondragstart
- ondrop
- ondurationchange
- onemptied
- onended
- onerror
- onfocus
- onformchange
- onforminput
- oninput
- oninvalid
- onkeydown
- onkeypress
- onkeyup
- onload
- onloadeddata
- onloadedmetadata
- onloadstart
- onmousedown
- onmousemove
- onmouseout
- onmouseover
- onmouseup
- onmousewheel
- onpause
- onplay
- onplaying
- onprogress
- onratechange
- onreadystatechange
- onscroll
- onseeked
- onseeking
- onselect
- onshow
- onstalled
- onsubmit
- onsuspend
- ontimeupdate
- onvolumechange
- onwaiting
For a full explanation of these attributes, see HTML 5 event handler content attributes.
What’s Wrong with ?
HTML5 controls are ideal when you want the user to choose from a small range of options. They’re less practical when:
- there are lots of options, such as countries or job titles
- the user wants to enter their own option which is not on the list
The obvious solution is an autocomplete control. This allows the user to enter a few characters, which limits the options available for quicker selection.
will jump to the right location as you start typing, but that’s not always obvious. It won’t work on all devices (such as touchscreens), and it resets within a second or two.
Developers often turn to one of the many JavaScript-powered solutions, but a custom autocomplete control is not always necessary. The HTML5 element is lightweight, accessible, and has no JavaScript dependencies. You may have heard it’s buggy or lacks support. That’s not true in 2021, but there are browser inconsistencies and caveats.
Polyfilling
One feature the select fallback doesn’t provide is the autocomplete behavior that datalists offer natively. If that is important for the datalists you’re adding, a second fallback option is to polyfill a datalist implementation.
To start, you first need to determine whether the user’s browser supports datalists. The popular feature detection library Modernizr provides such a test, as shown here:
Using this approach, you can now polyfill a datalist implementation for users in unsupporting browsers. While several polyfills are available for datalists, I prefer using jQuery UI’s autocomplete widget. The following code shows a polyfill implementation:
Figure 10 shows the display of the country list example in Safari with the jQuery UI autocomplete polyfill.
You may have noticed that by default, jQuery UI’s autocomplete widget matches characters anywhere in the options, whereas datalists match options only at the beginning of the string. Unlike the native datalist, the autocomplete widget allows you to customize this to match options however you’d like.
The following example shows how you can build an autocomplete feature that matches options only at the beginning of the string:
Other Input Types
While autocompletion is traditionally associated with textual input, datalists can also be used on a number of the new HTML5 input types. Consider the range input type, which allows for the creation of a slider form element. By combining this with a datalist, you can suggest points on the range to the user.
For example, the following input asks the user to provide a donation between $5 and $200 dollars.
HTML
<labelfor="donation">Donation Amount (USD):</label>
<inputtype="range"name="donation"id="donation"list="donation_list"step="5"min="5"max="200">
<datalistid="donation_list">
  <option>25</option>
  <option>50</option>
  <option>100</option>
  <option>200</option>
</datalist>
Figure 3 and Figure 4 show the display of a range input in Chrome 24 and Internet Explorer 10, respectively.
Figure 3. Range Input with Datalist (Chrome 24)
Figure 4. Range Input with Datalist (Internet Explorer 10)
You can see that each browser displays a tick mark for each datalist option provided. Additionally, Chrome will snap the slider to these predefined values as the user moves the slider near them.

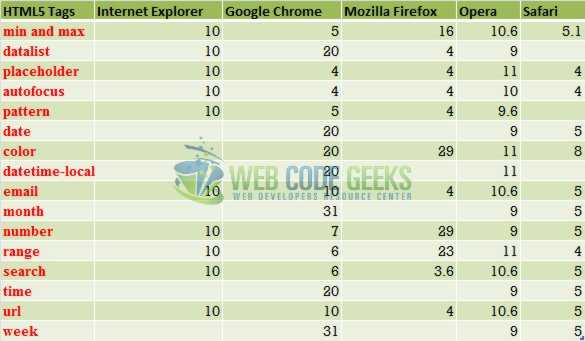
Unfortunately, Internet Explorer and Chrome are the only browsers to support datalists on range inputs at this time. Figure 5 shows support of datalists on common input types in modern browsers.
Figure 5. Browser Support of Datalists on Form Input Types
Example
In the pane below, you will find two examples.
- Example 1 (for HTML 5 browsers): Demonstrates usage for browsers that support the element. If when viewing/using this example, you don’t see the «autocomplete» feature (containing the contents of the tags), your browser doesn’t support the element.
- Example 2 (for both legacy and HTML 5 browsers): Demonstrates how to provide the autocomplete values to users whose browsers don’t support this element, as well as to those that do. You can place fallback content between the tags. This content will be only be displayed to browsers that don’t support the element. On browsers that do support this tag, the autocomplete feature will work as it is supposed to.
Wrapping Up
Datalists provide a quick, native means of displaying input suggestions to the user. Since the options are merely suggestions, for many situations it’s not necessary to provide a fallback for unsupporting browsers; users of these browsers simply will not see the suggestions.
For situations when you do want to provide a functional datalist to all users, you can detect support and polyfill the functionality for browsers that lack support.
While datalists are great for offering suggestions, they are limited in the functionality they provide. If you need a more robust autocomplete solution, jQuery UI’s autocomplete widget is a good place to get started.
Limitations of Datalists
Although datalists are perfect for adding suggestions to text inputs, they suffer from a lack of customization capabilities that many modern Web applications require. For example, you cannot do the following with datalists:
- Use CSS to change its display or the display of its options.
- Control the positioning of the list.
- Control the number of characters typed before the browser displays results to the user.
- Control what is considered a match (case sensitivity, match at beginning of string vs. anywhere, and so on).
- Tie the input to a server-side datasource.
This means that if you need any of this functionality, you need to look into a more robust autocomplete solution. The jQuery UI autocomplete widget provides the ability to do all of this and more. The autocomplete widget also supports all browsers back to Internet Explorer 7 without the need of a polyfill. For more information on the autocomplete widget, check out its demos and API documentation. (The autocomplete widget handles only text-based inputs, therefore it won’t be able to help you for some of the more specialized input types like range and color.)
Why Use DataList for AutoComplete?
Usually, the purpose of an Input box is to enter a set of values. It will not automatically suggest a word or two when you type a letter in the input box. It is not its default feature. However, to implement AutoComplete you will need to add a widget provided by a JavaScript framework, such as jQuery. These widgets use Ajax to fetch data from a remote (or local) data source, populate a list box and display the list below the input box. The feature requires you to write few lines of code at the client side.
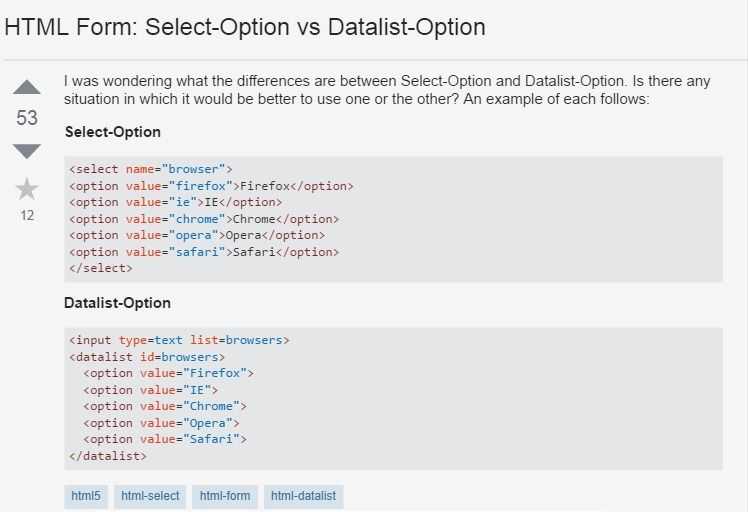
However, with the Datalist element you do not have to write any code for AutoComplete. The element is an advanced version of HTML <select> element. The select element is a control for displaying a dropdown list on a web page. It was one of most commonly used control, before HTML5 introduced its new set of features and elements.
<select>
<option>JavaScript</option>
<option>Asp.Net</option>
<option>Physics</option>
<option>Clipart</option>
<option>HTML5</option>
</select>
Answer by Alisson McCann
In the end you have a simple autosuggest feature. When the user starts typing e.g. «d», they will get a select showing «datalist» and «legend» for our example options above.,As with <option> inside <select>, the options for <datalist> are also not styleable at all. This means you will always get the native styles of the browser.,You can change styles for <datalist> as shown here if you force it to be display: block;, but this will not affect the dropdown you see with the suggestions, and is therefore not useful.,We continue our journey through the (fun) world of forms. This time it is all about <datalist>.
Wrapping Up
Datalists provide a quick, native means of displaying input suggestions to the user. Since the options are merely suggestions, for many situations it’s not necessary to provide a fallback for unsupporting browsers; users of these browsers simply will not see the suggestions.
For situations when you do want to provide a functional datalist to all users, you can detect support and polyfill the functionality for browsers that lack support.
While datalists are great for offering suggestions, they are limited in the functionality they provide. If you need a more robust autocomplete solution, jQuery UI’s autocomplete widget is a good place to get started.
Event Attributes
HTML <datalist> tag support following event attributes.
| Attributes | Value | Description |
|---|---|---|
| onfocus | script | element gets focus on object when script tobe run. |
| onblur | script | element lose the focus on object when scrip tobe run. |
| onabort | script | element gets aborted on object when script tobe run. |
| onchange | script | element gets anytime change on object when script tobe run. |
| onbeforeunload | script | element gets unloaded on object when scrip tobe run. |
| onclick | script | clicked on object when script tobe run. |
| ondblclick | script | double click on object when script tobe run. |
| onkeydown | script | key is pressed when script tobe run. |
| onkeypress | script | key is pressed over element then released when script tobe run. |
| onkeyup | script | key is released over element when script tobe run. |
| onmousedown | script | mouse button was pressed over an element when script tobe run. |
| onmouseout | script | mouse pointer release over an element when script tobe run. |
| onmousemove | script | run mouse pointer moved when script tobe run. |
| onmouseover | script | run mouse pointer move over when script tobe run. |
| onmouseup | script | mouse button is released when script tobe run. |
| onreset | script | form has been reset when script tobe run. |
| onselect | script | Select some content when script tobe run. |
| onsubmit | script | form has been submitted when script tobe run. |
| onload | script | object has load when script tobe run. |
| onchange | script | allow to change the object when script tobe run. |
| onunload | script | unload to the browser window when script tobe run. |
| ondrag | script | element being dragged when script tobe run. |
| ondragend | script | element being stop dragged when script tobe run. |
| ondragenter | script | element being go target dragged when script tobe run. |
| ondragleave | script | element being leave to target dragged when script tobe run. |
| ondragover | script | element being over to target dragged when script tobe run. |
| ondragstart | script | element being start dragged when script tobe run. |
| ondrop | script | element being dropped when script tobe run. |
| onerror | script | element error occurs when script tobe run. |
| onmessage | script | element message display when script tobe run. |
| onerror | script | element error occurs when script tobe run. |
| onmousewheel | script | mouse wheel will be rotate when script tobe run. |
| onscroll | script | scrollbar is scroll when script tobe run. |
| onresize | script | element should be resize when script tobe run. |
| onselect | script | all element content selected when script tobe run. |
| onstorage | script | element should be store in target when script tobe run. |