
Now You Know a Lot More
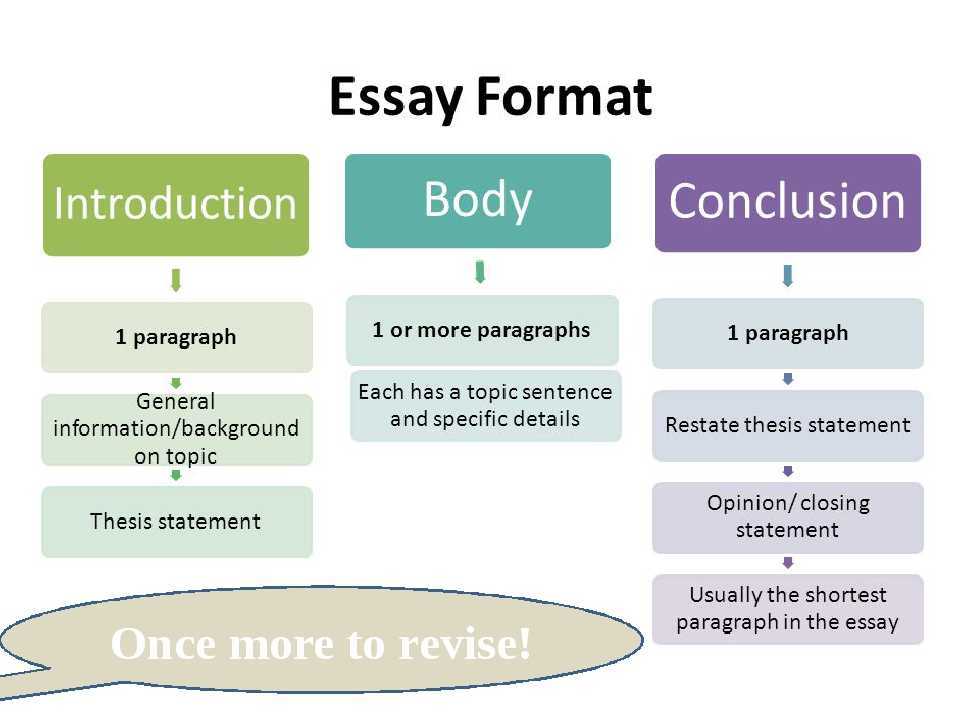
The main function of the HTML details element is to create a disclosure widget inside which you are going to add extra information. This method of creating additional content for your web page is reliable because the user can choose whether they want to see the content or not. Take a look at the main points we covered in the conclusion:
- The HTML details element is the best way to add extra information to your web page
- Inside it, you are supposed to add the <summary> and <p> elements
- They are going to represent the title and the actual content visible to the user
- You can use a variety of CSS properties to style this element
- You can change the visual output of the disclosure widget
- Creating multiple HTML details elements is easy
The best way to practice using this element is by implementing it in your next HTML project. Lucky for you, this article gave you a head start, and now you are ready to begin the journey of including details on your web page.
Toggling the summary marker #
In the two earlier Codepens, you’ll note the arrow to the inline-start side of the summary. A disclosure widget is typically presented on-screen using a small triangle that rotates (or twists) to indicate open/closed status, with a label next to the triangle. The contents of the element label the disclosure widget. The rotating arrow at the top of each section is a set on the element. Like list items, the element supports the shorthand property and its longhand properties, including . You can style the disclosure triangle with CSS, including changing the marker used from a triangle to any other bullet type, including an image with .
To apply other styles, use a selector similar to . The only accepts a limited number of styles. Removing the and replacing it with the easier-to-style is common practice, with CSS styles changing the style of the generated content slightly based on the presence (or absence) of the open attribute. You can remove the disclosure widget icon by setting or set the content of the marker to , but always include visual indicators to inform sighted users that the summary content is a toggle button that will show and hide content upon activation.
This example removes the default marker, and adds generated content to create a when the details are closed and a when the details are open.
If you want the details block open by default, include the attribute on the opening tag. You can also add space between each dialog and transition the rotation of the marker created with generated content to improve the appearance:
HTML Справочник
HTML по алфавитуHTML по категориямHTML Поддержка браузераHTML АтрибутыHTML Глобальные атрибутыHTML СобытияHTML ЦветаHTML CanvasHTML Аудио/видеоHTML Наборы символовHTML Типы документовHTML URL КодировкаHTML Коды языкаHTML Коды странHTTP СообщенияHTTP МетодыКонвертер PX в EMКомбинации клавиш
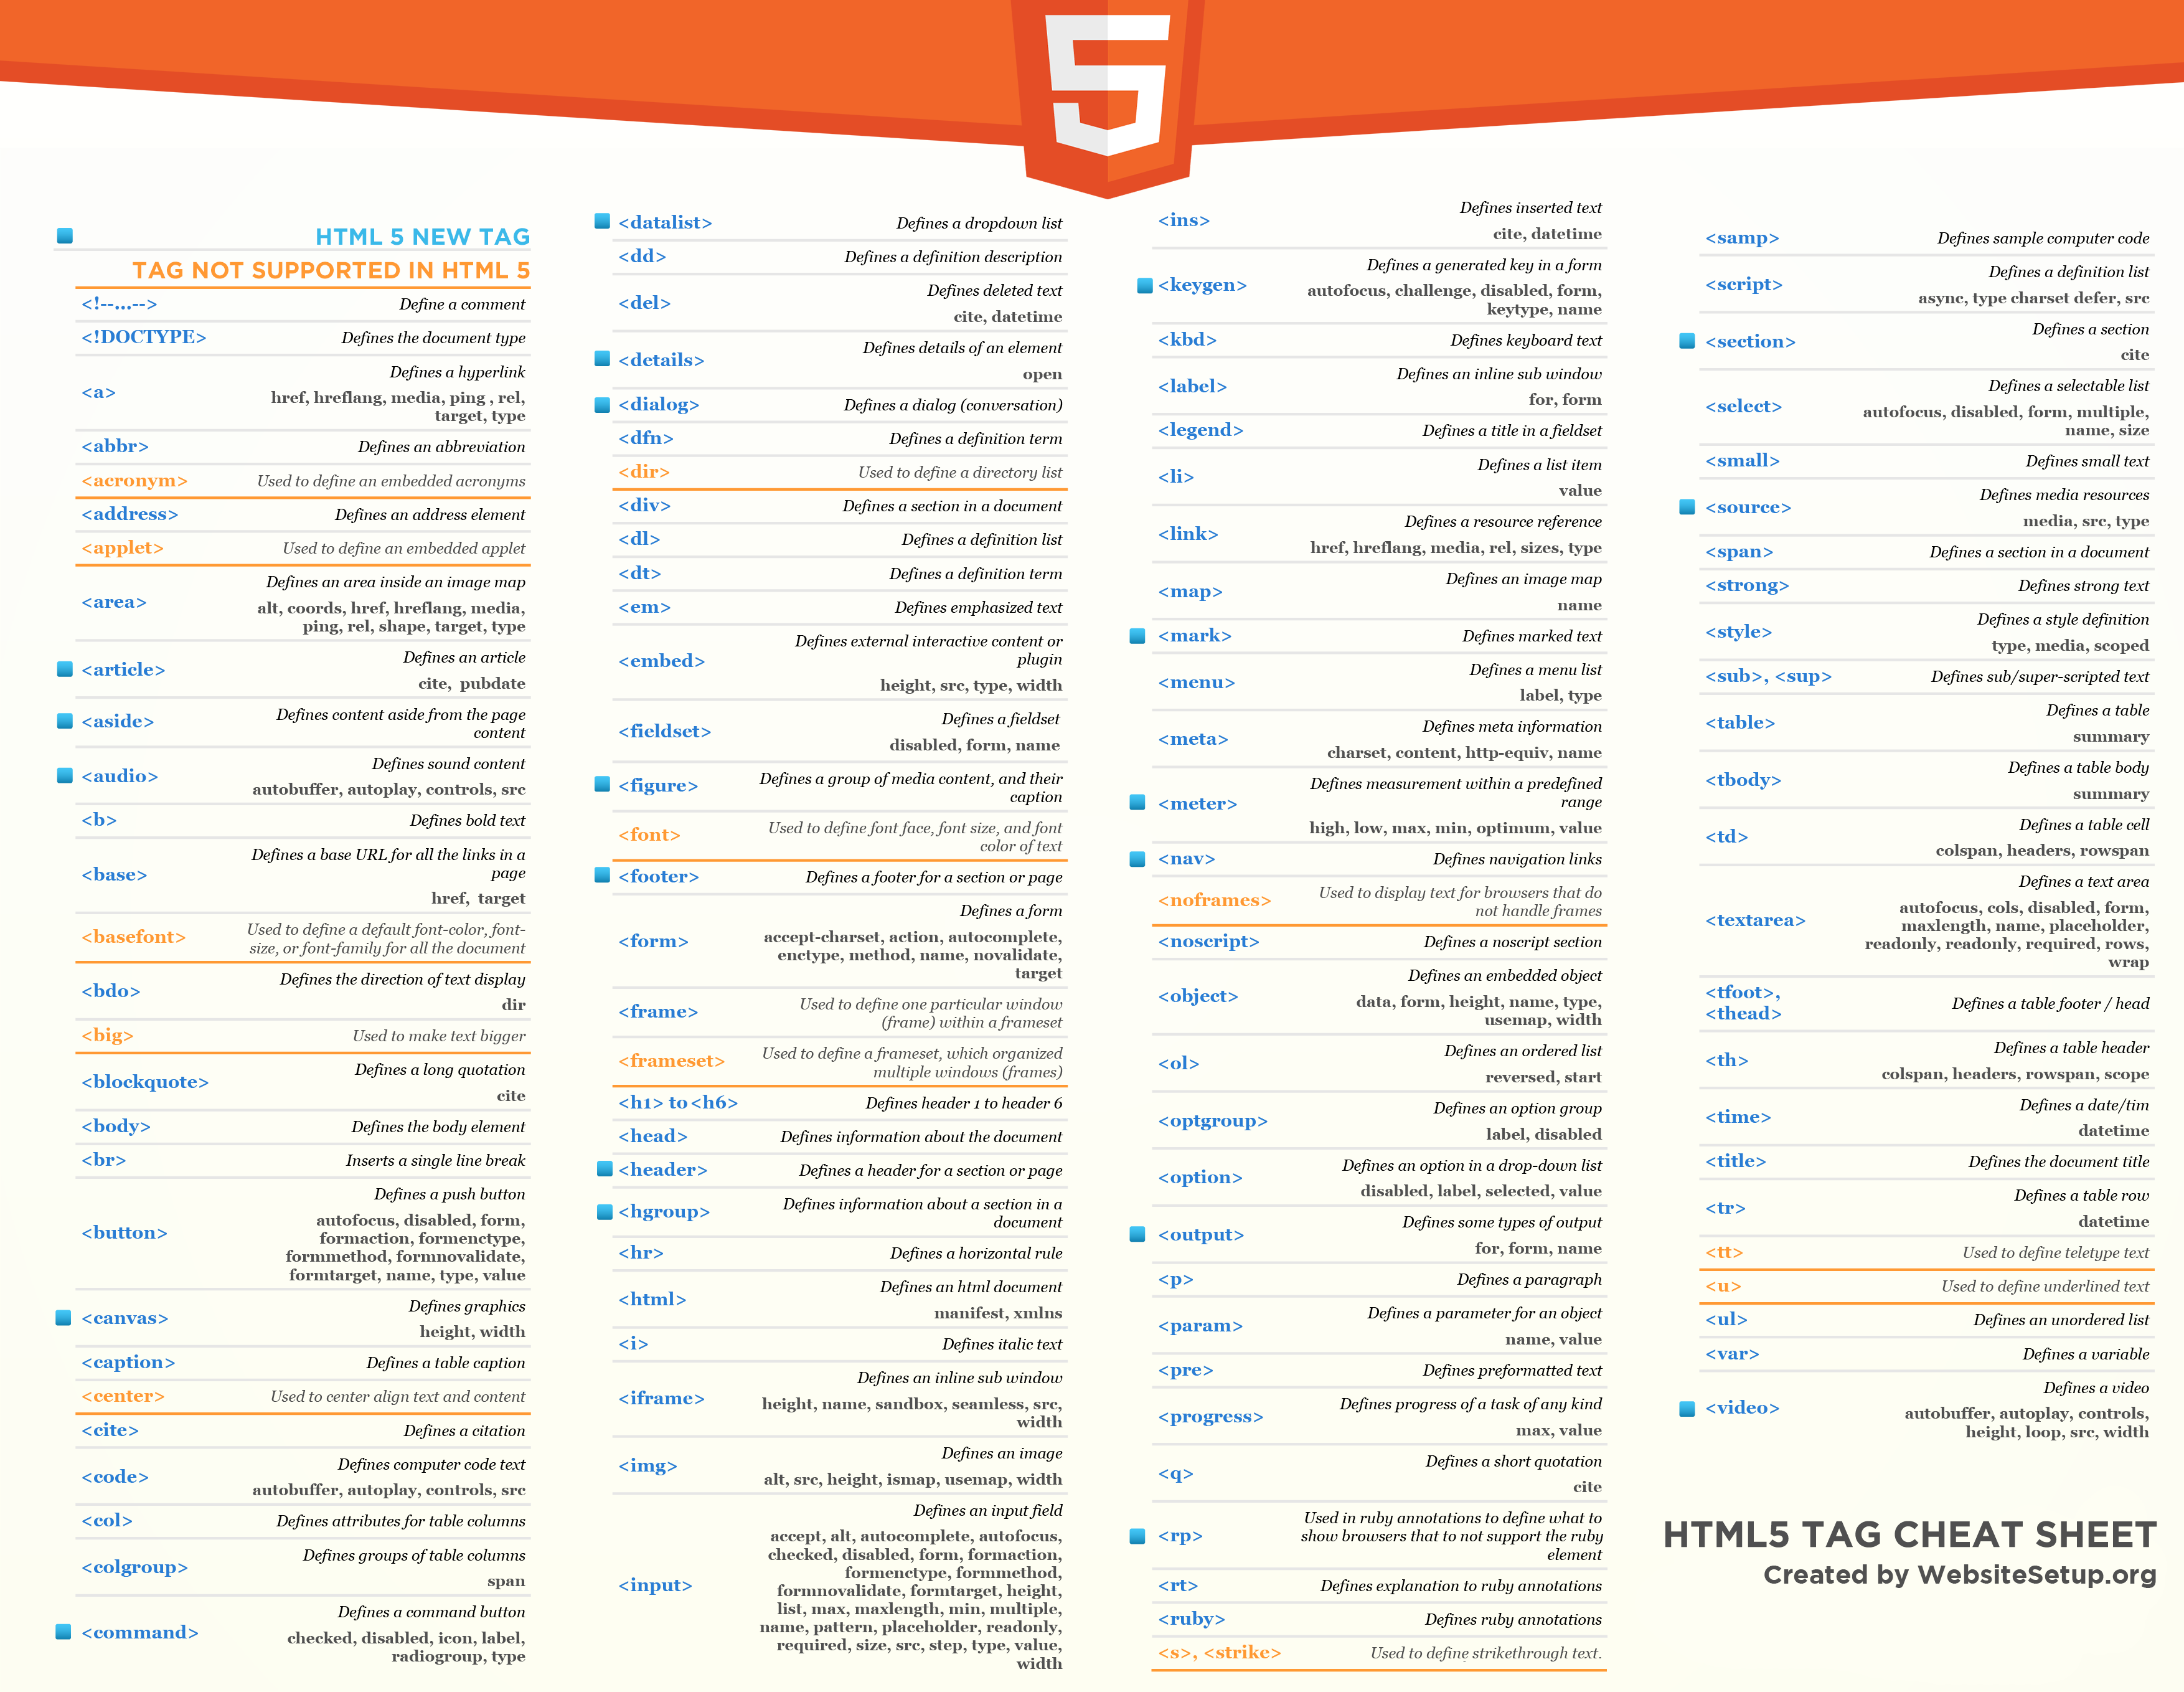
HTML Теги
<!—Комментарий—>
<!DOCTYPE>
<a>
<abbr>
<acronym>
<address>
<applet>
<area>
<article>
<aside>
<audio>
<b>
<base>
<basefont>
<bdi>
<bdo>
<big>
<blockquote>
<body>
<br>
<button>
<canvas>
<caption>
<center>
<cite>
<code>
<col>
<colgroup>
<data>
<datalist>
<dd>
<del>
<details>
<dfn>
<dialog>
<dir>
<div>
<dl>
<dt>
<em>
<embed>
<fieldset>
<figcaption>
<figure>
<font>
<footer>
<form>
<frame>
<frameset>
<h1> — <h6>
<head>
<header>
<hr>
<html>
<i>
<iframe>
<img>
<input>
<ins>
<kbd>
<label>
<legend>
<li>
<link>
<main>
<map>
<mark>
<meta>
<meter>
<nav>
<noframes>
<noscript>
<object>
<ol>
<optgroup>
<option>
<output>
<p>
<param>
<picture>
<pre>
<progress>
<q>
<rp>
<rt>
<ruby>
<s>
<samp>
<script>
<section>
<select>
<small>
<source>
<span>
<strike>
<strong>
<style>
<sub>
<summary>
<sup>
<svg>
<table>
<tbody>
<td>
<template>
<textarea>
<tfoot>
<th>
<thead>
<time>
<title>
<tr>
<track>
<tt>
<u>
<ul>
<var>
<video>
<wbr>
HTML Details Element: Getting To Know Its Importance
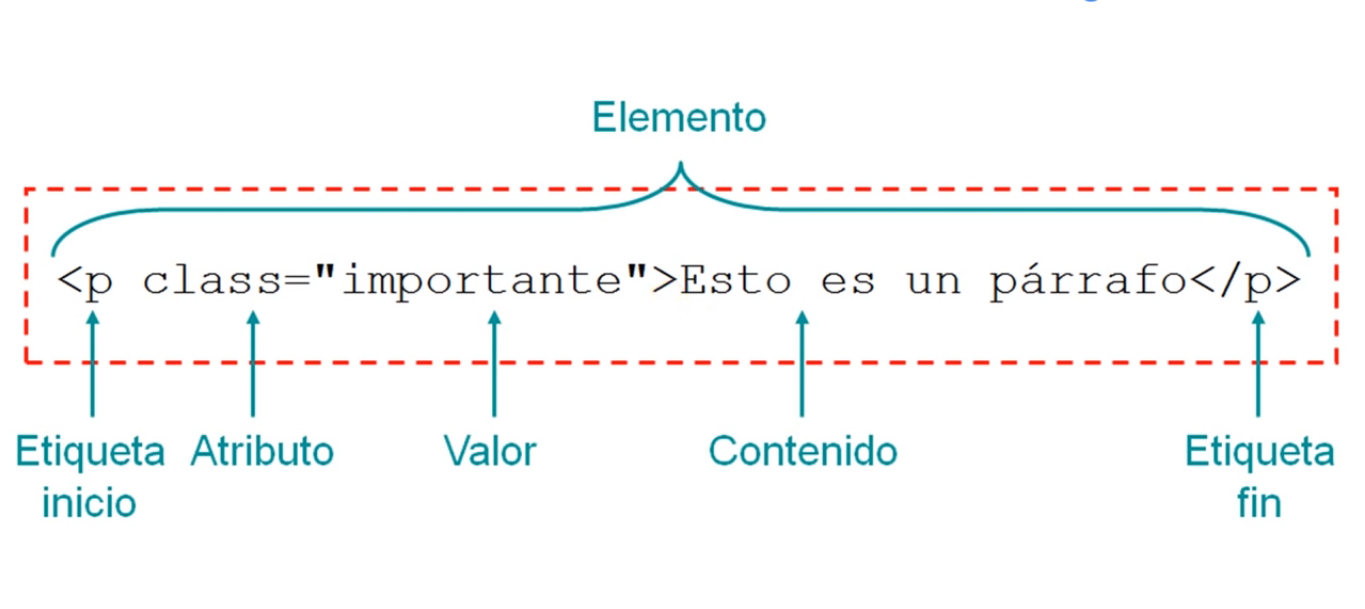
The HTML details tag belongs to the category of HTML5, as it represents one of those elements. Since this element has both an opening and a closing tag, any content you would like to add is placed between them. However, this does not mean that the content is going to be visible to the user because, by default, it stays hidden.
For the user to be able to open or view the content, the open attribute must be included. You are going to notice the details element by a small triangle which can both rotate or twist, all according to the open or closed state. As we have said, the content you include inside the <summary> tag is going to be displayed as the title of your HTML details summary.
However, even if you fail to include the header, a default value of “More details” is going to be displayed by the browser. Using this element is practical because besides making your web page complete, you are also making sure it is user-friendly and filled with information.
HTML Теги
<!—Комментарий—><!DOCTYPE><a><abbr><acronym><address><applet><area><article><aside><audio><b><base><basefont><bdi><bdo><big><blockquote><body><br><button><canvas><caption><center><cite><code><col><colgroup><data><datalist><dd><del><details><dfn><dialog><dir><div><dl><dt><em><embed><fieldset><figcaption><figure><font><footer><form><frame><frameset><h1> — <h6><head><header><hr><html><i><iframe><img><input><ins><kbd><label><legend><li><link><main><map><mark><meta><meter><nav><noframes><noscript><object><ol><optgroup><option><output><p><param><picture><pre><progress><q><rp><rt><ruby><s><samp><script><section><select><small><source><span><strike><strong><style><sub><summary><sup><svg><table><tbody><td><template><textarea><tfoot><th><thead><time><title><tr><track><tt><u><ul><var><video>
ОформлениеСкопировать ссылку
Как же нам оформить эту штуку? Для элемента, раскрывающего содержимое, в WebKit вы можете использовать псевдоэлемент . :
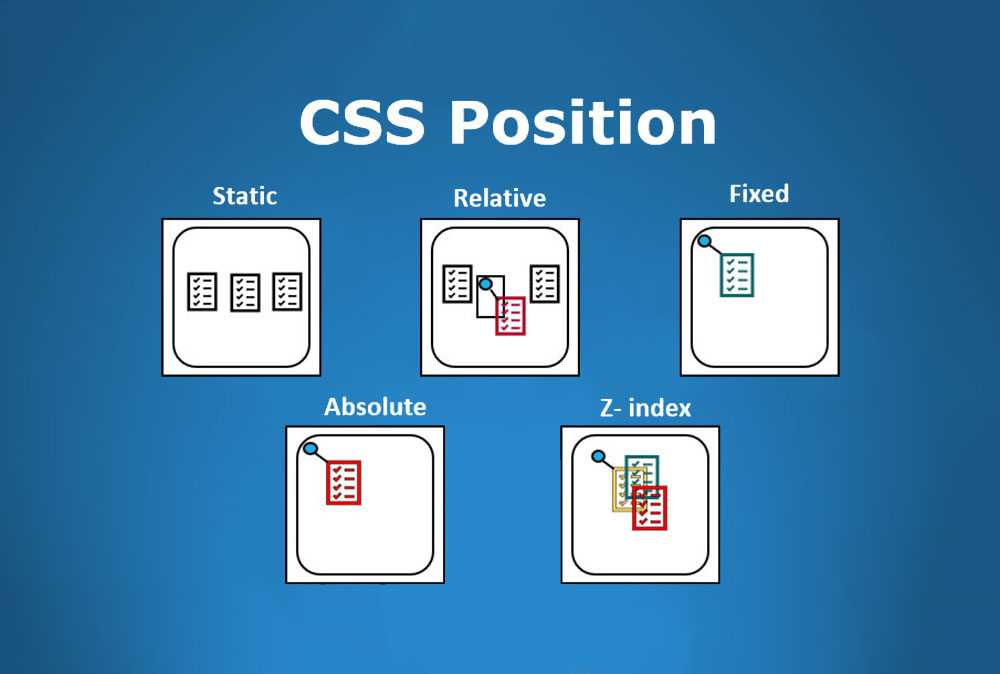
Мы также можем позиционировать этот элемент по отношению к родителю. . В общем-то, и все.
А как же заменить раскрывающий элемент своей иконкой? Используя выборку по атрибуту, вы можете определить, когда раскрыт, а когда закрыт, и применить соответствующее фоновое изображение. Мы делаем примерно то же самое в , за исключением того, что вместо фонового изображения мы используем псевдоэлемент :
В этом примере символы и используются в качестве раскрывающей ссылки. В зависимости от дизайна вы можете использовать вместо , но, в любом случае, оба псевдоэлемента позволяют использование изображения.
Выборка по атрибуту скрывает в себе некоторые интересные возможности. Как хорошие HTML5-доктора, мы создали , показанный на этом скриншоте:
 Оформленный в Chrome.
Было бы интересно (хотя это и не всегда уместно), если бы мы могли использовать CSS-трансформации для анимации разворачивания и сворачивания , но пока это невозможно.
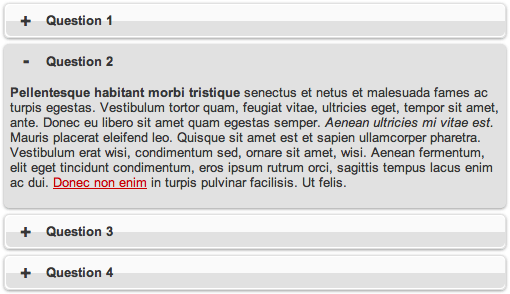
Toggling visibility: the open attribute #
The element is the disclosure widget container. The is the summary or legend for its parent . The summary is always displayed, acting as a button that toggles the display of the rest of the parent’s contents. Interacting with the toggles the display of the self-labeled summary siblings by toggling the ‘ element’s attribute.
The attribute is a boolean attribute. If present, no matter the value or lack thereof, it indicates that all the contents are shown to the user. If the attribute is not present, only the contents of the are shown.
Because the attribute is added and removed automatically as the user interacts with the control, it can be used in CSS to style the element differently based on its state.
You can create an accordion with a list of multiple elements, each with a child. Omitting the attribute in your HTML means the will all be collapsed, or closed, with just the summary headings visible when the page loads; each heading being the opener for the rest of the contents in the parent . If you include the attribute in your HTML, the will render expanded, with the contents visible, when the page loads.
The hidden content in the collapsed state is searchable in some browsers but not others, even though the collapsed content is not part of the DOM. If you search in Edge or Chrome, the details containing a search term will expand to display the occurrence. This behavior is not replicated in Firefox or Safari.
The must be the first child of a element, representing a summary, caption, or legend for the rest of the contents of the parent element in which it is nested. The element’s contents can be any heading content, plain text, or HTML that can be used within a paragraph.
Еще примеры
Пример
Используйте CSS для стилизации <details> и <summary>:
<html><style>details > summary { padding: 4px;
width: 200px; background-color: #eeeeee; border: none;
box-shadow: 1px 1px 2px #bbbbbb; cursor: pointer;}
details > p { background-color: #eeeeee;
padding: 4px; margin: 0; box-shadow: 1px 1px 2px #bbbbbb;
}</style><body><details>
<summary>Центр Epcot</summary>
<p>Epcot — это тематический парк на курорте Walt Disney World Resort с захватывающими достопримечательностями,
международные павильоны, отмеченные наградами фейерверки и сезонные специальные мероприятия.</p></details></body></html>
How errors are handled #
If you don’t include a , the browser will create one for you: with a marker and the word «details». This summary is part of a , and therefore will not have author CSS summary styles applied. Unfortunately, Safari does not include the details in the keyboard focus order.
If you do include a , but it is not the first element in the , the browser still displays the summary as it should. It will also not fail if you include a link, label, or other interactive element within the summary, but browsers handle interactive content within interactive content differently. For example, if you include a link in a summary, some browsers will add both the summary and the link to the default tabbing order, but other browsers will not focus on the link by default. If you click on a nested in a , some browsers will give focus to the associated form control; other browsers will give focus to the form control and toggle the open or closed.
Принцип работы тега «details»
Элемент представляет собой одно из многочисленных семантических нововведений HTML5 и предназначается для хранения контента, отображаемого или скрываемого по желанию пользователя. В отличие от традиционных методов разработки спойлера через и псевдокласса или посредством элемента и псевдокласса , для корректной работы элемента не требуется добавление стороннего HTML и CSS кода, что делает его использование простым и удобным.
Содержимое тега становится видимым, когда у него появляется атрибут , который автоматически добавляется или удаляется браузером при клике по — заголовку спойлера. В свою очередь, заголовок должен стоять первым среди дочерних элементов, но его наличие не является обязательным. В случае отсутствия заголовка браузер установит стандартное название «подробности» из Shadow DOM, однако такой тег не пройдет валидацию. Это аналогично ситуации, когда не имеет .
Элемент может содержать после своего заголовка блочный или строчный контент, принадлежащий к категории основной поточной информации (flow content). Содержимое, указанное после , как могло бы показаться, не будет отображаться и скрываться средствами CSS, а именно — переключением значения . Браузер переносит его в необходимое место за счёт манипуляций с Shadow DOM, что делает возможным применить к контенту эффекты перехода (). Иными словами, в примере выше при отсутствии у спойлера атрибута , для элемента правило не применяется.
Не смотря на кажущуюся практичность и тривиальность, элемент не лишён недостатков: отсутствие полной кроссбраузерной поддержки (речь идет об ограничениях в Internet Explorer, Edge и игнорирование Opera Mini) и непрезентабельное стандартное со (простой маркер перед заголовком , отсутствие анимации), поэтому при создании спойлеров необходимо учесть эти аспекты.
Использование Скопировать ссылку
Имеются два элемента: и необязательный . Элемент — это обёртка для содержимого, которое мы хотим показать и скрыть, а содержит описание и заголовок этой группы. Формально нам не нужен. В его отсутствие браузер подставит текст по умолчанию, например «details» в Chrome. Давайте взглянем на код:
Вы можете . Даже этот простой пример прекрасно демонстрирует эффект переключения. Без JavaScript!
Атрибут Скопировать ссылку
В вышеприведенном примере содержимое скрыто при загрузке страницы. Мы можем сделать его видимым по умолчанию, добавив одиночный атрибут для , :
Атрибута не существует. Поэтому, опуская , вы по умолчанию подразумеваете .
Элемент Скопировать ссылку
Мы бегло взглянули на в действии, теперь остановимся на нём подробнее. Внутри могут использоваться строчные элементы, такие как или . Для чего это может быть нужно? Например, для дополнительного оформления или, как предлагает спецификация, использования для элемента формы. По крайней мере, было бы удобно, если бы работала корректно:
Теоретически, нажатие на должно раскрывать содержимое элемента . Но в этом примере содержимое не будет развернуто, потому что вы, фактически, взаимодействуете с , который переводит фокус на соответствующий — даже если он скрыт с помощью .
Честно говоря, этот момент еще требует прояснения. А что по вашему мнению должно происходить? Возможно, у разработчиков браузеров, читающих эту статью, есть какие-то идеи? ![]()
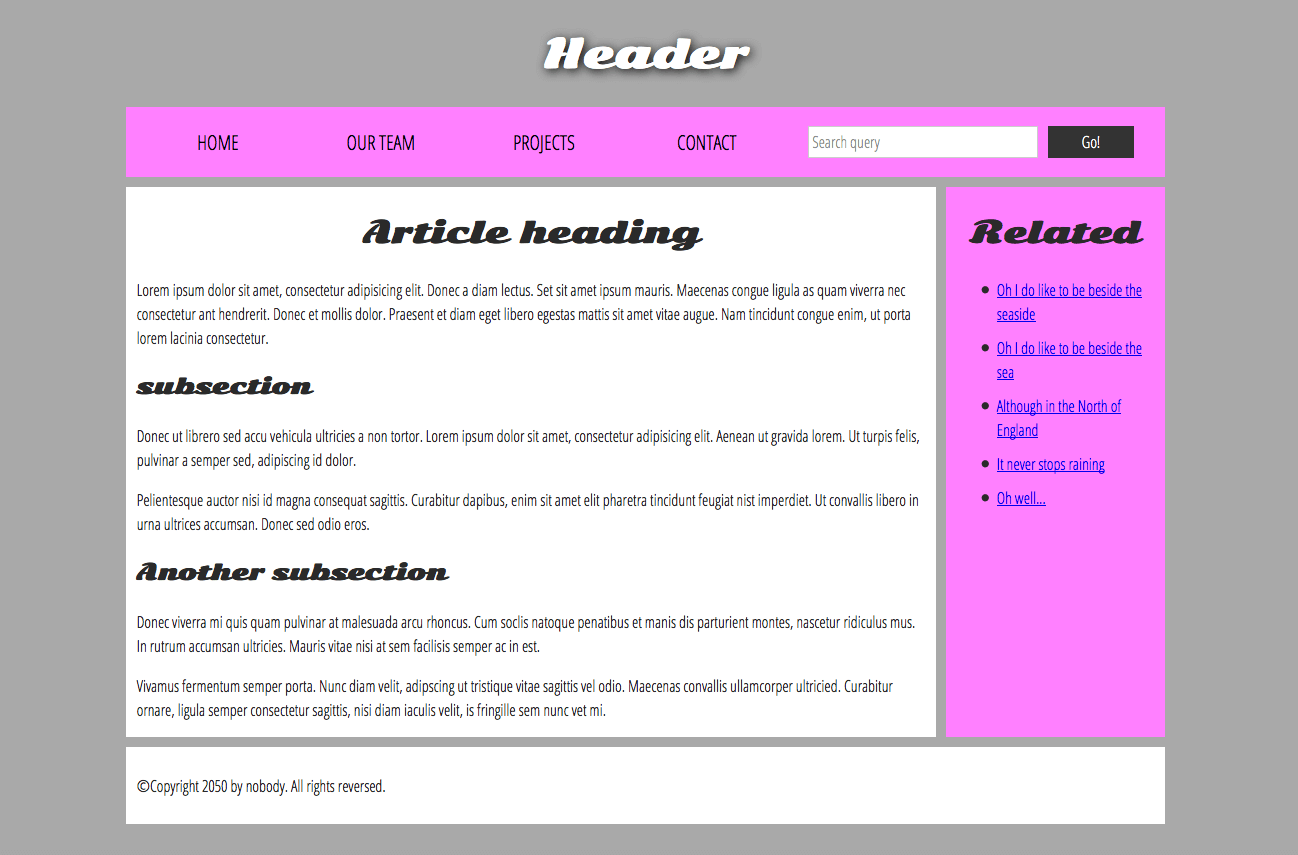
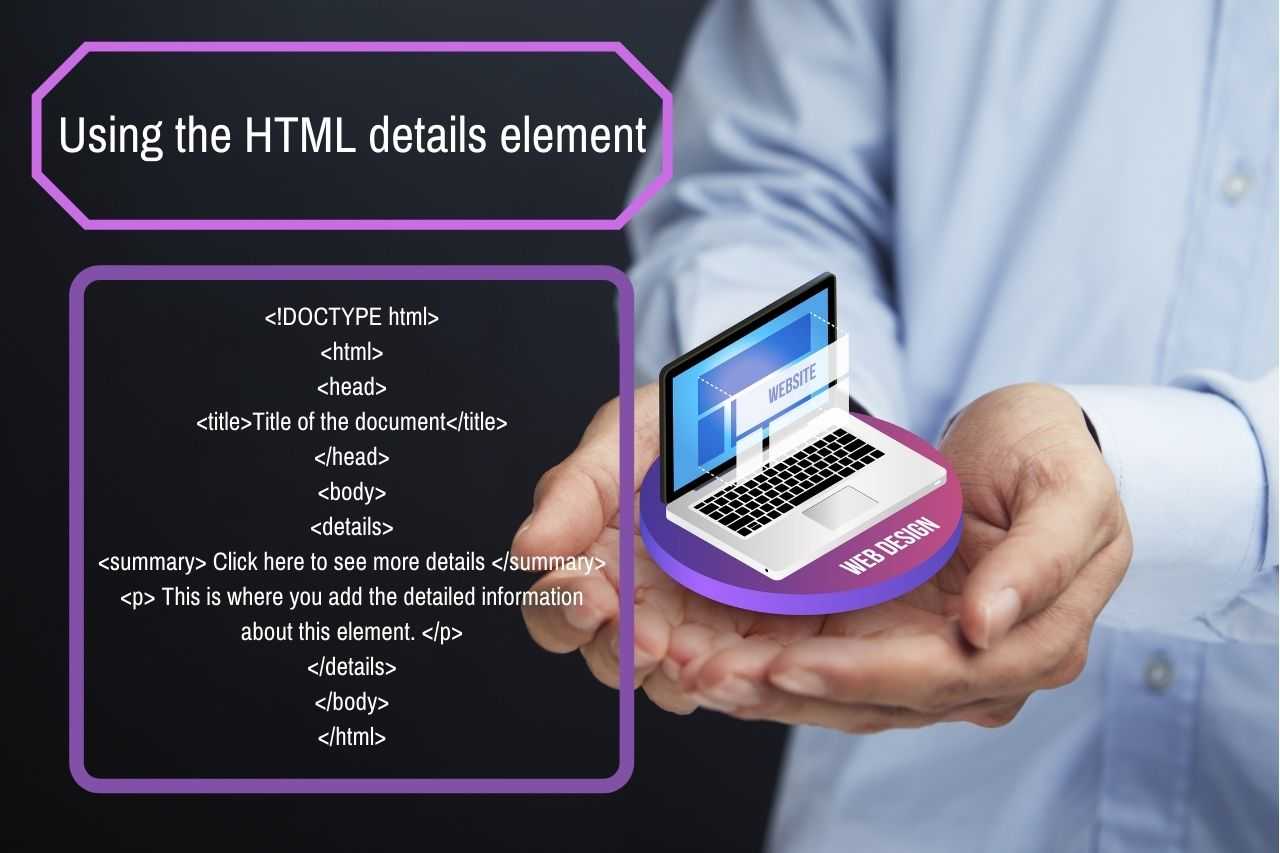
Using the HTML Tag – What Is the Syntax?
Using this element is very easy to do and it takes little to no effort because it functions like every other common HTML5 element. As we have said before, there are two states you can find this element in. The first one is the default closed state, which only displays the disclosure widget and the summary of the HTML details element.


Let us take a look at this element in action, in the following example:
| <!DOCTYPE html><html><head><title>Title of the document</title></head><body><details><summary> Click here to see more details </summary><p> This is where you add the detailed information about this element. </p></details></body></html> |
This example perfectly shows that the HTML <details> tag must always be included inside the <body> element. This is the only way it is going to work, and it is the only way that the syntax is going to be correct. Again, the content you include inside this element is up to you, however, make sure that the content inside the <summary> element is fairly short because this is the title.
– Understanding How the Disclosure Widget Works
The disclosure widget is always displayed alongside this element, and its function is to show whether the content of the details element is opened or not. Once the user clicks on the details block, the widget is going to twist and under the summary, you are going to see the detailed content. Even though you can style the disclosure widget using CSS properties, so far, there is no other way to animate the transition between the opened and closed position.
Let us take a look at an example where we used CSS properties to remove the widget:
| details > summary { padding: 6px 8px; width: 23em; background-color: #fff; border: none; box-shadow: 4px 4px 5px grey; cursor: pointer; list-style: none; |
The last attribute, list-style, is used for the widget in your HTML details element. If you set its value to none, you can completely remove it. The user is only going to see the summary but not the little triangle. You can use the list-style-type, however, to change the triangle to whatever shape you like.
Обратная совместимостьСкопировать ссылку
Прежде чем кто-то начнет восклицать, что это не работает в IE6, хочу сказать: мы знаем. Тем не менее, благодаря некоторым умным людям, мы можем обеспечить изящную обратную совместимость. В этой очень полезной коллекции всевозможных кроссбраузерных костылей я нашел два решения, оба они требуют jQuery:
- Обратная совместимость для с помощью jQuery от Матиаса Байненса;
- Еще одна альтернатива , также основанная на jQuery от Мануэля Бье.
Многие из вас захотят использовать Modernizr для определения возможностей браузера, но на данный момент в Modernizr отсутствует проверка поддержки . Матиас, автор приведенного выше решения для обратной совместимости, предлагает использовать этот Modernizr-сниппет.
Примеры использованияСкопировать ссылку
Так в каких же случаях вы можете использовать ? Первое, что приходит в голову — FAQ. Разработчики часто используют для них «аккордеоны», поэтому замечательно подходит.
Также не забывайте о навигации по странице. Это может быть закрепленный блок, передвигающаяся одновременно с прокруткой.
Вы можете использовать для сворачивания и разворачивания блока комментариев в блоге, для профиля пользователя, для описания загружаемого файла, для сложных форм или в веб-приложениях, как показано в этом примере из спецификации:
Пример использования из спецификации.
На самом деле, даже глядя сейчас на админку WordPress, я вижу множество возможностей использования . Если у вас есть ещё какие-то идеи и предложения — расскажите о них в комментариях.
Creating Multiple HTML Details Elements
There are times when creating a single HTML details element is not going to be enough, and you want to create more. Lucky for you, creating multiple HTML details elements is possible and you do not even have to change the syntax. All you have to do is to include as many HTML details elements as you would like to, and the browser is going to do all the work for you.
The following example is going to show us how easy and reliable this is:
| <!DOCTYPE html><title> Example </title><style>div {width:350px; padding:3px; background:#ddd; border:2px solid #ccc;}</style><div><details><summary> Introduction </summary><p> Source: JPEG Image <br>Size: 9,135 bytes (19 KB on disk)<br>Created: 4 October 2021 2:20 pm<br>Modified: 4 October 2021 2:34 pm</p></details><hr><details><summary> Name & Extra information: </summary><p><input name=”nameofthefile” value=”phi-phi-235×168.jpg”></p><p><input name=”hideExt” type=”checkbox” value=””>Collapse Extension</p></details><hr><details><summary> Overview: </summary><img src=”/pix/places/phi-235×168″ alt=”Photo of Phi”></details></div> |
Even though this example looks rather long, once we break it down, you will see that it is the same syntax used for creating a single HTML details element.
– Breaking Down the Syntax
In the previous long example, we have used all the elements discussed so far. First of all, we added a style element and included some basic styling attributes for a better look. Next, every HTML details element consists of its opening and closing tags, and there are three such elements. They are all included in a different <div> element and will function as a separate block.
Finally, all we did was add some content inside each details element, including the summary and paragraph, which completed the syntax used for creating multiple HTML details elements. Moreover, the number of such elements you can add is infinite but you have to make sure that the visual output is going to look professional.
Пример CSS-спойлеров
В результате объединения всего SCSS и добавления соответствующей HTML-разметки получаются простые кроссбраузерные спойлеры без использования JS.
JSFiddle недоступен без JavaScript
В заключение
Не смотря на преимущество с точки зрения семантики и практичности использования, тег не рекомендуется применять там, где требуется поддержка «древних» Internet Explorer и устаревших мобильных браузеров. В этом случае стоит прибегнуть к традиционным способам создания спойлеров на CSS, работающих практически везде, или использовать решения на JavaScript, в том числе HTML5-полифиллы. Остается надеется, что со временем старые браузеры окончательно уйдут в небытие и уступят место их обновленным версиям, и тогда новые семантические теги станут повсеместной практикой.
Using the Common Attribute
As we have said in the previous section of this article, you can include the open attribute inside this element. Whenever you are using this attribute, you are telling your browser to display or show the content of your details element.
Consequently, since this is a Boolean attribute, if you do not include it inside the tag, it means it is set to its default value, which is keeping the details not visible for the user. There is no other value for this element, and the only way to make sure that the content is not visible is by not including it at all.


Please observe the following example where we have used the open attribute:
| <details open><summary>Lorem ipsum example</summary><p> Lorem ipsum dolor sit amet, aliquid singulis philosophia cum et, an vel dolor maiorum constituam. Quo molestiae pertinacia ea. Ad quas dicit perpetua vis, mea cu dicat conceptam necessitatibus, mel movet corpora suavitate ex. Ei justo iuvaret docendi eos, omnium mentitum cu mel. </p></details> |
In this case, the user does not have to click on the summary because the detailed content is going to be displayed. This might be practical when you have a lot of HTML details elements, and you want to avoid users clicking each one separately to view the content.
– Using CSS to Style the HTML Details Element and Open Attribute
Using CSS is one of the best ways you can change the visual output of your HTML details element, including the open attribute. Changing the background color, width, padding, font, and margin are just some of the most common things you can style. Since we have shown you how to style the triangle, we are also going to see a way to style the other elements.
The following CSS code is going to show us how easy it is to do:
| details > summary { background-color: #ccc; } |
The only styling element we have used for the open attribute is the background color. You can include more but for the needs of this article, we tried to keep things simple and easy to understand.
The HTMLDetailsElement interface #
Like all HTML elements, the inherits all properties, methods, and events from , and adds the instance property and a event. The property is a boolean value reflecting the HTML attribute, indicating whether or not the element’s contents (not counting the ) are to be shown to the user. The toggle event is fired when the element is toggled open or closed. You can listen to this event using .
If you want to write a script to close the opened details when the user opens any other details, remove the open attribute using :
This is the only example to use JavaScript. You probably don’t need JavaScript except for this functionality of closing other opened disclosure widgets.
Remember, and can be heavily styled and can even be used to create tool tips. But, if you’re going to use these semantic elements for use cases in which the native semantics are a mismatch, always ensure that you maintain accessibility. HTML for the most part is by default accessible. Our job as developers is to ensure our content stays accessible.