

Навигация: формы и элементы
Формы в документе входят в специальную коллекцию .
Это так называемая «именованная» коллекция: мы можем использовать для получения формы как её имя, так и порядковый номер в документе.
Когда мы уже получили форму, любой элемент доступен в именованной коллекции .
Например:
Может быть несколько элементов с одним и тем же именем, это часто бывает с кнопками-переключателями .
В этом случае является коллекцией, например:
Эти навигационные свойства не зависят от структуры тегов внутри формы. Все элементы управления формы, как бы глубоко они не находились в форме, доступны в коллекции .
как «подформа»
Форма может содержать один или несколько элементов внутри себя. Они также поддерживают свойство , в котором находятся элементы управления внутри них.
Например:
Сокращённая форма записи:
Есть более короткая запись: мы можем получить доступ к элементу через .
Другими словами, вместо мы можем написать .
Это также работает, но есть небольшая проблема: если мы получаем элемент, а затем меняем его свойство , то он всё ещё будет доступен под старым именем (также, как и под новым).
В этом легче разобраться на примере:
Обычно это не вызывает проблем, так как мы редко меняем имена у элементов формы.
Отправка формы
В прошлом разделе мы рассмотрели различные способы взаимодействия пользователя и формы. Но это не имеет никакого смысла, если форма не будет отправлена. Для этого нужно создать элемент, при взаимодействии с которым будет отправлена форма.
Отправка формы может быть осуществлена одним из двух способов:
- Создание с типом . В этом случае создастся элемент в виде кнопки с именем, указанным в качестве значения атрибута .
- Использование парного тега . Такой способ больше развязывает руки, так как внутри такой кнопки может содержаться любой HTML код, при клике на который будет отправлена форма. Такой способ очень удобен для создания кнопки в виде иконки. Сейчас такой способ наиболее актуальный.
Стиль с CSS
Есть несколько особых соображений относительно стиля для .
Его значение по умолчанию является , и оно устанавливает контекст форматирования блока . Если стилизован с значением на уровне строки , он будет вести себя как , в противном случае он будет вести себя как . По умолчанию вокруг содержимого имеется шириной 2 и небольшое количество отступов по умолчанию. По умолчанию элемент имеет .
Если присутствует , она помещается поверх границы . В термоусадочные пояски, а также устанавливает контекст форматирования. значение blockified. (Например, ведет себя как .)
Будет анонимное поле, содержащее содержимое , которое наследует определенные свойства от . Если для задан стиль или , то анонимный блок будет контекстом форматирования сетки. Если оформлен с помощью или , то анонимное поле будет контекстом форматирования flex. В противном случае он устанавливает контекст форматирования блока.
Вы можете свободно и так, как хотите, в соответствии с дизайном вашей страницы.
fieldset margin: 2em 0;
<source lang="html4strict">
 <head>
   <meta http-equiv="Content-Type" content="text/html; charset=utf-8"/>
   <title>Example form</title>
   <style rel="stylesheet" type="text/css" media="screen">
fieldset {
   background-color:  #dfdfdf;
   border:  1px solid #ccc;
   margin:  2em 0;
   padding:  1em;
}
   </style>
 </head>

 <body>
   <form id="" action="" method="post">

     <fieldset id="name">
       <legend>Name</legend>
       <label>Title
         <select id="title1" name="title1">
           <option selected="selected">Mr.</option>
           <option>Mrs.</option>
           <option>Ms.</option>
         </select>
       </label>
       <label>First name
         <input id="first-name" name="first-name" type="text" />
       </label>
       <label>Last name
         <input id="las-name" name="last-name" type="text" />
       </label>

     </fieldset>
     <fieldset id="address">
       <legend>Address</legend>
       <label>Street
         <input id="street" name="street" type="text" />
       </label>

       <label>City
         <input id="city" name="city" type="text" />
       </label>
       <label>State
         <input id="state" name="state" type="text" />
       </label>
       <label>Zip code
         <input id="zip" name="zip" type="text" />
       </label>

       <label>Country
         <input id="country" name="country" type="text" />
       </label>

     </fieldset>
     <fieldset id="payment">
       <legend>Payment option</legend>
         <fieldset id="credit_card">
           <legend>Credit card</legend>
           <label><input id="visa" name="visa" type="radio" /> Visa</label>
           <label><input id="mastercard" name="mastercard" type="radio" /> Mastercard</label>
           <label><input id="discover" name="discover" type="radio" /> Discover</label>

         </fieldset>
       <label>Card number
         <input id="card_number" name="card_number" type="text" />
       </label>
       <label>Expiration date
         <input id="expiration" name="expiration" type="text" />
       </label>

       <input class="submit" type="submit" value="Submit" />

     </fieldset>

   </form>
 </body>
</html>
</source>
HTML 4.01
HTML теги
- по алфавиту
- по категориям
- <!—…—>
- <!DOCTYPE
- a
- abbr
- acronym
- address
- applet
- area
- b
- base
- basefont
- bdo
- bgsound
- big
- blink
- blockquote
- body
- br
- button
- caption
- center
- cite
- code
- col
- colgroup
- comment
- dd
- del
- dfn
- dir
- div
- dl
- dt
- em
- embed
- fieldset
- font
- form
- frame
- frameset
- h1-h6
- head
- hr
- html
- i
- iframe
- ilayer
- img
- input
- ins
- isindex
- kbd
- label
- layer
- legend
- li
- link
- listing
- map
- marquee
- menu
- meta
- multicol
- nobr
- noembed
- noframes
- noindex
- noscript
- object
- ol
- optgroup
- option
- p
- param
- plaintext
- pre
- q
- s
- samp
- script
- select
- small
- sound
- spacer
- span
- strike
- strong
- style
- sub
- sup
- table
- tbody
- td
- textarea
- tfoot
- th
- thead
- title
- tr
- tt
- u
- ul
- var
- wbr
- xmp
атрибуты HTML
- abbr
- above
- accept
- accept-charset
- accesskey
- action
- align
- alink
- allowtransparency
- alt
- archive
- autocomplete
- axis
- background
- bgcolor
- bgproperties
- border
- bordercolor
- cellpadding
- cellspacing
- char
- charoff
- charset
- checked
- cite
- class
- classid
- clear
- code
- codebase
- codetype
- color
- cols
- colspan
- compact
- content
- coords
- data
- datetime
- declare
- defer
- dir
- disabled
- enctype
- face
- for
- frame
- frameborder
- galleryimg
- headers
- height
- href
- hreflang
- hspace
- http-equiv
- id
- ismap
- label
- lang
- language
- link
- longdesc
- loop
- marginheight
- marginwidth
- maxlength
- media
- method
- multiple
- name
- nohref
- noresize
- noshade
- nowrap
- object
- profile
- prompt
- readonly
- rel
- rev
- rows
- rowspan
- rules
- scheme
- scope
- scrolling
- selected
- shape
- size
- span
- src
- standby
- start
- style
- summary
- tabindex
- target
- text
- title
- type
- usemap
- valign
- value
- valuetype
- version
- vlink
- vspace
- width
- xmlns
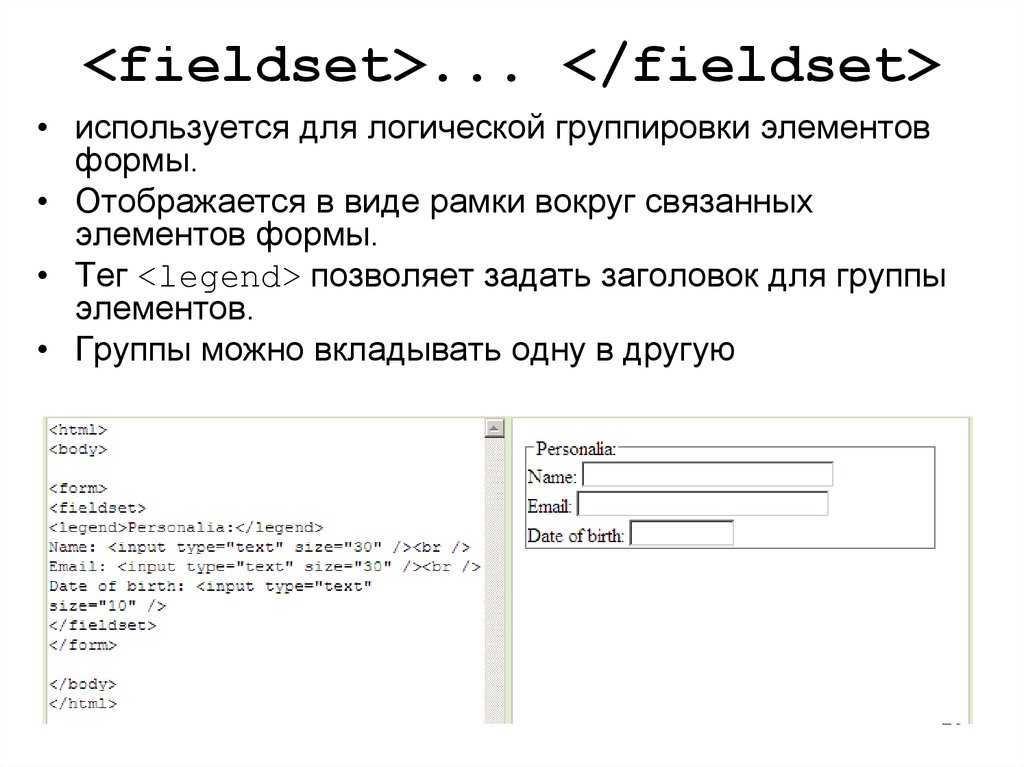
Fieldsets and labels
<source lang="html4strict">
<!DOCTYPE html PUBLIC «-//W3C//DTD XHTML 1.0 Strict//EN»
 <meta http-equiv="Content-Type" content="text/html; charset=utf-8" />
 <title>Fieldsets and labels</title>
</head>
<body>
 <form method="post" action="/">

   <fieldset>
     <legend>Subscribe to our mailing list</legend>
       <fieldset>
         <legend>Select your preferred format</legend>
-
<label for=»text»>
<input type=»radio» name=»pref» value=»text» id=»text» /> Plain text
</label> -
<label for=»html»>
<input type=»radio» name=»pref» value=»html» id=»html» /> HTML
</label>
</fieldset>
<input type=»submit» id=»subscribe» value=»Subscribe» />
   </fieldset>

 </form>
</body>
</html>
</source>
Other Inputs
Besides the applications we’ve just discussed, the element has a few other use cases. These include passing hidden data and attaching files during form processing.
Hidden Input
Hidden inputs provide a way to pass data to the server without displaying it to users. Hidden inputs are typically used for tracking codes, keys, or other information that is not pertinent to the user but is helpful when processing the form. This information is not displayed on the page; however, it can be found by viewing the source code of a page. It should therefore not be used for sensitive or secure information.
To create a hidden input, you use the value for the attribute. Additionally, include the appropriate and attribute values.
See the Pen File Input by Shay Howe (@shayhowe) on CodePen.
Unfortunately, styling an element that has a attribute value of is a tough task with CSS. Each browser has its own default input style, and none provide much control to override the default styling. JavaScript and other solutions can be employed to allow for file input, but they are slightly more difficult to construct.
Examples
Simple fieldset
This example shows a really simple example, with a , and a single control inside it.
form action="#"> fieldset> legend>Do you agree?legend> input type="checkbox" id="chbx" name="agree" value="Yes!" /> label for="chbx">I agreelabel> fieldset> form>
Disabled fieldset
This example shows a disabled with two controls inside it. Note how both the controls are disabled due to being inside a disabled .

form action="#"> fieldset disabled> legend>Disabled login fieldsetlegend> div> label for="name">Name: label> input type="text" id="name" value="Chris" /> div> div> label for="pwd">Archetype: label> input type="password" id="pwd" value="Wookie" /> div> fieldset> form>
Overview Table
- DOM Interface
- HTMLFieldSetElement
The fieldset element represents a set of form controls. Optionally given a name with a child legend element.
attributes
NOTE: Those attributes are considered valid since HTML5
- disabled
- If this Boolean attribute is set, the form controls that are its descendants, except descendants of its first optional legend element, are disabled, i.e., not editable. They won’t receive any browsing events, like mouse clicks or focus-related ones. Often browsers display such controls as gray.
- form
- This attribute has the value of the id attribute of the form element its related to. Its default value is the id of the nearest <form> element it is a descendant of.
- name
- The name associated with the group. This is for use in the API.
fieldset background-color: #dfdfdf;
<source lang="html4strict">
 <head>
   <meta http-equiv="Content-Type" content="text/html; charset=utf-8"/>
   <title>Example form</title>
   <style rel="stylesheet" type="text/css" media="screen">
fieldset {
   background-color:  #dfdfdf;
   border:  1px solid #ccc;
   margin:  2em 0;
   padding:  1em;
}
   </style>
 </head>

 <body>
   <form id="" action="" method="post">

     <fieldset id="name">
       <legend>Name</legend>
       <label>Title
         <select id="title1" name="title1">
           <option selected="selected">Mr.</option>
           <option>Mrs.</option>
           <option>Ms.</option>
         </select>
       </label>
       <label>First name
         <input id="first-name" name="first-name" type="text" />
       </label>
       <label>Last name
         <input id="las-name" name="last-name" type="text" />
       </label>

     </fieldset>
     <fieldset id="address">
       <legend>Address</legend>
       <label>Street
         <input id="street" name="street" type="text" />
       </label>

       <label>City
         <input id="city" name="city" type="text" />
       </label>
       <label>State
         <input id="state" name="state" type="text" />
       </label>
       <label>Zip code
         <input id="zip" name="zip" type="text" />
       </label>

       <label>Country
         <input id="country" name="country" type="text" />
       </label>

     </fieldset>
     <fieldset id="payment">
       <legend>Payment option</legend>
         <fieldset id="credit_card">
           <legend>Credit card</legend>
           <label><input id="visa" name="visa" type="radio" /> Visa</label>
           <label><input id="mastercard" name="mastercard" type="radio" /> Mastercard</label>
           <label><input id="discover" name="discover" type="radio" /> Discover</label>

         </fieldset>
       <label>Card number
         <input id="card_number" name="card_number" type="text" />
       </label>
       <label>Expiration date
         <input id="expiration" name="expiration" type="text" />
       </label>

       <input class="submit" type="submit" value="Submit" />

     </fieldset>

   </form>
 </body>
</html>
</source>
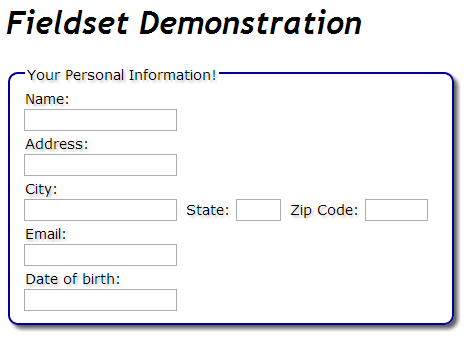
Пример использования
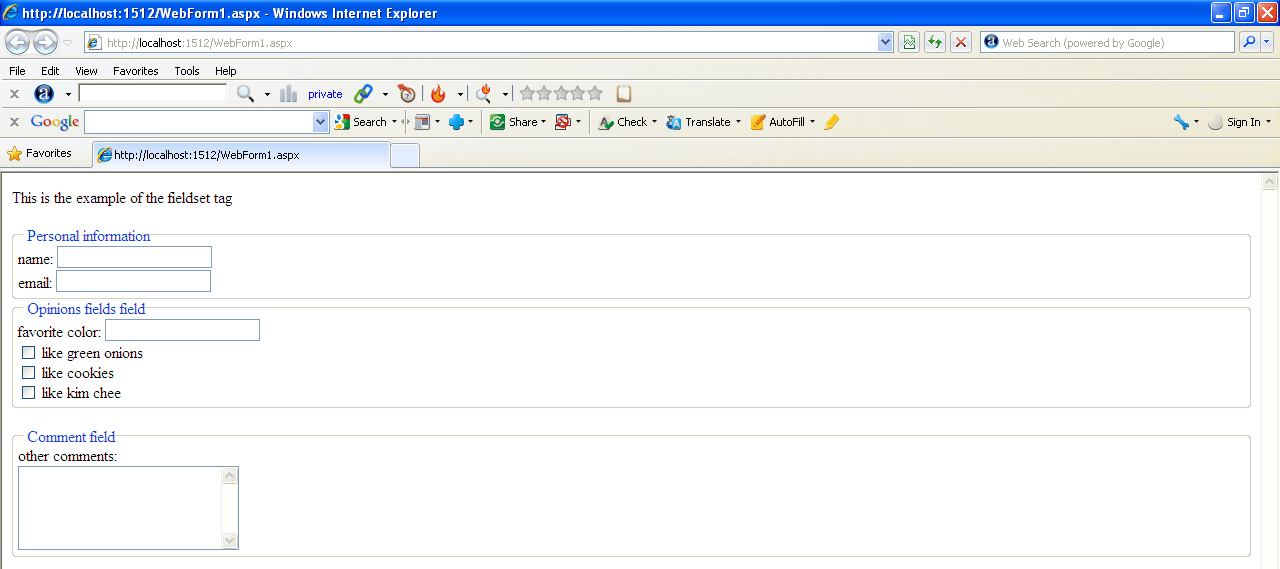
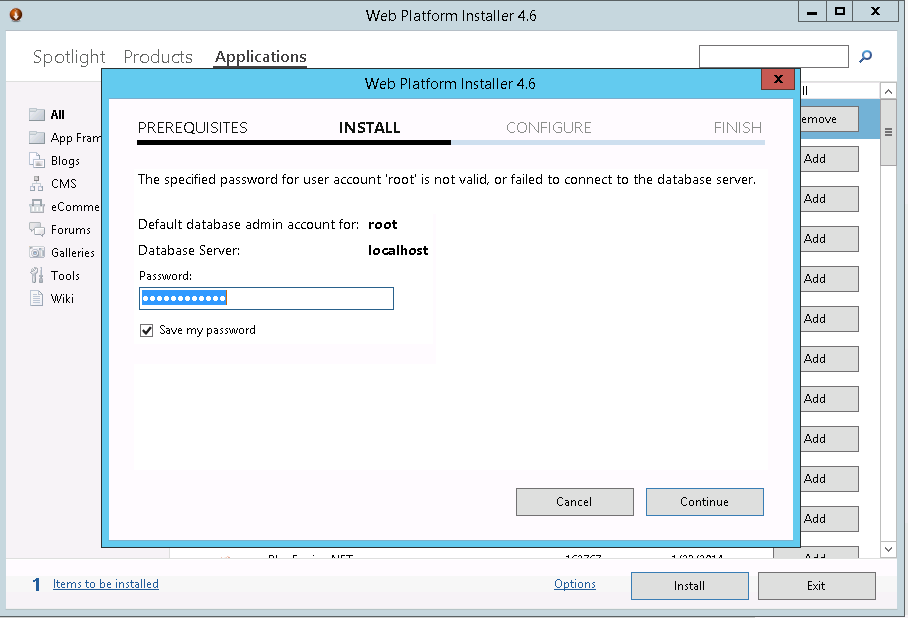
<!DOCTYPE html>
<html>
<head>
<title>Пример использования элемента <fieldset></title>
</head>
<body>
	<form>
		<fieldset>
			<legend>Пожалуйста, представьтесь</legend>
			Имя: <input type =  "text" name = "firstname" value =  "Введите имя"> <br> <br>
			Фамилия: <input type =  "text" name = "lastname" value =  "Введите фамилию"> <br> <br>
			Мужчина <input type =  "radio" name = "sex" value =  "male" checked>
			Женщина <input type =  "radio" name = "sex" value =  "female">
			<br> <br>
			<input type = "submit" name = "submit" value = "отправить">
		</fieldset>
	</form>
</body>
</html>
В этом примере мы:
Разместили внутри формы (парный тег
) элемент , благодаря которому мы группируем элементы формы, вокруг формы появляется рамка (внешний вид рамки может отличаться в зависимости от браузера). Тегом мы определяем для нашей рамки заголовок «Пожалуйста, представьтесь».
Разместили два однострочных текстовых поля () для ввода пользователем своего имени и фамилии. Присвоили этим полям уникальные имена атрибутом name (для корректной передачи и обработки формы обязательно указывайте для каждого элемента этот атрибут). Кроме того атрибутом value установили для этих полей значения по умолчанию (при заполнении полей значение этого атрибута будет соответствовать пользовательскому вводу).
Разместили две радиокнопки () для выбора одного из ограниченного числа вариантовОбратите внимание, что для радиокнопок необходимо указывать одинаковое имя, чтобы была возможность выбрать только один вариант из предложенных.
Заключительный элемент это кнопка, которая служит для отправки формы (). У кнопки по аналогии с другими элементами имеется свое имя (атрибут name) и значение (атрибут value).
Результат нашего примера в браузере:
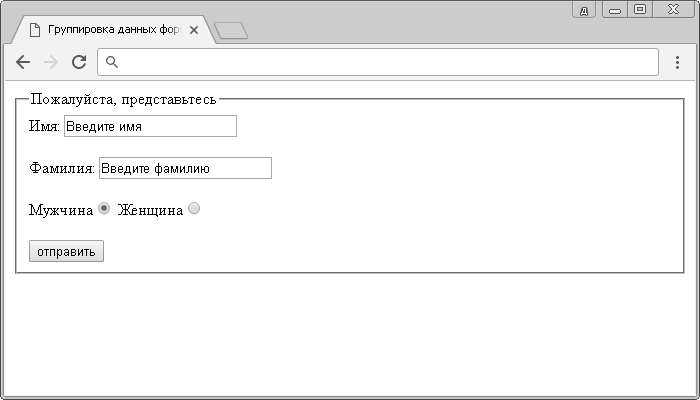
Группировка элементов формы.
Form & Input Attributes
To accommodate all of the different form, input, and control elements, there are a number of attributes and corresponding values. These attributes and values serve a handful of different functions, such as disabling controls and adding form validation. Described next are some of the more frequently used and helpful attributes.
Disabled
The Boolean attribute turns off an element or control so that it is not available for interaction or input. Elements that are disabled will not send any value to the server for form processing.
Applying the Boolean attribute to a element will disable all of the form controls within the fieldset. If the attribute has a value, the Boolean attribute is ignored.
See the Pen Disabled by Shay Howe (@shayhowe) on CodePen.
Placeholder
Placeholder Demo
See the Pen Placeholder by Shay Howe (@shayhowe) on CodePen.
The main difference between the and attributes is that the attribute value text stays in place when a control has focus unless a user manually deletes it. This is great for pre-populating data, such as personal information, for a user but not for providing suggestions.
Required
The HTML5 Boolean attribute enforces that an element or form control must contain a value upon being submitted to the server. Should an element or form control not have a value, an error message will be displayed requesting that the user complete the required field. Currently, error message styles are controlled by the browser and cannot be styled with CSS. Invalid elements and form controls, on the other hand, can be styled using the and CSS pseudo-classes.
Required Demo
See the Pen Required by Shay Howe (@shayhowe) on CodePen.
Other form and form control attributes include, but are not limited to, the following. Please feel free to research these attributes as necessary.
borderless fieldsets
<source lang="html4strict">
<!DOCTYPE html PUBLIC «-//W3C//DTD XHTML 1.0 Strict//EN»
 <meta http-equiv="Content-Type" content="text/html; charset=utf-8" />
 <title>Removing the border from fieldsets</title>
 <style type="text/css">
 ul { list-style: none; margin: 0; padding: 0; }
 li { margin: .2em 0; }

 fieldset {
   border: none;
   padding: 0;
 }
 </style>
</head>
<body>
   <form method="post" action="">
     <fieldset>
       <legend>Subscribe to our mailing list</legend>
         <fieldset>
           <legend>Select your preferred format</legend>
- <label for=»text»><input type=»radio» name=»pref» id=»text» /> Plain text</label>
- <label for=»html»><input type=»radio» name=»pref» id=»html» /> HTML</label>
</fieldset>
<input type=»submit» id=»subscribe» value=»Subscribe» />
     </fieldset>
   </form>
</body>
</html>
</source>
Style for form fieldset
<source lang="html4strict">
<!DOCTYPE html PUBLIC «-//W3C//DTD XHTML 1.0 Transitional//EN»
 <meta http-equiv="content-type" content="text/html; charset=utf-8" />
 <title>Forms</title>
 <style type="text/css" media="screen">

 #divID #thisform {
     font-family: Georgia, serif;
     font-size: 12px;
     color: #999;
     }

 #divID #thisform label {
    font-family: Verdana, sans-serif;
     font-weight: bold;
     color: #660000;
     }

 #divID #thisform fieldset {
   border: 1px solid #ccc;
   padding: 0 20px;
   }
 </style>
</head>
<body>
<form action=»/path/to/script» id=»thisform» method=»post»>
 <fieldset>
   <legend>Sign In</legend>
<label for=»name» accesskey=»9″ >Name:</label>
<input type=»text» id=»name» name=»name» tabindex=»1″ />
<input type=»checkbox» id=»remember» name=»remember» tabindex=»3″ />
<label for=»remember»>Remember this info?</label>
<input type=»submit» value=»submit» tabindex=»4″ />
</fieldset>
</form>
</body>
</html>
</source>
fieldset padding: 1em;
<source lang="html4strict">
 <head>
   <meta http-equiv="Content-Type" content="text/html; charset=utf-8"/>
   <title>Example form</title>
   <style rel="stylesheet" type="text/css" media="screen">
fieldset {
   background-color:  #dfdfdf;
   border:  1px solid #ccc;
   margin:  2em 0;
   padding:  1em;
}
   </style>
 </head>

 <body>
   <form id="" action="" method="post">

     <fieldset id="name">
       <legend>Name</legend>
       <label>Title
         <select id="title1" name="title1">
           <option selected="selected">Mr.</option>
           <option>Mrs.</option>
           <option>Ms.</option>
         </select>
       </label>
       <label>First name
         <input id="first-name" name="first-name" type="text" />
       </label>
       <label>Last name
         <input id="las-name" name="last-name" type="text" />
       </label>

     </fieldset>
     <fieldset id="address">
       <legend>Address</legend>
       <label>Street
         <input id="street" name="street" type="text" />
       </label>

       <label>City
         <input id="city" name="city" type="text" />
       </label>
       <label>State
         <input id="state" name="state" type="text" />
       </label>
       <label>Zip code
         <input id="zip" name="zip" type="text" />
       </label>

       <label>Country
         <input id="country" name="country" type="text" />
       </label>

     </fieldset>
     <fieldset id="payment">
       <legend>Payment option</legend>
         <fieldset id="credit_card">
           <legend>Credit card</legend>
           <label><input id="visa" name="visa" type="radio" /> Visa</label>
           <label><input id="mastercard" name="mastercard" type="radio" /> Mastercard</label>
           <label><input id="discover" name="discover" type="radio" /> Discover</label>

         </fieldset>
       <label>Card number
         <input id="card_number" name="card_number" type="text" />
       </label>
       <label>Expiration date
         <input id="expiration" name="expiration" type="text" />
       </label>

       <input class="submit" type="submit" value="Submit" />

     </fieldset>

   </form>
 </body>
</html>
</source>
nested fieldset background-color: #efefef;
<source lang="html4strict">
 <head>
   <meta http-equiv="Content-Type" content="text/html; charset=utf-8"/>
   <title>Example form</title>
   <style rel="stylesheet" type="text/css" media="screen">
fieldset fieldset {
   background-color:  #efefef;
   margin:  1em 0;
}
   </style>
 </head>

 <body>
   <form id="" action="" method="post">

     <fieldset id="name">
       <legend>Name</legend>
       <label>Title
         <select id="title1" name="title1">
           <option selected="selected">Mr.</option>
           <option>Mrs.</option>
           <option>Ms.</option>
         </select>
       </label>
       <label>First name
         <input id="first-name" name="first-name" type="text" />
       </label>
       <label>Last name
         <input id="las-name" name="last-name" type="text" />
       </label>

     </fieldset>
     <fieldset id="address">
       <legend>Address</legend>
       <label>Street
         <input id="street" name="street" type="text" />
       </label>

       <label>City
         <input id="city" name="city" type="text" />
       </label>
       <label>State
         <input id="state" name="state" type="text" />
       </label>
       <label>Zip code
         <input id="zip" name="zip" type="text" />
       </label>

       <label>Country
         <input id="country" name="country" type="text" />
       </label>

     </fieldset>
     <fieldset id="payment">
       <legend>Payment option</legend>
         <fieldset id="credit_card">
           <legend>Credit card</legend>
           <label><input id="visa" name="visa" type="radio" /> Visa</label>
           <label><input id="mastercard" name="mastercard" type="radio" /> Mastercard</label>
           <label><input id="discover" name="discover" type="radio" /> Discover</label>

         </fieldset>
       <label>Card number
         <input id="card_number" name="card_number" type="text" />
       </label>
       <label>Expiration date
         <input id="expiration" name="expiration" type="text" />
       </label>

       <input class="submit" type="submit" value="Submit" />

     </fieldset>

   </form>
 </body>
</html>
</source>
Attributes
This element includes the global attributes.
- HTML5
- If this Boolean attribute is set, the form controls that are its descendants, except descendants of its first optional element, are disabled, i.e., not editable. They won’t receive any browsing events, like mouse clicks or focus-related ones. Often browsers display such controls as gray.
- HTML5
- This attribute has the value of the id attribute of the element its related to. Its default value is the id of the nearest element it is a descendant of.
- HTML5
- The name associated with the group.
The label for the field set is given by the first element that is a child of this field set.
Styling with CSS
There are several special styling considerations for .
Its display value is block by default, and it establishes a block formatting context. If the is styled with an inline-level display value, it will behave as inline-block , otherwise it will behave as block . By default there is a 2px groove border surrounding the contents, and a small amount of default padding. The element has min-inline-size: min-content by default.

There will be an anonymous box holding the contents of the , which inherits certain properties from the . If the is styled with display: grid or display: inline-grid , then the anonymous box will be a grid formatting context. If the is styled with display: flex or display: inline-flex , then the anonymous box will be a flex formatting context. Otherwise, it establishes a block formatting context.
You can feel free to style the and in any way you want to suit your page design.
Examples
Simple fieldset
В этом примере показан действительно простой пример с и единственным элементом управления внутри него.
<form action="#">
  <fieldset>
    <legend>Simple fieldset</legend>
    <input type="radio" id="radio">
    <label for="radio">Spirit of radio</label>
  </fieldset>
</form>
Disabled fieldset
В этом примере показан отключенный с двумя элементами управления внутри него
Обратите внимание, что оба элемента управления отключены из-за того, что они находятся внутри отключенного
<form action="#">
  <fieldset disabled>
    <legend>Disabled fieldset</legend>
    <div>
      <label for="name">Name: </label>
      <input type="text" id="name" value="Chris">
    </div>
    <div>
      <label for="pwd">Archetype: </label>
      <input type="password" id="pwd" value="Wookie">
    </div>
  </fieldset>
</form>
Set fieldset border to dashed style
<source lang="html4strict">
<!DOCTYPE html PUBLIC «-//W3C//DTD XHTML 1.0 Transitional//EN»
   <meta http-equiv="content-type" content="text/html; charset=utf-8" />
   <title></title>
   <style type="text/css" media="Screen">
fieldset {
   border: 1px dashed #555555;
   padding: 20px;
}
</style>
</head>
<body>
   <form action="" enctype="x-www-form-encoded" method="post">
       <fieldset>
           <legend>Personal information</legend>
<label for=»realname»>Name</label>
<input class=»formField» type=»text» id=»realname» name=»realname» size=»30″ />
<label for=»phone»>Telephone</label>
<input class=»formField» type=»text» id=»phone» name=»phone» size=»30″ />
       </fieldset>
   </form>
</body>
</html>
</source>
Text Fields & Textareas
When it comes to gathering text input from users, there are a few different elements available for obtaining data within forms. Specifically, text fields and textareas are used for collecting text- or string-based data. This data may include passages of text content, passwords, telephone numbers, and other information.
Text Fields
Along with setting a attribute, it is best practice to give an element a attribute as well. The attribute value is used as the name of the control and is submitted along with the input data to the server.
Text Fields Demo
See the Pen Text Fields by Shay Howe (@shayhowe) on CodePen.
The element is self-contained, meaning it uses only one tag and it does not wrap any other content. The value of the element is provided by its attributes and their corresponding values.
These values were added to provide clearer semantic meaning for inputs as well as to provide better controls for users. Should a browser not understand one of these HTML5 attribute values, it will automatically fall back to the attribute value. Below is a list of the new HTML5 input types.
The following elements show a few of these HTML5 attribute values in use; the following figures show how these unique values may look within iOS. Notice how the different values provide different controls, all of which make gathering input from users easier.
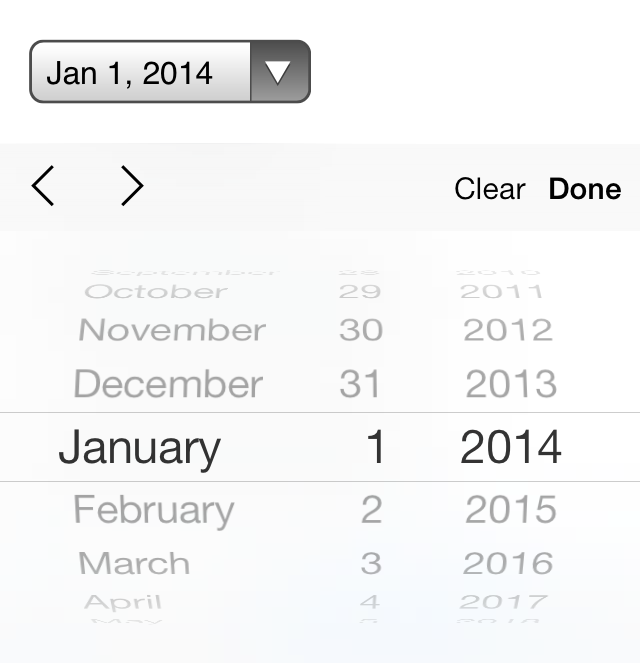 Fig 10
iOS7 controls for an element with a attribute value of
 Fig 10
iOS7 controls for an element with a attribute value of
 Fig 10
 Fig 10
iOS7 controls for an element with a attribute value of
 Fig 10
iOS7 controls for an element with a attribute value of
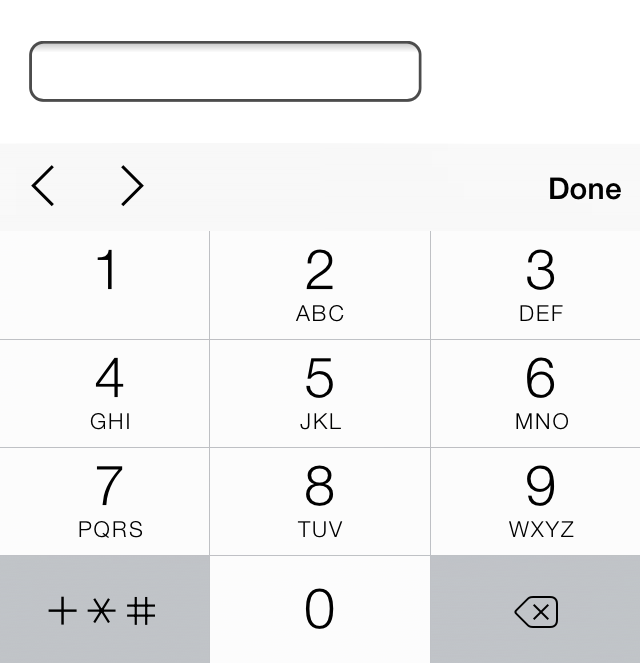 Fig 10
iOS7 controls for an element with a attribute value of
Textarea
Another element that’s used to capture text-based data is the element. The element differs from the element in that it can accept larger passages of text spanning multiple lines. The element also has start and end tags that can wrap plain text. Because the element only accepts one type of value, the attribute doesn’t apply here, but the attribute is still used.
Textarea Demo
See the Pen Textarea by Shay Howe (@shayhowe) on CodePen.
The element has two sizing attributes: for width in terms of the average character width and for height in terms of the number of lines of visible text. The size of a textarea, however, is more commonly identified using the and properties within CSS.
border nested text
In this article — How to Add Text in Borders Using Basic HTML Elements, and also introduces a very interesting usage scenario, nesting text in borders.
Imagine that a element combined with a element can generate a border inlaid text effect. Then, by combining multiple groups and positioning and arranging, you can generate a polygon border with nested text. effect.
The pseudo code is as follows:
Enter fullscreen modeExit fullscreen mode
Enter fullscreen modeExit fullscreen mode
The effect diagram is as follows:
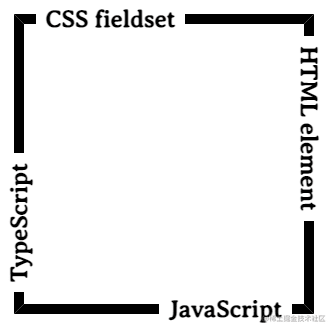
Through the combination of multiple and , we can spell out the 4 sides of a container to form a very beautiful border inlay effect.
Animate text by adding to
Enter fullscreen modeExit fullscreen mode
Well, based on this, we can generate borders for various N-sided border inlays. Below is a simple attempt at several polygon borders.


Organizing Form Elements
Knowing how to capture data with inputs is half the battle. Organizing form elements and controls in a usable manner is the other half. When interacting with forms, users need to understand what is being asked of them and how to provide the requested information.
By using labels, fieldsets, and legends, we can better organize forms and guide users to properly complete them.
Label
Labels provide captions or headings for form controls, unambiguously tying them together and creating an accessible form for all users and assistive technologies. Created using the element, labels should include text that describes the inputs or controls they pertain to.
Labels may include a attribute. The value of the attribute should be the same as the value of the attribute on the form control the label corresponds to. Matching up the and attribute values ties the two elements together, allowing users to click on the element to bring focus to the proper form control.
Label Demo
See the Pen Label by Shay Howe (@shayhowe) on CodePen.
If desired, the element may wrap form controls, such as radio buttons or check boxes. Doing so allows omission of the and attributes.
Labels with Nested Inputs Demo
See the Pen Labels with Nested Inputs by Shay Howe (@shayhowe) on CodePen.
Fieldset
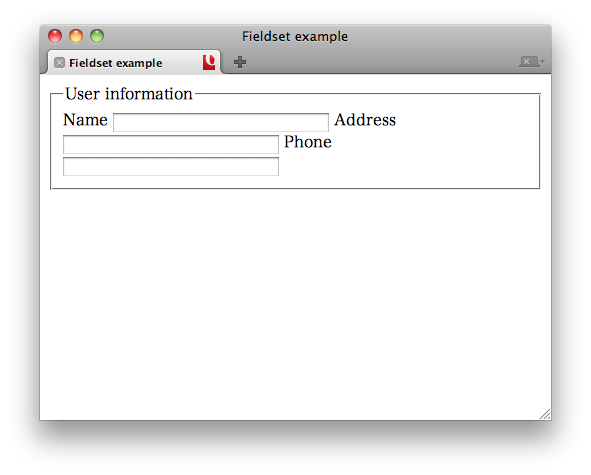
Fieldsets group form controls and labels into organized sections. Much like a or other structural element, the is a block-level element that wraps related elements, specifically within a element, for better organization. Fieldsets, by default, also include a border outline, which can be modified using CSS.
Fieldset Demo
See the Pen Fieldset by Shay Howe (@shayhowe) on CodePen.
Legend
A legend provides a caption, or heading, for the element. The element wraps text describing the form controls that fall within the fieldset. The markup should include the element directly after the opening tag. On the page, the legend will appear within the top left part of the fieldset border.
Итого
Свойства для навигации по формам:
- Форма доступна через .
- Элементы формы доступны через , или можно просто использовать . Свойство также работает для .
- Элементы хранят ссылку на свою форму в свойстве .
Значения элементов формы доступны через , , и т.д. либо для чекбоксов и переключателей.
Для элемента мы также можем получить индекс выбранного пункта через , либо используя коллекцию пунктов .
Это были основы для начала работы с формами. Далее в учебнике мы встретим ещё много примеров.
В следующей главе мы рассмотрим такие события, как и , которые могут происходить на любом элементе, но чаще всего обрабатываются в формах.