
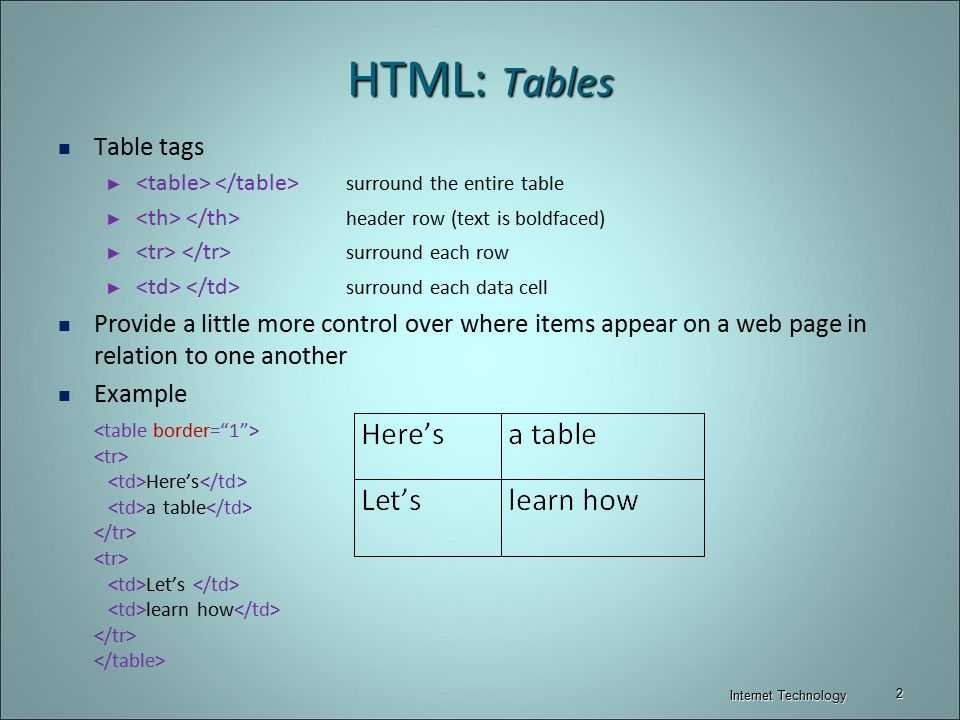
Resources
Is your frontend hogging your users’ CPU?
As web frontends get increasingly complex, resource-greedy features demand more and more from the browser. If you’re interested in monitoring and tracking client-side CPU usage, memory usage, and more for all of your users in production, try LogRocket.https://logrocket.com/signup/
LogRocket is like a DVR for web and mobile apps, recording everything that happens in your web app, mobile app, or website. Instead of guessing why problems happen, you can aggregate and report on key frontend performance metrics, replay user sessions along with application state, log network requests, and automatically surface all errors.
Modernize how you debug web and mobile apps — Start monitoring for free.
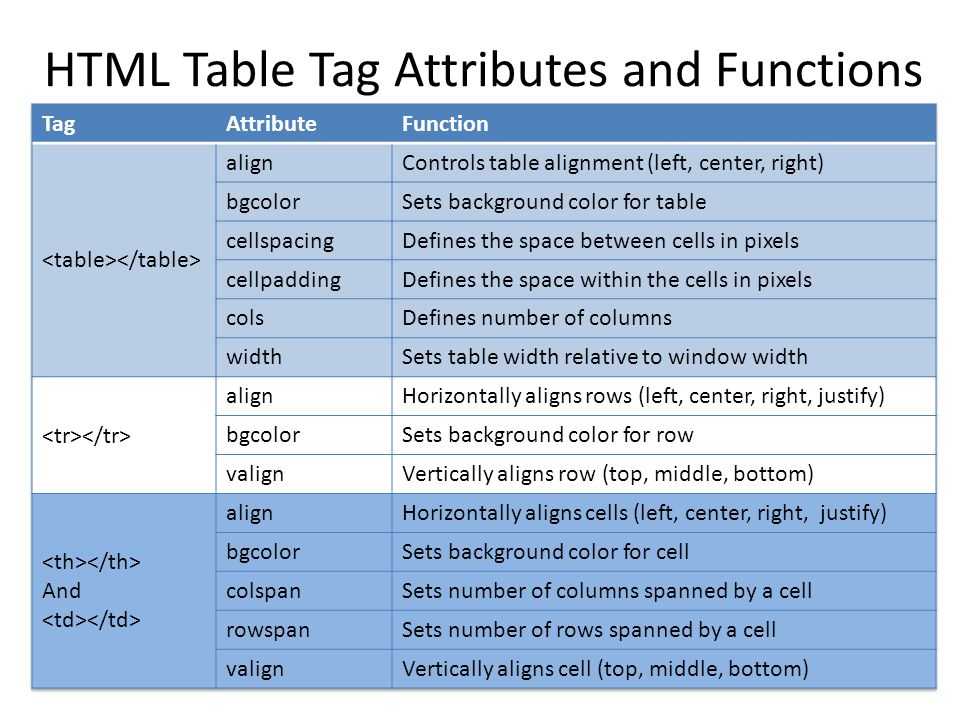
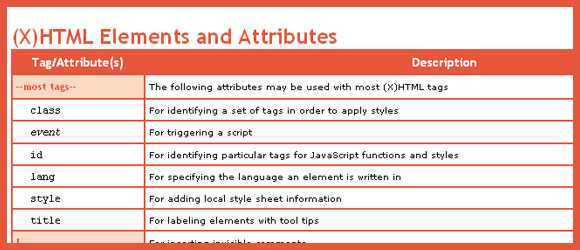
Атрибуты тега <td>
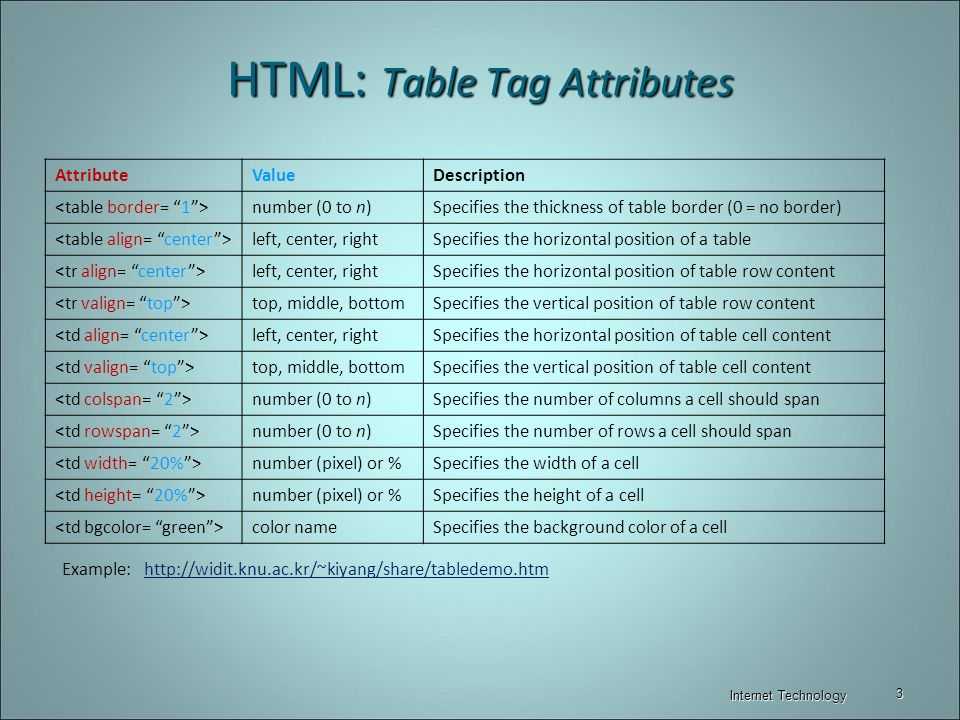
height — с помощью этого атрибута задается высота ячейки, значение дается в пикселях. Если данный атрибут не задан, то высота ячейки растягивается по величине содержимого контента (текста). Если для всей таблицы (для тега <table>) задан атрибут height, а для ячейки (для тега <td>) данный атрибут не задан, то ячейка будет вытягиваться относительно заданной высоты для всей таблицы. Пример написания кода: <td height=»30px»>
width — с помощью этого атрибута задается ширина ячейки, значение дается в пикселях. Если данный атрибут не задан, то ширина ячейки растягивается по величине содержимого контента (текста). Если для всей таблицы (для тега <table>) задан атрибут width, а для ячейки (для тега <td>) данный атрибут не задан, то ячейка будет вытягиваться относительно заданной ширины для всей таблицы. Пример написания кода: <td width=»60px»>
bgcolor — атрибут для изменения цвета фона ячейки. В качестве значения для этого атрибута можно использовать любой цвет. Пример написания кода: <td bgcolor=»yellow»>
align — атрибут для выравнивания содержимого ячейки по горизонтали. Этому атрибуту могут быть даны следующие значения:left — выравнивает содержимое ячейки по левому краю. right — выравнивает содержимое ячейки по правому краю. center — выравнивает содержимое ячейки по центру. Пример написания кода: <td align=»center»>
valign — атрибут для выравнивания содержимого ячейки по вертикали. Этому атрибуту могут быть даны следующие значения:top — выравнивает содержимое ячейки по верхнему краю. middle — выравнивает содержимое ячейки посередине. bottom — выравнивает содержимое ячейки по нижнему краю. Пример написания кода: <td valign=»middle»>
Применим знания на практике.
В этом уроке мы рассмотрели основные атрибуты которые используются при создании таблиц. Выучивать всю эту информацию смысла нет, не забивайте себе голову. Всегда можно зайти и посмотреть подсказки.
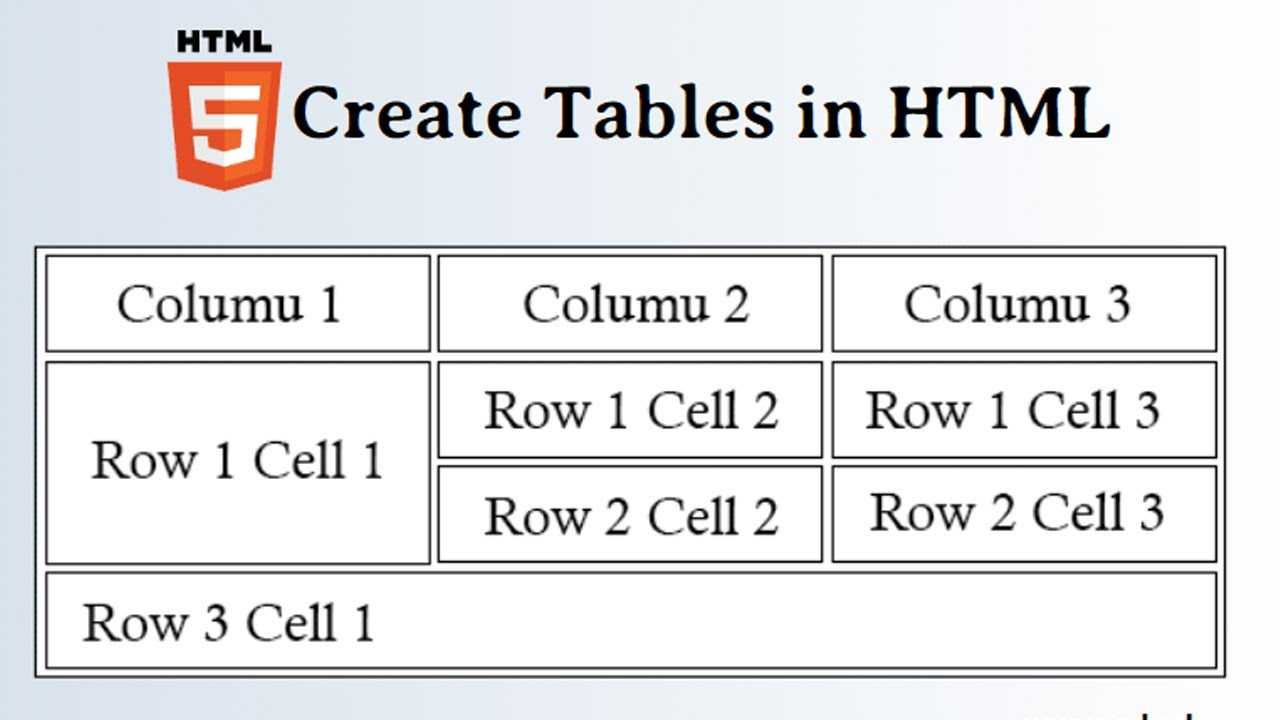
Теперь, на основе данных которые размещены на этой странице мы создадим таблицу. Давайте сделаем таблицу из 4 строк и 2-ух столбцов. Чтобы у нас получилось 2 столбца нам нужно будет в каждой строчке создавать по 2 ячейки.
Комментарии к коду:1) Для тега <table> мы задали атрибут border и дали ему значение 1. Это означает, что ширина границ нашей таблицы 1 пиксель. 2) Еще для тега <table> мы задали атрибут cellspacing и дали ему значение . Это означает, что расстояние между нашими ячейками равно 0. Если бы мы не задали этот атрибут, то по умолчанию расстояние между ячейками составляло бы 2 пикселя. 3) Для 1-ой строки мы задали атрибут bgcolor и дали ему значение green. С помощью данного атрибута мы задали зеленый цвет фона всем ячейкам находящимся в этой строке. 4) Еще для 1-ой строки мы задали атрибут height и дали ему значение 50px. С помощью данного атрибута мы задали высоту ячеек первой строки. Данная строка будет выше, чем все другие, так как в нашем случае она является «шапкой» таблицы. 5) Для 1-ой ячейки первой строки мы задали атрибут width и дали ему значение 150px. С помощью этого атрибута мы задали ширину данной ячейки
Теперь внимание! Автоматически все ячейки которые располагаются под этой ячейкой, тоже будут иметь ширину 150px. 6) Тоже самое мы сделали и со 2-ой ячейкой первой строки, отличается только значение атрибута, для этой ячейки задана ширина 110px
Все нижние ячейки в этом столбце, соответственно, тоже будут иметь ширину 110px.7) И для 1-ой и для 2-ой ячейки первой строки мы задали атрибут align и дали ему значение center. С помощью данного атрибута мы выравняли текст по центру ячеек. ![]() Для других трех строк мы задали атрибут bgcolor и дали ему значение yellow. С помощью данного атрибута мы задали желтый цвет фона всем ячейкам этих строк. 9) Так же для этих трех строк мы задали одинаковую высоту с помощью тега height дав ему значение 30px.
Для других трех строк мы задали атрибут bgcolor и дали ему значение yellow. С помощью данного атрибута мы задали желтый цвет фона всем ячейкам этих строк. 9) Так же для этих трех строк мы задали одинаковую высоту с помощью тега height дав ему значение 30px.
Вы что-то не поняли из этого урока? Спрашивайте!
— vadimgreb@yandex.ru
Элементы языков HTML и JAVASCRIPT
Разделительные линии между столбцами и рядами таблицы HTML
Разделительные линии между столбцами и рядами таблицы описывается атрибутом
RULES в теге <TABLE>.
Атрибут RULES может принимать следующие значения,
задающие способ изображения разделительных линий:
- ALL — все вертикальные и горизонтальные
линии; -
ROWS — только горизонтальные линии между
рядами; -
COLS — только вертикальные линии между
столбцами; -
NONE — не изображать разделительные
линии.
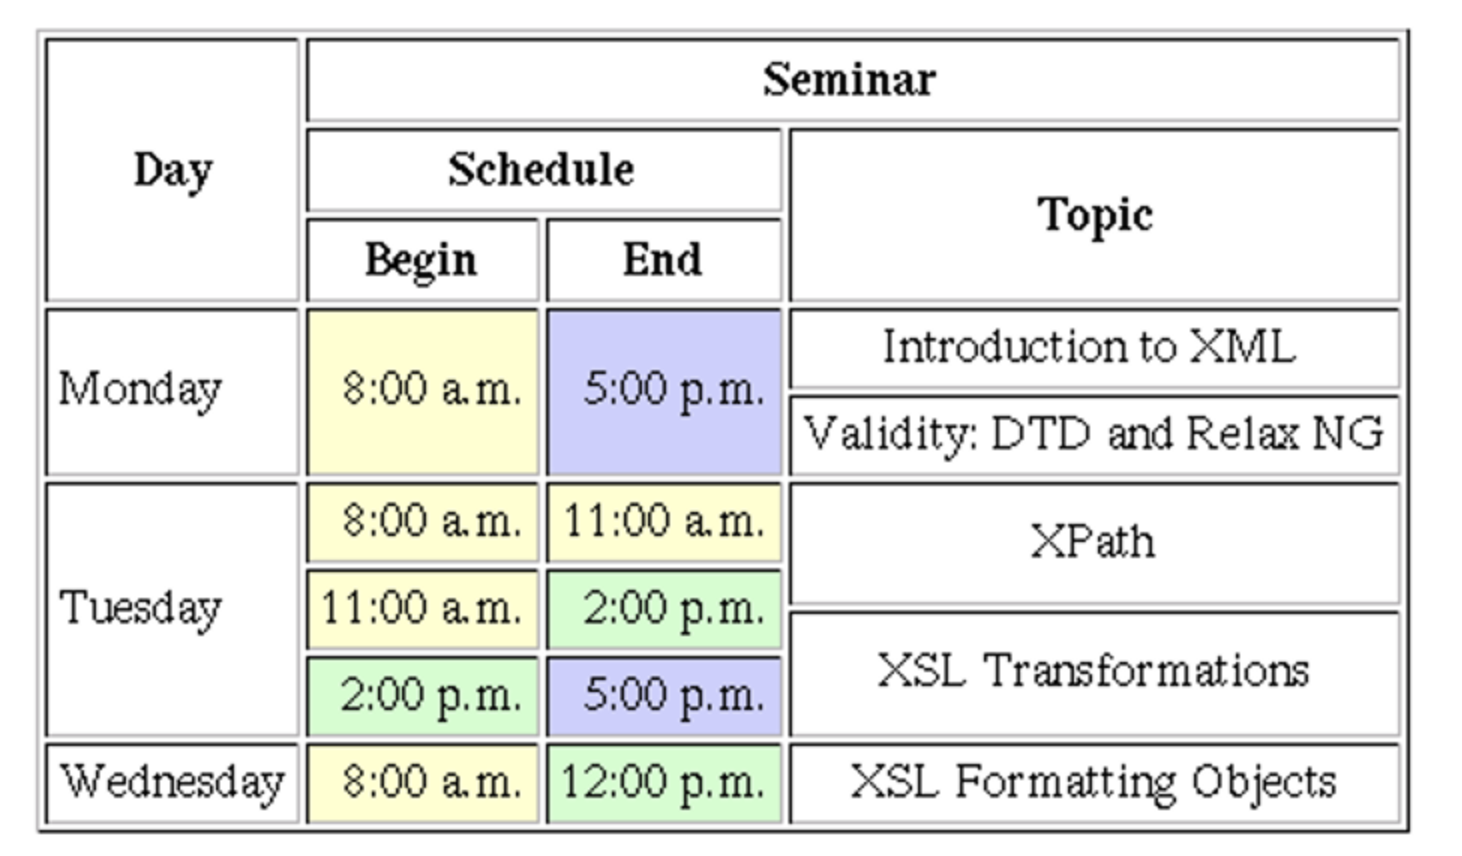
Приведем пример управления дизайном таблиц.
<HTML>
<НЕАD> <ТITLE>Таблицы</ТITLE></НЕАD> <BODY>
<Н2>Основные элементы таблиц</Н2>
<Р>Различный дизайн таблиц
<Р>
<TABLE BORDER=15 FRAME=BOX RULES=ROWS WIDTH=300>
<CAPTION ALIGN=TOP>Cписок сотрудников</САРТION>
<TR>
<TH COLSPAN=2>Имя и должность</ТН><ТН>Оклад</ТН>
</TR> <TR>
<ТD>Иван</ТD><ТD>Директор</ТD><ТD>1000</ТD>
</TR>
<TR>
<ТП>Петр</ТD><ТD>Бухгалтер</ТD><ТD>800</ТD>
</TR>
<TR>
<ТD>Федор</ТD><ТD ROWSPAN=2>Pa6oчий</ТD><ТD>>50</TD>
</TR>
<TR>
<ТD>Василий</ТD><ТD>70</ТD>
</TR>
</TABLE> <TABLE BORDER=10 FRAME=BOX RULES=COLS WIDTH=300>
<CAPTION ALIGN=TOP>Список сотрудников</САРТION>
<TR>
<TH COLSPAN=2>Имя и должность</ТН><ТН>Оклад</ТН>
</TR>
<TR>
<ТD>Иван</ТD><ТD>Директор</ТD><ТD>1000</ТD>
</TR>
<TR>
<ТD>Петр</ТD><ТD>Бухгалтер</ТD><ТD>800</ТD>
</TR>
<TR>
<ТD>Федор</ТОХТП ROWSPAN=2>Pa6oчий</ТD><ТD>50</TD>
</TR>
<TR>
<ТD>Василий</ТD>70</ТD>
</TR>
</TABLE>
</BODY>
</HTML>
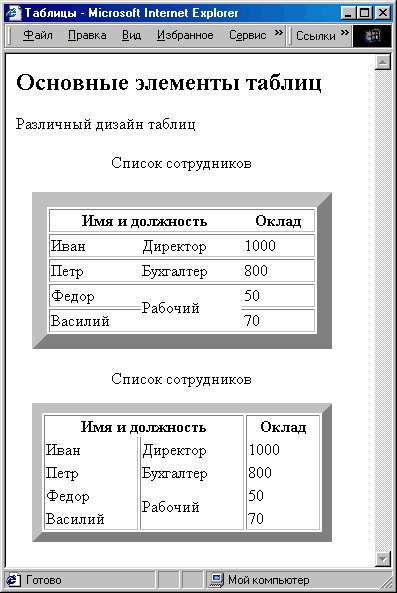
Рис. 662. Примеры оформления таблиц
В следующем примере используем таблицу без рамок как способ размещения
различных элементов на странице. В ячейки помещены текстовые ссылки, картинки
и число 1000, а некоторые ячейки остались пустыми. Для задания нужного
расстояния между элементами следует использовать атрибуты выравнивания.
Пока еше нет другого способа разместить несколько элементов в одном ряду,
кроме использования таблиц. В следующем разделе, посвященном каскадным
таблицам стилей, будет рассмотрен другой способ позиционирования элементов.
В приведенном ниже примере просто задана таблица, но не указаны ее размеры
и способ выравнивания для того, чтобы показать: можно располагать элементы
как по горизонтали, так и по вертикали в пределах некоторой области. При
этом только опытный программист на языке HTML может догадаться по внешнему
виду страницы, что для ее создания была использована таблица. Освойте
этот прием позиционирования, если хотите располагать на Web-странице много
графических элементов и ссылок. Это позволит сэкономить место и достаточно
эффектно разместить материал в окне браузера.
<HTML>
<НЕАD> <ТITLE>Таблица</ТITLE></НЕАD>
<BODY>
<Н2>
Использование таблицы как способа расположения элементов на странице
</Н2>
<TABLE>
<TR>
<TD><A HREF=»пример1.htm»>Пример 1</A> </TD>
<TD> <IMAGE SRC=»logotip.gif» WIDTH=100 HEIGHT=100> </TD>
<TD>1000</TD>
</TR>
<TR>
<TD> <A HREF=»пример2.htm»>Пример 2</A> </TD>
<TD> <IMAGE ЗРС=»квадрат.bmp»> </TD>
</TR>
</TABLE>
</BODY>
</HTML>
@property
This is still not implemented in any of the modern browsers and the conversation around its specifications is . However, the idea behind it is promising and it seems like it can fix some of the previous CSS issues such as fading a gradient to a new color on hover or focus.
@property is nothing but a simplified version of . With these features, you can define the syntax for custom CSS properties. You can then use these properties under other selectors. For example, defining a custom CSS property called using both the @property and looks something like this:
@property --my-color {
  syntax: "<color>";
  inherits: false;
  initial-value: '#9400D3';
}

/
window.CSS.registerProperty({
  name: '--my-color',
  syntax: '<color>',
  inherits: false,
  initialValue: '#9400D3',
});
You can then use this custom property under other selectors:
// CSS
.mycolor {
  --my-color: '#FFFFFF';
  background: linear-gradient(var(--my-color), black);
  transition: --my-color 1s;
}

..mycolor:hover {
  --my-color: '#FF0000';
}

// HTML
<button class="mycolor">@property</button>
Examining this shows that the gradient of the button will change from the defined custom property to which is the red color. This is a much easier way of handling it compared to other ways of handling such scenarios with pseudo-elements.
However, until we get a wider range of browser support for this feature, it is a matter of various speculations on what would be the end functionality of this feature. Until then, feel free to test this as an experimental feature and keep an eye for its wider support in browsers.
Source:
Html table rules rows
Disclosure: Your support helps keep the site running! We earn a referral fee for some of the services we recommend on this page. Learn more
Attribute of Create An HTML Table Quickly & Easily With Our Code Example What does do? Was used to specify the display of internal borders between rows and colums. This attribute has been deprecated. Use CSS to style table borders instead.
The Rules Attribute has been Deprecated This attribute has been deprecated and should not be used. Browser support for this attribute is limited and using it may produce unexpected results. Instead, use CSS to style tables.
Полезные советы:
Тег
помимо своей прямой задачи, решает еще одну полезную штуку..
При загрузке таблицы браузеры не показывают её содержание до тех пор пока таблица полностью не загрузилась. Так вот при использовании тега , браузер зная количество и будущие размеры колонок, сразу начинает показывать содержание, не дожидаясь полной загрузки.. что есть гуд! особенно при медленном соединении ИнтернетаСайты свёрстанные табличным способом перестают «плясать» во время загрузки.
По наблюдениям, на тег обращают внимание поисковые системы, и слова в заголовке таблицы имеют больший «вес», в глазах поисковиков, нежели чем текст в обычных ячейках, что в свою очередь может повлиять на результаты выдачи по тому или иному поисковому запросу.
Всё что написано в этой главе, по большей своей части, ориентированно на логику таблиц, что облегчает жизнь всем!:
— Веб-мастерам, для более простого управления таблицей через стили или скрипты.
— Браузерам, и речевым браузерам для более корректного отображения или чтения таблиц. — Алгоритмам поисковых систем, которые стараются найти эту самую логику на той или иной странице, чтобы выдать пользователю наиболее релевантные результаты.
Так что не стоит пренебрегать тегами: ,
, , , , ,
— они весьма полезны!
@media
This is one of the most common CSS at-rules, used for setting CSS styles that will be applied to elements at different screens and window sizes. This is mainly used for responsive design, so developers can style elements at different window sizes that tend to resemble common mobile, tablet, and desktop devices. Let’s see an example in action:
#box {
  background-color: green;
}

@media only screen and (max-width: 600px) {
  #box {
    background-color: yellow;
  }
}
With the above CSS rule, we are saying that we want to change the color of the box element to yellow when the browser window size is 600px or less. Otherwise, we set the box color to green on window sizes above 600px:
When you do use rules, pay close attention to their leading
Traditionally, typographic rules set on a leading of their own. The bottom edge of a rule constituted its baseline, and the distance from the bottom edge of the rule to the baseline of the text or rule above it was its leading.
Page layout programs have changed this. A typographic rules now plays by the same rules as a stroked path in a graphic; that is, its width is built outward, equally, on both sides of the path, in this case the cell boundary. (Oddly, InDesign allows you to define how a stroke is aligned to—or rather built out from—a path in many situations, but not this one.)
A rule at the top of a cell, then, straddles the cell boundary, pushing text below it down and text above it up, and the text “sees” the edge of the rule as the new border of the cell. At the bottom of the cell, use an inset to create space between a rule below and the text above. These principles are illustrated in Figure 2.
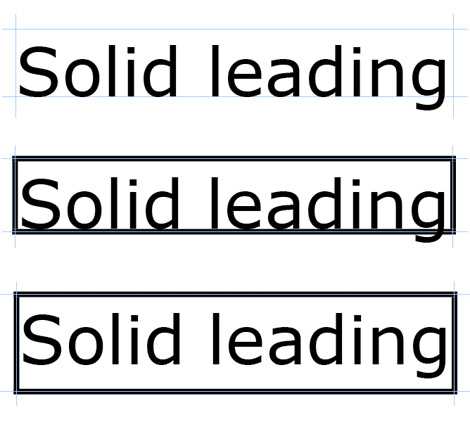
Figure 2: At the top is the program view of a single table cell with no insets that’s been created based on type set solid—where point size and leading are equal—and the position of the first baseline is defined by the type’s leading. With these specs, the bottom of the cell coincides with the text’s baseline. In the center, the cell has had rules applied to its edges, and you can see how they are built out on each side of the cell boundary. The text’s baseline now coincides with the top of the lower rule. In the bottom sample, a bottom inset has been added to visually center the text vertically.
When you want to vertically center a line of type between two tables rules, things get tricky. First, reset the first-baseline offset in the Cell Options dialog to “x-height,” and then choose “Center” from the Vertical Justification pop-up menu. If your entry has a fortunate balance of ascending and descending characters, it will appear fairly well vertically centered. If it has lots of descenders and not many ascenders, it’s going to look like it’s riding too low. Likewise, a preponderance of ascenders will make the text look too high. These effects are shown in Figure 3. You can tweak its position using cell insets or the baseline shift control in the Character palette, but watch out for obvious base-misalignments with the contents of neighboring cells.
![[chapter 5] rules, images, and multimedia](https://rwvt.ru/wp-content/uploads/a/e/7/ae74d62031aeb322ce3cd7ba226b862d.png)

Figure 3: Normal text is composed mostly of x-height characters, so centering text between rules based on its x-height will always get you close to visual balance. But as seen in the top sample here, ascending characters combined with an absence of descenders can make the text appear too high. In the corrected sample below it, a baseline shift has been applied to get the text to look more centered. In the lower pair of samples, the opposite is the case, and the surplus of descending characters makes the text in the upper sample appear too low until its baseline has been raised slightly.
If the text you’re trying to center is all-caps, choose “Cap height” instead of “x-height” in the First Baseline pop-up menu in the Cell Options dialog and “Center” from the Vertical Justification pop-up. No additional tweaking should be necessary.
Use these same techniques to assure vertical centering when you choose to use a background color to highlight selected rows of a table.
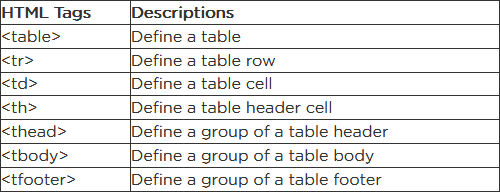
Дополнительные дескрипторы
а) <th> … </th>(th — table header cell — англ. ячейка заголовка)
<table width=200 border=1>
    <tr><th>1х1
        <th>1х2
    <tr><td>2х1
        <td>2х2
</table>
|
|
б) <caption> … </caption>(caption — англ. заголовок)
<table width=200 border=1>
    <caption>Мой_заголовок</caption>
    <tr><td>1х1
        <td>1х2
    <tr><td>2х1
        <td>2х2
</table>
|
|
(Значения right и left не работают в Safari5 и GHr9, а в MF3.6, Opera11 и IE8 функционируют по-разному.)
| top |
|
||||
| bottom |
|
||||
| left |
|
||||
| right |
|
в) <thead> … </thead>, <tbody> … </tbody>, <tfoot> … </tfoot>
<table border=1 width=150 rules=groups>
    <thead>
        <tr><td>1х1<td>1х2
    <tbody>
        <tr><td>2х1<td>2х2
        <tr><td>3х1<td>3х2
    <tbody bgcolor=white align=right>
        <tr><td>4х1<td>4х2
        <tr><td>5х1<td>5х2
    <tfoot>
        <tr><td>6х1<td>6х2
</table>
|
|
г) <col>
<table border=1 width=500>
    <col width=50%>
    <col span=2 width=100>
    <col>
    <tr><td>1х1<td>1х2<td>1х3<td>1х4
    <tr><td>2х1<td>2х2<td>2х3<td>2х4
    </table>
|
|
||||||||
<table border=1 width=500>
    <col>
    <col bgcolor=yellow>
    <col span=2 bgcolor=blue align=right>
    <tr><td>1х1<td>1х2<td>1х3<td>1х4
    <tr><td>2х1<td>2х2<td>2х3<td>2х4
</table>
|
|
| 1х1 | 1х2 |
| 2х1 | 2х2 |
| 1х1 | 1х2 |
| 2х1 | 2х2 |
д) <colgroup> … </colgroup>
<table border=1 rules=groups>
    <colgroup align=right>
        <col width=160>
        <col width=120>
    </colgroup>
    <colgroup bgcolor=yellow>
        <col width=80>
        <col width=40>
    </colgroup>
    <tr><td>1х1<td>1х2<td>1х3<td>1х4
    <tr><td>2х1<td>2х2<td>2х3<td>2х4
</table>
|
|
| жёлтый цвет |
|
Obsolete TABLE Attributes
The previous information describes attributes of the HTML element that are valid in HTML 4.01 but are obsolete in HTML5.
The following describes TABLE attributes that are not valid in any current specification. If you don’t care about whether your pages validate and your users use a browser that supports these elements, then you can use these elements. But most of them are either unsupported in modern browsers or have alternatives that are more standards-compliant.
We do not recommend using these attributes on your HTML tables.
The attribute is an old attribute that was included before CSS was widely supported. It allows you to change the background color of the table. You can set a color name or a hexadecimal code. This attribute still works in a lot of browsers, but for future-proofed HTML, you should not use it, and use CSS instead.
The better alternative to this attribute is the style property.
To change the background color of a table, write:
style="background-color: #ccc;">
This table has a grey background
Similar to the bgcolor attribute, the bordercolor attribute lets you change the color of the attribute. This attribute is only supported by Internet Explorer. Instead, you should use the border-color style property.
To change the color of your table’s border, write:
style=»border-color: red;»>This table has a red border.The bordercolorlight and bordercolordark attributes were included in Internet Explorer to allow you to create a 3D border around your table. However, as of IE8 and up, this is only supported in IE7 Standards Mode and Quirks Mode. Microsoft states that these properties are no longer supported.
For a short time, the cols attribute on the TABLE element was proposed to help browsers know how many columns a table had. The premise was that this would help speed up the rendering of large tables. However it was only implemented by Internet Explorer, and as of IE8 and up, this is only supported in IE7 Standards Mode and Quirks Mode.
Because there is a width attribute (obsolete in HTML5) many people assumed there was a height attribute for tables as well. But because tables conform to the width of their content or the defined width in the CSS or width attribute, the height could not be constrained. So instead, browsers allowed the height attribute to define the minimum height of the table. If the table were taller than that height, it would display taller. But you should use the property
With the CSS height property you can constrain the height if you use the CSS property as well to define what happens with any excess content.
To set the minimum height on a table, write:
style="height: 30em;">
This table is at least 30 ems high.
The two attributes and added space around the left/right sides (hspace) and top/bottom (vspace) of the table. You should use the style property instead.
To set the vertical space to 20 pixels and the horizontal space to 40 pixels, write:
style="margin: 20px 40px;"
This table has a vspace of 20 pixels and an hspace of 40 pixels.
The attribute is a boolean attribute that defines whether the contents of the table should wrap at the edge of the parent element or window or force horizontal scrolling. Instead, you should define the wrapping characteristics of each table cell using the CSS property.
To make a column with a lot of text not wrap, write:
style=»white-space: nowrap;»>This is a column with a ton of content. But even if it is wider than the container the text should not wrap to the next line, but instead force the browser window to scroll horizontally to see all the content.Finally, the attribute defines how the contents of each cell should align vertically within the cell. Instead of this invalid attribute, you should use the CSS property on each cell you want to change the alignment of. You won’t notice the effects of this style unless the cell’s contents are less than the available space created by other, larger cells.
To force a cell to align to the bottom (rather than the middle, as the default), write:
This cell is longer than the rest and so will force the height to be taller. So you will see that the vertically aligned cell is aligned to the bottom.style=»vertical-align: bottom;»>Contents at bottom.Contents in middle.
Valid HTML 4.01 Attributes
The attribute we described above. The only difference in HTML 4.01 from HTML5 is that you can specify any whole integer (0, 1, 2, 15, 20, 200, etc.) to define the width of the border in pixels.
To build a table with a 5px border, write:
border="5">
This table has a 5px border.
The attribute defines the amount of space between cell borders and the contents of the cell. The default is two pixels. Set the cellpadding to 0 if you want no space between the contents and borders.
To set the cell padding to 20, write:
cellpadding="20">
This table has a cellpadding of 20.
Cell borders will be separated by 20 pixels.
View an example of a table with cellpadding
The attribute defines the amount of space between the table cells and the cell content. Like cellpadding, the default is set to two pixels, so you must set it to 0 if you want no cell spacing.
To add cell spacing to a table, write:
cellspacing="20">
This table has a cellspacing of 20.
Cells will be separated by 20 pixels.
The attribute identifies which portions of the border surrounding the outside of a table will be visible. You can frame your table on all four sides, any one side, top and bottom, left and right, or none.

Here is the HTML for a table with only the left side border:
frame=»lhs»>This tablewill haveonly theleft side framed.And another example with the bottom frame:
frame=»below»>This table has a frame on the bottom.Check out some tables with frames
The attribute is similar to the frame attribute, only it affects the borders around the cells of the table. You can set rules on all the cells, between columns, between groups like TBODY and TFOOT or none.
To build a table with lines only between the rows, write:
rules=»rows»>This 4×4 table hasthe rows not columnsoutlined with therules attribute.And another with lines between the columns:
rules=»cols»>This isa tablewhere thecolumnsarehighlightedThe attribute provides information about the table for screen readers and other user agents that might have trouble reading tables. To use the summary attribute, you write up a brief description of the table and put that as the value of the attribute. The summary won’t display on the web page in most standard web browsers.
Here is how to write a simple table with a summary:
summary="This is a sample table that contains filler information. The purpose of this table is to demonstrate a summary.">
column 1 row 1
column 2 row 1
column 1 row 2
column 2 row 2
The attribute defines the width of the table in either pixels or as a percentage of the container element. If the width is not set, the table will take up only as much space as it needs to display the contents, with a maximum width the same as the width of the parent element.
To build a table with a specific width in pixels, write:
width="300">
This table is 80% of the width of the container it’s in.
And to build a table with a width that is a percentage of the parent element, write:
width="80%">
This table is 80% of the width of the container it’s in.
Use rules only where necessary
It’s wise to use rules only when they make a table function better. Using them as decorative elements often just clutters things up, as shown in Figure 1.
Figure 1:The table on top (copied from a real annual report) doesn’t need all of the rules it’s been burdened with. It looks unnecessarily busy. Below, the table works perfectly well with most of the rules deleted and the gutter between the two sections expanded for clarity.
That said, certain rules are conventional when setting tables, such as one that separates the heading row from the content rows below it. In general, though, adding white space—extra leading—between rows usually works better and creates a cleaner impression.
It’s easy to add horizontal rules to a table rather late in the process. But if you intend to use vertical rules, you should add them at the very beginning. Because you add vertical rules by adding strokes to the vertical edges of the cells in a column, the only way to position them logically is to define in advance the exact widths of all your columns. You can tweak the horizontal positions of cell contents using left and right insets, but you’re stuck with the positions of the cell boundaries themselves and the rules that sit on top of them.
Rules are best applied (or selectively omitted) through the use of cell styles.
@document
This is a unique rule that allows you to specify styles for a certain page, without affecting the styles of other pages. This page-based style customization comes in different forms:
You can specify the rules for a specific URL:
@document url(https://example.com/),
You can specify the rules for pages that their URLs start with:
@document url-prefix(https://example.com/index),
You can specify the rules on a domain level and for all the pages related to it:
@document domain(example.com),
You can also specify the rules for a predefined regex pattern you defined for more control:
@document regexp("https:.*"),
Remember that rule has limited browser support at this time.
Source:
Заголовки таблиц.
Любая ячейка таблицы может быть определена как заголовок. Для того чтобы сделать ячейку таблицы заголовком нужно вместо знакомого тега <td> использовать тег <th>.
Например, вот так:
<table><tr><th>Данная ячейка является заголовком</th></tr></table>
Как правило, текст ячейки определённый в качестве заголовка отображается браузерами жирным шрифтом по центру ячейки.
Ну что давайте попробуем сделать некоторые ячейки нашей таблицы заголовками? смотрим пример:
<!DOCTYPE HTML PUBLIC «-//W3C//DTD HTML 4.01 Transitional//EN» «http://www.w3.org/TR/html4/loose.dtd»><html><head><title>Заголовок таблицы</title></head><body><table border=»1″ width=»400″ cellpadding=»3″ cellspacing=»0″><tr><th>Продукт</th><th>Белки</th><th>Жиры</th><th>Углеводы</th><th>ккал</th></tr><tr><th>Хлеб ржаной</th><td>4,7</td><td>0,7</td><td>49,8</td><td>214</td></tr><tr><th>Молоко</th><td>2,8</td><td>3,2</td><td>4,7</td><td>58</td></tr><tr><th>Картофель</th><td>2</td><td>0,1</td><td>19,7</td><td>83</td></tr><tr><th>Свинина</th><td>11,4</td><td>49,3</td><td>9</td><td>489</td></tr><tr><th>Итого:</th><td>20,9</td><td>53,3</td><td>83,2</td><td>844</td></tr></table></body></html>
смотреть пример
К тегу <th> могут применятся точно такие же атрибуты как и к тегу <td> о них мы говорили в 4 главе поэтому повторятся не буду, а просто перечислю их:
- width — Ширина ячейки в процентах или пикселях.
-
height — Высота ячейки в процентах или пикселях.
-
align — Выравнивает текст в ячейке:
- left — по левому краю.
- right — по правому краю.
- center — по центру.
- justify — по левому и правому краю.
-
valign — Выравнивает текст в ячейке по вертикали:
- top — по верхнему краю.
- middle — по центру.
- bottom — по нижнему краю.
- baseline — по базовой линии.
- colspan — количество столбцов занимаемое ячейкой.
- rowspan — количество рядов занимаемое ячейкой.
- bgcolor — Цвет фона ячейки.
- background — Задает фоновый рисунок в ячейке.
- bordercolor — Цвет бордюра.
- title — Всплывающая подсказка
- nowrap — Запрещает перенос строк в ячейке.
Думаю понятно, а посему идем дальше..
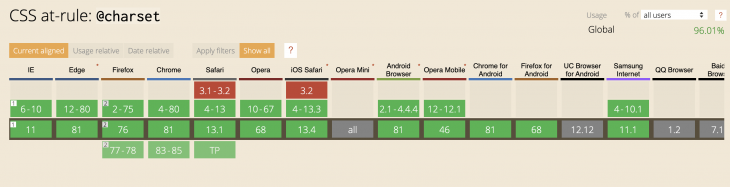
@charset
This is the first CSS at-rule that needs to be declared in the stylesheet for defining character encoding and no other rules should precede it. There are other ways of handling charset, like placing it on the HTTP header, but there are certain use cases for declaring it in CSS. For example, when we are using non-ASCII characters for the property, the browser has different ways of figuring out the character encoding.
Setting it in the calling HTML file:
<meta charset="utf-8" />
The server might set content type with a certain character encoding, in the response header:
Content-Type: text/css; charset=utf-8
So in most cases, this is managed, but in case the encoding of the calling or returned HTML is different from a certain stylesheet, then needs to be declared in the CSS file.
Here is an example of usage:
supports a good range of browsers, except early versions of Safari.
Source:
Границы таблицы.
Ранее в главе «Таблицы» мы с Вами познакомились с атрибутами border — ширина границы и bordercolor — цвет границы, но это не весь набор инструментов применимых к границам таблицы.. Есть ещё два атрибута: frame и rules о них мы и поговорим ниже.


Начнём с атрибута frame — рамка, данный атрибут применяется к тегу <table> и указывает на то, как следует отображать внешние границы таблицы, то есть вокруг самой таблицы, а не между её отдельными ячейками
Атрибут frame может принимать следующие значения:
- void — не отображать границы вокруг таблицы.
- border — отображать границы вокруг таблицы (по умолчанию).
- hsides — отображать только горизонтальные границы сверху и снизу.
- vsides — отображать только вертикальные границы слева и справа.
- above — отображать только верхнюю границу таблицы.
- below — отображать только нижнюю границу таблицы.
- lhs — отображать только левую границу.
- rhs — отображать только правую границу.
Пример:
<!DOCTYPE HTML PUBLIC «-//W3C//DTD HTML 4.01 Transitional//EN» «http://www.w3.org/TR/html4/loose.dtd»><html><head><title>frame</title></head><body><table border=»8″ frame=»hsides» width=»400″ cellpadding=»3″ cellspacing=»0″><caption><b>Энергетическая ценность продуктов питания:</b></caption><thead bgcolor =»#deb887″ title=»Шапка»><tr><th>Продукт</th><th>Белки</th><th>Жиры</th><th>Углеводы</th><th>ккал</th></tr></thead><tbody align=»left» bgcolor =»#faebd7″ title=»Энергетическая ценность продуктов питания»><tr><th>Хлеб ржаной</th><td>4,7</td><td>0,7</td><td>49,8</td><td>214</td></tr><tr><th>Молоко</th><td>2,8</td><td>3,2</td><td>4,7</td><td>58</td></tr><tr><th>Картофель</th><td>2</td><td>0,1</td><td>19,7</td><td>83</td></tr><tr><th>Свинина</th><td>11,4</td><td>49,3</td><td>9</td><td>489</td></tr></tbody><tfoot align=»left» bgcolor =»#f5f5dc» title=»Итого:»><tr><th>Итого:</th><td>20,9</td><td>53,3</td><td>83,2</td><td>844</td></tr></tfoot></table></body></html>
смотреть пример
А вот атрибут rules в отличие от frame наоборот указывает на то, как следует рисовать границы между ячейками таблицы.
Атрибут rules может принимать следующие значения:
- all — отображать все границы между ячейками.
- none — не отображать границы между ячейками.
- rows — отображать границы только между строками.
- cols — отображать границы только между стобцами.
- groups — отображать границы только между группами строк и группами столбцов образованными с помощью тегов: <thead>, <tbody>, <tfoot> и <colgroup>.
Пример:
<!DOCTYPE HTML PUBLIC «-//W3C//DTD HTML 4.01 Transitional//EN» «http://www.w3.org/TR/html4/loose.dtd»><html><head><title>rules</title></head><body><table border=»1″ rules=»groups» width=»500″ cellpadding=»3″ cellspacing=»0″><caption><b>Энергетическая ценность продуктов питания:</b></caption><thead bgcolor =»#deb887″ title=»Шапка»><tr><th>Продукт</th><th>Белки</th><th>Жиры</th><th>Углеводы</th><th>ккал</th></tr></thead><tbody align=»left» bgcolor =»#faebd7″ title=»Энергетическая ценность продуктов питания»><tr><th>Хлеб ржаной</th><td>4,7</td><td>0,7</td><td>49,8</td><td>214</td></tr><tr><th>Молоко</th><td>2,8</td><td>3,2</td><td>4,7</td><td>58</td></tr><tr><th>Картофель</th><td>2</td><td>0,1</td><td>19,7</td><td>83</td></tr><tr><th>Свинина</th><td>11,4</td><td>49,3</td><td>9</td><td>489</td></tr></tbody><tfoot align=»left» bgcolor =»#f5f5dc» title=»Итого:»><tr><th>Итого:</th><td>20,9</td><td>53,3</td><td>83,2</td><td>844</td></tr></tfoot></table></body></html>
смотреть пример
Атрибут rules напрочь игнорирует браузер Opera, но как я уже не раз намекал такие проблемы можно решить с помощью средств CSS.
HTML rules attribute
The purpose of the HTML rules attribute is to specify which rulings (between rows and columns) are to be shown in a table.
Supported elements
HTML rules attribute supports table element.
Type of value
| Values | Description |
|---|---|
| all | All rulings are shown. |
| cols | Only column rulings are shown. |
| groups | Only group rulings are shown. |
| none | No rulings are shown. |
| rows | Only row rulings are shown. |
Default value
Default value of HTML rules attribute is all
Supported doctypes
HTML 4.01 strict, HTML 4.01 transitional, HTML 4.01 frameset.
Example of HTML rules attribute with table element
View this example in a separate browser window
Test your Programming skills with w3resource’s quiz.
Follow us on Facebook and Twitter for latest update.
- Weekly Trends
- Java Basic Programming Exercises
- SQL Subqueries
- Adventureworks Database Exercises
- C# Sharp Basic Exercises
- SQL COUNT() with distinct
- JavaScript String Exercises
- JavaScript HTML Form Validation
- Java Collection Exercises
- SQL COUNT() function
- SQL Inner Join
- JavaScript functions Exercises
- Python Tutorial
- Python Array Exercises
- SQL Cross Join
- C# Sharp Array Exercises
We are closing our Disqus commenting system for some maintenanace issues. You may write to us at reachyahoocom or visit us at Facebook