
Install Modules in Python 3
The package manager is the best way to install Python 3 modules. However, modules that do not support can still be installed locally as long as they provide a file.
Python includes a large number of useful standard modules, which are known as the Library Reference. These modules do not have to be installed and are available to import and use as long as Python is installed on your system. A good example of a standard Python module is the module.
These instructions are geared toward Ubuntu users but are generally applicable for most Linux distributions.
Install Modules with pip
-
Ensure the module is already installed. can be installed using the APT package manger.
-
Verify the release of to ensure it is installed correctly.
-
Install the new Python module using the command . The following example demonstrates how to install the module, which is used for media processing tasks.
-
To list all installed Python modules and packages, use the command.
Install Modules Locally
If a module cannot be installed using , there is almost always a way to install it locally. To install a module locally, download it and run the associated script.
The following example explains how to install the Python kubernetes-client module without using .
Like most modules nowadays, this module is also available through . It can be installed using . It is always worth verifying whether a module is available through first. The following instructions are provided as a resource for cases where the module can only be installed locally.
-
Download the package and extract it into a local directory. This particular example uses , but different modules provide different download instructions.
-
Consult the installation directives for the module to determine the location of the file. In this case, it is located in the directory.
If the module does not have a file, consult the instructions on the Python site. See the sections on and .
-
Install the module using the command.
This particular module also requires the module. It is not uncommon for locally-installed modules to require the installation of other modules before they can be used.
«Fake» loading third-party UI with a facade
You might be importing a third-party script and have less control over what it renders or when it loads code. One option for implementing load-on-interaction is straight-forward: use a facade. A facade is a simple «preview» or «placeholder» for a more costly component where you simulate the basic experience, such as with an image or screenshot. It’s terminology we’ve been using for this idea on the Lighthouse team.
When a user clicks on the «preview» (the facade), the code for the resource is loaded. This limits users needing to pay the experience cost for a feature if they’re not going to use it. Similarly, facades can preconnect to necessary resources on hover.
6.2. Standard Modules
Python comes with a library of standard modules, described in a separate
document, the Python Library Reference (“Library Reference” hereafter). Some
modules are built into the interpreter; these provide access to operations that
are not part of the core of the language but are nevertheless built in, either
for efficiency or to provide access to operating system primitives such as
system calls. The set of such modules is a configuration option which also
depends on the underlying platform. For example, the module is only
provided on Windows systems. One particular module deserves some attention:
, which is built into every Python interpreter. The variables
and define the strings used as primary and secondary
prompts:
>>> import sys
>>> sys.ps1
'>>> '
>>> sys.ps2
'... '
>>> sys.ps1 = 'C> '
C> print('Yuck!')
Yuck!
C>
These two variables are only defined if the interpreter is in interactive mode.
The variable is a list of strings that determines the interpreter’s
search path for modules. It is initialized to a default path taken from the
environment variable , or from a built-in default if
is not set. You can modify it using standard list
operations:
Finding the FileFinding the File permalink
It wouldn’t be any fun to write out absolute URLs for every stylesheet you
import, so Sass’s algorithm for finding a file to import makes it a little
easier. For starters, you don’t have to explicitly write out the extension of
the file you want to import; will automatically load
, , or .
️ Heads up!
To ensure that stylesheets work on every operating system, Sass imports files
by URL, not by file path. This means you need to use forward slashes, not
backslashes, even when you’re onWindows.
Load Paths
All Sass implementations allow users to provide load paths: paths on the
filesystem that Sass will look in when resolving imports. For example, if you
pass as a load path, you can use to
load .
Imports will always be resolved relative to the current file first, though. Load
paths will only be used if no relative file exists that matches the import. This
ensures that you can’t accidentally mess up your relative imports when you add a
newlibrary.
Fun fact:
Unlike some other languages, Sass doesn’t require that you use for
relative imports. Relative imports are alwaysavailable.
Partials
As a convention, Sass files that are only meant to be imported, not compiled on
their own, begin with (as in ). These are called partials, and
they tell Sass tools not to try to compile those files on their own. You can
leave off the when importing apartial.
Index Files
- Dart Sass
- ✓
- LibSass
- since 3.6.0
- Ruby Sass
- since 3.6.0
If you write an or in a folder, when the folder
itself is imported that file will be loaded in itsplace.
Custom Importers
All Sass implementations provide a way to define custom importers, which control
how s locate stylesheets:
-
Node Sass and Dart Sass on npm provide an as
part of their JSAPI. -
Dart Sass on pub provides an abstract class that can be
extended by a customimporter. -
Ruby Sass provides an abstract class that can be
extended by a customimporter.
Импорт всего
В Пайтоне предусмотрена возможность импорта всех функций, переменных и модулей за раз. Это может быть плохой идеей, так как такой импорт может засорить ваше пространство имен. Пространство имен – это место, в котором находятся все ваши переменные, пока работает программа. К примеру, у вас есть своя переменная под названием sqrt:
Python
from math import sqrt
sqrt = 5
|
1 |
frommathimportsqrt sqrt=5 |
Только что вы сделали функцию sqrt переменной, значение которой 5. Это называется затенением (shadowing). Это особенно хитрый способ упрощения своей жизни, когда вы выполняете импорт всего из модуля. Давайте взглянем:
Python
from math import *
sqrt = 5
sqrt(16)
|
1 |
frommathimport* sqrt=5 sqrt(16) |
Будет ошибка!
Python
Traceback (most recent call last):
File “<string>”, line 1, in <fragment>
TypeError: ‘int’ object is not callable
|
1 |
Traceback(most recent call last) File“<string>”,line1,in<fragment> TypeError‘int’objectisnotcallable |
Для импорта всего, кроме определенных частей модуля, мы просто используем знак * , что означает, что нам нужно импортировать все. В случае если мы не знаем, что находится в модуле math, мы даже не поймем, что уничтожили одну из импортированных функций. Когда мы пытаемся вызвать функцию sqrt после присвоения её целому числу, мы обнаружим, что она больше не работает.
По этой причине, в большинстве случаев рекомендуется использовать один из указанных в данном разделе способов для импорта. Но есть и несколько исключений из этого правила. В некоторых модулях импорт предусмотрен заранее, это возможно благодаря методу “*”. Одним из ярких примеров является Tkinter – набор инструментов, работающий с Пайтоном, который позволяет пользователю создавать пользовательские интерфейсы на рабочем столе. Причина, по которой определенно удобно импортировать через Tkinter заключается в том, что модули все имеют имена, так что вероятность повторного использования стремится к нулю.
Partials
Sass compiles all the .scss or .sass files inside the directory it’s watching. However, when your goal is to import a file, you don’t need to compile it directly.
You can tell Sass not to compile a file through the file’s name. If you add an underscore to the start of the file name, Sass won’t compile it. If you don’t want color.scss to compile to .color.css, name the file _color.scss instead. Files named this way are called partials in Sass terminology.
You can skip the underscore when referencing a file inside an @import rule, the same way you can skip the extension.
@import “color”;
Sass understands to import the file _color.scss (or _color.sass) from the current directory, if present.


The ability to tell Sass which files to compile and which to only include in other files, allows you to create a file and directory structure that’s easier for you to maintain, without ending up with a lot of extra CSS files.
Chat widgets
Calibre app improved performance of their Intercom-based live chat by 30% through usage of a similar facade approach. They implemented a «fake» fast loading live chat button using just CSS and HTML, which when clicked would load their Intercom bundles.
Postmark noted that their Help chat widget was always eagerly loaded, even though it was only occasionally used by customers. The widget would pull in 314KB of script, more than their whole home page. To improve user-experience, they replaced the widget with a fake replica using HTML and CSS, loading the real-thing on click. This change reduced Time to Interactive from 7.7s to 3.7s.
Импорт CSS permalinkИмпорт CSS
- Dart Sass
- since 1.11.0
- LibSass
- partial
- Ruby Sass
- ✗
LibSass поддерживает импорт файлов с расширением , но вопреки спецификации они обрабатываются как файлы SCSS, а не анализируются как CSS. Это поведение устарело, и в настоящее время разрабатывается обновление для поддержки поведения, описанного ниже.
Помимо импорта файлов и , Sass может импортировать простые старые файлы . Единственное правило состоит в том, что импорт не должен явно включать расширение , потому что оно используется для обозначения .
CSS Output
Файлы CSS, импортированные Sass, не поддерживают никаких специальных функций Sass. Чтобы гарантировать, что авторы случайно не напишут Sass в своем CSS, все функции Sass, которые также не являются корректным CSS, будут вызывать ошибки. В противном случае CSS будет отображаться как есть. Его можно даже расширить!
Не используйте @import
В данной статье автор приводит наглядные доказательства, почему не стоит использовать @import для загрузки стилей в документ.
LINK vs. @import
Существует 2 способа загрузки файлов стилей. Использовать тег LINK:
Или импортировать файлы с помощью @import:
Я предпочитаю использовать LINK для удобства, т.к. вы должны помнить, что @import нужно размещать всегда в самом верху блока стилей, в противном случае они не импортируются.
@import @import
Если вы всегда будете использовать только @import для загрузки стилей, то проблем с производительностью не будет, хотя мы увидим ниже, это может привести к ошибке с JavaScript. Оба файла загружаются параллельно (см. рисунок 1) Но проблемы начинают появляться, если использовать @import внутри файла стилей, либо вместе с LINK.
Рис. 1.
LINK @import
В IE (тестировалось в 6, 7, и 8), это привело к тому, что файлы загружаются последовательно друг за другом, как показано на рисунке 2. Соотвественно, время загрузки страницы в IE увеличится.
Рис. 2
LINK с @import
В документе:
в a.css:
Этот способ также приводит к тому, что файлы загружаются последовательно (рис. 3.), а не параллельно, но теперь это происходит не только в IE, но и остальных браузерах. Если подумать — все логично: браузер загружает a.css и начинает парсить его. Обнаружив внутри правило @import, начинается загрузка файла b.css.
Рис. 3.
Блоки LINK с @import
Незначительное отличие от предыдущего примера привело к удивительным результатам в IE. LINK используется для вызова a.css и для нового файла proxy.css, который содержит только @import для b.css.
В proxy.css:
Результаты эксперимента в IE показаны на рисунке 4. Первый запрос — HTML документ. Второй запрос — a.css (2 секунды). Третий — proxy.css. Четвертый — b.css (2 секунды). И вот что удивительно, IE не хочет начинать загрузку b.css, пока файл a.css не будет загружен полностью. Во всех других браузерах такого сюрприза не происходит, что приводит к более быстрой загрузке страницы (см. рисунок 5).
Рис. 4. Результаты в IE.
Рис. 5. Результаты в других браузерах.
Много @imports
На рис. 6 вы увидите, что самый долгий по загрузке — это скрипт. Несмотря на то что он указан после стилей, в IE он загружается первым. Если в скрипте содержится код, который зависит от применяемых стилей (getElementsByClassName, и т.п.), это может привести к ошибкам работы скрипта, т.к. он загружается прежде чем стили.
Рис. 6.
LINK LINK
Использование LINK обеспечивает параллельную загрузку файлов во всех браузерах (см. рисунок 7). Применение LINK также гарантирует, что файлы будут загружены именно в том порядке, который указан в коде документа.
Рис. 7.
Для нас особенно плохо то, что ресурсы могут быть загружены в другом порядке, нежели указано в документе. Все браузеры должны заглядывать наперед перед загрузкой стилей для извлечения правил @import и начинать их загрузку немедленно. До тех пор, пока браузеры не реализуют это, я советую избегать использование @import и загружать стили только с помощью LINK.
Conclusion
Let’s see what we have learned in this article:
- You can link a CSS file into another CSS file by using the import rule.
- While importing, make sure to define the important rule at the top of the file you want to import.
- You can import a CSS file by specifying the path or by defining the URL of that file.
- You can also import a CSS file containing different styles and settings for a particular media.
- The import rule allows you to import files containing four types of media settings, including print, screen, speech and all.
- You can also add a CSS file into an HTML document by import rule.
- The import rule allows you to style some elements in a different CSS file and then import them into an HTML document.
This article has covered the information that you need to know about the import rule. It’s time to use this feature in your HTML and CSS files to remove the disorderliness and create an organized piece of code.
Импортируем модуль «this»
В Пайтоне есть ключевые слова для импорта модулей. Попробуйте вот этот:
Python
import this
| 1 | importthis |
Запустив данный код в своем интерпретаторе, вы увидите что-то в таком духе:
Python
The Zen of Python, by Tim Peters
Beautiful is better than ugly.
Explicit is better than implicit.
Simple is better than complex.
Complex is better than complicated.
Flat is better than nested.
Sparse is better than dense.
Readability counts.
Special cases aren’t special enough to break the rules.
Although practicality beats purity.
Errors should never pass silently.
Unless explicitly silenced.
In the face of ambiguity, refuse the temptation to guess.
There should be one— and preferably only one —obvious way to do it.
Although that way may not be obvious at first unless you’re Dutch.
Now is better than never.
Although never is often better than *right* now.
If the implementation is hard to explain, it’s a bad idea.
If the implementation is easy to explain, it may be a good idea.
Namespaces are one honking great idea — let’s do more of those!


|
1 |
The Zen of Python, by Tim Peters Beautiful is better than ugly. Explicit is better than implicit. Simple is better than complex. Complex is better than complicated. Flat is better than nested. Sparse is better than dense. Readability counts. Special cases aren’t special enough to break the rules. Although practicality beats purity. Errors should never pass silently. Unless explicitly silenced. In the face of ambiguity, refuse the temptation to guess. There should be one— and preferably only one —obvious way to do it. Although that way may not be obvious at first unless you’re Dutch. Now is better than never. Although never is often better than *right* now. If the implementation is hard to explain, it’s a bad idea. If the implementation is easy to explain, it may be a good idea. Namespaces are one honking great idea — let’s do more of those! |
Поздравляем, вы нашли «пасхальное яйцо» в Пайтоне, также известное как «Дзен». Это одна из лучших неофициальных частей работы в Пайтон. Сам по себе модуль this не делает ничего особенного, только показывает оригинальный способ импорта чего-либо. Теперь давайте импортируем что-нибудь, чем мы сможем воспользоваться в будущем, к примеру, модуль math:
Python
import math
print(math.sqrt(4)) # 2.0
|
1 |
importmath print(math.sqrt(4))# 2.0 |
В примере выше мы импортировали модуль math и сделали что-то новое. Мы вызвали одну из функций модуля – sqrt (т.е. square root – квадратный корень). Для вызова метода импортированного модуля, нам нужно использовать следующий синтаксис: module_name.method_name(аргумент). В данном примере мы нашли квадратный корень от 4. В модуле math есть много других функций, которыми мы можем воспользоваться, такие как нахождение косинуса, факториал, логарифмы и другие. Вы можете призывать эти функции таким же образом, как и с функцией sqrt. Единственное, в чем вам нужно удостовериться – принимают ли они большее количество аргументов или нет. Теперь посмотрим на другой способ импорта.
Импорт с использованием абсолютных и относительных путей
Импорт по абсолютному пути использует полный путь (начинающийся с корневой папки проекта) до требуемого для импорта модуля .
Импорт по относительному пути использует относительный путь (начинающийся с пути к текущему модулю) до требуемого для импорта модуля. Существует два вида импорта с использованием относительного пути:
- явный импорт задается в следующей форме , где имеет префикс в виде последовательности имен каталогов, разделенных точками , которые указывают, на сколько каталогов необходимо переместиться вверх или вниз. При этом одна точка соответствует текущему каталогу, а две точки предписывают переместиться на одну папку вверх и т.д.
- неявный импорт записывается так, как будто текущий каталог является частью содержимого переменной . Неявный относительный импорт поддерживается только Python 2 и не поддерживается Python 3.
В документации Python говорится о том, как Python 3+ обрабатывает импорт по относительному пути:
Например, предположим, что мы запускаем на исполнение скрипт , который импортирует , который, в свою очередь, импортирует , и . Инструкции в файле будут выглядеть следующим образом:
# импорт по абсолютному пути
import other
import packA.a2
import packA.subA.sa1

# явный импорт по относительному пути
import other
from . import a2
from .subA import sa1

# неявный импорт по относительному пути (не поддерживается в Python 3)
import other
import a2
import subA.sa1
Импорт по относительному пути может выполняться только для модулей в пакете; не допускается использовать эту возможность для ссылки на модули, которые находятся в другом каталоге файловой системы
Обратите внимание, что при импорте по относительному пути, точки помогут перемещаться при поиске файла для импорта только выше каталога (но не включая его), содержащего скрипт, запускаемый из командной строки. Таким образом, не будет работать в
Это приводит к ошибке ValueError: attempted relative import beyond top-level package (попытка импорта по относительному пути за пределы пакета верхнего уровня).
В целом импорт по абсолютному пути предпочтительнее чем по относительному. Их использование позволяет избежать путаницы между явным или неявным импортом. Кроме того, любой сценарий, который использует явный импорт по относительному пути, не может быть запущен напрямую:
Replacing interactive embeds with a static variant
We have discussed the import-on-interaction pattern and progressive loading, but what about going entirely static for the embeds use-case?.
The final rendered content from an embed may be needed immediately in some cases e.g a social media post that is visible in the initial viewport. This can also introduce its own challenges when the embed brings in 2-3MB of JavaScript. Because the embed content is needed right away, lazy-loading and facades may be less applicable.
If optimizing for performance, it’s possible to entirely replace an embed with a static variant that looks similar, linking out to a more interactive version (e.g the original social media post). At build time, the data for the embed can be pulled in and transformed into a static HTML version.
This is the approach @wongmjane leveraged on their blog for one type of social media embed, improving both page load performance and removing the Cumulative Layout Shift experienced due to the embed code enhancing the fallback text, causing layout shifts.
While static replacements can be good for performance, they do often require doing something custom so keep this in mind when evaluating your options.
permalinkA Basic Example
OK so what’s a very basic import look like?
In its simplest form an import works just like calling a stylesheet. We have to make sure there’s a document to import so let’s create a fake blog post in .
To test, you’ll need to host your and folder on a local server. I recommend serve if you don’t already have one installed.
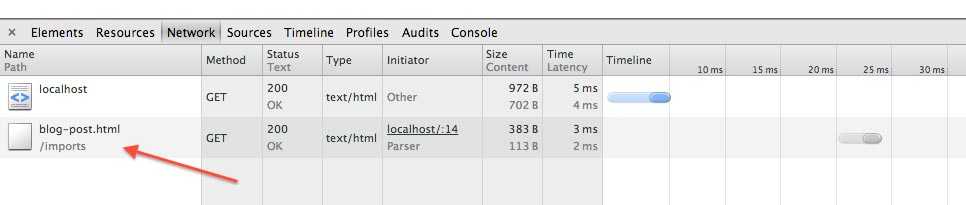
Once you have that setup, visit your index page. If you take a look at the console you can see the request returning.

Well that’s cool, but now what?
Let’s grab the content of the import using some JavaScript and append it to the body. We’ll do this back in our .
First we query the tag which loaded our import. Then we extract our element and store it in a variable called . In browsers with native support for imports (i.e. Chrome and Opera) notice that we don’t have to write any event handler code to wait till the import has loaded, we can just assume the content is there and start working with it. Finally we add the new content to our .
If you’re following along you should end up with something like this:
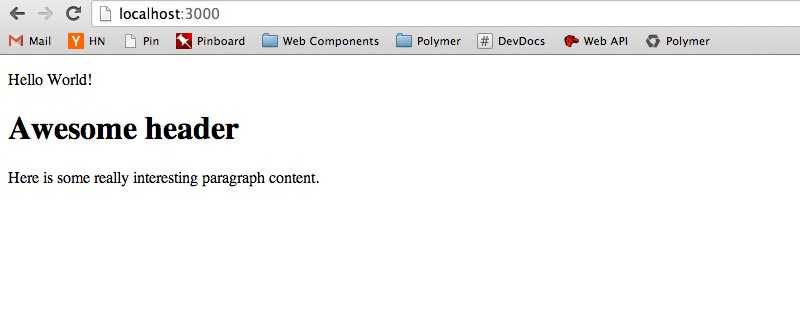
Exciting, I know ![]() But it demonstrates a no frills approach to loading content that doesn’t require ajax and writing our own event handlers. Let’s keep digging to see what else we find…
But it demonstrates a no frills approach to loading content that doesn’t require ajax and writing our own event handlers. Let’s keep digging to see what else we find…
Browser compatibility
The compatibility table on this page is generated from structured data. If you’d like to contribute to the data, please check out https://github.com/mdn/browser-compat-data and send us a pull request.
| Chrome | Edge | Firefox | Internet Explorer | Opera | Safari | Android webview | Chrome for Android | Firefox for Android | Opera for Android | Safari on iOS | Samsung Internet | Node.js | |
|---|---|---|---|---|---|---|---|---|---|---|---|---|---|
|
Chrome Full support 64 |
Edge Full support 79 |
Firefox Full support 62 |
IE No support No |
Opera Full support 51 |
Safari Full support 11.1 |
WebView Android Full support 64 |
Chrome Android Full support 64 |
Firefox Android Full support 62 |
Opera Android Full support 47 |
Safari iOS Full support 12 |
Samsung Internet Android Full support 9.0 |
nodejs Full support 10.4.0 |
Implementation Progress
The following table provides a daily implementation status for this feature, because this feature has not yet reached cross-browser stability. The data is generated by running the relevant feature tests in Test262, the standard test suite of JavaScript, in the nightly build, or latest release of each browser’s JavaScript engine.
Conclusion #
HTML Imports allow bundling HTML/CSS/JS as a single resource. While useful by themselves, this idea becomes extremely powerful in the world of Web Components. Developers can create reusable components for others to consume and bring in to their own app, all delivered through .
HTML Imports are a simple concept, but enable a number of interesting use cases for the platform.
Use cases
-
Distribute related . Theoretically, you could import an entire web app into another.
-
Code organization — segment concepts logically into different files, encouraging modularity and reusability**.
-
Deliver one or more Custom Element definitions. An import can be used to and include them in an app. This practices good software patterns, keeping the element’s interface/definition separate from how its used.
-
— resources are automatically de-duped.
-
Chunk scripts — before imports, a large-sized JS library would have its file wholly parsed in order to start running, which was slow. With imports, the library can start working as soon as chunk A is parsed. Less latency!
-
Parallelizes HTML parsing — first time the browser has been able to run two (or more) HTML parsers in parallel.
-
Enables switching between debug and non-debug modes in an app, just by changing the import target itself. Your app doesn’t need to know if the import target is a bundled/compiled resource or an import tree.
Использование объектов из импортированного модуля или пакета
Существует четыре различных вида синтаксиса для записи операторов импорта.
Пусть любое имя после ключевого слова .
- если — это имя модуля или пакета, то для использования объектов, определенных в , вам нужно написать .
- если является именем переменной, его можно использовать непосредственно напрямую.
- если является именем функции, то его можно вызвать с помощью инструкции .
Необязательно, но после любого оператора может быть добавлена инструкция вида , например, . Эта инструкция переименовывает в в пределах файла скрипта
Обратите внимание, что имя далее не действительно и его использовать не имеет смысла. Например
Аргументом при ключевом слове может быть одно имя или список из нескольких имен. Каждое из этих имен может быть также переименовано с помощью ключевого слова . Например, следующие инструкции импорта в файле в будут работать правильно: , .


Рассмотрим следующий пример: в файле необходимо импортировать функцию из файла .
Решение №1:
from packA.subA.sa1 import helloWorld
затем мы можем вызывать функцию непосредственно по имени:
a = helloWorld()
Решение №2:
# следующие две строки кода эквивалентны
from packA.subA import sa1
import packA.subA.sa1 as sa1
затем мы должны будем использовать в качестве префикса к имени функции имя модуля.
x = sa1.helloWorld()
Иногда это решение предпочтительнее Решения №1 для того чтобы сделать явным вызов функции из модуля .
Решение №3:
import packA.subA.sa1
Далее необходимо использовать полный путь:
x = packA.subA.sa1.helloWorld()
Использование dir() для проверки содержимого импортированного модуля
После импорта модуля, используйте функцию для того чтобы получить список доступных имен модуля. Например, предположим, что вы импортируете . Если в определена функция , то инструкция в числе прочих выведет имя .
>>> from packA.subA import sa1
>>> dir(sa1)
Импорт пакетов
Импорт пакета концептуально эквивалентен импорту файла из папки пакета в качестве модуля. И действительно это так. Вот как Python рассматривает импортируемый пакет:
>>> import packA
>>> packA
<module 'packA' from 'packA\__init__.py'>
Скриптам, импортирующим пакеты, доступны лишь те объекты, которые были объявлены в файле пакета . Например, так как каталог не содержит файла , то вызов инструкции в Python 3.3+ будет мало полезен, поскольку никакие объекты при импорте пакета не будут доступны. Последующий вызов завершится неудачей, поскольку объект не будет импортирован.
Importing your code
So far, we have seen how to import packages and modules developed by other people. Importing, however, is a great tool to structure different parts of the code. It makes it easier to maintan and collaborate. Therefore, sooner or later we are going to find ourselves importing our code. We can start simple and slowly build the complexity.
We can create a file first.py, with following code:
In a file called second.py, we can add the following code:
And we run it:
That is as easy as it gets. We define a function in a file, but we use it in another file. Once we have many files, it becomes handier to start creating some structure to organize the program. We can create a folder called package_a, and we add a new file, called third.py. The folder structure is like this:
In third we create a new function, appropriately called :
The examples are very basic, but they already start to show some patterns and caveats in the importing procedures. If we want to use the new function from the second.py, we need to import it:
If we run the code, we’ll get the following output:
Pay attention to the notation we used to import the . We specified the folder, in this case, and then we referred to the file with a dot: . This is the way in which the hyerarchy of folders and files is transformed into packages and modules in Python. In this case, replacing the folder separators by a we end up having , and we stripped the extension.