

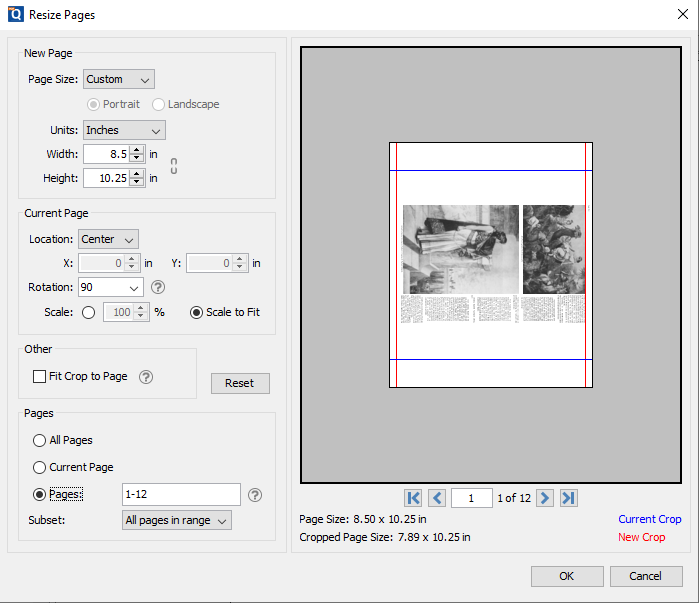
Crop by ratio
Crops the image to the specified aspect ratio, cutting off
the rest of the image.
-
— two numbers greater than zero separated by .
Ratio is the quotient from the division of these numbers. -
— horizontal and vertical offsets in pixels or percents
separated by .
Offset in pixels is allowed to be negative. Percent values are
a position of cropped area in full image canvas and should end
with or char.
Examples: , , .
A single semantic shortcut is also allowed as an alignment value: ,
, , , .
If alignment is not specified, value is used.
In URLs, is an escape character and should be encoded with escape
sequence, e.g. . For convenience, you can use
the shortcut for percent which doesn’t require encoding.
Background Images
You can also resize background images using CSS. In particular, you can use the property to resize background images.
Here’s an example:
In this example, I use the keyword to specify the size of the background image. You can also supply any or value, the keyword, or (which specifies that the image size is automatically determined using the intrinsic width and/or height of the image).
Further to this, all CSS properties are able to use the , , and values.
When working with background images, you also have the option of using the property as a shorthand to specify the background image URL, its size, the background color, etc, all in one go. I encourage you to look at that page, because there are several other things you can do with regards to resizing/cropping/repeating background images, etc.
Crop by objects
Crops the image to the object specified by the parameter.
-
— one of the following values:
-
— the largest detected face in the image is used as
a crop basis. - — the whole image is used as a crop basis.
-
— the largest detected face in the image is used as
-
— two numbers greater than zero separated by .
Ratio is the quotient from the division of these numbers.
The found object fits into the given aspect ratio. -
— width and height in percents separated by .
Percent values are based on the tag size and should end with
or char.
Examples: , . -
— horizontal and vertical offsets in percentage
values separated by comma ().
The offsets represent a position of cropped area that is based on
the selected tag location (for instance, a face). The offset
percentage values should end with or char.
Examples: ,
A single semantic shortcut is also allowed as an alignment value: ,
, , , .
If alignment is not specified, value is used.
In URLs, is an escape character and should be encoded with escape
sequence, e.g. . For convenience, you can use
the shortcut for percent which doesn’t require encoding.
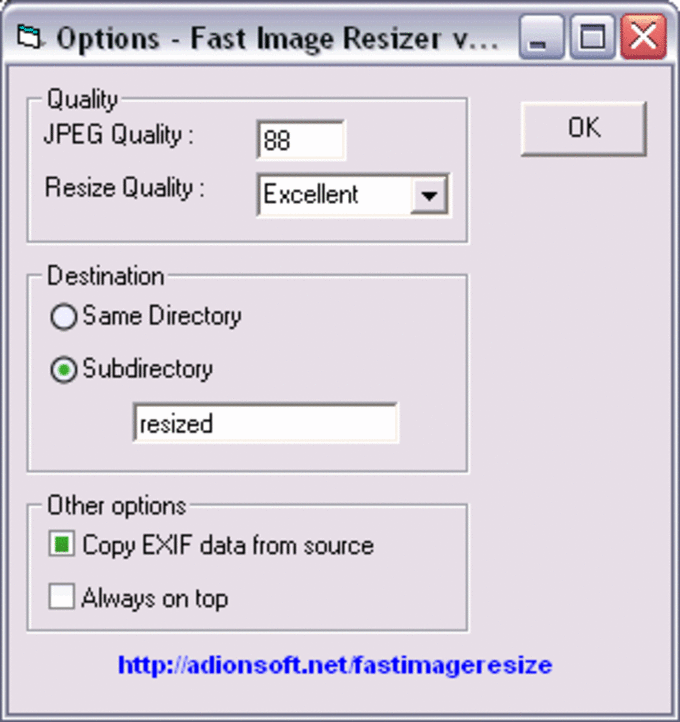
About Birme
New features in version 2
- NEW* Added support for WebP format
- Now you can adjust the focal point of each photo individualy
- Auto load previous settings you used
- Auto focal point detection
- Renaming file names in bulk
- Save resized images as files in bulk
- Coming up: customize watermark for photos. This would be very helpful for photographers.
A bit of history
Almost 10 years ago, we handed over a beautifully themed WordPress website to a client. After a while, we found out the website started to look like a disaster because all the images uploaded by the client were distorted. The person in charge of uploading photos didn’t have the right software to crop the images.
Spending thousands of dollars to buy a copy of Photoshop to resize images in bulk was not a wise choice. However, we couldn’t find any decent software to crop and resize the images in batch properly. They either produced pixelated images or distorted the image into the dimension without cropping. To this date, I still wonder why anyone needs a squashed image to fit into a desired dimension.
Even you have Photoshop, it is not so bad to record one batch action to resize the images. However, if you want to change a different dimension, you need to record a different batch action. Eventually, you will end up with have many batch actions in your Photoshop. You’ll have the same problem if you use Automator in Mac.
Another problem is that all these software options needed to be installed and some companies’ security policies are very strict and installing a software would need layers of management approval.
I wanted to solve this problem. In the beginning, I tried to create an app which did not require installation. However, I soon hit a major problem of supporting multiple operating systems. All the versions of Windows and Mac required different executable files and I didn’t have the time nor means to test it on all systems.
Until one day the idea of making a website to solve this problem came to my mind. For sure a website wouldn’t be as powerful as a software, but it could do a decent job.
The first version of BIRME was first built in 2012 with HTML, Javascript and a little bit of help from Flash (do you still remember there was Flash?). In 2015, BIRME removed the Flash component which was used to generate a zip file and prompt the browser for download.
The design of BIRME 2.0 was done in 2016. Slowly the code has been refreshed and it is now finally close to what we once envisioned.
Resize Images Using Nodeca/Pica
Pica is an in-browser image resizing tool that lets you resize a Canvas element, Image element, or Image Bitmap. It outputs the resized image as a Canvas element, which can then be converted to a blob for upload.
Pica can be used to resize images for upload, which decreases upload time and saves server side processing time; it can also be used to generate thumbnails directly in the browser.
Pica autoselects between webworkers, webassembly, createImageBitmap, or pure JS for resizing images. Depending on which browser your client uses, and what resources are available, Pica automatically falls back to the best available option to convert images.
Get Started
To get started with Pica, install it into your project using NPM or Yarn.
Next, import the Pica module into the file you use to resize images, and use as follows:
That basic use case is all it takes to resize images in the browser with Pica. Pass the Canvas element you want to resize as the from option. For the to option, create an empty canvas element using document.createElement and pass that.
Configuration
Pica provides the option to pass a configuration object specifying the quality, unsharp amount, filter, and other options for the resized image. Pass it like so:
You can also create a Pica instance by calling new Pica() and passing an optional configuration object with base configurations for all resized images.
Crop
Crops an image by using specified dimensions and alignment.
-
— width and height in pixels or percents separated by
.
Percent values are based on original size and should end with or
char.
Examples: , , . -
— horizontal and vertical offsets in pixels or percents
separated by .
Offset in pixels is allowed to be negative. Percent values are a position
of cropped area in full image canvas and should end with or char.
Examples: , , .
A single semantic shortcut is also allowed as an alignment value: ,
, , , .
If alignment is not specified, value is used.
In URLs, is an escape character and should be encoded with escape
sequence, e.g. . For convenience, you can use
the shortcut for percent which doesn’t require encoding.
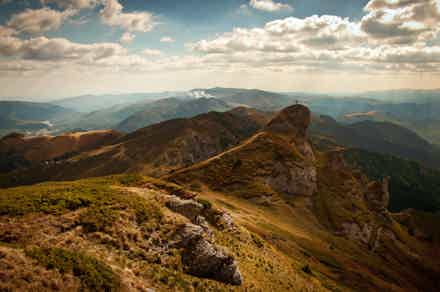 Original Original |
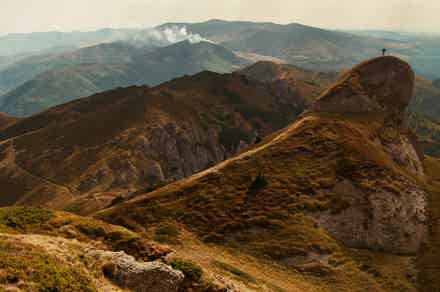 |
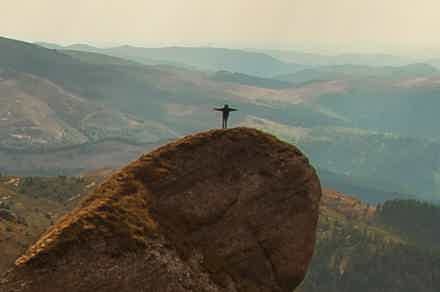 |
Пример использования
<!DOCTYPE html>
<html>
	<head>
		<title>Использование jQuery метода .resize() (без параметров и с функцией)</title>
		<script src = "https://ajax.googleapis.com/ajax/libs/jquery/3.1.0/jquery.min.js"></script>
		<script>
	$( document ).ready(function(){
	  $( "button" ).click(function(){ // задаем функцию при нажатиии на элемент <button>
	    $( window ).resize(); // вызываем событие "resize" на объекте window
	  });
	  $( window ).resize(function(){ // задаем функцию при срабатывании события "resize" на объекте window
	    var width = $( window ).width();// ширина области просмотра браузера
	    $( "p" ).html( width ); // вставляем значение ширины области просмотра браузера
	  });
	});
		</script>
	</head>
	<body>
		<button>Клик</button>
		<p></p>
	</body>
</html>
В этом примере с использованием jQuery метода .resize() мы при нажатии на элемент <button> (кнопка) вызываем событие «resize» на объектe window, которому задали, что при срабатывании события «resize» необходимо получить значение ширины области просмотра браузера и вставить его в элемент <p>. При изменении размеров окна браузера значение в элементе <p> будет изменяться.
Результат нашего примера:
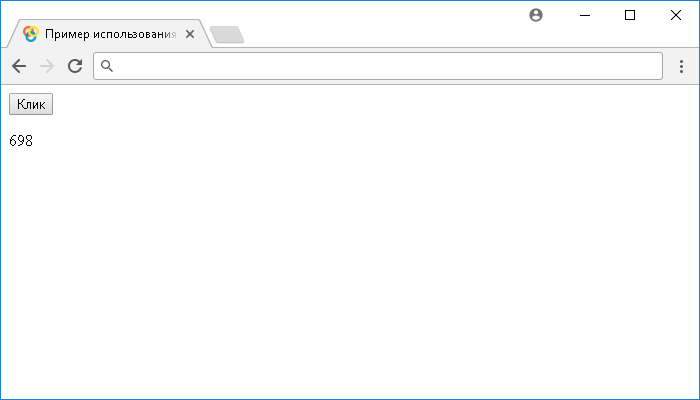
Пример использования jQuery метода .resize() (без параметров и с функцией)jQuery события
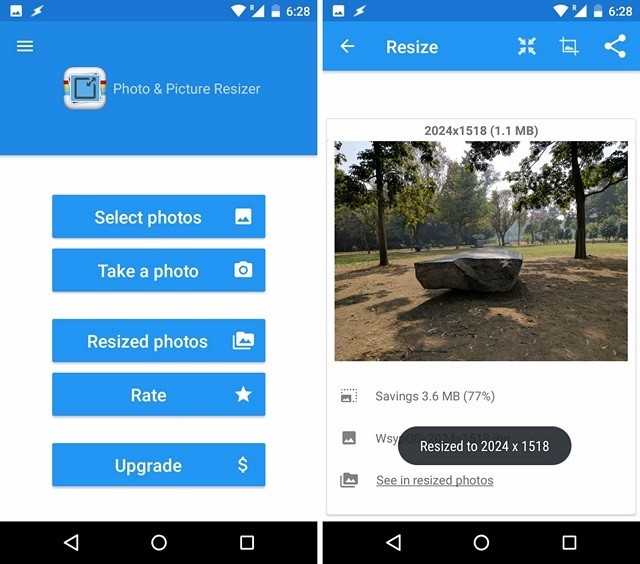
How to resize images online without losing quality
When you use free image resizing tools, you might find that the image’s quality becomes worse, such as blurry, pixelated, or distorted. It’s important to make sure that the tool you use doesn’t lower the image’s quality. This can harm your store’s performance.
Many of the free tools you find online will make it a priority to keep quality high. This can be seen in some of the tools we discussed, which ask you what quality you want your final image to be.
For example, the free image resizer BIRME has a “quality setting” option that lets you render images with 100% original resolution.. We recommend using this option for smaller files.
You can also find image compressor tools online to help resize images. For example, the free image resizer tools I Love IMG and Simple Image Resizer that we discussed above have the option to compress an image.
Optimizilla and Compressor are two other great online image compressor tools. Optimizilla lets you compress multiple images, while Compressor compresses one at a time.
Using the best image Resizer Tools
While it’s easy to overlook, ensuring an image is the right size and quality is one of the most important parts of building your online presence. Quality photos create a positive impression of your company. In some cases, photos can be the difference between a new customer and someone who immediately leaves your website.
There are dozens of tools to resize images online, free of charge. Even if you have no experience, you can find a quick and simple image resizer that can do the job in a few clicks. If you have a higher level of skill, you can use a tool that has more custom options, or you can learn how to resize an image in Photoshop.
To summarize, if you’re looking for:
A simple image resizer tool, you can choose from BeFunky, Free Image Resizer by Shopify, Simple Image Resizer,VistaCreate.
An image resizer tool for social media, you can choose from Social Image Resizer Tool, Photo Resizer, Resize Images for Facebook.
A way to resize more than one image at the same time, you can choose from BIRME, I Love IMG, Bulk Resize Photos.
Get started today optimizing your photos and making your website beautiful and attractive to visitors.
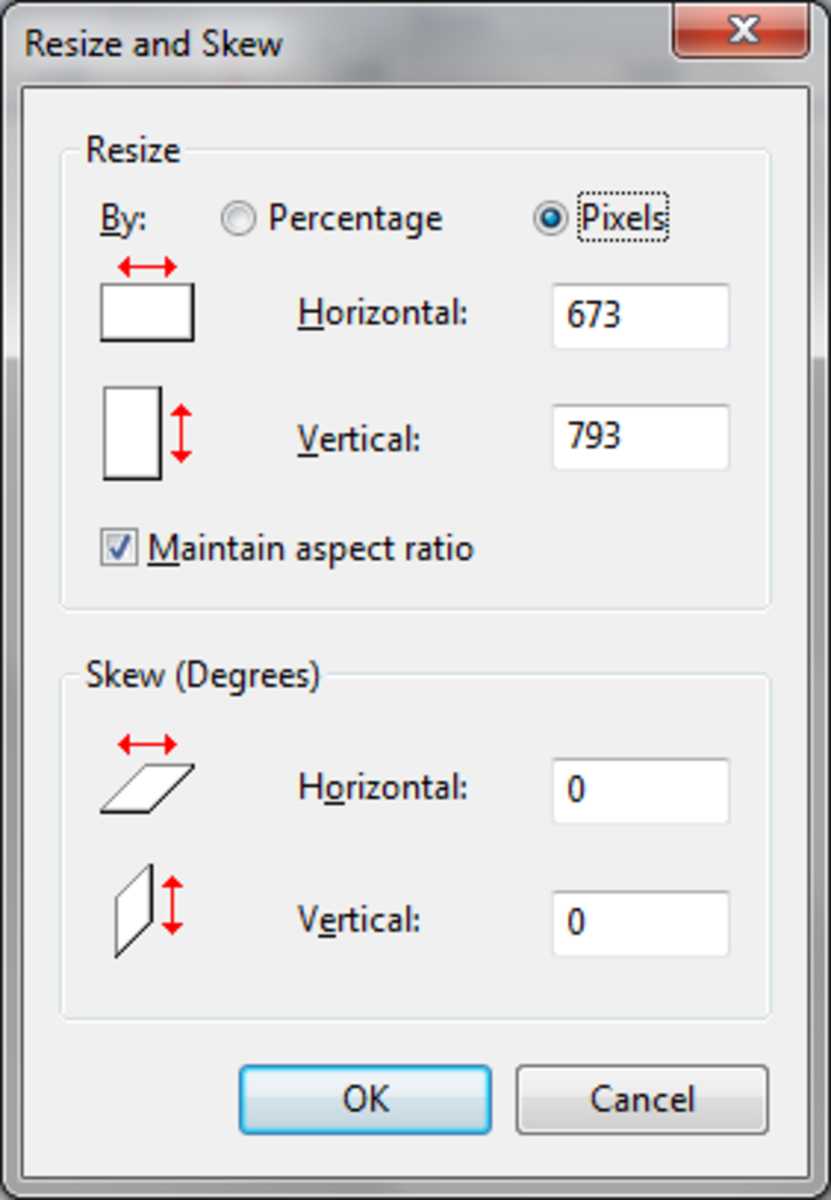
How to Resize an Image Using Microsoft Paint Without Losing Quality
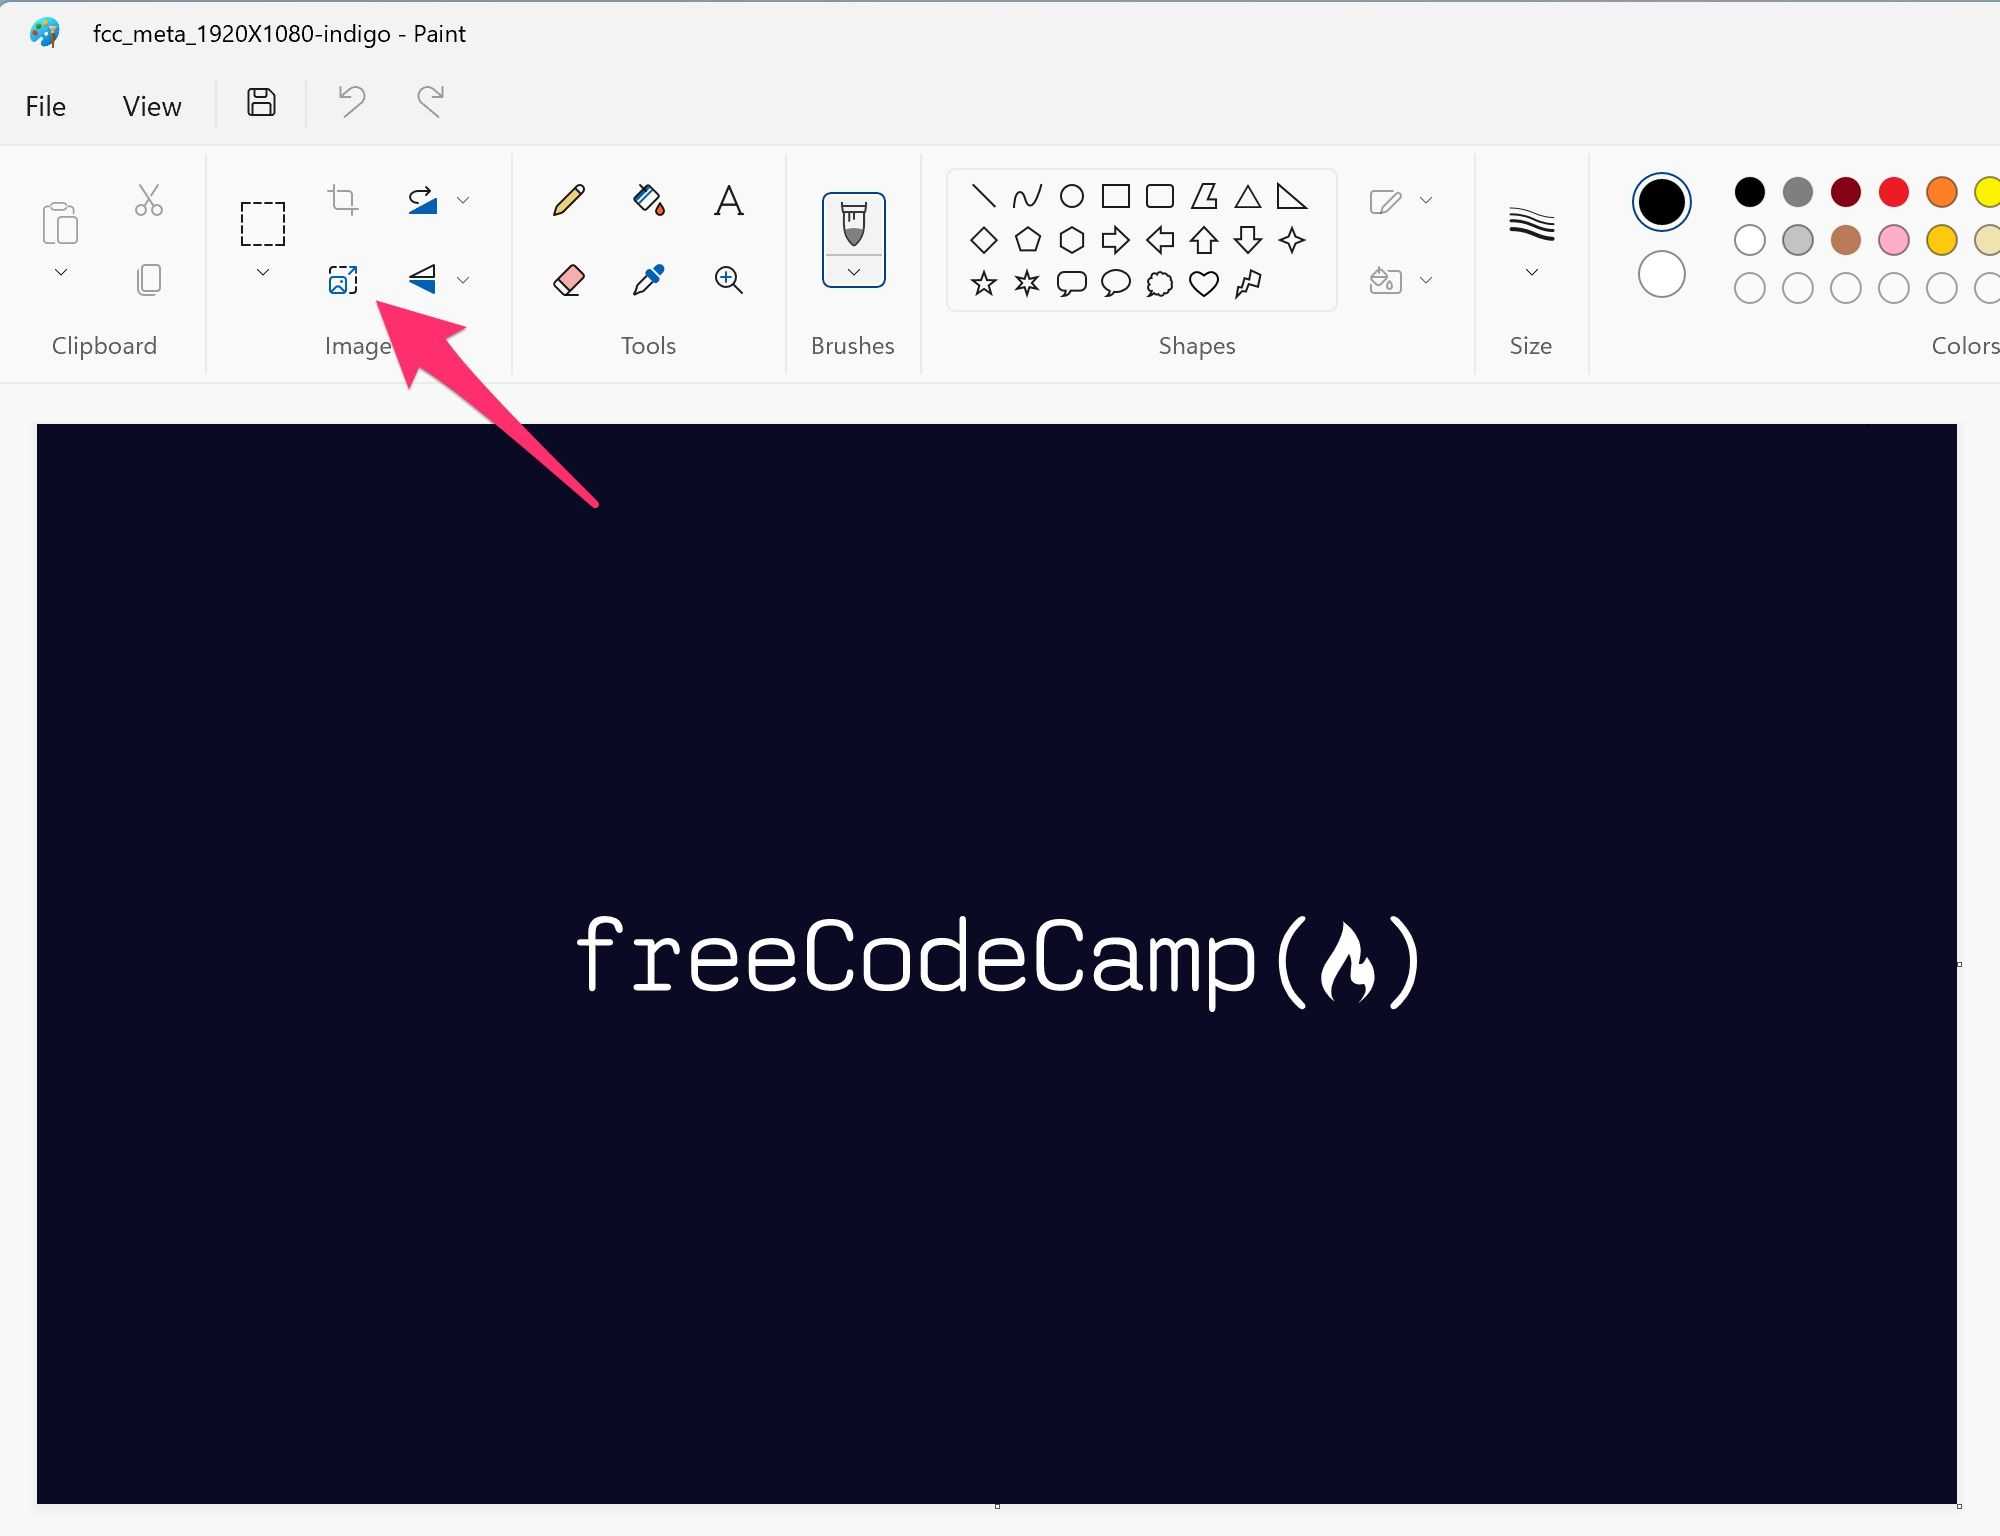
Another way to resize an image without losing quality is to use a program like Microsoft Paint. With Paint, you can resize an image without losing quality by using the «Resize and Skew» dialog box.
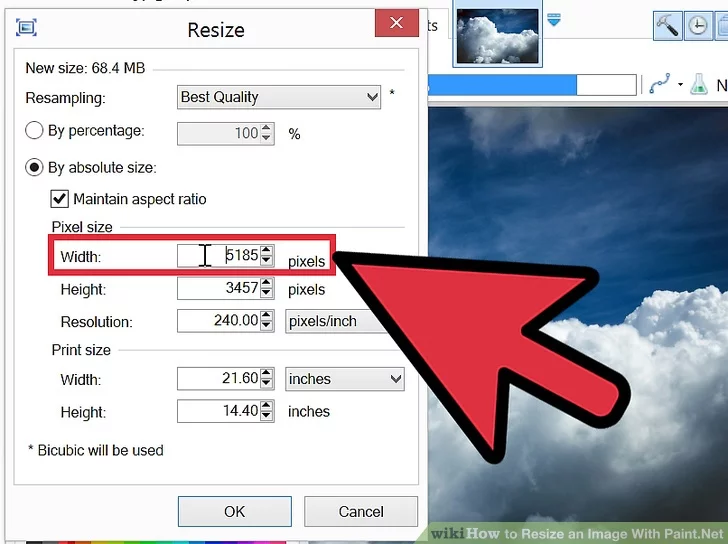

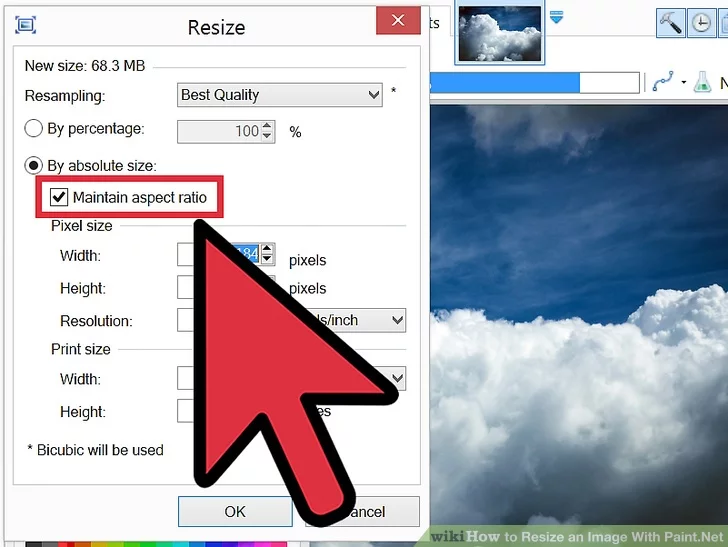
To open the «Resize and Skew» dialog box, open an image, and in the «Image» section of the toolbar, click the «Resize and Skew» button:
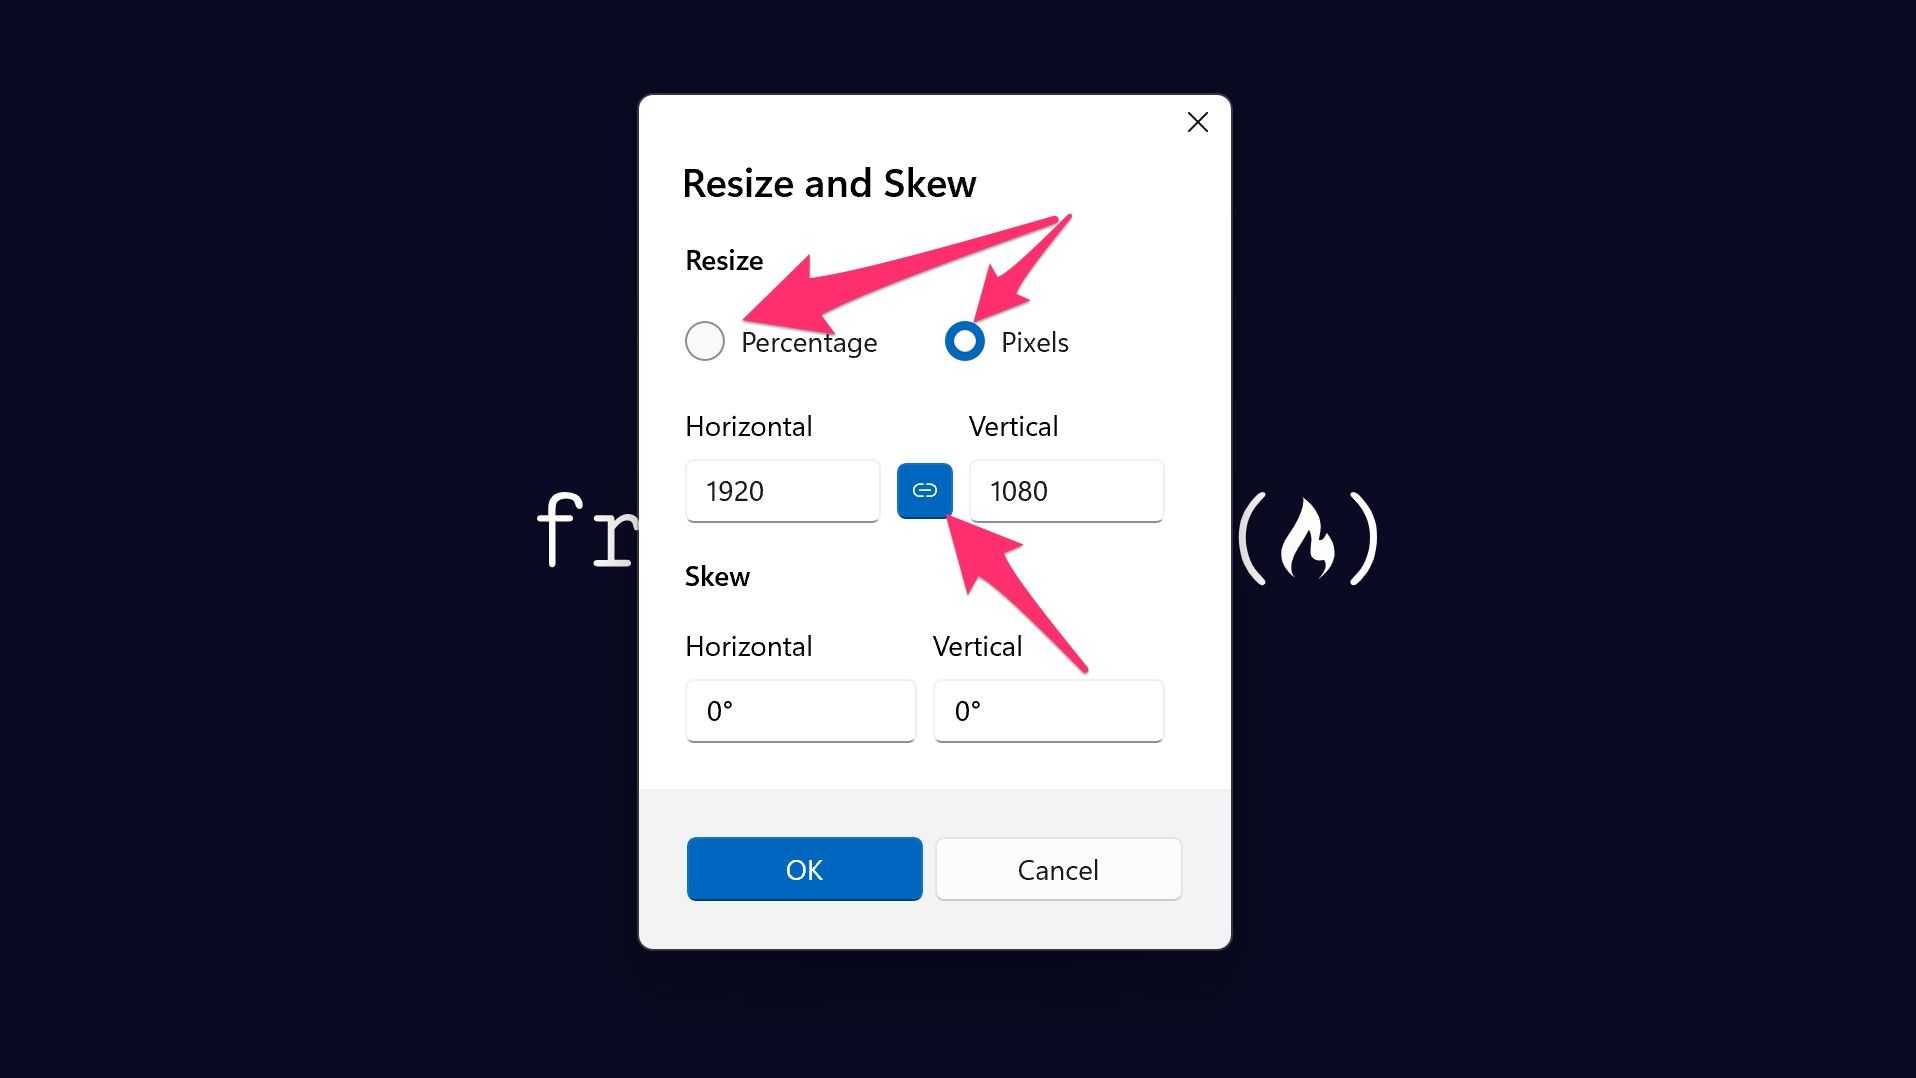
In the «Resize and Skew» dialog box, you can change the width and height of the image. You can also change the horizontal and vertical stretch. The horizontal and vertical stretch determine how much the image is stretched.
In the «Resize and Skew» dialog box, select either «Percentage» or «Pixels» as a unit of measurement, and make sure the chain icon between «Horizontal» and «Vertical» is connected. That will lock the aspect ratio of your image so it doesn’t get distorted:
 Microsoft Paint’s «Resize and Skew» dialog box
Then change either the horizontal or vertical dimension of the image, and the other one will automatically update.
Finally, click the «OK» button to resize the image.
FAQs
How to Resize an Image in JavaScript?
There are many ways to resize an image in JavaScript. One of the best client-side libraries available for image resizing is Pica, which provides an API to resize Canvas elements, Images and Image Bitmaps directly in the browser.
You could also use a third-party API like Abstract API’s Free Image Resizing API. This API accepts a POST request with a URL to an image to be resized and returns a URL to the resized image, hosted in an S3 bucket.
How Do I Resize an Image in Node JS?
If you need to work with images in Node, we recommend you use Jimp, a Node image processing library. Jimp provides many tools to manipulate images, including resizing, cropping, color correction, filters, and more.
How Do I Reduce File Size Before Uploading?
One of the easiest ways to reduce an image’s file size before uploading is to use lossy compression to decrease the quality of the image without changing the size. APIs such as Abstract API’s Free Image Resizing API allows you to upload a URL for resize and specify a lossy option without width and height parameters. This will cause the API to use lossy compression to resize the file without touching the image size.
The picture Element and Responsive Design
One of the more recent additions to HTML is the element.
This element allows you to load a different image, depending on the user’s screen pixel density, viewport size, image format, and other factors.
Here’s an example:
Click the two orientation buttons at the top right of the editor to toggle the two images. Those two buttons change the orientation of the editor/preview pane, and therefore the width of the viewport.
Alternatively, try clicking the button, then resizing your browser window to see the same effect.
Doing this should switch the image from a close-up of the kitten’s face, to a larger version that includes the kitten’s whole body.
I don’t know what device/size screen you’ll be viewing this on, so you may need to resize your screen or reorient your device to see the effect. Alternatively you can adjust the code to use a more suitable width for your device (i.e. change to a different value).
The element contains multiple elements to determine possible source images for the element, depending on factors such as screen pixel density, viewport size, image format, etc.
When using this element, you’re not actually resizing the image as such. What you’re doing is selecting the appropriately sized image for a given situation.
The good thing about this method is that it allows you to do things like, display a cropped version of the image for smaller viewports, while displaying an uncropped version for larger ones.
jQuery синтаксис:
Синтаксис 1.0:
$( selector ).resize() // метод используется без параметров

$( selector ).resize( handler )

handler - Function( Event eventObject )

Синтаксис 1.4.3:
$( selector ).resize( eventData, handler )

eventData - Anything
handler - Function( Event eventObject )
Обращаю Ваше внимание, что метод .resize(), используемый вместе с функцией, переданной в качестве параметра (handler) является, короткой записью метода .on(), а без параметра является короткой записью метода .trigger():
$( selector ).on( "resize", handler ) // снятие возможно с .off( "resize" )

$( selector ).trigger( "resize" )
How PyTorch resize an image on GPU
In this section, we will learn about the PyTorch resizing an image on GPU in python.
Before moving forward we should have a piece of knowledge about the GPU.
GPU stands for Graphical Processing Unit and is a trained electronic circuit that is designed to handle and change memories to increase the design of images.
Code:
In the following code, we will import all the necessary libraries such as import torch, import matplotlib.pyplot as plot, import numpy as np, import transforms from torchvision, import Image from PIL.
- image = Image.open(‘Rose.jpg’) is used to read a PIL Image.
- device = torch.device(“cuda” if torch.cuda.is_available() else “CPU”) is used to define path and set GPU.
- size = image.size is used to compute the size of the image.
- transforms = transforms.Resize(size = (450,650)) is used to Define transform or resize the an image on GPU.
- image = transforms(image) is use of the transformation on the input image.
- print(“The size after resize:”, image.size) is used to print the size after resize.
Output:
In the below output, you can see that PyTorch resizes an image on GPU printed on the screen.
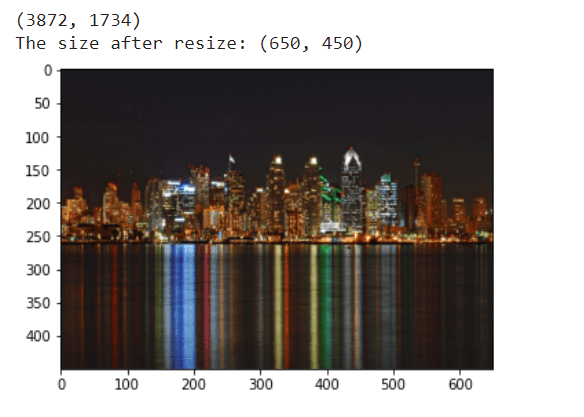
PyTorch resize image on GPU
So, with this, we understood about the PyTorch resize image on GPU with the help of Resize() function.
Need of Image Resizer
When viewing or sharing images online, it is often necessary to resize them or change the file size so that they fit perfectly on the viewer’s screen. You may need to reduce the size of your images.
Now it’s important to understand how to resize photos without losing quality. Technically, resizing changes the underlying pixel information. For example, reducing the width and height of an image removes all unnecessary pixel information. In order to enlarge the image, the image resizer has to add new pixels based on the original ones, so the photo looks blurry. So the essence of resizing an image without losing quality is taking it at the highest resolution and scaling it down.
Image Resizing for Social Media
Before resizing for social media, you need to be clear about the picture size guidelines of each social media handle.
Whenever you create a post on Facebook, be sure to check how it will appear in people’s feeds. All images should look sharp and have good specs on the feed. It often happens that someone uploads the wrong size photo and the result is not pretty. Facebook publishes official guidelines for the most important images to upload.
Facebook Profile Picture
Your profile picture will appear square, so you’ll need to upload a 1:1 square photo that represents your brand. This should be a personal photo, but if it’s a business, it should clearly represent your business, perhaps your business logo.


Shared Preview Link Image
- Recommended upload size: 1,200 x 628 pixels
- Square shaped Photo: 154 x 154 pixels in feed
- Square Photo: Minimum 116 x 116 on page
- Rectangular sized Photo: Minimum 470 x 246 pixels in feed
- Rectangular Photo: Minimum 484 x 252 on page
Twitter Profile Photo Size
- Recommended upload size: 400 x 400 pixels
- Display: 200×200
- Maximum file size: 2MB
- Acceptable image types are .JPG, .GIF, or .PNG.
Twitter in-stream Photos:
- Minimum expanded view size: 440 x 220 pixels (2:1 ratio)
- Maximum expanded view: 1024 x 512 pixels.
- On the desktop it will be displayed as a compressed stream of 506 x 253 pixels.
Instagram Shared Photos:
- 1080 x 1080 pixels (square, horizontal). 1080 x 1350 pixels (vertical)
- Scaled down: 612 x 612 pixels
- Feed size: 510 x 510 pixels
- Aspect ratios from 1.19:1 to 4:5
- Smaller header images are displayed at 204 x 204 pixels
- Larger featured header image displays at 409 x 409 pixels
Instagram Stories Photos:
- Recommended resolution: 1080 x 1920 pixels
- Minimum resolution: 600 x 1067 pixels
- Aspect Ratio: 9:16
- Maximum file size: 4GB
Profile Image Size
- Profile image size is 165 x 165 pixels
- Up to 10MB (you can’t upload anything larger than this)
- Image type: JPG and PNG for profile pictures
Board Cover Image Size
- 222 x 150 pixels (large preview image)
- 55 x 55 (small thumbnail)
Profile pictures are more important here than on any other network, as LinkedIn also serves as a central resume for workers around the world. It is important to set the size and appearance of your profile image.
LinkedIn Profile Image Size
Profile pictures are usually displayed as circles, so you want to make sure that the important part of your picture is visible in the center area.
Here are the official sizes and specifications for LinkedIn profile photos:
- Recommended upload size: 400 x 400 pixels
- Minimum upload size: 200 x 200 pixels
- Aspect Ratio: 1:1
- Maximum file size: 10MB
- File formats: .JPG, .GIF, .PNG
Moreover, below are the official sizes and specs for LinkedIn’s company logo:
- Recommended upload size: 300 x 300 px (large logo), 60 x 60 px (small logo)
- Aspect Ratio: 1:1
- Maximum file size: 4 MB (large logo), 2 MB (small logo)
- File formats: .JPG, .GIF, .PNG
- Recommended upload size: 1584 x 396 pixels
- Maximum file size: 4MB
- File formats: .JPG, .GIF, .PNG
Linkedin Background Image Size
LinkedIn’s personal background image covers a narrow area. Finding a suitable image for this area can be difficult. Look for things that articulate who you are and your interests.
Here are the official sizes and specifications for LinkedIn company cover photos:
- Recommended upload size: 1536 x 768 pixels
- Minimum upload size: 1192 x 220 pixels
- Displayed as 1400 x 425 pixels
- Maximum file size: 4MB
- File formats: .JPG, .GIF, .PNG
Resize image for Tumblr profile, post and header photo size online. Following are the image sizes for Tumblr:
- Profile image: 128 x 128 pixels
- Image post: 500 x 750 pixels
Snapchat Geofilter
- Image size: 1080 x 1920
- File type: JPEG or PNG
- Maximum file size: 5MB
Resize image for WhatsApp profile (DP) photo online. Following are the image sizes for WhatsApp:
WhatsApp profile (DP) picture size: 192 x 192 pixels
Now according to picture guidelines, you can change photo size using image resizer and get the appropriate picture to upload.
Point to note: We care about your privacy that’s why we tends to delete your photos after the photo get saved.
FAQs
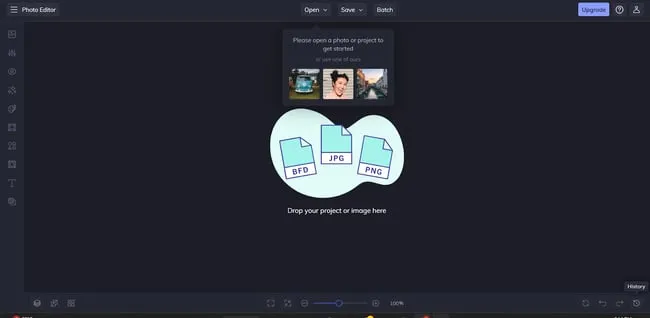
Is it safe to use BIRME?
BIRME uses Javascript to resize and crop your photos within your browser. All codes are executed within your computer without uploading any photo to a server.
Because of the natural of Javascript, all codes can be reviewed by another programmer easily and there is no way we can hide any malicious codes in BIRME.
What is «auto focal» detection?
When an image is cropped to meet your desired dimension or aspect ratio, some parts of the image will be cropped out. The tricky part is to know which part to crop off and which part to retain. Auto focal detection helps to identify which part of the image is important.
Auto focal detection uses a brilliant Javascript library called «smartcrop». Generally, the important part of an image has more lines and curves than the background. From data science point of view, the «messy» region contains more data/information. BIRME uses smartcrop to analyse your photo and guesses which part is «messy» and retain that part and crop out the quieter surroundings.
The «save files» button only saves one photo. Where are the rest?
By default, the browser doesn’t allow a web page to save multiple files. The first time BIRME tries to save multiple files the browser will alert you. If you accidentally disallowed it, you can change this in your browser’s settings page. Alternatively, you can use the save as zip file function.
You can easily find out how to reset your browser by searching keywords like «allow chrome download multiple files» or «allow firefox download multiple files»
How to use «rename» function?
BIRME looks for xxxx’s in the name and replace them with numbers. For example, my-photo-xxx will rename photos into my-photo-001, my-photo-002, my-photo-003 etc. You can put as many x’s as you like.
What is the recommend image quality for JPG photos?
Generally I recommend people to use 80%. You should never use more than 90% unless you have a good reason.
I assume the images resized are meant for online use. To improve the loading time and save bandwidth for mobile phone users, you should try to keep your images as small as possible. Of cause the photos shouldn’t be so pixelated and they affect the aesthetic of your website. You can try out different qualities and find the optimal number.
Syntax
/* Keyword values */
resize: none;
resize: both;
resize: horizontal;
resize: vertical;
resize: block;
resize: inline;

/* Global values */
resize: inherit;
resize: initial;
resize: unset;
The property is specified as a single keyword value from the list below.
Values
- The element offers no user-controllable method for resizing it.
- The element displays a mechanism for allowing the user to resize it, which may be resized both horizontally and vertically.
- The element displays a mechanism for allowing the user to resize it in the horizontal direction.
- The element displays a mechanism for allowing the user to resize it in the vertical direction.
- The element displays a mechanism for allowing the user to resize it in the block direction (either horizontally or vertically, depending on the and value).
- The element displays a mechanism for allowing the user to resize it in the inline direction (either horizontally or vertically, depending on the and value).
does not apply to the following:
- Inline elements
- Block elements for which the property is set to
OpenCV Python – Resize image
Resizing an image means changing the dimensions of it, be it width alone, height alone or changing both of them. Also, the aspect ratio of the original image could be preserved in the resized image. To resize an image, OpenCV provides cv2.resize() function.
Syntax of cv2.resize()
The syntax of resize function in OpenCV is
cv2.resize(src, dsize]]])
where
| Parameter | Description |
| src | source/input image |
| dsize | desired size for the output image |
| fx | scale factor along the horizontal axis |
| fy | scale factor along the vertical axis |
| interpolation | flag that takes one of the following methods. INTER_NEAREST – a nearest-neighbor interpolation INTER_LINEAR – a bilinear interpolation (used by default) INTER_AREA – resampling using pixel area relation. It may be a preferred method for image decimation, as it gives moire’-free results. But when the image is zoomed, it is similar to the INTER_NEAREST method. INTER_CUBIC – a bicubic interpolation over 4×4 pixel neighborhood INTER_LANCZOS4 – a Lanczos interpolation over 8×8 pixel neighborhood |
ADVERTISEMENT
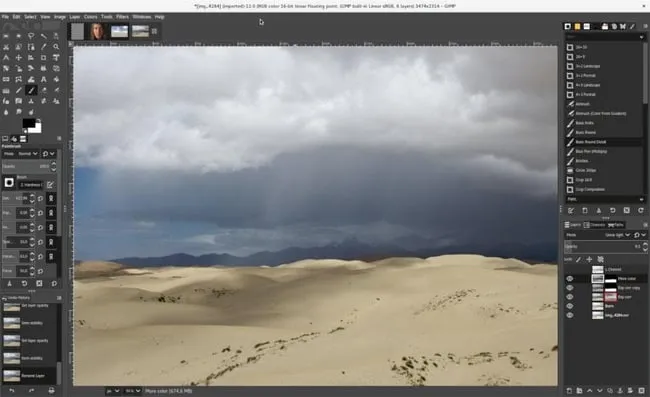
How to Resize an Image With GIMP Without Losing Quality
You can also try using a program like GIMP. GIMP is a free program that you can download from the internet. With GIMP, you can resize an image without losing quality by using the «Scale Image» dialog box.
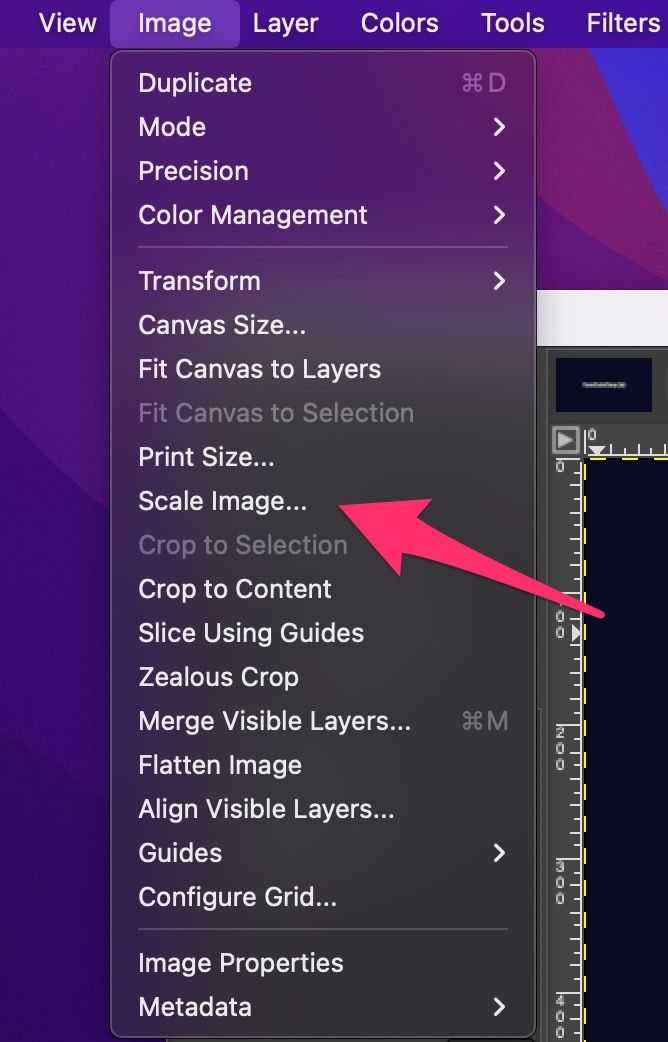
To open the «Scale Image» dialog box, open an image in GIMP, click on the «Image» menu dropdown, then click on «Scale Image»:
In the «Scale Image» dialog box, select a unit of measurement from the dropdown box. «px», or pixels, is selected by default.
And make sure the chain icon between «Width» and «Height» is connected. That will lock the aspect ratio of your image so it doesn’t get distorted:
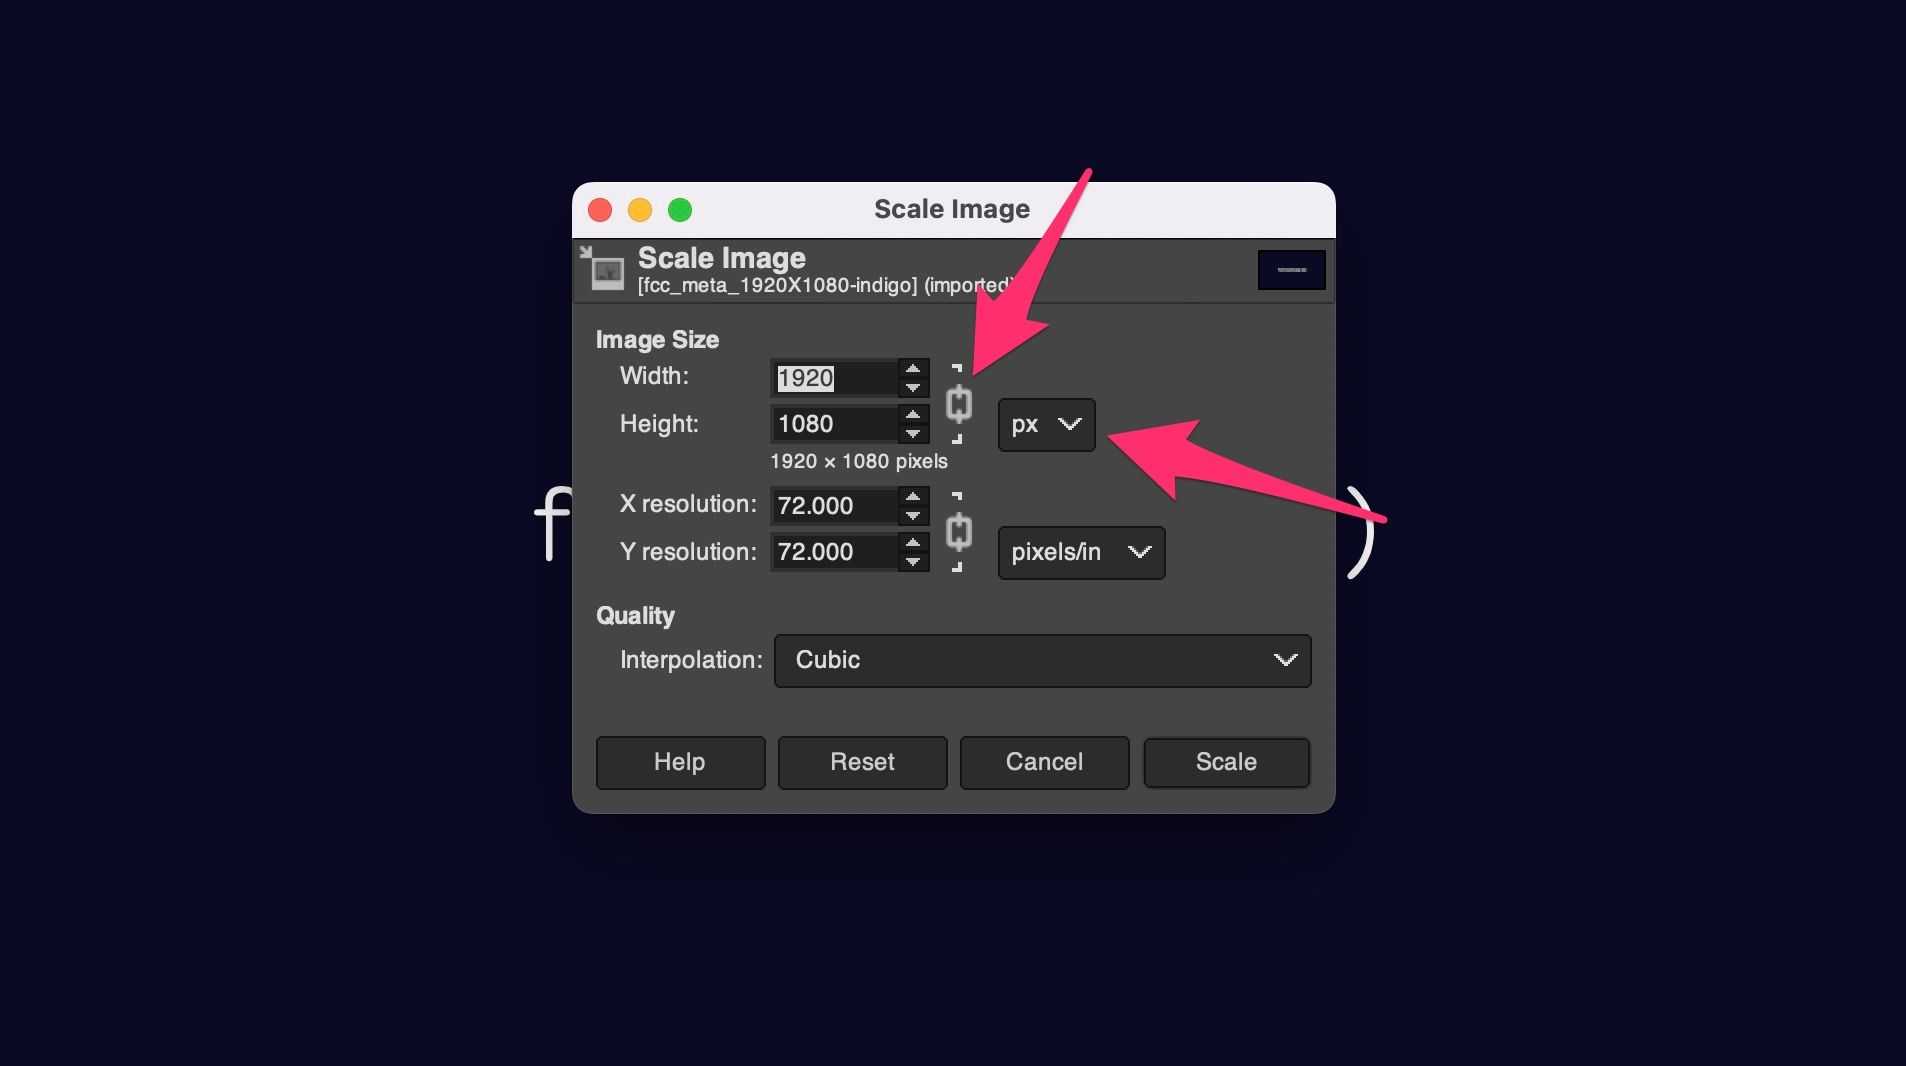
Then change either the horizontal or vertical dimension of the image, and the other one will automatically update.
Also, in the «Interpolation» dropdown, select either «Cubic» or «Sinc (lanczos3)».
Finally, click the «OK» button to resize the image.
Image Resizing Tools
Manually resizing each and every image you upload to your website would require a huge investment of time and energy — and likely some experience in graphic design. The good news is you can simplify the process with an image resizing tool.Below is a collection of the best image resizing tools. They range in functionality and price so you can choose the right one for your needs and budget. Let’s get started.
Resizing.app
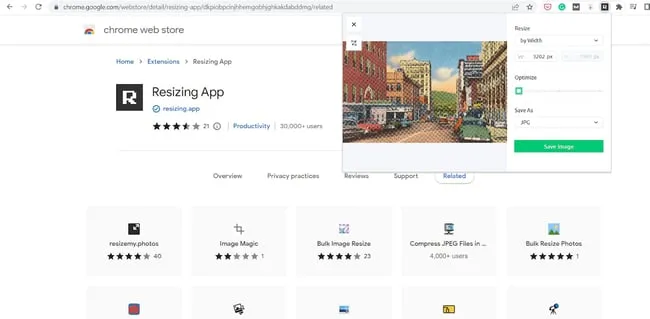 Resizing.app is a free Chrome extension that allows users to resize images right in their browsers. It features an incredibly simple interface.
Clicking the extension triggers a pop-up page that instructs the user to click an icon to upload an image. Then, once the image is uploaded, the user can resize the image by width, height, percentage, or using custom dimensions.
Once you resize the image, you can optimize it with the sliding scale and convert it. One drawback of this tool is that it doesn’t show the file size when you’re optimizing it. That can make it difficult to know when to stop sliding the scale to the right.
Pricing: Free
BeFunky
 BeFunky is a web-based image editor that allows users to edit photos, create collages, and design digital assets such as banners and flyers. It’s designed to be Photoshop for beginners. It’s rich with features but presented in a user-friendly interface.
With BeFunky’s Batch Image Resizer, you can even resize images in bulk instead of one by one. There’s a free version with 125 digital effects available, and a premium version with hundreds more.
To resize an image with this tool, you can import the image directly from your computer, choose an image from your Google Drive, or simply drag and drop images into the editor.
Once the image is in the editor, the rest is pretty simple — select the “Edit” menu and navigate to “Resize.” This will trigger a pop-up window where the image can be resized by width, height, or scale.
Pricing: A free version is available. The paid version costs $4.99 a month billed annually or $9.99 a month billed monthly.
PicResize
 PicResize is a web-based, image-resizing tool that allows users to crop, resize, and convert images. The standout feature of this tool is the ability to resize images in bulk using a feature called “BatchResize.”
This feature allows users to upload up to 100 pictures at once, resize these images using a single parameter such as “make my pictures X% smaller,” and finally save the images in JPG, GIF, or PNG format.
Once complete, users can download the resized images as a Zip folder.
It’s important to note two things.
-
The free version of PicResize is only for shrinking photos. You’ll have to purchase PicResize Pro to enlarge them.
-
You can only compress JPG file formats. Instead of a slider, there’s a dropdown menu with the options: good, better, best. While you can’t see the image file size, you can set a maximum file size.
Pricing: A free version is available. The paid (ad-free) version costs $75 for lifetime access.
GIMP
 GIMP is a free, open-source tool. However, unlike the other tools on this list which are web-based, this tool is a downloadable program.
Although you can use this program for resizing, it is designed as an “image manipulation program.” It has many other powerful features, such as photo enhancement and digital retouching.
To resize an image on GIMP, users can either insert fixed dimensions (similar to other tools on this list) or resize the image completely freehand by dragging the corners of the image.
Pricing: Free