
Unknown Elements
Standards and accessibility advocates will hate me for telling you this, but the fact is, you don’t have to use any valid HTML5 elements in your documents. You could build an entire web page using your own made-up tags like , , and .
So how would the browser read these foreign elements? Well, here’s a clue. Do you remember seeing this chunk of code in your CSS reset?
article,aside,details,figcaption,figure,
footer,header,hgroup,nav,section,summary {
    display: block;
}
That’s added for older browsers (like IE6-8) that don’t recognize the new HTML5 elements. By default, in all browsers, all unknown elements have a computed value of “inline”. Here’s a JS Bin that demonstrates this using a made-up element and then logging the value of the element in the console.
And here’s another example with the same element given “block” status.
Значения list-item, run-in и flex
У свойства есть и другие значения. Они используются реже, поэтому посмотрим на них кратко:
-
Этот display по умолчанию используется для элементов списка. Он добавляет к блоку с содержимым ещё и блок с номером(значком) списка, который стилизуется стандартными списочными свойствами:
-
Если после идёт , то становится его первым инлайн-элементом, то есть отображается в начале .
Если ваш браузер поддерживает это значение, то в примере ниже , благодаря , окажется визуально внутри :
Если же вы видите две строки, то ваш браузер НЕ поддерживает .
Вот, для примера, правильный вариант отображения , оформленный другим кодом:
Если этот вариант отличается от того, что вы видите выше – ваш браузер не поддерживает . На момент написания этой статьи только IE поддерживал .
-
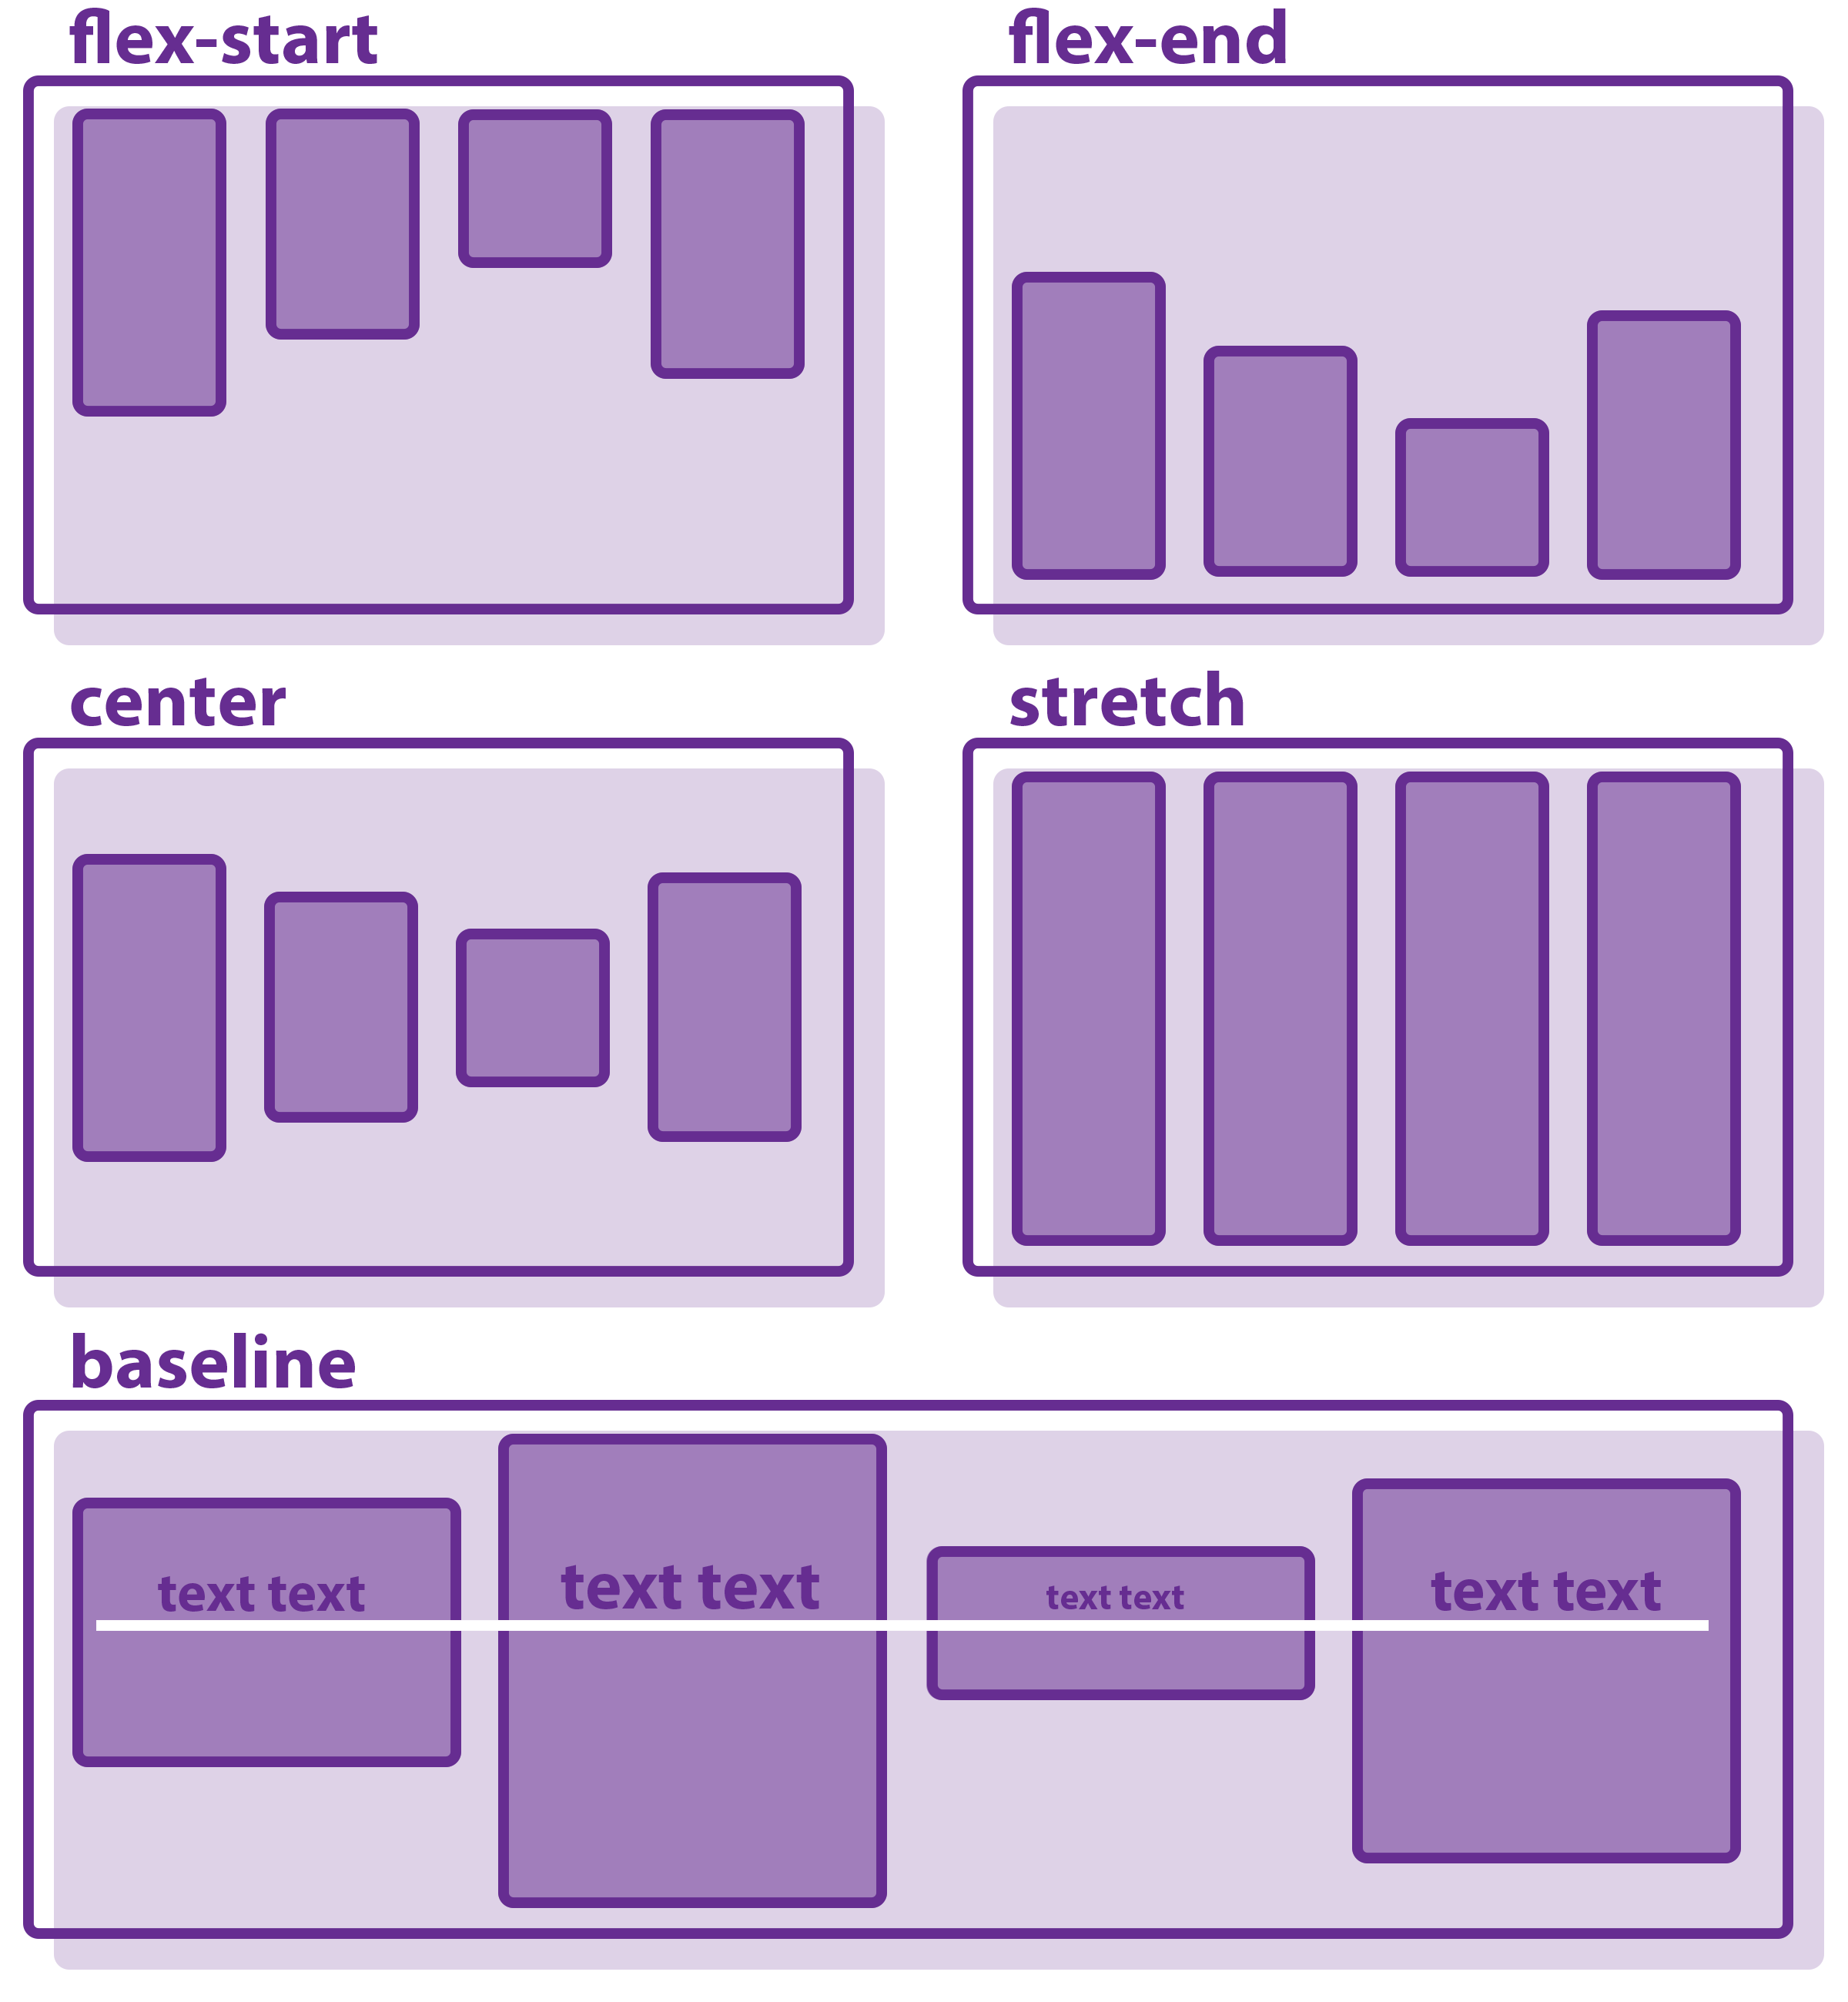
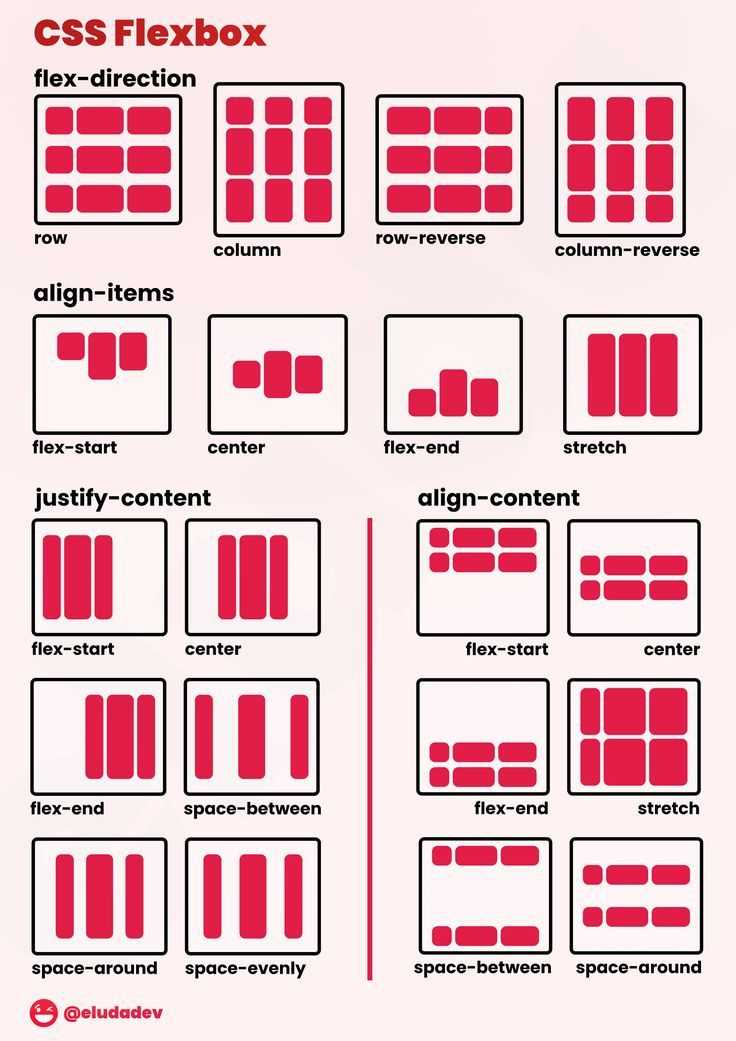
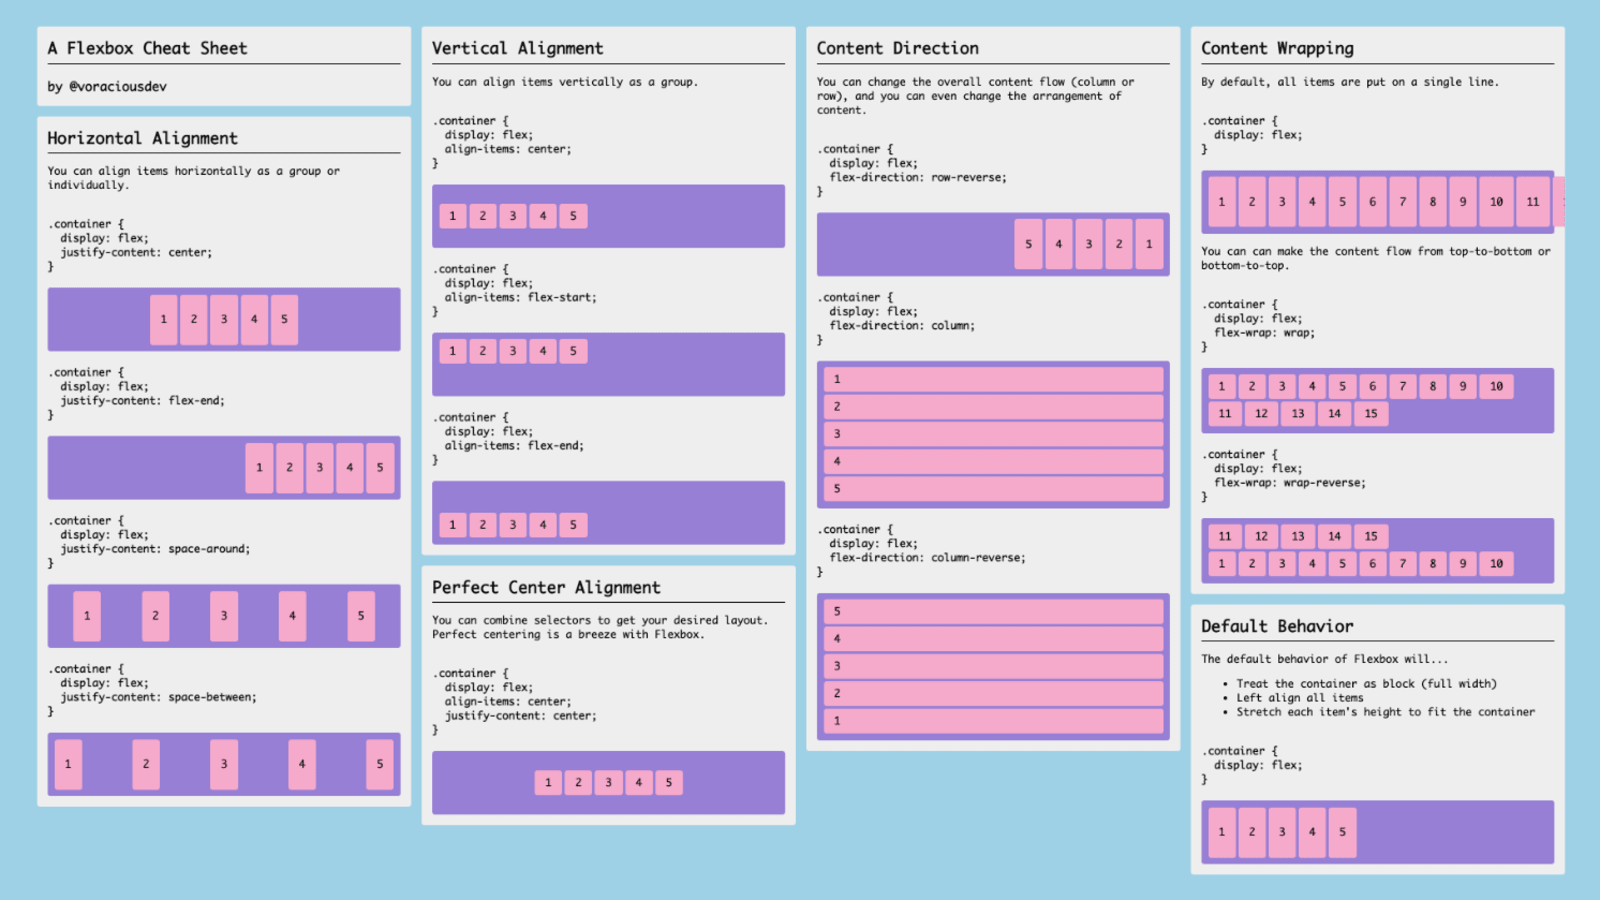
Flexbox позволяет удобно управлять дочерними и родительскими элементами на странице, располагая их в необходимом порядке. Официальная спецификация находится здесь: CSS Flexible Box Layout Module
Поверхностная разметка
Одним очевидным методом вовлечения в гриды спонсоров является удаление и использование для каждого спонсора. Но что мы потом будем делать? Это просто сделает нашу разметку поверхностной и не точной.
Выгода от использования элемента:
display: contents идёт на помощь
По факту, для наших целей в этом случае использование на элементе делает следующее: элемент перестает участвовать в гриде, а его контент с другой стороны, начинает. Это позволяет нам указывать спонсоров в гриде, вместо списка в который они помещены изначально.
Это одни из самых интересных последних кейсов указанных в спецификациях, если свойство использовалось на элементах, таких как или .
Проблемы доступности в выполнении display: contents современными барузерами
Для людей, которые используют вспомогательные технологии(AT), браузеры применяют свойства доступности, включая role элементы на странице. Это такая штука, которая дает знать AT, что есть что на странице. Множество элементов идут с встроенным role из коробки, для примера у уже есть .
И вот где все идет не так с современными браузерами, которые поддерживают . Они не интерпретируют только как элемент разметки, они из него суть элемента на странице. Это проблематично и является багом, в соответствии с комментарием на спецификацию по влиянию на отображению шаблона:
Смотря на пример списка спонсоров в нашем примере, это означает то, что элемент больше не является списком, но теперь является чем-то другим.
Я добавил мои результаты тестов по браузерам ниже. В каждом из них, на получает правильный role без , но как только это свойстов применяется, элемент теряет свой role.
Блочные элементы (block)
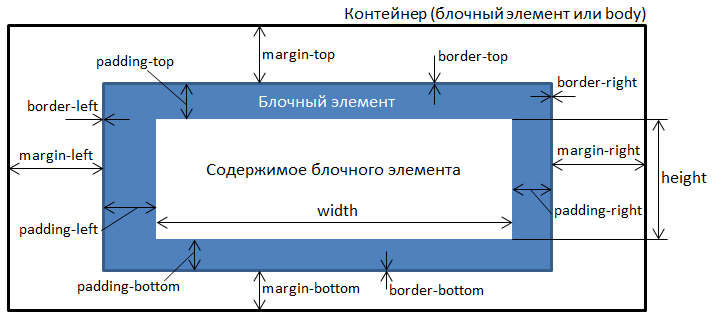
Блочные элементы в отличие от строчных элементов занимают по умолчанию всю ширину блока-контейнера, в которую они помещены. По этому признаку можно легко определить, к какому способу отображения относится элемент. Высота блочного элемента по умолчанию определяется автоматически и зависит от содержимого, которое в него помещено. Блочный элемент можно представить как прямоугольник, который имеет ширину () и высоту (). Ширину и (или) высоту блочного элемента можно задавать вручную с помощью CSS свойств и (или) . Также блочные элементы имеют границы, которые можно оформлять с помощью стилей CSS. Кроме этого блочным элементам можно задавать отступы внешние и внутренние. Внешний отступ () – это отступ от границы до элемента контейнера или до соседних блочных элементов. Внутренний отступ () – это отступ для содержимого блока, который задаётся от границы.
Блочные элементы могут содержать строчные элементы и другие блочные элементы, для которых их родитель будет являться контейнером. Блочные элементы предназначены для разработки каркаса веб-страницы, разметки больших блоков текста и много другого.
HTML
Lorem ipsum dolor sit amet. Ipsa, quae ab illo inventore veritatis et dolorum fuga amet consectetur. Assumenda est, omnis voluptas sit amet. Hic tenetur a sapiente delectus, ut perspiciatis, unde omnis. Id est laborum et quas molestias excepturi sint. Id est et voluptates repudiandae sint. Vero eos et iusto odio dignissimos ducimus, qui blanditiis praesentium. Dolores et quasi architecto beatae vitae dicta sunt, explicabo quia. Necessitatibus saepe eveniet, ut et aut odit aut reiciendis voluptatibus. Praesentium voluptatum deleniti atque corrupti, quos dolores et voluptates repudiandae sint. Sapiente delectus, ut aut perferendis. Non numquam eius modi tempora incidunt. Veritatis et aut odit aut fugit, sed quia.
HTML
Внутри этого блочного элемента помещён строчный элемент.
CSS display none
So far, you have learned very important display values. One last value to be explained is the value. This value hides HTML elements from displaying on your web page. For example, you can use this value if you have a portion of your web page or an element you wish to hide from appearing on the screen.
 An illustration of how to hide an element from the screen with .
You might be conversant with the CSS property which does a similar task to help hide HTML elements from displaying on the screen, but they both have some differences.
CSS display none vs. visibility hidden
A very plain explanation is that when you use with as its value, it hides the HTML elements. However, the gap occupied by the hidden element will remain and affect the page. While the property set to will remove the element and its effects from the web page, the elements and tags will remain visible in the source code.
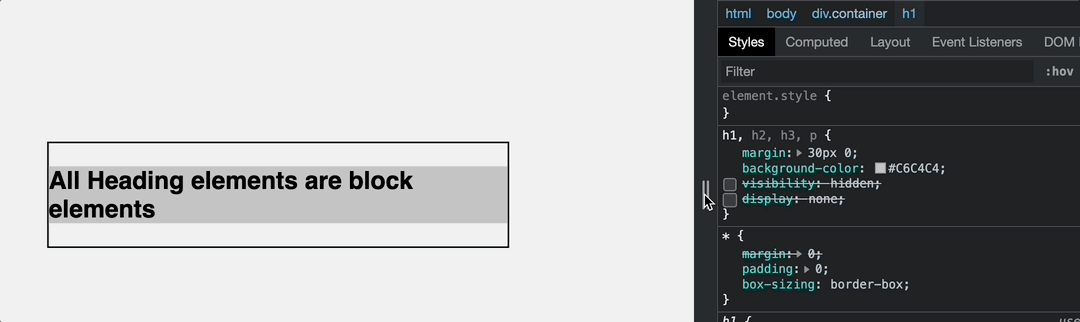 An illustration showing the difference between visibility of hidden and display set to none.
If you are building responsive web pages, you can use the value of the property to hide specific sections and display when on larger devices or when maybe a button is clicked, like the navigation menu.
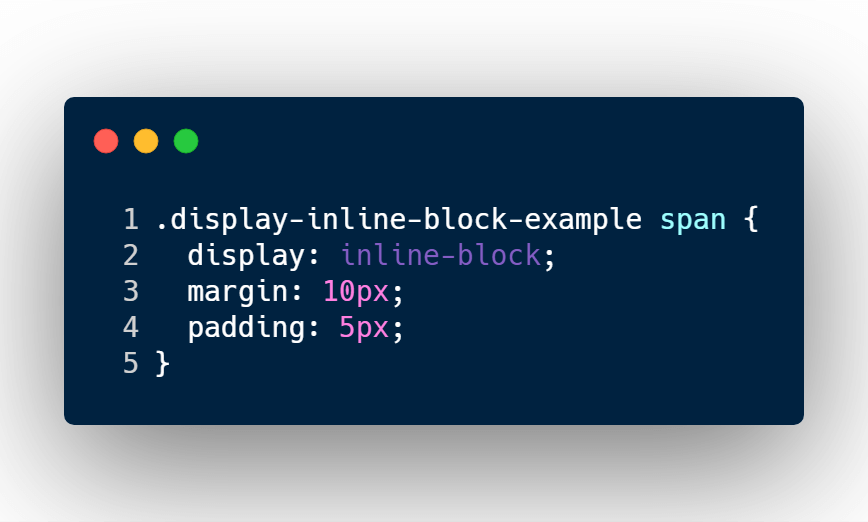
display: inline-block
Display inline-block is a team player.
Inline-block can remain small or may grow in height and width.
It’s also accepts horizontal, and vertical padding and margin spacing.
Unlike block type element, it tolerates other elements to sit next to it if enough space is available.
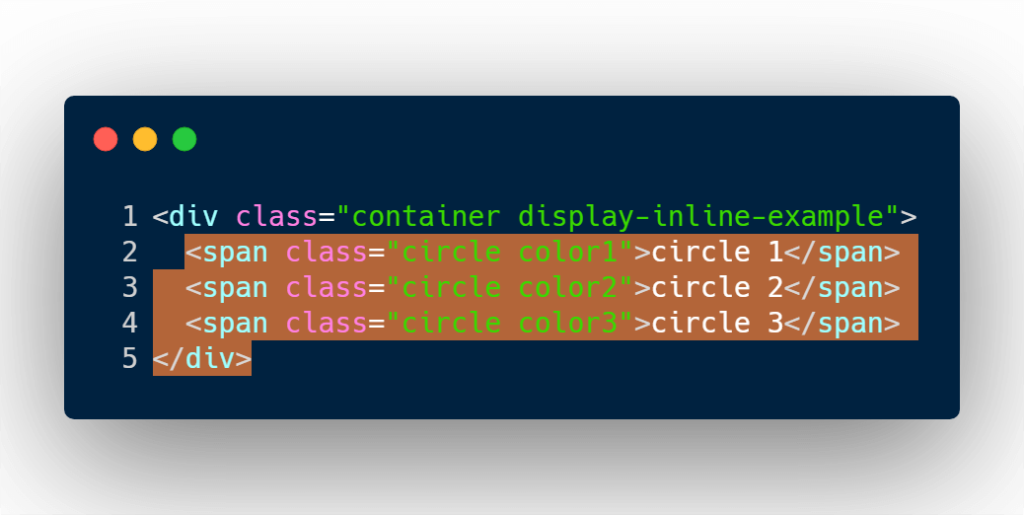
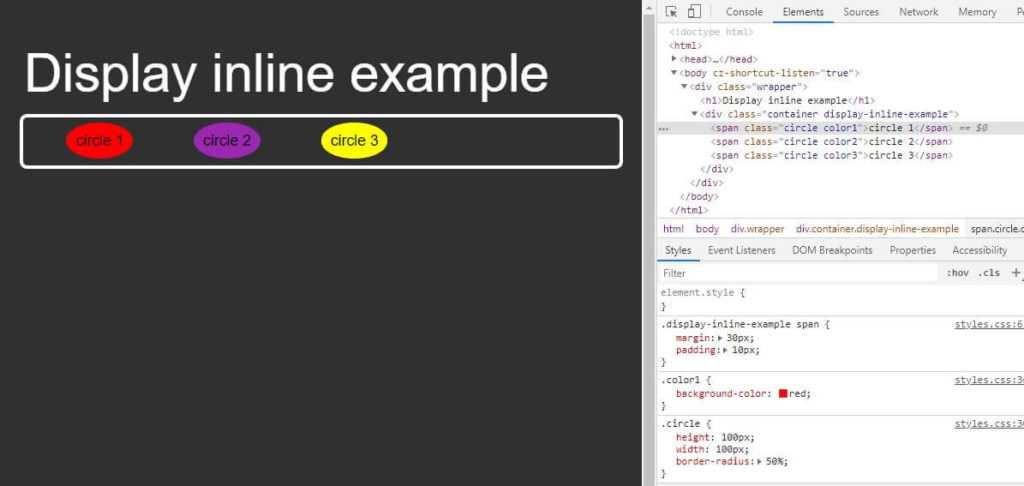
Let’s take a look at the HTML code.

The code above is using the span element tag to represent the circles.
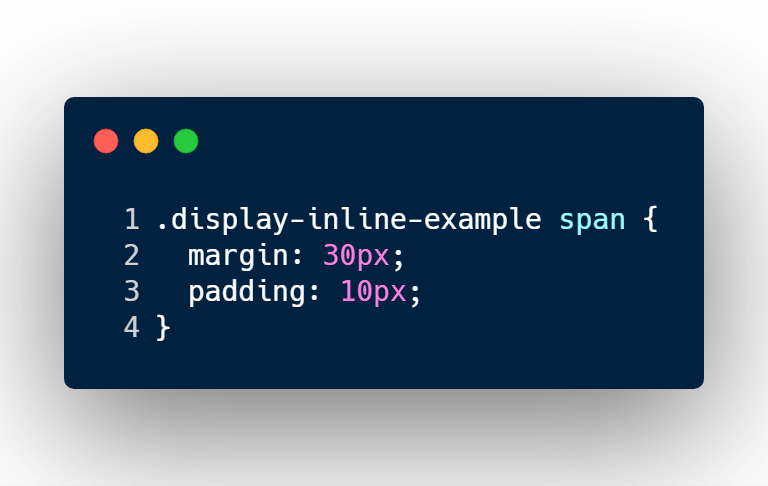
By default span elements are inline element types. So I need to convert them into inline-block types and I’m going to add some padding and margin on each side of the elements.
And just like that you can convert each span element into an inline-block element type.
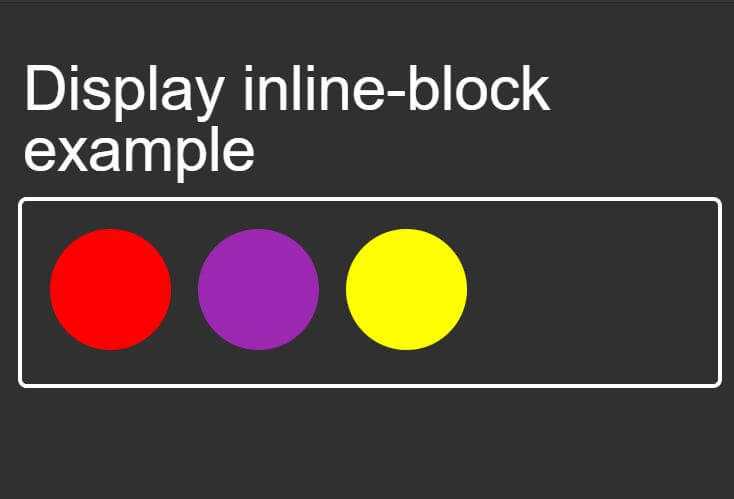
Let’s take a look at the properties that it accepted.

As you can see each span tag has accepted that following CSS properties:
- width
- height
- margin
- padding
and still sit next to each other as inline element types would.
The browser support for CSS inline-block is Chrome, Firefox, Edge, Safari, and IE6+.
Related Posts
What is Prompt Engineering?
August 28, 2023•
Development
By Abdulazeez Abdulazeez Adeshina
Introducing AI tools such as ChatGPT and Bard helps increase the efficiency of tasks such as data generation, code generation and completion, text summarization, etc. How were these AI tools trained to answer almost every question you ask them? The answer, prompt engineering, is discussed in this blog post.
A Guide To Using React’s useCallback() Hook
April 25, 2023•
Development
By Mercy Kibet
Are you looking to optimize your React applications? Have you heard of the useCallback hook? useCallback is a powerful React hook that helps you optimize your application by preventing unnecessary re-renders. In this post, we’ll dive into React’s useCallback() hook, define referential equality and callback functions and how to tie it all together.
CSS inline flex and inline grid
When exploring the CSS flexbox and grid layout properties, you will notice little or no emphasis made to the and options which work similarly to the and options but with little differences.
The , , , or values are usually applied to container elements. By default, these container elements like are elements. When you use either or as its property, it functions like block-flex (it’s called flex) or block-grid (it’s called grid). However, there is nothing like block-flex or block-grid. But this means that the container works like a block container, but you now apply flex functionalities.
This means the container will take up full width, start from a new line, and all block features will work with the container element where the display value is added.
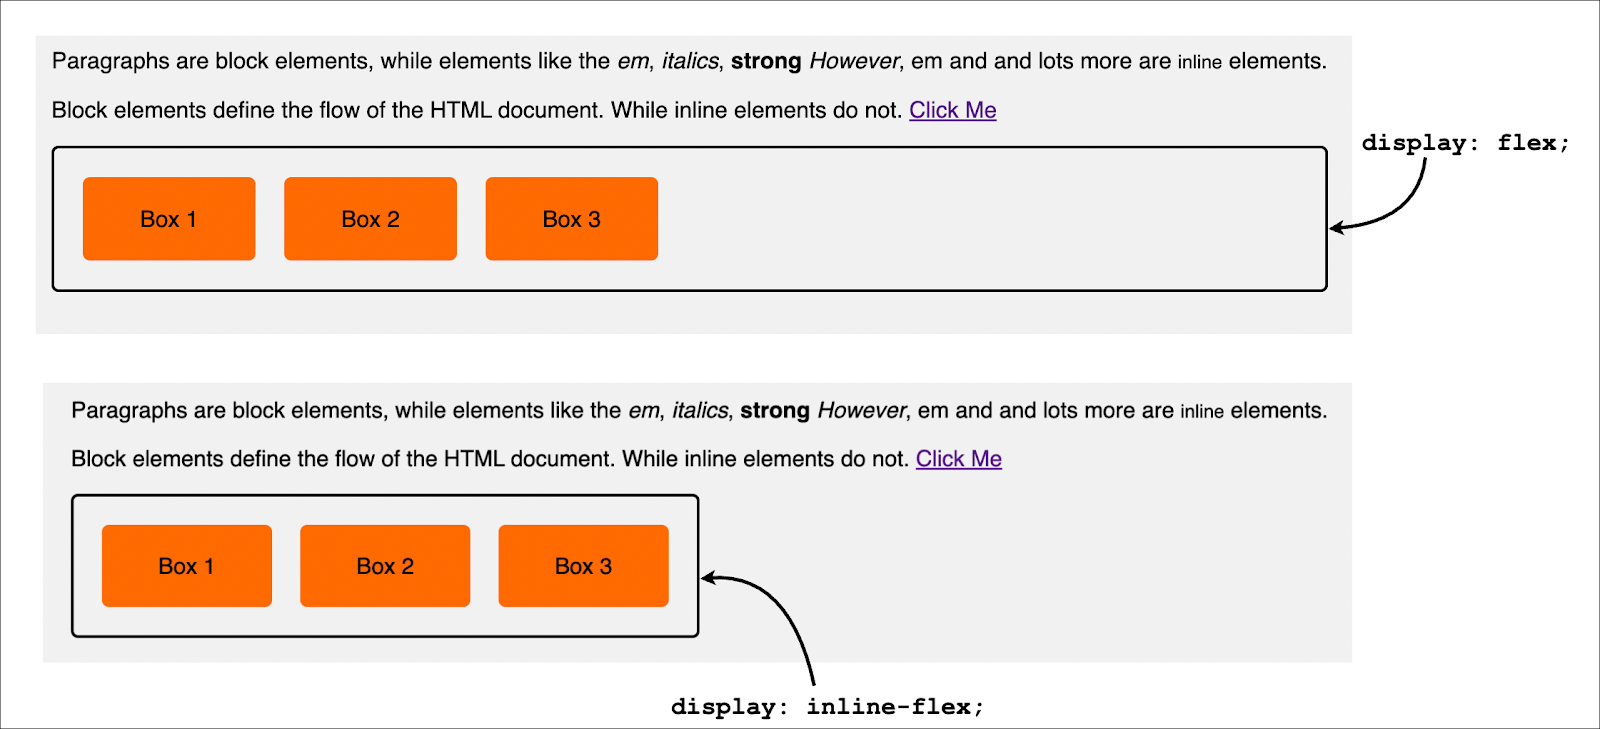 The difference between flex and inline-flex.
This is also similar to CSS grid. It is important to know that the , , , and is added to the container, and the or display flow will only affect the container and not the container items.
display: inline
Display inline is the shy, timid type.
Display inline may not be giving height or width.
It may request padding vertically and horizontally. It may also request margin only horizontally.
Since display inline remains pretty fragile and weak, other elements may sit next to them on the left or right side.
And it can’t do anything about it.
Code time!
The HTML will remain the same as the block example, but I will add a different class name to the container element.
By default span elements are inline element types. So there is no need to define in the CSS display:inline. But if you want to convert any element to inline, well that’s how you would do it.
I will add some padding and margin to the CSS code.
I’ve added margin, and padding space for the top, bottom, left and right sides of each span element.
As mentioned above, inline elements will:
- sit next to each other
- not accept width or height CSS rules
- accept padding rules for all sides of the element
- only accepts the horizontal margin rule but not my vertical rules
The browser support for CSS inline is Chrome, Firefox, Edge, Safari, and IE6+
Contents
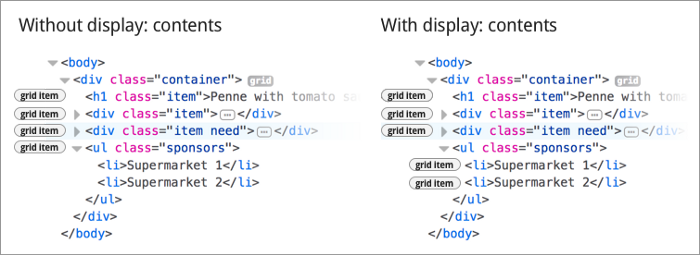
Использование свойства приводит к тому, что блок, которому оно назначено, удаляется из потока документа, но его дочерние элементы сохраняются. Это как будто у блока удаляются открывающий и закрывающий теги.
Опустим у нас есть хедер и в нем находится логотип и меню навигации. Меню при этом обернуто в nav. Нам бы хотелось внедрить логотип в центр меню, но как это сделать. Так вот убрав контейнер через мы ставим логотип и пункты меню на один уровень в иерархии, а затем можем просто указать у логотипа порядок следования (# 3). Пример ниже.
See the Pen
display contents by Андрей (@adlibi)
on CodePen.
The relatively obscure and experimental
Now this is a fun one I hadn’t heard of until I started reading the CSS Display specification. And I also uncovered the 2010 article, CSS Run-in Display Value by Chris Coyier. Unfortunately, it seems that browser vendors are not fond of this specification at all and it has since been removed from all browsers, so you can think of this as an alternate reality specification. ¯\_(ツ)_/¯
Theoretically, if you set an element’s display property to , it renders as a run-in box. The use-case is to have a native method to create run-in headings, which in graphic design parlance is a heading positioned on the same line as the next line of body copy.
You could use floats to achieve a similar effect, but it is sort of a hack-ish method. Lining up the baseline of the header with the body copy is quite challenging, as you have to tweak the font-size of the header and the line-height of the body copy until they match up. And there may be situations where the header just ‘catches’ more than a single line.
If you want to use on the header instead, it won’t work unless you nest the header element in the paragraph element of body copy (because is a block element), and that is semantically incorrect. So I personally would have liked to see this implemented, but I suppose the browser vendors have more high priority specifications to worry about at the moment.


This particular property needs an introduction to the <ruby> element for it to make sense to you. In a nutshell, there is an element for displaying annotations alongside a base line of text, usually to help with pronunciation. They’re a pretty common sight for East Asian languages, like Chinese or Japanese. Most of the articles I came across during my research were dated around 2010, so I wrote about the 2016 state of HTML <ruby>.
There are some parallels between and , but the specification strongly discourages applying ruby display values to non-ruby elements like to display ruby text. Rather, we should markup our content using the HTML ruby elements so screen readers and non-CS renderers can interpret the ruby structures.
ruby
Corresponds to the HTML element. It generates a ruby container box, which establishes a ruby formatting context for child elements marked as internal ruby boxes.
ruby-base
Corresponds to the HTML element. An internal ruby box in the ruby formatting context.
ruby-text
Corresponds to the HTML element. An internal ruby box in the ruby formatting context.
ruby-base-container
Corresponds to the HTML element. An internal ruby box in the ruby formatting context.
ruby-text-container
Corresponds to the HTML element. An internal ruby box in the ruby formatting context.
What the specification is trying to say is that, when you set on an element, it will disappear from the DOM but all its children remain and take up the space it occupied. Unfortunately, this specification is only supported by Firefox for now. Resize the full size CodePen in Firefox to get a feel of how it works.
See the Pen CSS display: contents by Chen Hui Jing (@huijing) on CodePen.
I’ve managed to uncover 2 articles that talk about this display property thus far, Firefox is releasing support for CSS display: contents by Sam Rueby and Vanishing boxes with display contents by Rachel Andrew. Rachel Andrew also presents a fantastic use-case for this property with flex-items. Do check out both articles.
Remember them table-based layouts?
There are a set of display values that allow your elements to behave just like HTML tables. My fellow Singapore-based developer Colin Toh wrote a great post on the display: table property, which you should really check out.
Although most of us no longer use table-based layouts, is still pretty useful in certain cases. For example, if you wanted to have tables only on wider layouts, but retain a typical block layout on smaller widths. This can be achieved with a combination of media queries and display (with some pseudo-elements thrown in for good measure), just resize this window to see how it works.
table
Corresponds to the HTML element. It defines a block-level box.
table-header-group
Corresponds to the HTML element.
table-row
Corresponds to the HTML element.
table-cell
Corresponds to the HTML element.
table-row-group
Corresponds to the HTML element.
table-footer-group
Corresponds to the HTML element.
table-column-group
Corresponds to the HTML element.
table-column
Corresponds to the HTML element.
table-caption
Corresponds to the HTML element.
inline-table
This is the only value that does not have a direct mapping to a HTML element. The element will behave like a table HTML element but as an inline-block rather than a block-level element.
Поддержка браузерами
| Свойство | Chrome | Firefox | Opera | Safari | IExplorer | Edge |
|---|---|---|---|---|---|---|
| inlineblock | 1.0 | 1.0 | 1.0 | 1.0 | 4.0 | 12.0 |
| list-item | 1.0 | 1.0 | 7.0 | 1.0 | 6.0 | 12.0 |
| inline-block inline-table |
1.0 | 1.0 | 7.0 | 1.0 | 8.0 | 12.0 |
|
table table-caption table-column-group table-header-group table-footer-group table-row-group table-cell table-column table-row |
1.0 | 1.0 | 7.0 | 1.0 | 8.0 | 12.0 |
| flex inline-flex |
29.021.0 -webkit- | 28.018.0 -moz- | 17.0 | 9.06.1 -webkit- | 11.010.0 -ms- | 12.0 |
| gridinline-grid | 54.0* | 52.0 | 44.0 | 10.3 | 10.0* -ms- | 16.012.0 -ms- |
Браузер Internet Explorer 8 требует наличия декларации !DOCTYPE в документе
CSS синтаксис:
display:"inline | block | flex | grid | inline-block | inline-flex | inline-grid | inline-table | list-item | table | table-caption | table-column-group | table-header-group | table-footer-group | table-row-group | table-cell | table-column | table-row | none | initial | inherit";
JavaScript синтаксис:
object.style.display = "block"
Краткая справка
| Класс | Свойства |
|---|---|
| block | display: block; |
| inline-block | display: inline-block; |
| inline | display: inline; |
| flex | display: flex; |
| inline-flex | display: inline-flex; |
| table | display: table; |
| inline-table | display: inline-table; |
| table-caption | display: table-caption; |
| table-cell | display: table-cell; |
| table-column | display: table-column; |
| table-column-group | display: table-column-group; |
| table-footer-group | display: table-footer-group; |
| table-header-group | display: table-header-group; |
| table-row-group | display: table-row-group; |
| table-row | display: table-row; |
| flow-root | display: flow-root; |
| grid | display: grid; |
| inline-grid | display: inline-grid; |
| contents | display: contents; |
| list-item | display: list-item; |
| hidden | display: none; |
Inline
На примере ниже мы обернули второе слово в контейнер и указали свойства:
Хотя для значение уже установлено по умолчанию и оно здесь избыточно, но здесь это сделано для демонстрации. Видно, что второе слово выводится в строке в рамке.
See the Pen
inline by Андрей (@adlibi)
on CodePen.
Для встроенного элемента можно задать поля и отступы, но поскольку элемент встроен в строку то, как и следовало ожидать margin и padding расталкивают другие элементы только по горизонтали, но не по вертикали. Для встроенного элемента нельзя задать высоту и ширину. Эти свойства будут проигнорированы.
Для того же элемента, что и на примере выше, мы задали красный фон и задали поля и отступы по 20px. Элемент по прежнему остается в строке.
See the Pen
inline padding by Андрей (@adlibi)
on CodePen.
Значения свойств
| Значение | Описание | Воспроизвести |
|---|---|---|
| inline | Отображает элемент как встроенный элемент (например, <span>). Любые свойства высоты и ширины не будут иметь никакого эффекта | Воспроизвести » |
| block | Отображает элемент в виде блочного элемента (например, <p>). Он начинается на новой линии и занимает всю ширину | Воспроизвести » |
| contents | Делает контейнер исчезнуть, создание дочерних элементов элемента на следующий уровень вверх в DOM | Воспроизвести » |
| flex | Отображает элемент в виде контейнера flex уровня блока | Воспроизвести » |
| grid | Отображение элемента в виде контейнера сетки уровня блока | Воспроизвести » |
| inline-block | Отображает элемент в виде контейнера блоков встроенного уровня. Сам элемент отформатирован как встроенный элемент, но вы можете применить значения высоты и ширины | Воспроизвести » |
| inline-flex | Отображает элемент в виде контейнера flex встроенного уровня | Воспроизвести » |
| inline-grid | Отображает элемент в виде контейнера сетки встроенного уровня | Воспроизвести » |
| inline-table | Элемент отображается в виде таблицы встроенного уровня | Воспроизвести » |
| list-item | Пусть элемент ведет себя как элемент <li> | Воспроизвести » |
| run-in | Отображает элемент как блочный или встроенный в зависимости от контекста | Воспроизвести » |
| table | Пусть элемент ведет себя как элемент <table> | Воспроизвести » |
| table-caption | Пусть элемент ведет себя как элемент <caption> | Воспроизвести » |
| table-column-group | Пусть элемент ведет себя как элемент <colgroup> | Воспроизвести » |
| table-header-group | Пусть элемент ведет себя как элемент <thead> | Воспроизвести » |
| table-footer-group | Пусть элемент ведет себя как элемент <tfoot> | Воспроизвести » |
| table-row-group | Пусть элемент ведет себя как элемент <tbody> | Воспроизвести » |
| table-cell | Пусть элемент ведет себя как элемент <td> | Воспроизвести » |
| table-column | Пусть элемент ведет себя как элемент <col> | Воспроизвести » |
| table-row | Пусть элемент ведет себя как элемент <tr> | Воспроизвести » |
| none | Элемент полностью удален | Воспроизвести » |
| initial | Устанавливает для этого свойства значение по умолчанию. Прочитать о initial | Воспроизвести » |
| inherit | Наследует это свойство от родительского элемента. Прочитать о inherit |
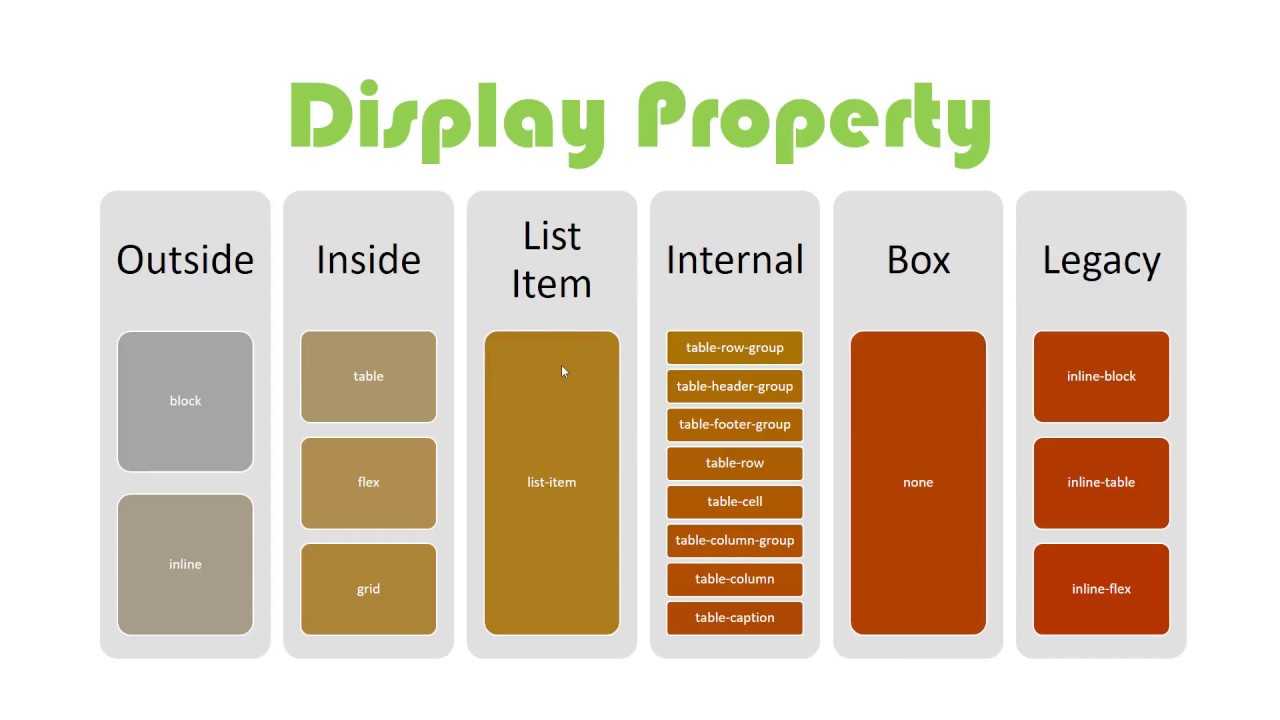
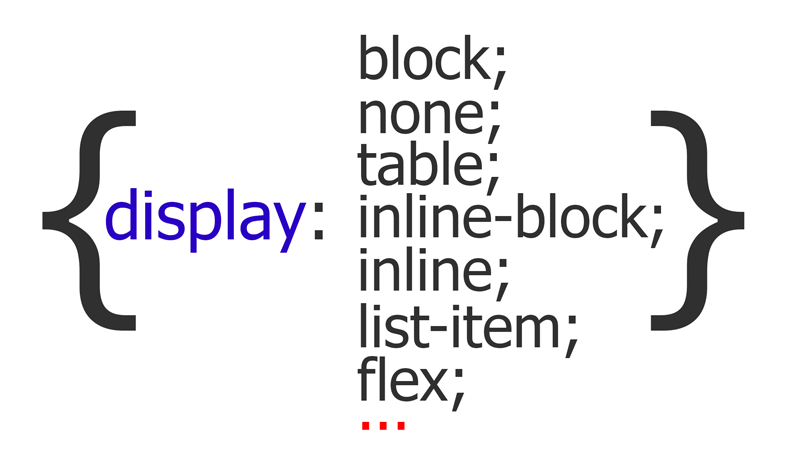
Значения свойства display
- ,
- ,
- ,
- .
Теперь разберём на примерах значения свойства .
— элемент отображается как блок и занимает всю доступную ширину. Новый блок начинается с новой строки. Примером элемента, который имеет значение , может быть .
— элемент отображается как строчный элемент и не создаёт новый блок. Элемент занимает столько места, сколько ему нужно для отображения содержимого. Примером элемента, который имеет значение , может быть .
Этот текст выделенный текст и еще немного текста
— элемент отображается как строчный элемент, но его содержимое может быть отформатировано как блок. Элемент занимает столько места, сколько ему нужно для отображения содержимого, но может иметь ширину и высоту. Примером элемента, который имеет значение , может быть .
— элемент не отображается на веб-странице и его содержимое не занимает места. Это может быть полезно для скрытия элементов на странице или для создания анимаций. Примером элемента, который имеет значение , может быть .
Пример использования свойства с разными значениями.
Стилизуем элементы так:

Блочный элемент имеет жёлтый фон, строчный элемент — розовый фон, элемент — голубой фон и имеет ширину и высоту, а скрытый элемент не отображается на странице.
Accessibility concerns
Using a value of on an element will remove it from the . This will cause the element and all its descendant elements to no longer be announced by screen reading technology.
If you want to visually hide the element, a more accessible alternative is to use to remove it visually from the screen but keep it parsable by assistive technology such as screen readers.
Current implementations in most browsers will remove from the any element with a value of (but descendants will remain). This will cause the element itself to no longer be announced by screen reading technology. This is incorrect behavior according to the .
- More accessible markup with display: contents | Hidde de Vries
- Display: Contents Is Not a CSS Reset | Adrian Roselli
Changing the value of a element to , , or will alter its representation in the . This will cause the table to no longer be announced properly by screen reading technology.
- Short note on what CSS display properties do to table semantics — The Paciello Group
- Hidden content for better a11y | Go Make Things
- Understanding Success Criterion 1.3.1 | W3C Understanding WCAG 2.0
Conclusion
There are many possibilities when working with the property. In this tutorial, you learned about the default values of and . You changed an element to , which gave it a special combination of both and . You then changed all the elements of a to be on a small screen and set them to return to their default table display values on a large screen. Lastly, you used the value to hide content when and where necessary to users of all abilities. The property is a powerful feature and has even more values available to further manipulate how the box model functions and affects elements.
If you would like to read more CSS tutorials, try out the other tutorials in the How To Style HTML with CSS series.
CSS Display Values
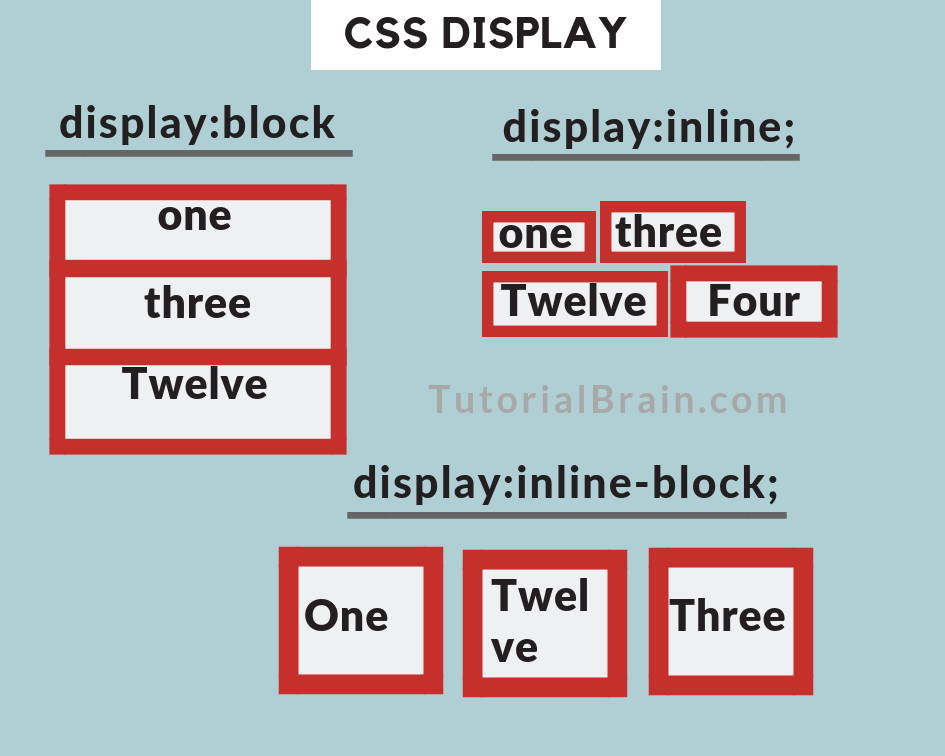
By default, browsers render certain elements on different levels. For example, <div> elements are rendered as blocks by default, while <span> elements appear inline by default, as demonstrated below:
See the Pen css display: div and span by HubSpot (@hubspot) on CodePen.
Here, the first three <div> elements take up the full width of the page and begin on a new line. The following three <span> elements all exist on the same line, and their widths and heights are determined by the text inside them (as well as some extra padding I added).
The display property can override these default display types. So, let’s take this example and see what changes when we apply various display rules.
CSS Display: inline
The inline display value turns any element into an inline element. These elements will appear on the same line without breaks, like <span> elements behave.
See the Pen css display: inline by HubSpot (@hubspot) on CodePen.
Note that I removed the padding rule to better illustrate the effect of inline. Also, The width and height of inline elements are determined by the content they contain. You can’t set their widths and heights with CSS.


If we add text between our <div> elements, we clearly see how they fit within a line:
![]()
CSS Display: block
The block display value makes an element a block element. Block elements start a new line and span the entire width of the viewport by default, like how <div> elements behave. There are also line breaks before and after these elements.
See the Pen css display: block by HubSpot (@hubspot) on CodePen.
CSS Display: inline-block
The inline-block value is a hybrid of inline and block. Elements assigned display: inline-block appear on the same line with other inline elements, a characteristic of inline elements. However, inline-block elements are also like block elements in that you can change their widths and heights with CSS.
See the Pen css display: inline-block by HubSpot (@hubspot) on CodePen.
CSS Display: list-item
Elements assigned display: list-item behave like <li> elements. The entire element becomes a block-level element, the text inside becomes its own inline element, and a bullet point is added.
See the Pen css display: list-item by HubSpot (@hubspot) on CodePen.
Note that without the rule margin-left: 30px; our bullet points would fall outside the viewport. I increased the left margin to make them visible.
Add the rule list-style-position: inside; to place the bullets inside the list item element:
See the Pen css display: list-item inside by HubSpot (@hubspot) on CodePen.
CSS Display: none
display: none removes the targeted element (and all its child elements) from the page. This causes accompanying elements to behave as if this element does not exist. In this example, display: none is applied to the second <div> element and the second <span> element.
See the Pen css display: none by HubSpot (@hubspot) on CodePen.
To hide an element without affecting page layout, use the CSS visibility property instead:
See the Pen css display: visibility hidden by HubSpot (@hubspot) on CodePen.
CSS Display: grid
The grid display value makes the assigned element a grid container, and its child elements behave as grid items. Learn how to make CSS grids in our in-depth guide.
CSS Display: flex
Finally, the flex display value sets an element as a flex container, another way to build dynamic and responsive elements. You learn more about this CSS module in the blog post Here’s the Difference Between Flexbox, CSS Grid & Bootstrap.
Prerequisites
- Knowledge of type selectors, combinator selectors, and selector groups, which you can find in How To Select HTML Elements to Style with CSS.
- Knowledge of the CSS box model, which you can find in the How To Work with the Box Model in CSS tutorial.
- Understanding of HTML table elements and their visual properties as context for the refactoring of the sample table later in the tutorial. You can learn about tables in the How To Style a Table with CSS tutorial.
- An empty HTML file saved on your local machine as that you can access from your text editor and web browser of choice. To get started, check out our How To Set Up Your HTML Project tutorial, and follow for instructions on how to view your HTML in your browser. If you’re new to HTML, try out the whole How To Build a Website in HTML series.
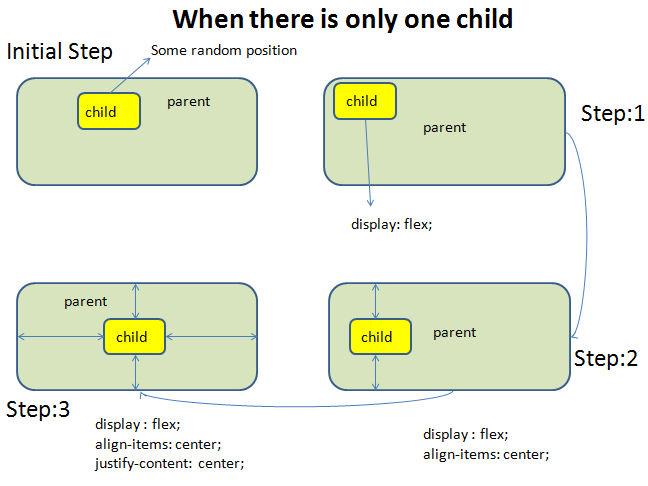
We Are Always Going Back To Normal Flow
When thinking about these inner and outer display properties, it can be helpful to consider what happens if we don’t mess around with the value of display at all. If you write some HTML and view it in a browser, what you get is Block and Inline Layout, or Normal Flow. The elements display as or elements.
See the Pen Block and Inline Layout by Rachel Andrew.
See the Pen Block and Inline Layout by Rachel Andrew.
The example below contains some markup that I have turned into a media object, by making the (the two direct children) now become flex items, so the image is now in a row with the content. If you see in the content, however, there is a heading and a paragraph which are displaying in normal flow again. The direct children of the media object became flex items; their children return to normal flow unless we change the value of display on the flex item. The flex container itself is a block box, as you can see by the fact the border extends to the edge of its parent.
See the Pen Block and Inline Layout With Flex Component by Rachel Andrew.
See the Pen Block and Inline Layout With Flex Component by Rachel Andrew.
If you work with this process, the fact that elements on your page will lay themselves out with this nice readable normal flow layout, rather than fighting against it and trying to place everything, CSS is much easier. You are also less likely to fall into accessibility issues, as you are working with the document order, which is exactly what a screen reader or a person tabbing through the document is doing.
Explaining And
The value of is also likely to be familiar to many of us who have been doing CSS for a while. This value is a way to get some of the block behavior on an element. For example, an element can have a width and a height. An element with also behaves in an interesting way in that it creates a Block Formatting Content (BFC).
A BFC does some useful things in terms of layout, for example, it contains floats. To read about Block Formatting Contexts in more detail see my previous article “Understanding CSS Layout And The Block Formatting Context.” Therefore saying gives you an inline box which also establishes a BFC.
As you will discover (if you read the above-mentioned article about the Block Formatting Context), there is a newer value of display which also explicitly creates a BFC. This is the value of . This value creates a BFC on a block, rather than an inline element.
- gives you a BFC on an inline box.
- gives you a BFC on a block box.
You are now probably thinking that is all a bit confusing: why do we have two completely different keywords here, and what happened to the two-value syntax we were talking about before? This leads neatly into the next thing I need to explain about , i.e. the fact that CSS has a history we need to deal with in terms of the property.