
With initial as the value
If you pass initial as a value of the border-collapse Property, it is set to its default value i.e. separate. Following is the syntax, which uses initial attribute of the border-collapse property in HTML.
border-collapse:initial;
Example
Given below is an example, which uses initial attribute of the border-collapse property in HTML.
<!DOCTYPE html>
<html>
<head>
   <meta charset="UTF-8">
   <meta http-equiv="X-UA-Compatible" content="IE=edge">
   <meta name="viewport" content="width=device-width, initial-scale=1.0">
   <style>
      table,tr,th,td {
         border:1px solid black;
         border-collapse:initial;
      }
   </style>
</head>
<body>
   <h2>Tables in HTML</h2>
   <table style="width: 100%">
      <tr>
         <th >First Name </th>
         <th>Job role</th>
      </tr>
      <tr>
         <td >Tharun</td>
         <td >Content writer</td>
      </tr>
      <tr>
         <td >Akshaj</td>
         <td >Content writer</td>
      </tr>
   </table>
</body>
</html>
Styling the Top Row Header Cells
Next, you will apply styles to the top row headings. The element will contain the top row, so all styles for this can be applied to that element directly. The intent will be to create a dark gray background with white, all uppercase text.
To start, open in your text editor. Create a new type selector. In the selector block, add a property with a value of , which will create the dark gray color. Then, add a property with a value of :
styles.css
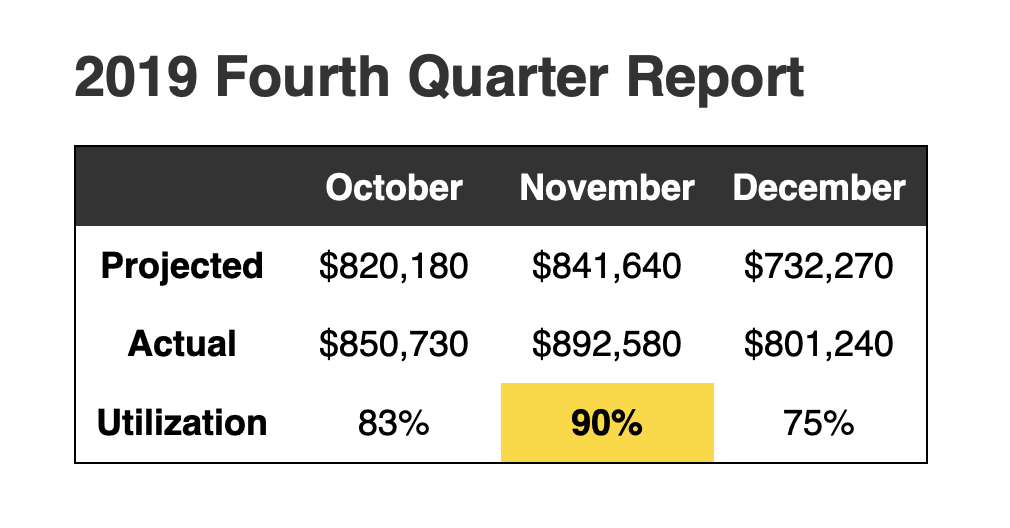
Save you changes to and refresh in your browser. The top heading row is now visually distinctive, with a solid black background and bold white text. The following image shows how this will appear in the browser:
Next, to add a bit more to the aesthetic of the top header, return to in the text editor. Change the size of the text by adding a property with a value of , which will bring the font-size down a little. Then, to make all the letters capitals, add a property with as the value. Finally, to give some space between the letters, use the property and set the value to . This will create a sufficient space between the uppercase characters so they aren’t bunched up, making them easier to read.
The highlighted CSS in the following code block demonstrates how to format these styles:
styles.css
Save your changes to and then return to your browser to refresh . As shown in the following image, the text is now uppercase, a bit smaller in size than the cell contents, but hierarchically clear as a heading:

In this step, you used several properties to provide a discernible style to the top heading row. The HTML for this portion of the table was already accessible for non-sighted and assertive technology users. Now, the visual styles provide more contextual information. Next, you will continue to work with visual aids by adding alternating row colors.
Prerequisites
- An understanding of CSS’s cascade and specificity features, which you can get by reading How To Apply CSS Styles to HTML with Cascade and Specificity.
- Knowledge of type selectors, combinator selectors, and selector groups, which you can find in How To Select HTML Elements to Style with CSS.
- An empty HTML file saved on your local machine as that you can access from your text editor and web browser of choice. To get started, check out our How To Set Up Your HTML Project tutorial, and follow for instructions on how to view your HTML in your browser. If you’re new to HTML, try out the whole How To Build a Website in HTML series.
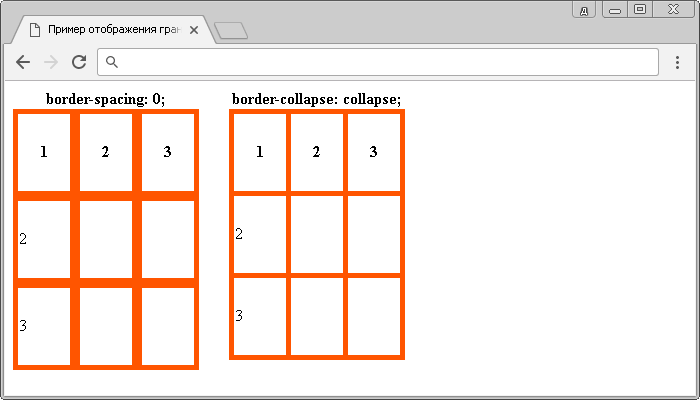
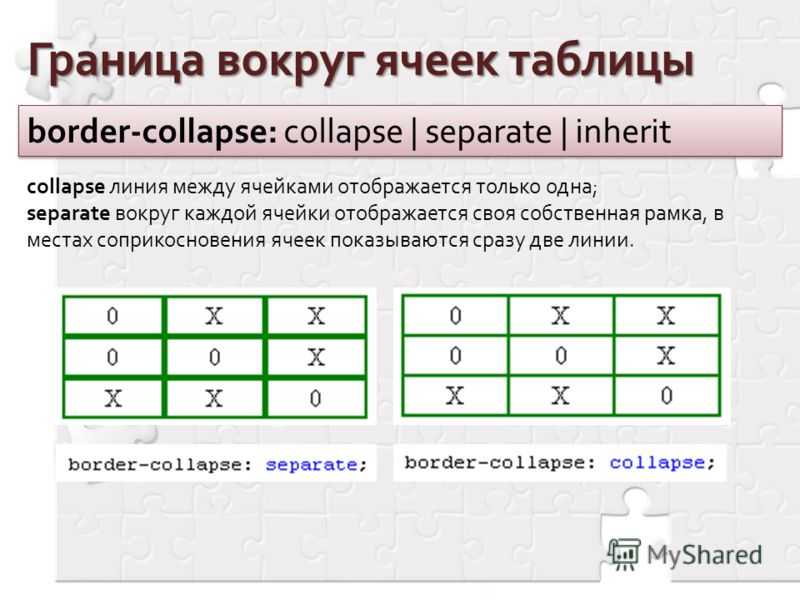
With separate as the value
If we create a collapsed border by passing separate as a value of the border-collapse Property, the individual cells will be wrapped in separate borders.
border-collapse:separate;
Example 1
In the example given below we are trying to create a separate collapsed border in HTML.
<!DOCTYPE html>
<html>
<head>
   <meta charset="UTF-8">
   <meta http-equiv="X-UA-Compatible" content="IE=edge">
   <meta name="viewport" content="width=device-width, initial-scale=1.0">
   <style>
      table,tr,th,td {
         border:1px solid black;
         border-collapse:separate;
      }
   </style>
</head>
<body>
   <h2>Tables in HTML</h2>
   <table style="width: 100%">
      <tr>
         <th >First Name </th>
         <th>Job role</th>
      </tr>
      <tr>
         <td >Tharun</td>
         <td >Content writer</td>
      </tr>
      <tr>
         <td >Akshaj</td>
         <td >Content writer</td>
      </tr>
      </table>
</body>
</html>
Following is the output for the above example program.
Example 2
Let’s see another example with separate as a value to the border-collapse Property −
<!DOCTYPE html>
<html>
<head>
   <style>
      table {
         border-collapse: separate;
      }
      table,
      td,
      th {
         border: 1px solid blue;
      }
   </style>
</head>
<body>
   <h1>Technologies</h1>
   <table>
   <tr>
      <th>IDE</th>
      <th>Database</th>
   </tr>
   <tr>
      <td>NetBeans IDE</td>
      <td>MySQL</td>
   </tr>
   </table>
</body>
</html>
Styling the Table Caption
The element provides context for both sighted and non-sighted readers of the table and displays above the table, regardless of where the is within the element. For screen reader and braille users, a provides clear context of the purpose of a table, especially when there are multiple tables on a page.
Since is an element that only occurs inside of a element, it can be styled with the type selector. The default for is centered text, with an inherited size, family, and a regular weight.
To begin changing the styles of the element, open in your text editor. Add a selector after the selector in order to keep your CSS in a logical flow order. Then, using the , , , and properties, create a caption that is large, bold, left-aligned, and dark gray. The highlighted CSS in the following code block demonstrates how this will be formatted:
styles.css
Save your changes to and reload in your browser. As shown in the following image, the caption contents are now much larger and bold, creating a heading for the table:
Next, some space is needed between the and the visual part of the . Return to in your text editor to add additional spacing to the .
The can accept and spacing properties. Since the spacing is only needed beneath the , add a property to the selector block with a value of . The highlighted line of the following code block indicates how to apply this:
styles.css
Save your changes to and refresh in the web browser. The now has more space between the text and the table, as shown in the following image:
In this section, you created custom styles for the table’s element. You also learned that the is an important element to provide informational context to those using assistive technologies to read the table. In the next section, you will apply styles to the top heading table row.

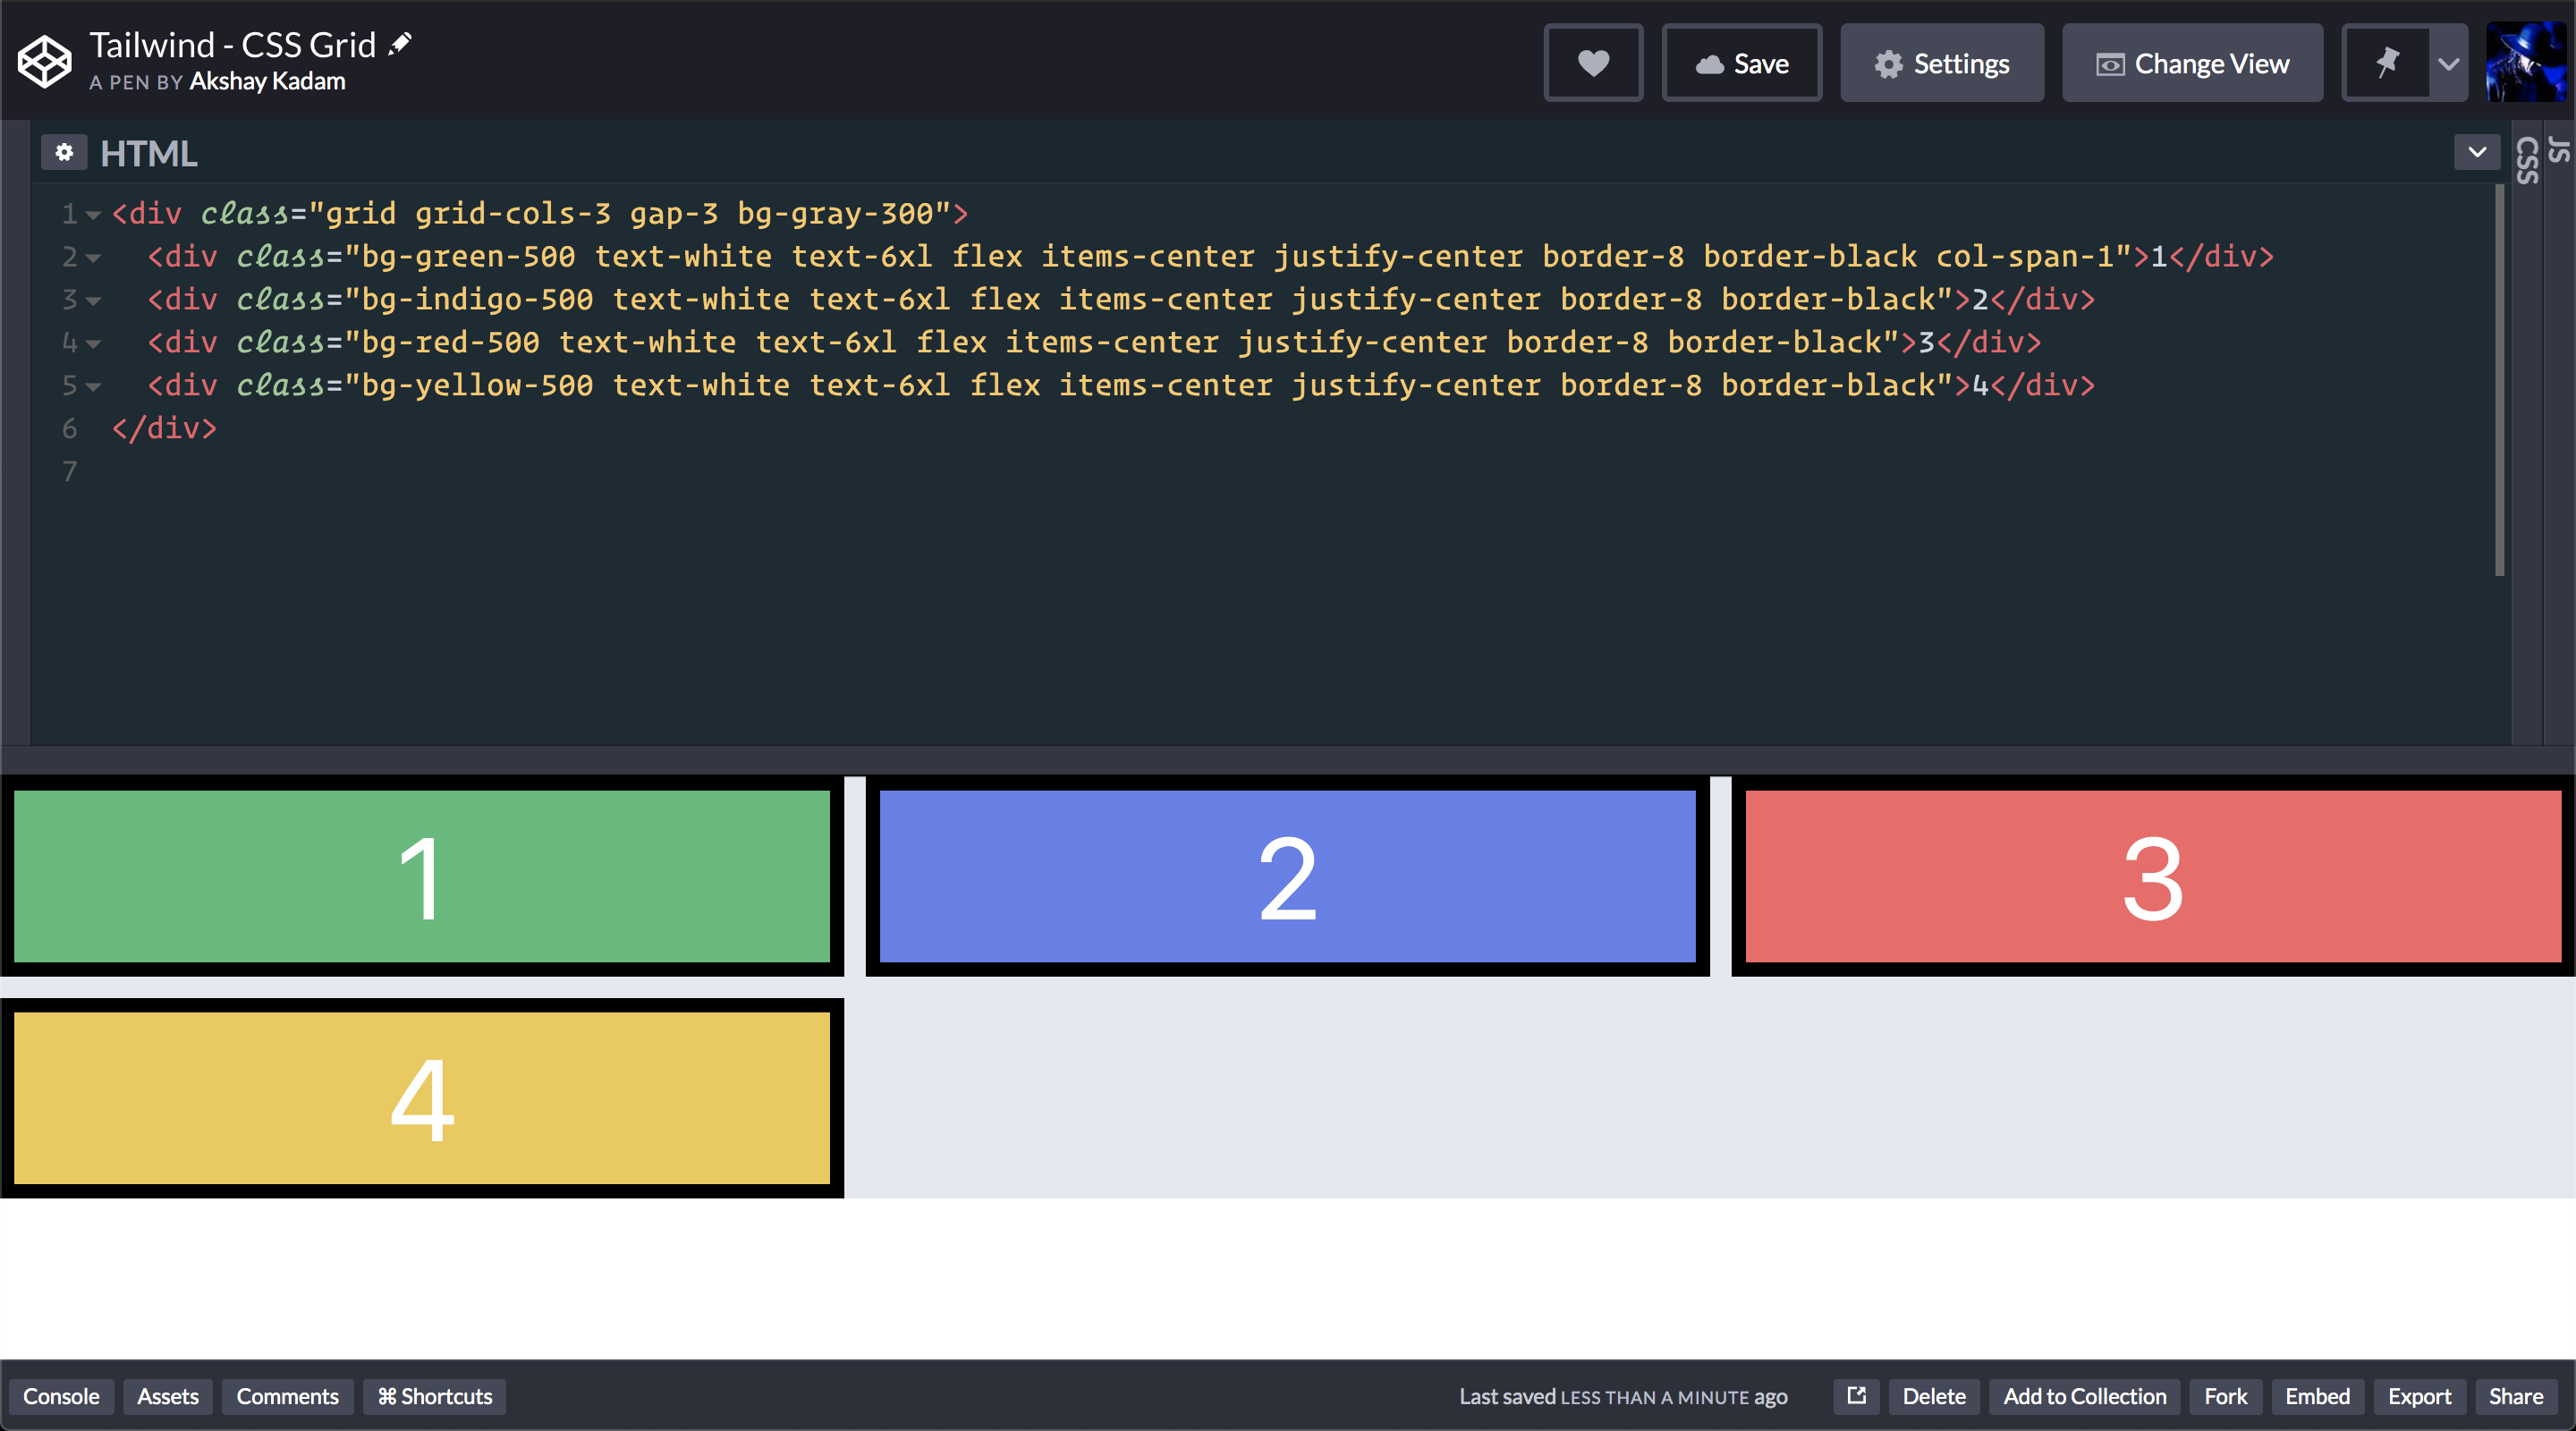
Basic usage
Collapse
Use to combine adjacent cell borders into a single border when possible. Note that this includes collapsing borders on the top-level tag.
<table class="border-collapse border border-slate-400 ...">
  <thead>
    <tr>
      <th class="border border-slate-300 ...">State</th>
      <th class="border border-slate-300 ...">City</th>
    </tr>
  </thead>
  <tbody>
    <tr>
      <td class="border border-slate-300 ...">Indiana</td>
      <td class="border border-slate-300 ...">Indianapolis</td>
    </tr>
    <tr>
      <td class="border border-slate-300 ...">Ohio</td>
      <td class="border border-slate-300 ...">Columbus</td>
    </tr>
    <tr>
      <td class="border border-slate-300 ...">Michigan</td>
      <td class="border border-slate-300 ...">Detroit</td>
    </tr>
  </tbody>
</table><table class="border-collapse border border-slate-500 ...">
  <thead>
    <tr>
      <th class="border border-slate-600 ...">State</th>
      <th class="border border-slate-600 ...">City</th>
    </tr>
  </thead>
  <tbody>
    <tr>
      <td class="border border-slate-700 ...">Indiana</td>
      <td class="border border-slate-700 ...">Indianapolis</td>
    </tr>
    <tr>
      <td class="border border-slate-700 ...">Ohio</td>
      <td class="border border-slate-700 ...">Columbus</td>
    </tr>
    <tr>
      <td class="border border-slate-700 ...">Michigan</td>
      <td class="border border-slate-700 ...">Detroit</td>
    </tr>
  </tbody>
</table>
Separate
Use to force each cell to display its own separate borders.
<table class="border-separate border border-slate-400 ...">
  <thead>
    <tr>
      <th class="border border-slate-300 ...">State</th>
      <th class="border border-slate-300 ...">City</th>
    </tr>
  </thead>
  <tbody>
    <tr>
      <td class="border border-slate-300 ...">Indiana</td>
      <td class="border border-slate-300 ...">Indianapolis</td>
    </tr>
    <tr>
      <td class="border border-slate-300 ...">Ohio</td>
      <td class="border border-slate-300 ...">Columbus</td>
    </tr>
    <tr>
      <td class="border border-slate-300 ...">Michigan</td>
      <td class="border border-slate-300 ...">Detroit</td>
    </tr>
  </tbody>
</table><table class="border-separate border border-slate-500 ...">
  <thead>
    <tr>
      <th class="border border-slate-600 ...">State</th>
      <th class="border border-slate-600 ...">City</th>
    </tr>
  </thead>
  <tbody>
    <tr>
      <td class="border border-slate-700 ...">Indiana</td>
      <td class="border border-slate-700 ...">Indianapolis</td>
    </tr>
    <tr>
      <td class="border border-slate-700 ...">Ohio</td>
      <td class="border border-slate-700 ...">Columbus</td>
    </tr>
    <tr>
      <td class="border border-slate-700 ...">Michigan</td>
      <td class="border border-slate-700 ...">Detroit</td>
    </tr>
  </tbody>
</table>
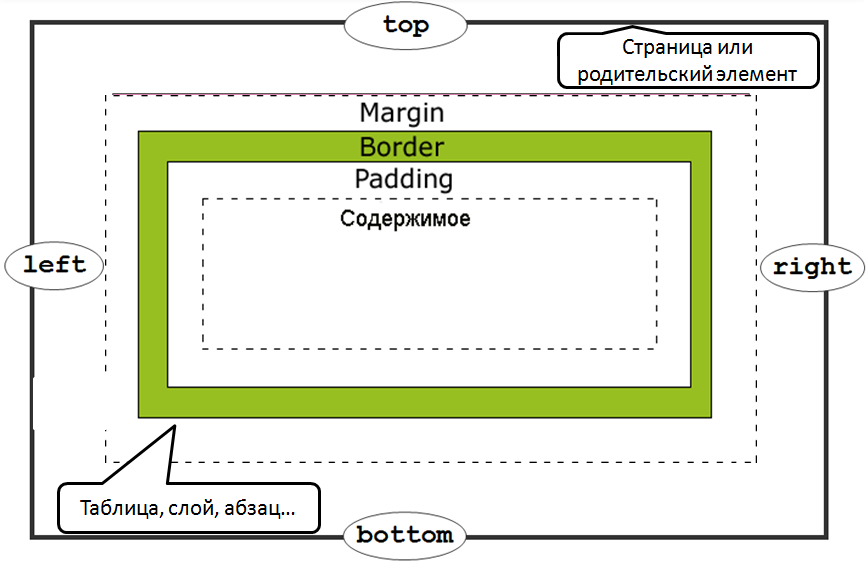
Толщина рамки[править]
Аналогично работает стиль border-width, однако рамка не отображается, если не установлен отличный от нуля атрибут border или стиль border-style. При одновременной установке толщины при помощи border-width и border, приоритет имеет border-width.
Для border-width указывается числовое значение или синоним: thin (1-2 пиксела), medium (3-4 пиксела) и thick (5-6 пикселов), значения отличаются для разных браузеров.
Можно указать от 1 до 4 значений толщины.
Для раздельного назначения толщины границам можно использовать стили border-bottom-width, border-top-width, border-left-width, border-right-width.
Setting Up the HTML
Before you can style a , you need one to work with. There are a lot of possible elements that can exist within a element. The element is one of the best examples of HTML semantics, as it only works when it has table-related descendent elements within it. In this step, you will create a element and populate it with example data.
To start, open in your text editor and add the HTML in the following code block:
index.html
All the HTML you will add from this point forward will go inside the element. The element itself only defines the tabular content area, and must have specific elements inside of it to work properly. The element references the file that you’ll add later and will load the CSS onto the page to generate the styles. The attribute designates what device the content is made for. In this case, you’ve set it to , since this is for all device types.
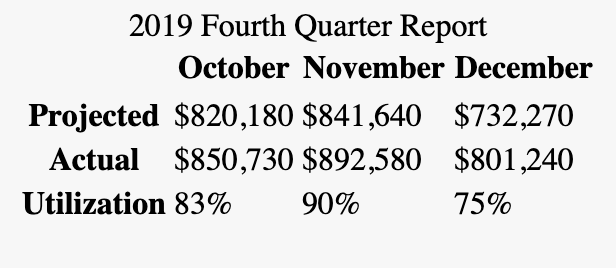
First, you’ll add the element within the element, with the text of 2019 Fourth Quarter Report inside. In the file in your text editor, add the highlighted HTML from the following code block:
index.html
The contains the name or description of the table. Be sure to include this element in your tables, as it provides useful information for those who use assistive technologies, such as a screen reader. It may be helpful to think of a element as the of the .
Next, add the followed by the elements as siblings to the element, as shown in the highlighted HTML in the next code block:
index.html
The element is the equivalent of and defines a context for heading information. Like the , the element defines the area where the tabular content will reside. In both cases they define an area, but on their own they do not show content. While not used in this example, the element exists to provide summary information, such as totals.
A table in HTML is built by rows, not columns. Each cell of the table is contained within a element. These elements are usually descendants of , , and , but can also be a direct descendant of if the area elements are not used.
Return to the in your text editor to add a single heading row and three rows of content in the body, as highlighted in the following code block:
index.html
The last two elements are functionally similar and are both the final element in the HTML structure, meaning unlike the previous elements, these can contain non-table elements.
elements contain the individual table data points. defines content as a heading for a row or a column. Table elements are unique to HTML as their markup structure correlates directly with a visual structure. When considering a table as a spreadsheet, the and elements behave as the cells. In order to have four columns in this table, each will need to have no more and no less than four or elements. Depending on the content of the data, this may mean there is a blank or element. It can be helpful to use an HTML comment to explain when an element is intentionally left blank.
Add the highlighted HTML from the following code block to your file:
index.html
Note: Like in spreadsheet software, there are times that it may be necessary to merge cells, such as when a single cell takes up two columns. This is possible to do, but only with the use of HTML attributes on the cells, and not with CSS. It is important to keep this in mind when dealing with more complex tables.


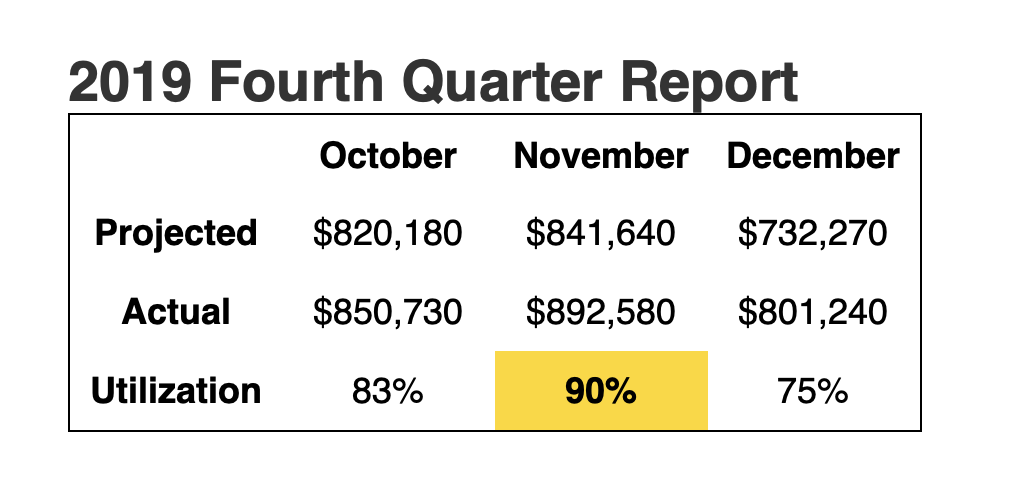
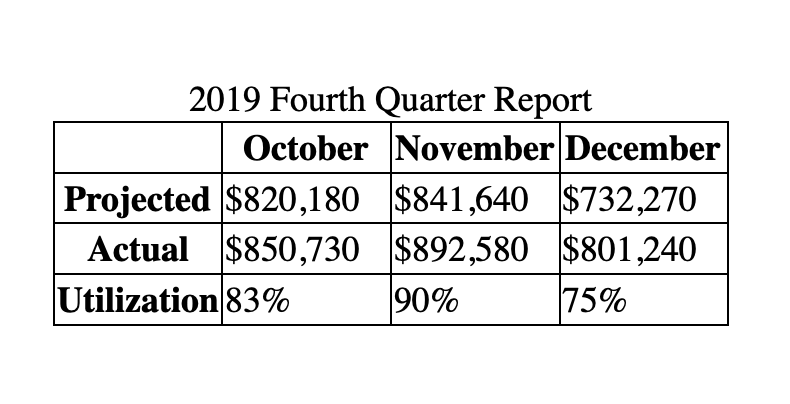
Now that you have written out your table, save the file. Then, open in your web browser. The following image depicts how the browser default styles for this table will look when loaded in the Firefox web browser:
In this section, you set up the HTML for the tabular data. You learned about how a table is made of a series of elements combined in a distinct order to create an accessible dataset. Next, you will use the and properties to begin applying styles to the table.
CSS Border Shorthand
CSS shorthand is a group of CSS properties that allow values of multiple properties to be set simultaneously. These values are separated by spaces.
The border property, for example, is shorthand for the individual border properties above: border-width, border-style, and border-color.
So I could write the following declarations in longhand:
Or in one declaration using the shorthand border property:
While this shorthand property can save you time and make your code look cleaner, it does introduce room for error. Let’s take a look at a common issue you may run into when using this shorthand property.
Нужна ли нам таблица
Лучше текстом. Иногда в таблице много текста, который переходит на несколько строчек. Издалека она выглядит опрятно, но читать ее неудобно. Автору приходится мельчить и выбрасывать важные подробности, чтобы уместить текст в таблицу. Вместо этого лучше оформить информацию текстом в виде наборных подзаголовков. Для каждой ячейки таблицы написать отдельный абзац, а смысл изложить в мире читателя. Например, построить структуру в таблице, в которой сравниваются языки программирования, не по их названиям: С, Java, Swift, — а по назначению: «Языки для мобильной разработки», «Языки для web-разработки» и подобное.
Лучше инфографикой. Часто цель таблицы — не просто продемонстрировать цифры, а показать наглядно тезис автора, поэтому во многих случаях лучше подготовить инфографику. Например, данные о гендерном и этническом составе сотрудников технологических компаний можно представить в виде таблицы, но простая инфографика будет нагляднее.
Инфографика Diversity in Tech, портал informationisbeautiful.net
CSS Справочники
CSS СправочникCSS ПоддержкаCSS СелекторыCSS ФункцииCSS ЗвукCSS Веб шрифтыCSS АнимацииCSS ДлиныCSS Конвертер px-emCSS Названия цветаCSS Значения цветаCSS по умолчаниюCSS Символы
CSS Свойства
align-content
align-items
align-self
all
animation
animation-delay
animation-direction
animation-duration
animation-fill-mode
animation-iteration-count
animation-name
animation-play-state
animation-timing-function
backface-visibility
background
background-attachment
background-blend-mode
background-clip
background-color
background-image
background-origin
background-position
background-repeat
background-size
border
border-bottom
border-bottom-color
border-bottom-left-radius
border-bottom-right-radius
border-bottom-style
border-bottom-width
border-collapse
border-color
border-image
border-image-outset
border-image-repeat
border-image-slice
border-image-source
border-image-width
border-left
border-left-color
border-left-style
border-left-width
border-radius
border-right
border-right-color
border-right-style
border-right-width
border-spacing
border-style
border-top
border-top-color
border-top-left-radius
border-top-right-radius
border-top-style
border-top-width
border-width
bottom
box-decoration-break
box-shadow
box-sizing
caption-side
caret-color
@charset
clear
clip
color
column-count
column-fill
column-gap
column-rule
column-rule-color
column-rule-style
column-rule-width
column-span
column-width
columns
content
counter-increment
counter-reset
cursor
direction
display
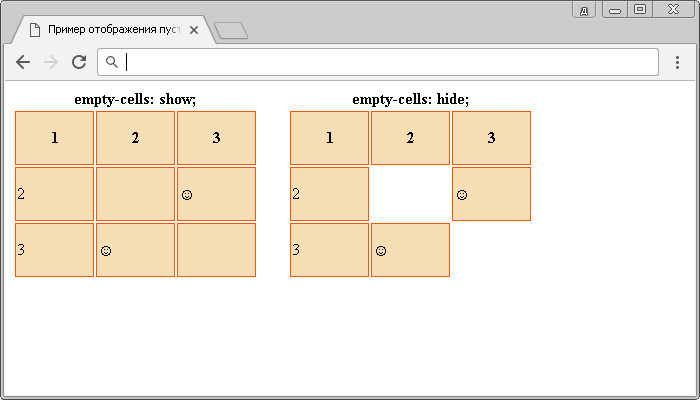
empty-cells
filter
flex
flex-basis
flex-direction
flex-flow
flex-grow
flex-shrink
flex-wrap
float
font
@font-face
font-family
font-kerning
font-size
font-size-adjust
font-stretch
font-style
font-variant
font-weight
grid
grid-area
grid-auto-columns
grid-auto-flow
grid-auto-rows
grid-column
grid-column-end
grid-column-gap
grid-column-start
grid-gap
grid-row
grid-row-end
grid-row-gap
grid-row-start
grid-template
grid-template-areas
grid-template-columns
grid-template-rows
hanging-punctuation
height
hyphens
@import
isolation
justify-content
@keyframes
left
letter-spacing
line-height
list-style
list-style-image
list-style-position
list-style-type
margin
margin-bottom
margin-left
margin-right
margin-top
max-height
max-width
@media
min-height
min-width
mix-blend-mode
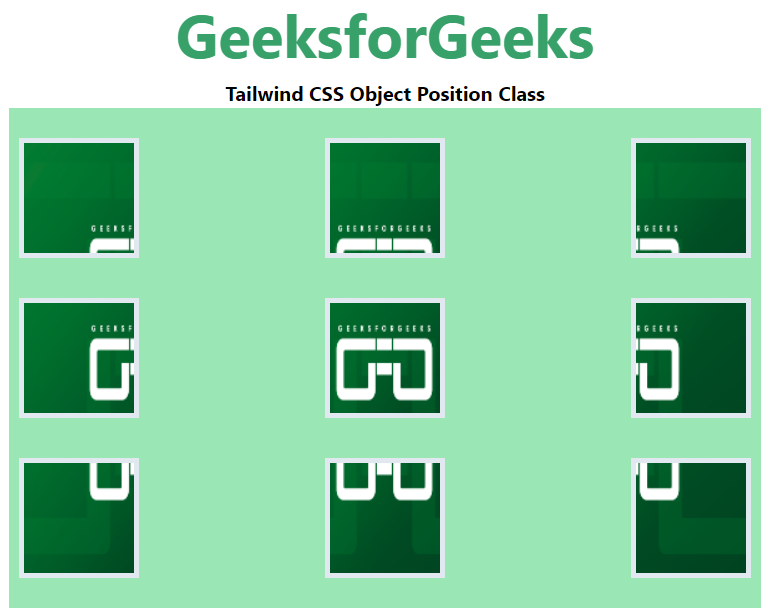
object-fit
object-position
opacity
order
outline
outline-color
outline-offset
outline-style
outline-width
overflow
overflow-x
overflow-y
padding
padding-bottom
padding-left
padding-right
padding-top
page-break-after
page-break-before
page-break-inside
perspective
perspective-origin
pointer-events
position
quotes
resize
right
tab-size
table-layout
text-align
text-align-last
text-decoration
text-decoration-color
text-decoration-line
text-decoration-style
text-indent
text-justify
text-overflow
text-shadow
text-transform
top
transform
transform-origin
transform-style
transition
transition-delay
transition-duration
transition-property
transition-timing-function
unicode-bidi
user-select
vertical-align
visibility
white-space
width
word-break
word-spacing
word-wrap
writing-mode
z-index
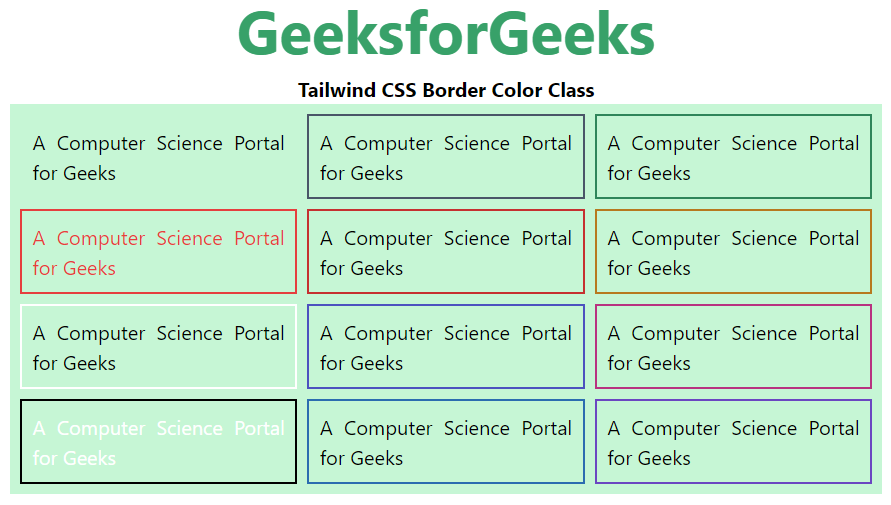
Цвет рамки[править]
Цвет рамки можно установить при помощи атрибута bordercolor тега <table> (отсутствует в стандарте HTML 4.01 и не поддерживается браузером Opera).
Для назначения цвета рамке имеется CSS-стиль border-color.
Для назначения разных цветов разным сторонам границы есть стили border-top-color, border-bottom-color, border-left-color, border-right-color.
Это можно сделать также в одном выражении border-color, перечислив цвета через пробел (сверху по часовой стрелке):
<table style="border-width: 10; width: 250; border-color: red green blue yellow;  border-style: ridge">
    <tr>
     <td>border-color: red green blue yellow</td>
    </tr>
</table>
Для указания цветов можно использовать шестнадцатеричные значения наподобие #aabbcc, см. wr:Цвета в HTML.
Setting the Size of the Table
Next, you will add some spacing to the table cells to make the data more readable. To address adding in white space to the table cells and making the table more balanced, this section will focus on the and properties.
As of now, the content of each cell is bunched up, with the borders right on top of the content. You may have also noticed that the table is only as wide as its content. has its own display property: . To make the table go the full width of the parent container, a can be added to the selector.
As this is a relatively small table, adding a property to the element isn’t necessary. Instead, open in your text editor and add a combinator selector consisting of , which will scope styles to elements inside of a element. Then, add a property with a value of , as indicted in the highlighted portion of the following code block:
styles.css
Since there are four columns in this table, you can give each column an equal width by applying a . Only the first cell of each column needs to be set, hence the selector. The width of one cell determines the width of all cells in that column.


After saving your changes to , return to your browser and refresh . The table will now have four columns of the same width, as depicted in the following image:
Note: If you wish to have varying widths for each column, apply a specific class to each in the column. Then, using those classes, set your desired width.
Now that the columns are equal widths, the content of each cell could use some more space inside by using the property. Unlike the property, applying space inside the cell requires targeting all the and cell elements.
Open in your text editor and add a property to the group selector for , then give it a value of . The highlighted line in the following code block indicates the necessary change:
styles.css
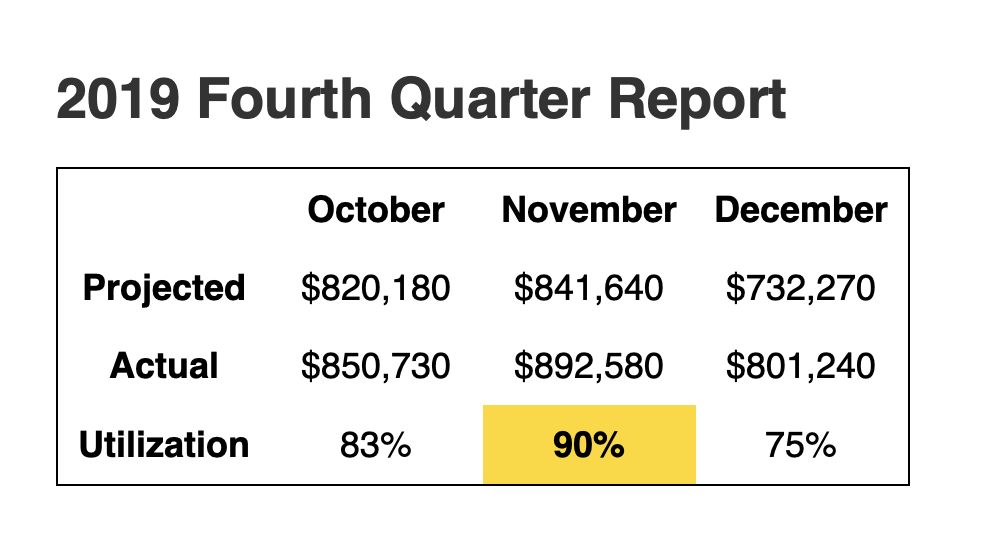
Save your changes to , then refresh in the browser. The padding is added to each side of each cell, providing space to make the tabular data more legible. The following image depicts how this will appear in the browser:
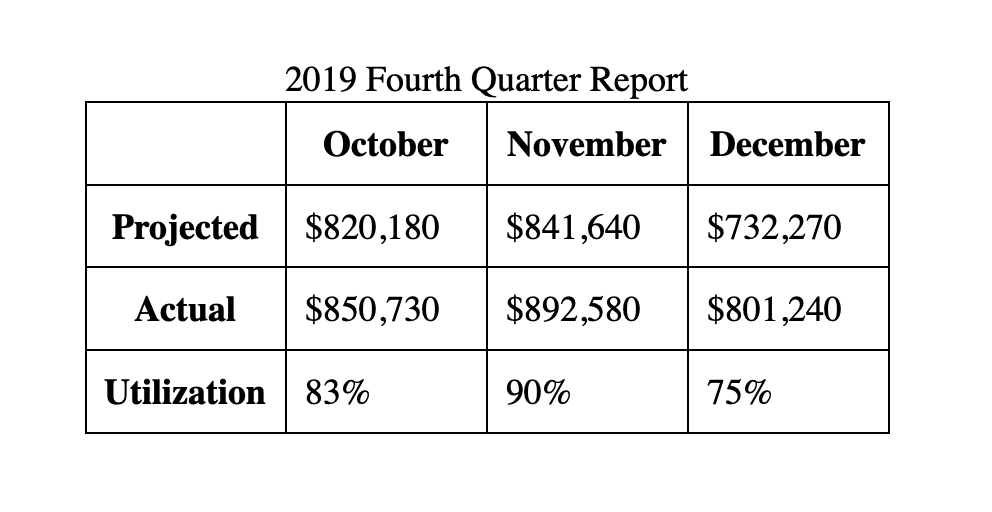
Note: The box model for table cells is an outlier from the usual model, and does not recognize the property.
In this section, you set the property of each column to be equal and you added spacing to each cell using the property to make the data easier to read. In the next section, you will use a class to target and style a specific table cell.