
Other Uses of Margin
Accounting Margin
In business accounting, margin refers to the difference between revenue and expenses, where businesses typically track their gross profit margins, operating margins, and net profit margins. The gross profit margin measures the relationship between a company’s revenues and the cost of goods sold (COGS). Operating profit margin takes into account COGS and operating expenses and compares them with revenue, and net profit margin takes all these expenses, taxes, and interest into account.
Margin in Mortgage Lending
Adjustable-rate mortgages (ARM) offer a fixed interest rate for an introductory period of time, and then the rate adjusts. To determine the new rate, the bank adds a margin to an established index. In most cases, the margin stays the same throughout the life of the loan, but the index rate changes. To understand this more clearly, imagine a mortgage with an adjustable rate that has a margin of 4% and is indexed to the Treasury Index. If the Treasury Index is 6%, the interest rate on the mortgage is the 6% index rate plus the 4% margin, or 10%.
What Does It Mean to Trade on Margin?
Trading on margin means borrowing money from a brokerage firm in order to carry out trades. When trading on margin, investors first deposit cash that serves as collateral for the loan and then pay ongoing interest payments on the money they borrow. This loan increases the buying power of investors, allowing them to buy a larger quantity of securities. The securities purchased automatically serve as collateral for the margin loan.
What Is a Margin Call?
A margin call is a scenario in which a broker who had previously extended a margin loan to an investor sends a notice to that investor asking them to increase the amount of collateral in their margin account. When faced with a margin call, investors often need to deposit additional cash into their account, sometimes by selling other securities. If the investor refuses to do so, the broker has the right to forcefully sell the investor’s positions in order to raise the necessary funds. Many investors fear margin calls because they can force investors to sell positions at unfavorable prices.
What Are Some Other Meanings of the Term Margin?
Outside of margin lending, the term margin also has other uses in finance. For example, it is used as a catch-all term to refer to various profit margins, such as the gross profit margin, pre-tax profit margin, and net profit margin. The term is also sometimes used to refer to interest rates or risk premiums.
What Are the Risks of Trading on Margin?
When investing on margin, the investor is at risk of losing more money than what they deposited into the margin account. This may occur when the value of the securities held declines, requiring the investor to either provide additional funds or incur a forced sale of the securities.
Related Resources
- CSS margin-top Property
- CSS margin-bottom Property
- CSS margin-left Property
- CSS margin-right Property
- How to Vertically Center Text with CSS
- How to Style a Horizontal Line
- How to Add a Frame Around an Image
- How to Remove, Replace or Style List Bullets with Pure CSS
- How to Create Search Boxes
- How to Create a Modal Dialog Box with CSS and JavaScript
- How to create a drop-down navigation menu with CSS
- How to Style a Checkbox with CSS
- How to Change the Background Image on Scroll Using CSS
- How to Align Divs Side by Side
- How to Make the Cursor a Hand When Hovering Over a List Item
- How to Create a Typewriter Text with Pure CSS
- How to Give a Div Element 100% Height of the Browser Window
- How to Add Space Between Rows in the Table
- How to Horizontally Center a Div with CSS
- How to Create Polaroid Image With CSS
- How to Create Drop Caps for the Text
- How to Create a Fullscreen Image Slider with Pure CSS
- How to Add a Glass Background Effect to the Text
- How to Add a Fade out Text Effect with CSS
- How to Create a Shining Text Animation Effect
- How to Get the Height of an Element
- How to Set Space Between Flexbox Items
- How to Add Lines Before and After the Heading Text
- How to Flip Text with CSS
- How to Create Sticky Footer with CSS
- How to Customize File Inputs
- How to Create Animation on Page Load
- How to Center a Button Both Horizontally and Vertically within a Div
- How to Stretch a Text with CSS
- How to Adjust the Position of List Style Image
- How to Select All Child Elements Except the Last One
- How to Make a <div> Fill the Height of the Remaining Space
- How to Create an Unordered List without Bullets
- How to Create Checkbox with a Clickable Label
- How to Overlay One Div Over Another
- How to Add Border Inside a Div
- How to Create an HTML Table with a Fixed Left Column and Scrollable Body
- How to Get Image Size Using JavaScript
- How to Hide the HTML5 Number Input’s Arrow Buttons
- How to Center the Content in Grid
- How to Center an Image with the CSS text-align Property
- How to Change the Size of Glyphicons
- How to Calculate Text Width with JavaScript
- How to Style Input and Submit Buttons
- How to Style the Selected Label of a Radio Button
- How to Make a Child Div Element Wider than the Parent Div
- How to Make the CSS margin-top Style Work
- How to Remove the CSS :hover Behavior from an Element
- How To Make a <div> Element Extend to the Page Bottom Even Having No Content
- What is the Difference Between the «inline» and «inline-block» Values of the CSS display Property
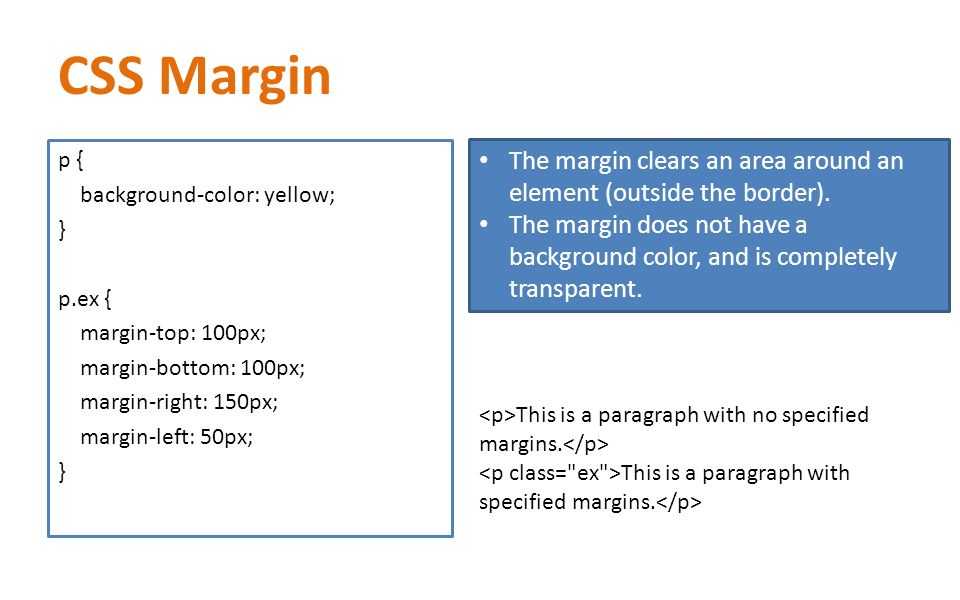
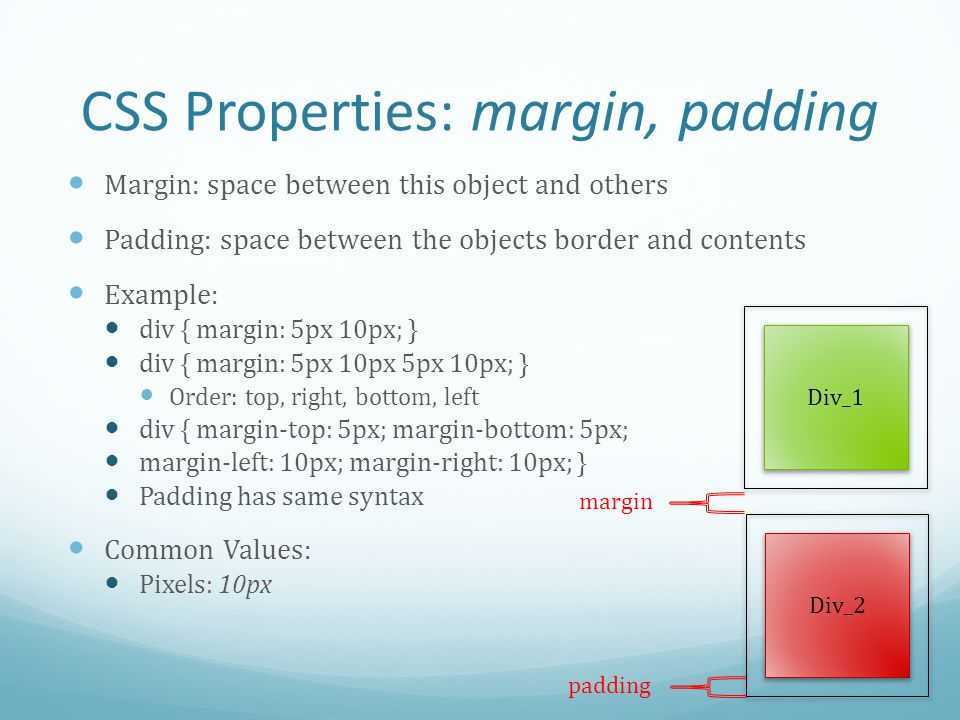
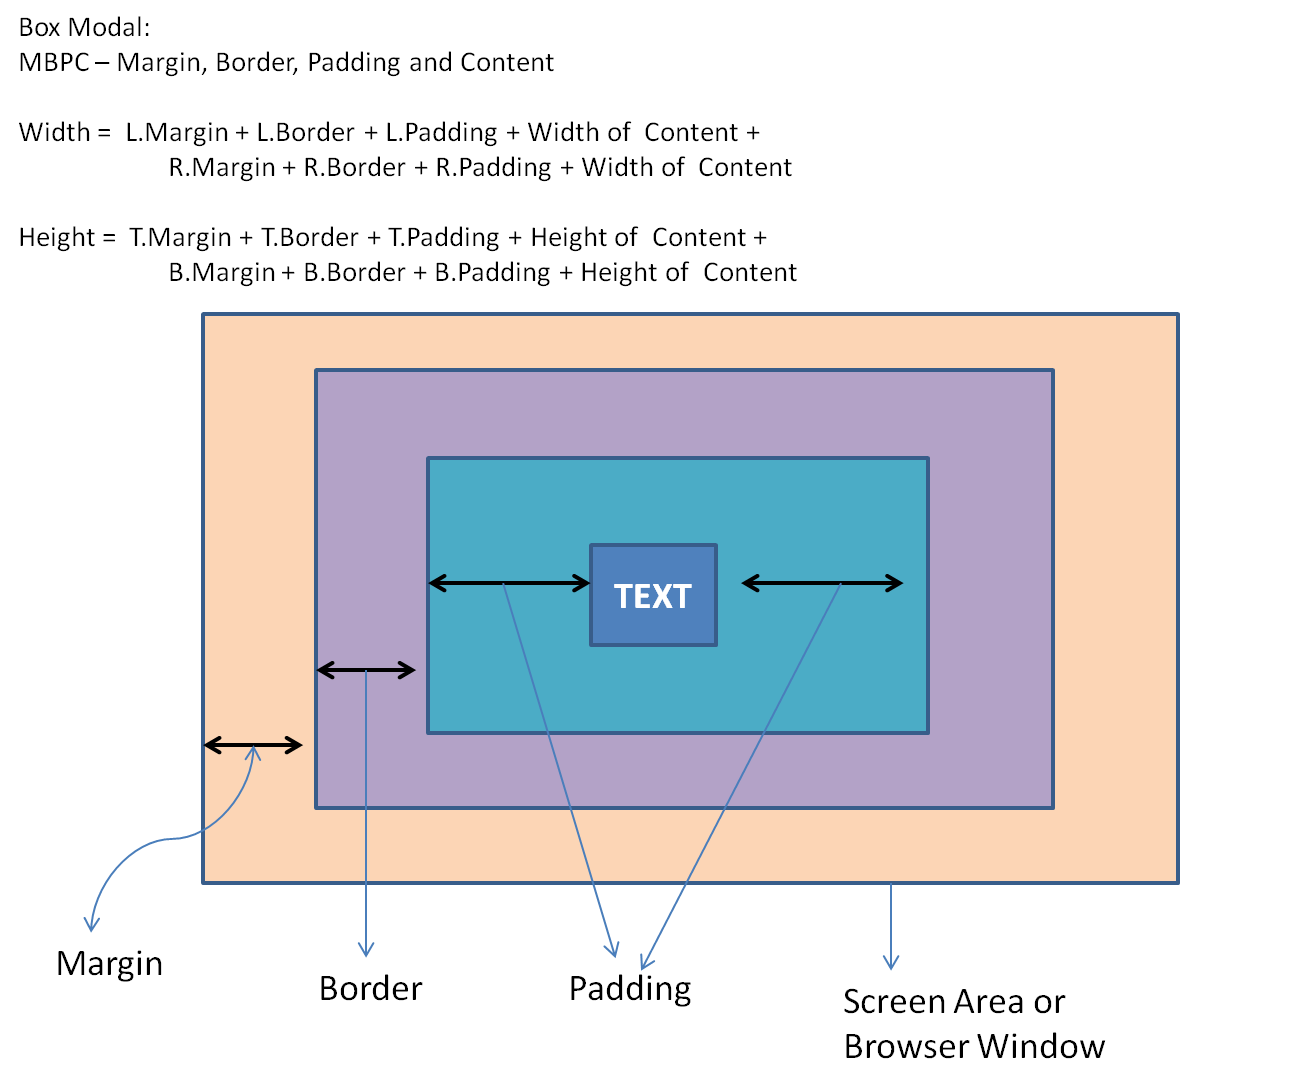
CSS Margin
The CSS margin property is a shorthand property to set the margin area around an HTML element. Consider you want to set a quarter-inch margin on h1 elements then following is the syntax:
<html>
<head>
<style>
   div {
      border:1px dotted
   }
   h1 {
      margin: 0.25in; background-color: #eee;
   }
</style>
</head>
<body>
   <div>
      <h1>This h1 element has  quarter-inch margin around it!</h1>
   </div>
</body>
</html>
You can set margin using any units, whether in pixels, inches, millimeters, or ems. The default value for margin is 0 (zero), so if you don’t set a margin value then no margin should appear around the element. To set a margin of 20 pixels around h1 element, above code will be written as follows:
<html>
<head>
<style>
   div {
      border:1px dotted
   }
   h1 {
      margin: 20px; background-color: #eee;
   }
</style>
</head>
<body>
   <div>
      <h1>This h1 element has 20 pixels margin around it!</h1>
   </div>
</body>
</html>
Margin Collapsing
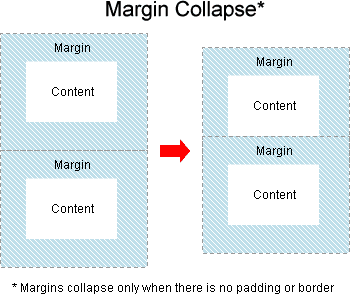
The CSS1 specification, as it defined margins, also defined that vertical margins collapse. This collapsing behavior has been the source of margin-related frustration ever since. Margin collapsing makes sense if you consider that in those early days, CSS was being used as a documenting formatting language. Margin collapsing means that when a heading with a bottom margin, is followed by a paragraph with a top margin, you do not get a huge gap between those items.
When margins collapse, they will combine so that the space between the two elements becomes the larger of the two margins. The smaller margin essentially ending up inside the larger one.
Margins collapse in the following situations:
Let’s take a look at each of these scenarios in turn, before looking at the things which prevent margins from collapsing in these scenarios.
Adjacent Siblings
My initial description of margin collapsing is a demonstration of how the margins between adjacent siblings collapse. Other than in the situations mentioned below, if you have two elements displaying one after the other in normal flow, the bottom margin of the first element will collapse with the top margin of the following element.
In the CodePen example below, there are three elements. The first has a top and bottom margin of 50 pixels. The second has a top and bottom margin of 20px. The third has a top and bottom margin of 3em. The margin between the first two elements is 50 pixels, as the smaller top margin is combined with the larger bottom margin. The margin between the second two elements in 3em, as 3em is larger than the 20 pixels on the bottom of the second element.
See the Pen (https://codepen.io/rachelandrew/pen/OevMPo) by Rachel Andrew.
See the Pen Margins: adjacent siblings by Rachel Andrew.
Completely Empty Boxes
If a box is empty, then its top and bottom margin may collapse with each other. In the following CodePen example, the element with a class of empty has a top and bottom margin of 50 pixels, however, the space between the first and third items is not 100 pixels, but 50. This is due to the two margins collapsing. Adding anything to that box (even padding) will cause the top and bottom margins to be used and not collapse.
See the Pen (https://codepen.io/rachelandrew/pen/JQLGMr) by Rachel Andrew.
See the Pen Margins: empty boxes by Rachel Andrew.
Parent And First Or Last Child Element
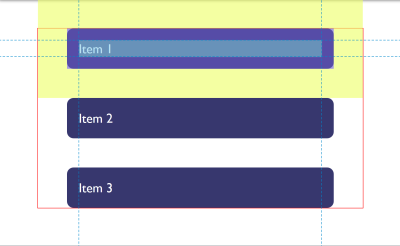
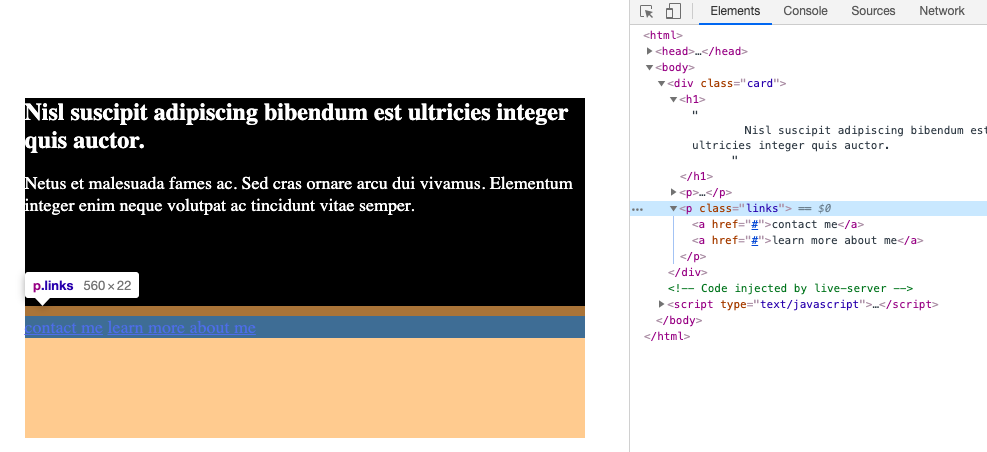
This is the margin collapsing scenario which catches people out most often, as it does not seem particularly intuitive. In the following CodePen, I have a with a class of wrapper, and I have given that an in red so that you can see where it is. The three child elements all have a margin of 50 pixels. However, the first and last items are flush with the edges of the wrapper; there is not a 50-pixel margin between the element and the wrapper.
See the Pen (https://codepen.io/rachelandrew/pen/BgrKGp) by Rachel Andrew.
See the Pen Margins: margin on first and last child by Rachel Andrew.
This is because the margin on the child collapses with any margin on the parent thus ending up on the outside of the parent. You can see this if you inspect the first child using DevTools. The highlighted yellow area is the margin.
There is an easy way to avoid even thinking about collapsing margins
First off, there is my general rule of thumb that I talked about above:
- If you need empty space, use
- If you need more background, use
That will get you out of trouble most of the time. But let’s add an extra rule to this that will help even more:
Try to avoid margin-top except when you really need it
This rule is in a bit of conflict with the user-agent-styles, which set a and to a bunch of elements, which is one reason I often will do something like this:
It eliminates a lot of the issues that come from collapsing margins on their own, as well as differences in your layout when some places are using flex or grid and others are not.
(Note: if you inspect the code here on freeCodeCamp, you’ll see they do something similar as well!)
It’s not a perfect solution, and I often do use a little on certain subtitles or in specific situations where it’s called for. But I’m doing it very intentionally instead of letting the user-agent-styles potentially get in the way in some unforeseen way.
These lessons are just a snippet of my much larger course on responsive web design. To continue this coding journey, take a look at the course.
In the course I cover an introduction to responsive web design, and dive into both flexbox and grid, all the while trying to show people how much fun CSS really is once you start to understand how it works.
Happy coding ![]()
Значения свойства
| Значение | Описание |
|---|---|
| auto | для вертикальных отступов вычисляется как 0. При использовании для горизонтальных отступов следует учитывать следующие моменты:
|
| величина | Указывает размер поля в единицах измерения, используемых в CSS. |
| % | Величина, указанная в процентах, вычисляется в зависимости от ширины области содержимого родительского элемента. |
| inherit | Указывает, что значение наследуется от родительского элемента. |
Пример
CSS Свойство:
margin:
Результат:
myBox
CSS Код:
div#myBox { background-color: red; margin: auto; }
Кликните на любое значение свойства, чтобы увидеть результат
CSS Margins — Inline Elements
Margins can also be applied to inline elements but top and bottom margins do not have any effect on the line height of these nonreplaced elements and these margins are always transparent. Though when you apply margins to the left and right sides of an inline nonreplaced element then it will show the effect as shown in the following example.


<html>
<head>
<style>
   div {
      border:1px dotted
   }
   strong {
      margin-top: 25px; margin-bottom: 50px;
      margin-left: 25px; background-color: #eee;
   }
</style>
</head>
<body>
   <div>
       <p>This text has some <strong>strong text</strong> with grey background</p>
   </div>

</body>
</html>
Here margin-left created some extra space before the highlited strong text. We can create same space before and after the element as follows:
<html>
<head>
<style>
   div {
      border:1px dotted
   }
   strong {
     margin: 25px; background-color: #eee;
   }
</style>
</head>
<body>
   <div>
       <p>This text has some <strong>strong text</strong> with grey background</p>
   </div>

</body>
</html>
Example
We will discuss the margin property below, exploring examples of how to use this property in CSS with 1, 2, 3, or 4 values (as either a fixed value or as a percentage).
Using Fixed Value
Let’s look at a CSS margin example where we provide one value expressed as a fixed value.
In this CSS margin example, we have provided one value of 10px which would apply to all 4 sides of the element.
Let’s look at how to use the optional auto value in the CSS margin property.
In this CSS margin example, we are centering the <div> tag and applying 0 margins.
Next, we’ll look at a CSS margin example where we provide two values expressed as a fixed value.
In this CSS margin example, we have provided two values. The first value of 10px would apply to the top and bottom of the element. The second value of 5em would apply to the left and right sides of the element.
Next, we’ll look at a CSS margin example where we provide three values expressed as a fixed value.
In this CSS margin example, we have provided three values. The first value of 2px would apply to the top of the element. The second value of 4px would apply to the right and left sides of the element. The third value of 6px would apply to the bottom of the element.
Next, we’ll look at a CSS margin example where we provide four values expressed as a fixed value.
In this CSS margin example, we have provided four values. The first value of 5px would apply to the top of the element. The second value of 10px would apply to the right side of the element. The third value of 12px would apply to the bottom of the element. The fourth value of 8px would apply to the left side of the element.
Using Percentage
Let’s look at a CSS margin example where we provide one value expressed as a percentage.
In this CSS margin example, we have provided one value of 4% which would apply to all 4 sides of the element.
Let’s look at how to use the optional auto value in the CSS margin property.
In this CSS margin example, we are centering the <div> tag and applying 4% margins.
Next, we’ll look at a CSS margin example where we provide two values expressed as a percentage.
In this CSS margin example, we have provided two values. The first value of 10% would apply to the top and bottom of the element. The second value of 5% would apply to the left and right sides of the element.
Next, we’ll look at a CSS margin example where we provide three values expressed as a percentage.
In this CSS margin example, we have provided three values. The first value of 2% would apply to the top of the element. The second value of 5% would apply to the right and left sides of the element. The third value of 10% would apply to the bottom of the element.
Next, we’ll look at a CSS margin example where we provide four values expressed as a percentage.
In this CSS margin example, we have provided four values. The first value of 5% would apply to the top of the element. The second value of 10% would apply to the right side of the element. The third value of 2% would apply to the bottom of the element. The fourth value of 8% would apply to the left side of the element.
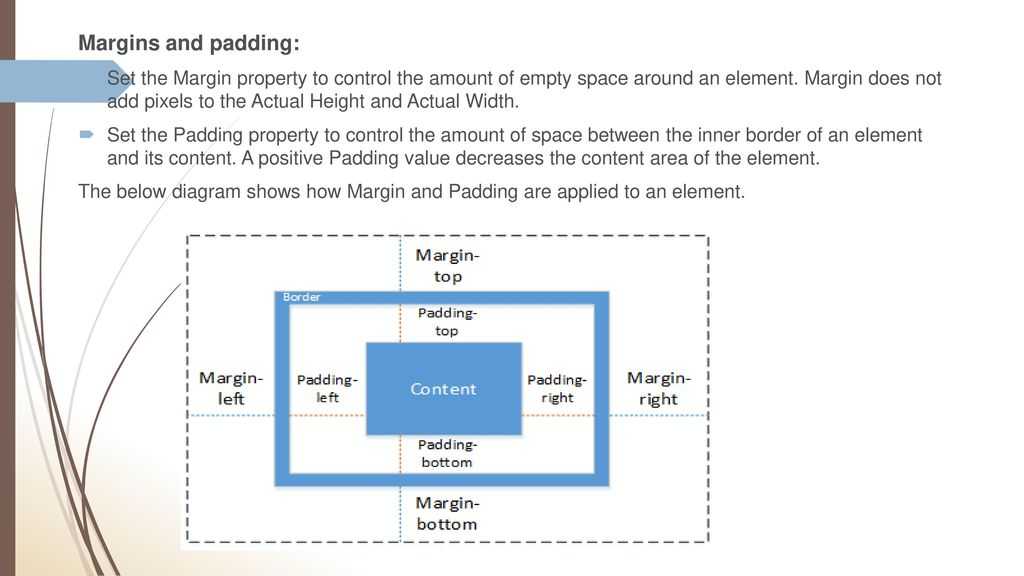
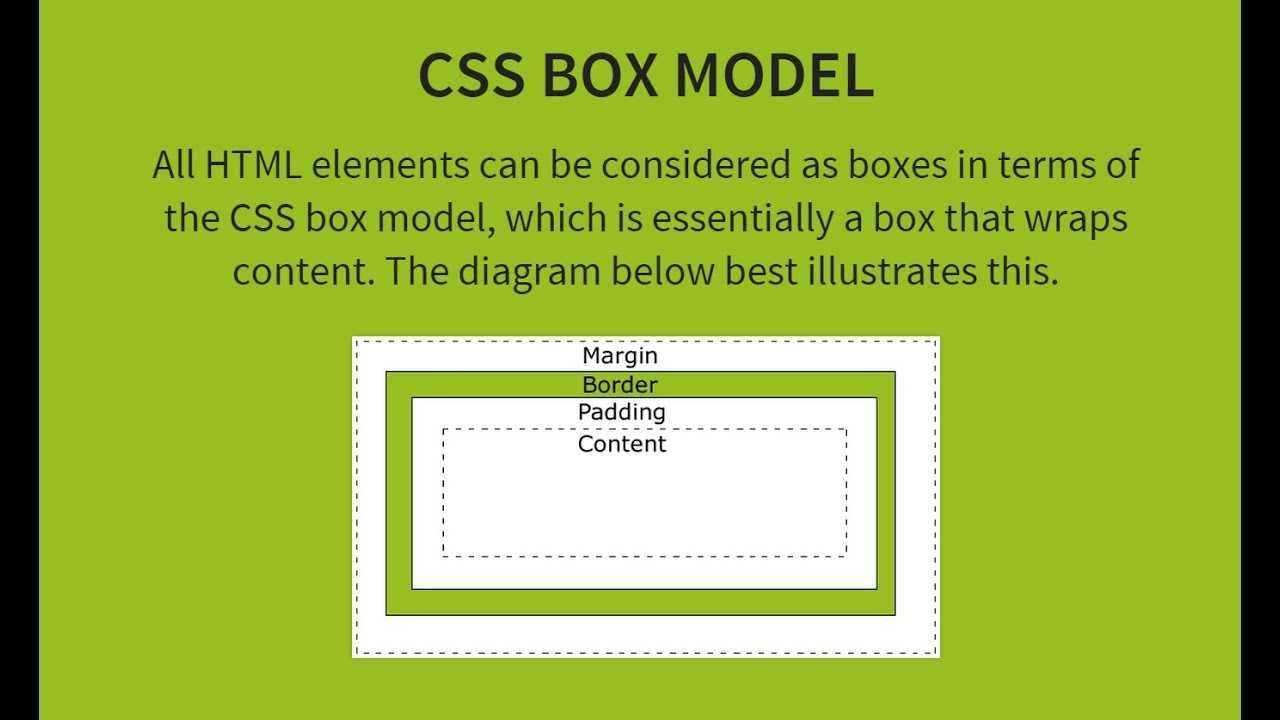
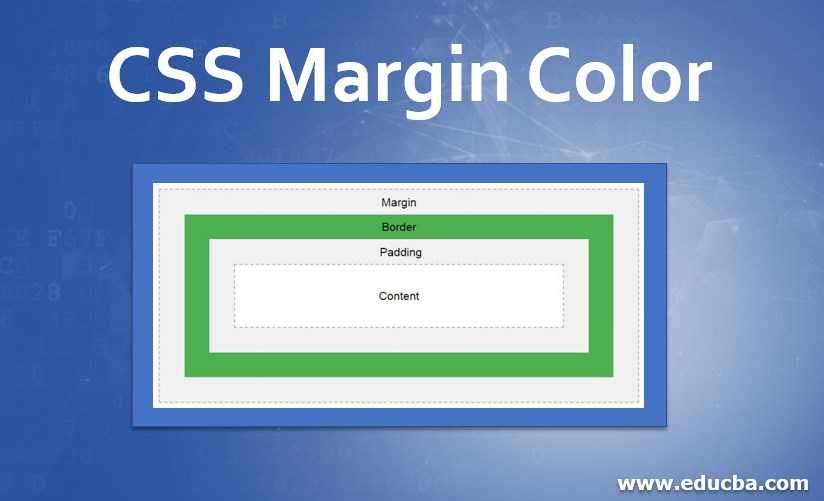
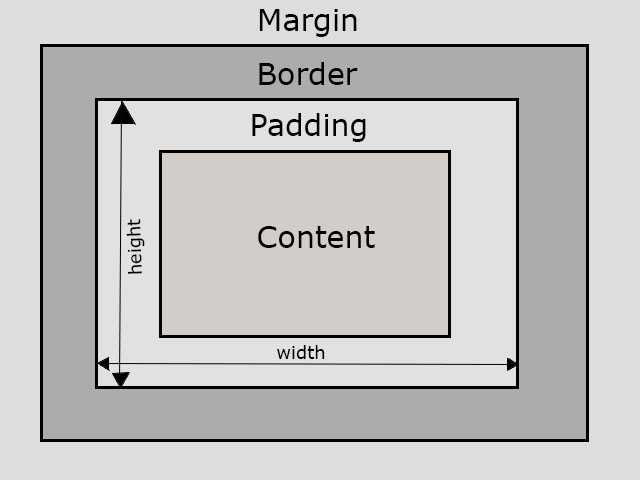
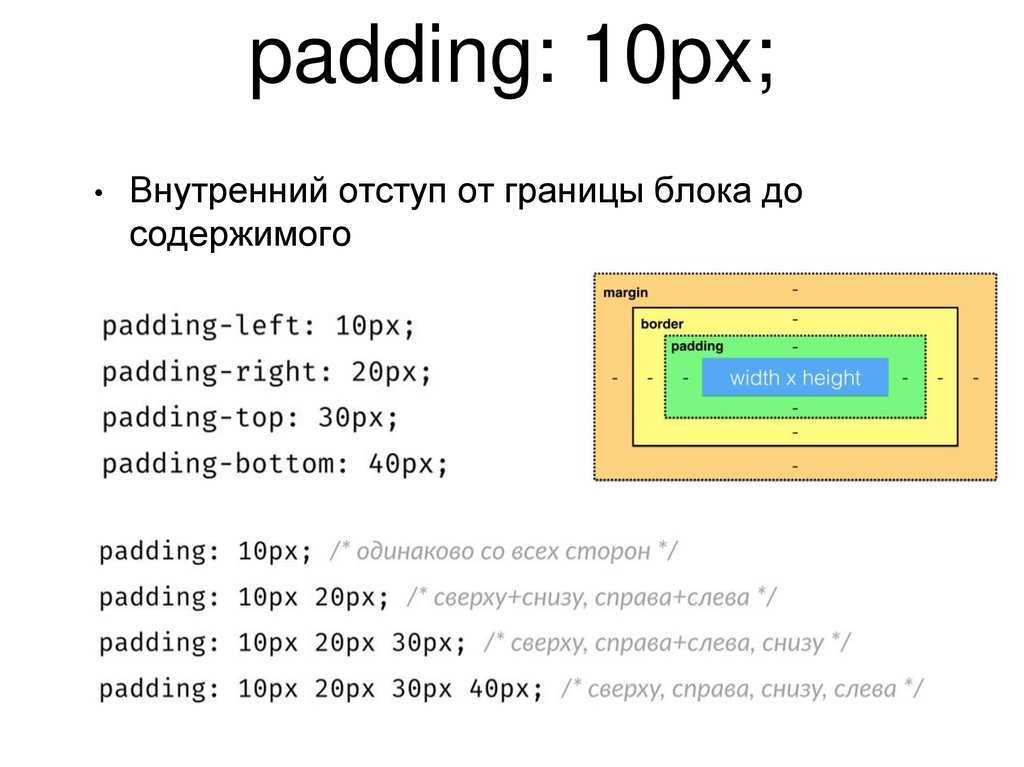
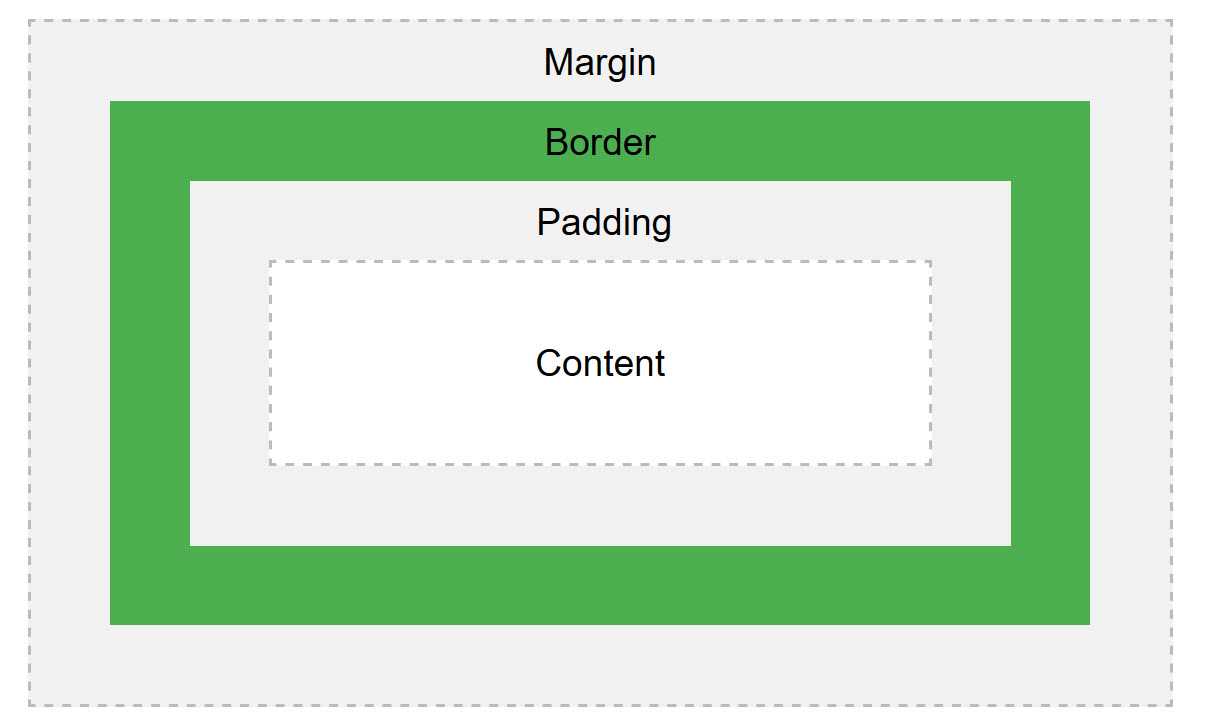
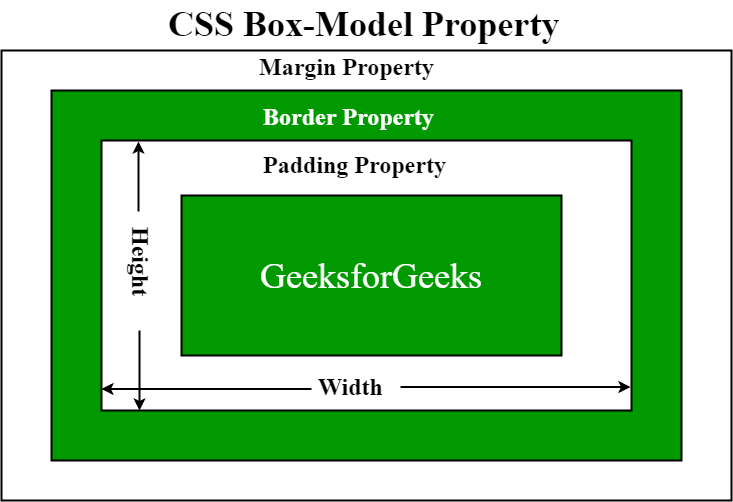
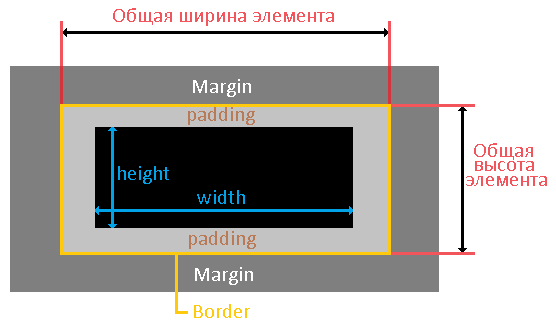
Padding Versus Margin
The main difference between margin and padding is that margin controls external space while the padding controls the internal space of an element.
– Example
We present an example in our next code that shows the effect of margin and padding on a single element. Take a closer look at the code, you’ll note that we set the margin and padding to 100 pixels. As a result, when you run the code in your web browser, the element should have a margin of 100 pixels applied on all sides. Also, within the element, padding of 100 pixels should exist around the content.
| <main> <p>This main element has its margin and padding set to 100 pixels.</p> </main> * { box-sizing: border-box; padding: 0; margin: 0; } main { width: 50%; border: 5px solid #0e9285; line-height: 1.168; /** * We set the margin and padding to * 100 pixels. */ margin: 100px; padding: 100px; } |
Значения margin
В качестве значений margin используются любые допустимые единицы длины, к примеру, пиксели, проценты, em, rem и др. В отличие от padding свойство margin может быть отрицательным (например: -10px), а также принимать значение auto. В остальном margin похоже на padding, у него также может быть от одного до четырёх значений.
Одно значение — определяет отступы для всех сторон блока.
Два значения — первое определяет отступы сверху и снизу для элемента, второе слева и справа для элемента.
Три значения — первое задаёт отступ сверху для элемента, второе одновременно слева и справа, а третье снизу.
Четыре значения — первое определяет отступ сверху, второе справа, третье снизу, четвёртое слева. Для запоминания последовательности можно представить часы — значения идут по часовой стрелке, начиная с 12 часов.
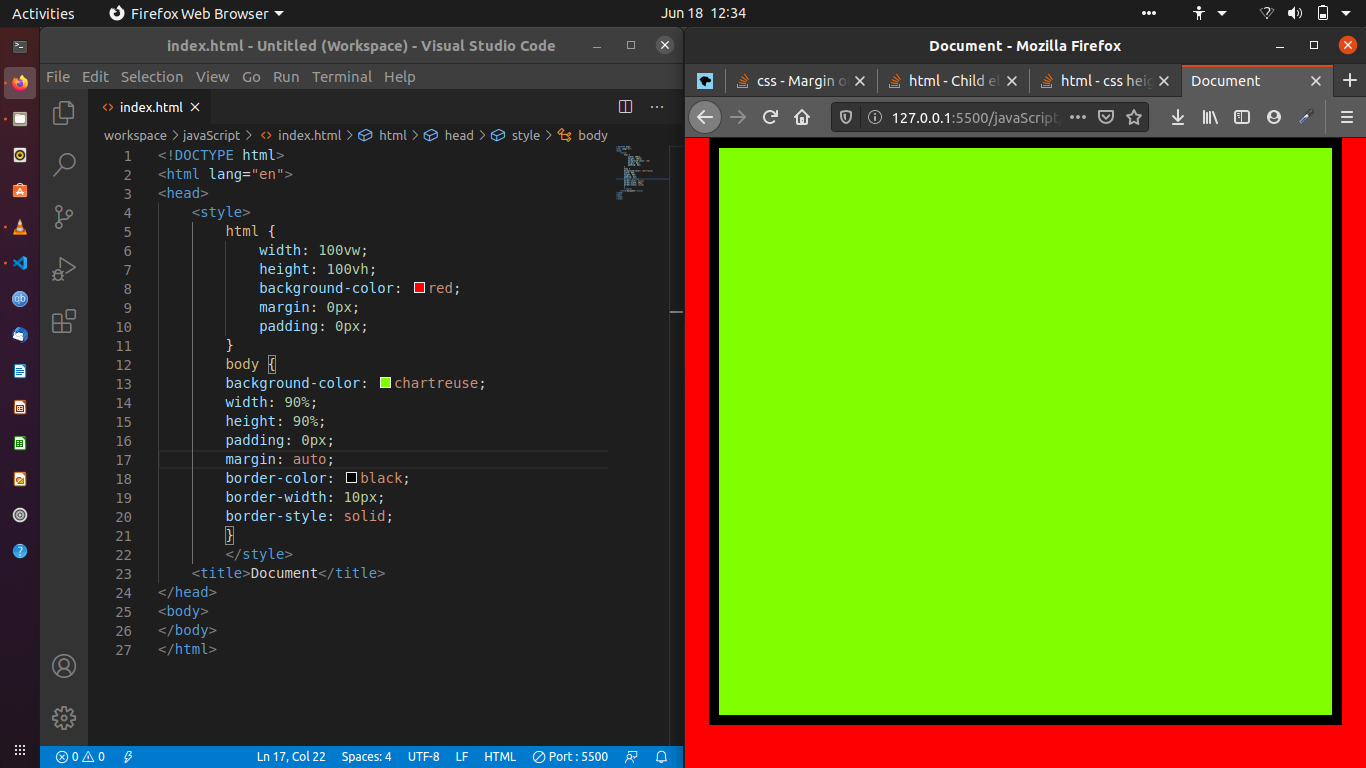
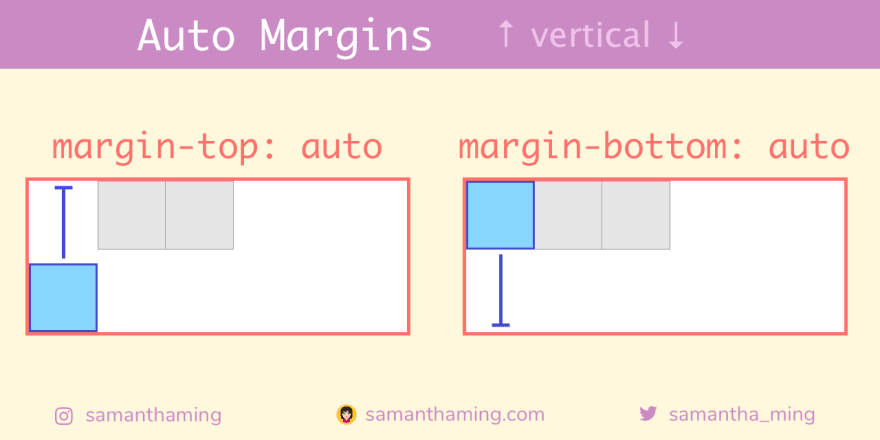
Значение auto
Свойство margin позволяет выравнивать элемент по центру горизонтали, если использовать значение auto и задать ширину элемента через width (пример 1).
Пример 2. Значение auto
<!DOCTYPE html>
<html>
<head>
<meta charset=»utf-8″>
<title>margin</title>
<style>
.dialog {
width: 80%; /* Ширина блока */
background: #D4E3A5; /* Цвет фона */
border: 2px solid #7D9B3D; /* Параметры рамки */
padding: 1rem; /* Поля */
margin: auto; /* Выравниваем по центру */
}
</style>
</head>
<body>
<div class=»dialog»>
Полинезийцы называют Млечный путь Манго-Роа-И-Ата,
что в переводе с маори означает «Длинная акула на рассвете».
</div>
</body>
</html>
Результат данного примера показан на рис. 3.
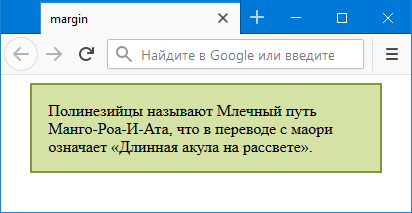
Рис. 3. Выравнивание блока по центру
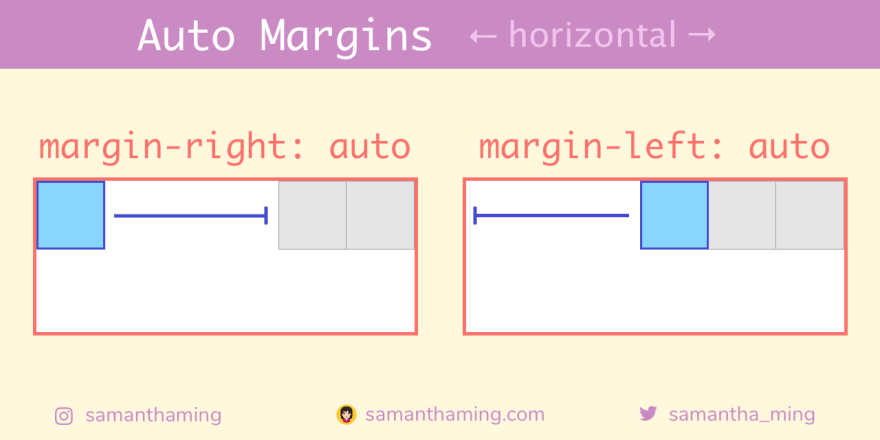
Вместо margin: auto можно использовать комбинацию margin-left: auto и margin-right: auto.
Выравнивание блока по центру через значение auto работает только в сочетании с width.
Аналогично можно выровнять по центру горизонтали изображение, для этого даже не надо указывать ширину картинки, поскольку браузер получает её автоматически. Следует только превратить изображение в блочный элемент через свойство display, как показано в примере 3.

Пример 3. Значение auto
<!DOCTYPE html>
<html>
<head>
<meta charset=»utf-8″>
<title>margin</title>
<style>
.center {
display: block; /* Блочный элемент */
margin: auto; /* Выравниваем по центру */
}
</style>
</head>
<body>
<img src=»image/html-128.png» alt=»HTML5″ class=»center»>
</body>
</html>
Результат данного примера показан на рис. 4.

Рис. 4. Выравнивание картинки по центру
Проценты
В качестве значения margin можно использовать процентную запись, с которой связаны следующие особенности.
- По горизонтали проценты считаются от ширины всего блока.
- По вертикали проценты считаются от ширины всего блока.
Таким образом, margin в процентах берётся от ширины всего блока, даже для margin-top и margin-botom.
Отрицательный margin
margin может быть задан с отрицательным значением, тем самым элемент сдвигается в противоположном направлении. К примеру, margin-top:-10px поднимает блок вверх на 10 пикселей, а margin-left:-10px сдвигает блок влево.
В примере 4 показан сдвиг блока с классом stat вверх, если он располагается сразу после элемента <p>.
Пример 4. Использование отрицательного значения
<!DOCTYPE html>
<html>
<head>
<meta charset=»utf-8″>
<title>margin</title>
<style>
p + .stat {
margin-top: -1rem; /* Поднимаем текст вверх */
}
.stat {
font-size: 3rem; /* Размер текста */
}
</style>
</head>
<body>
<p>Продано ёлок</p>
<p class=»stat»>64</p>
</body>
</html>
Результат данного примера показан на рис. 5. Без отрицательного margin строки располагаются далеко друг от друга.
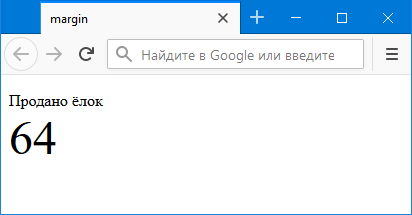
Рис. 5. Поднимаем блок вверх через margin-top
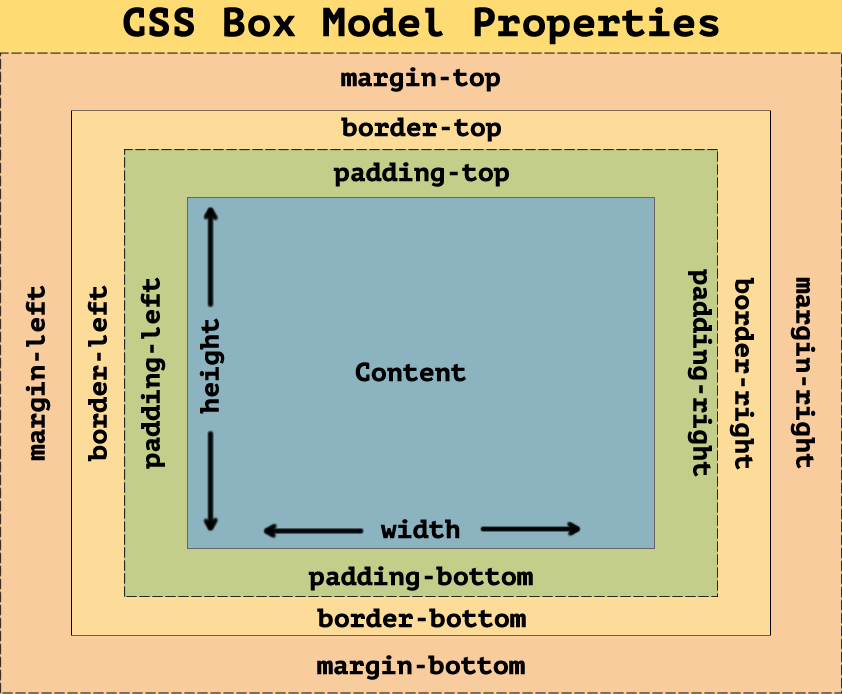
Определение и использование
Свойство устанавливает поля для элемента, и это сокращенное свойство для следующих свойств:
- margin-top
- margin-right
- margin-bottom
- margin-left
Если свойство margin имеет четыре значения:
- margin: 10px 5px 15px 20px;
- верхнее поле 10px
- правое поле 5px
- нижнее поле 15px
- левое поле 20px
Если свойство margin имеет три значения:
- margin: 10px 5px 15px;
- верхнее поле 10px
- правый и левый поля 5px
- нижнее поле 15px
Если свойство margin имеет два значения:
- margin: 10px 5px;
- верхнее и нижнее поля 10px
- правое и левое поля 5px
Если свойство margin имеет одно значение:
- margin: 10px;
Примечание: Допускаются отрицательные значения.
| Значение по умолчанию: | |
|---|---|
| Унаследованный: | нет |
| Анимируемый: | да, смотреть индивидуальные свойства. Прочитать о animatable Попробовать |
| Версия: | CSS1 |
| JavaScript синтаксис: |
object.style.margin=»100px 50px» Попробовать |
CSS Advanced
CSS Rounded CornersCSS Border ImagesCSS BackgroundsCSS ColorsCSS Color KeywordsCSS Gradients
Linear Gradients
Radial Gradients
Conic Gradients
CSS Shadows
Shadow Effects
Box Shadow
CSS Text EffectsCSS Web FontsCSS 2D TransformsCSS 3D TransformsCSS TransitionsCSS AnimationsCSS TooltipsCSS Style ImagesCSS Image ReflectionCSS object-fitCSS object-positionCSS MaskingCSS ButtonsCSS PaginationCSS Multiple ColumnsCSS User InterfaceCSS Variables
The var() Function
Overriding Variables
Variables and JavaScript
Variables in Media Queries
CSS Box SizingCSS Media QueriesCSS MQ ExamplesCSS Flexbox
CSS Flexbox
CSS Flex Container
CSS Flex Items
CSS Flex Responsive
How the Process Works
Buying on margin is borrowing money from a broker in order to purchase stock. You can think of it as a loan from your brokerage. Margin trading allows you to buy more stock than you’d be able to normally.
To trade on margin, you need a margin account. This is different from a regular cash account, in which you trade using the money in the account. With a margin account, you deposit cash, which serves as the collateral for a loan to purchase securities. You can use this to borrow up to 50% of the purchase price of an investment. So if you deposit $5,000, you could buy up to $10,000 in securities.
Your broker will charge interest on this loan you’re using, which you’ll need to repay. If you sell your securities, the proceeds will pay off your loan first, and you can keep what’s left.
The Financial Industry Regulatory Authority (FINRA) and the Securities and Exchange Commission (SEC) regulate margin trading, with strict rules as to how much you must deposit, how much you can borrow, and how much you must keep in your account.
Проблемы с логическими свойствамиСкопировать ссылку
Со всеми этими новыми доработками мы столкнёмся с новыми для нас проблемами. Например, что если мы захотим записать все значения свойства в сокращённом виде: ? В таком случае мы не сможем предсказать, как это будет проинтерпретировано браузером. Если сайт построен на физических свойствах, то значения будут расшифрованы следующим образом: , , , . Но если сайт построен на новых логических свойствах, то значения будут расшифрованы так: , , , .
На сайтах, написанных под английский (или русский) языки, физические и логические свойства будут работать одинаково. Для сайтов на других языках значения сокращений, как в примере с , должны работать в соответствии со значением свойства или .
Это вопрос всё ещё открыт. Я внёс предложение, которое . Если у вас есть решение получше, то вы можете оставить комментарий в этой ветке!
В данный момент, если вы хотите использовать логические единицы, вам следует отказаться от шорткатов в пользу полных названий свойств.
Предложенное мною решение:
Проблемы с адаптивным дизайномСкопировать ссылку
Пока пытался создать рабочее демо, я попробовал использовать новое свойство максимальной ширины внутри медиавыражения, предполагая, что для языков «справа налево» и «слева направо» оно будет вести себя как , а для языков вроде японского — как . К сожалению, браузеры пока отказываются понимать это свойство внутри медиавыражений.
Изменения, которые нужно учестьСкопировать ссылку
Во время написания этого поста, уже после глубокого изучения и понимания концепции логических свойств, я заметил несколько упущенных моментов, которые следует поправить в будущем:
- заменить на
- заменить на
Но, похоже, пока не стоит этого ждать, по крайней мере в отношении . Это свойство обновили буквально только что и в его названии по прежнему присутствует . Пример: .
Но кто знает, может этот пост попадётся на глаза правильным людям из W3C ![]()
Определение и применение
CSS свойство margin устанавливает величину внешнего отступа от каждого края элемента в одном объявлении.
CSS свойство margin объединяет в себе такие свойства как margin-top, margin-right, margin-bottom и margin-left. Это свойство может иметь от одного до четырех значений.

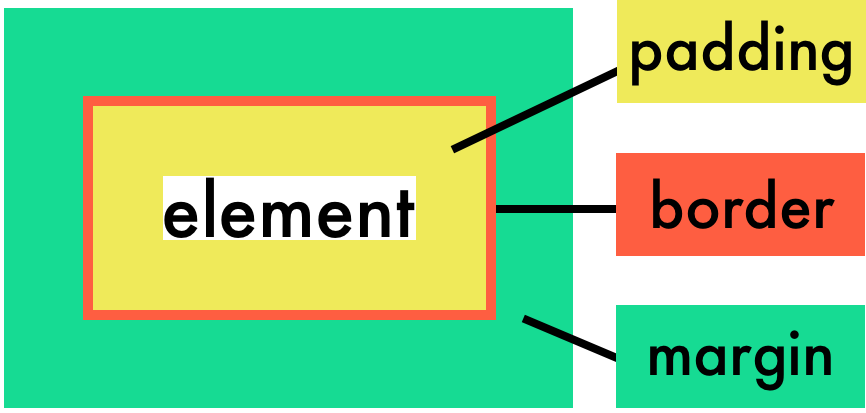

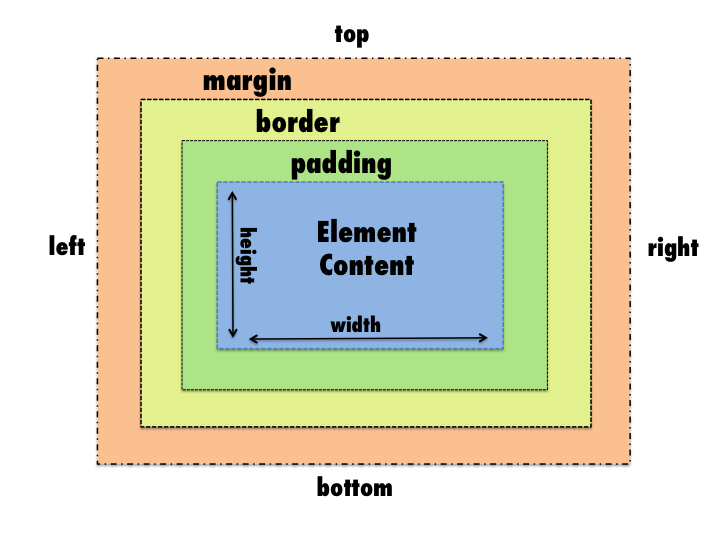
На изображении темно-серым цветом обозначена зона за которую отвечает свойство margin:
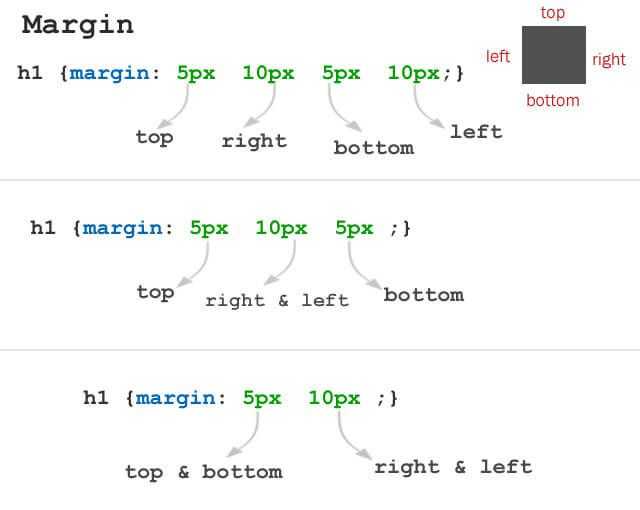
- При указании четырёх значений (5px 10px 15px 20px) — порядок расстановки отступов будет следующий: Top(5px) — Right(10px) — Bottom(15px) — Left(20px). Для запоминания порядка расстановки отступов в одном объявлении можно использовать английское слово TRouBLe(где T — top, R — right, B — bottom, L — left).
- При указании трёх значений (5px 10px 15px) — порядок расстановки отступов будет следующий: Top (5px) — Right & Left (10px) — Bottom (15px).
- При указании двух значений (5px 10px) — первое значение(5px) будет задавать размер отступа от верха и от низа, второе (10px) значение — отступы слева и справа.
- При указании одного значения (5px) — отступ со всех сторон будет одного размера — 5px.
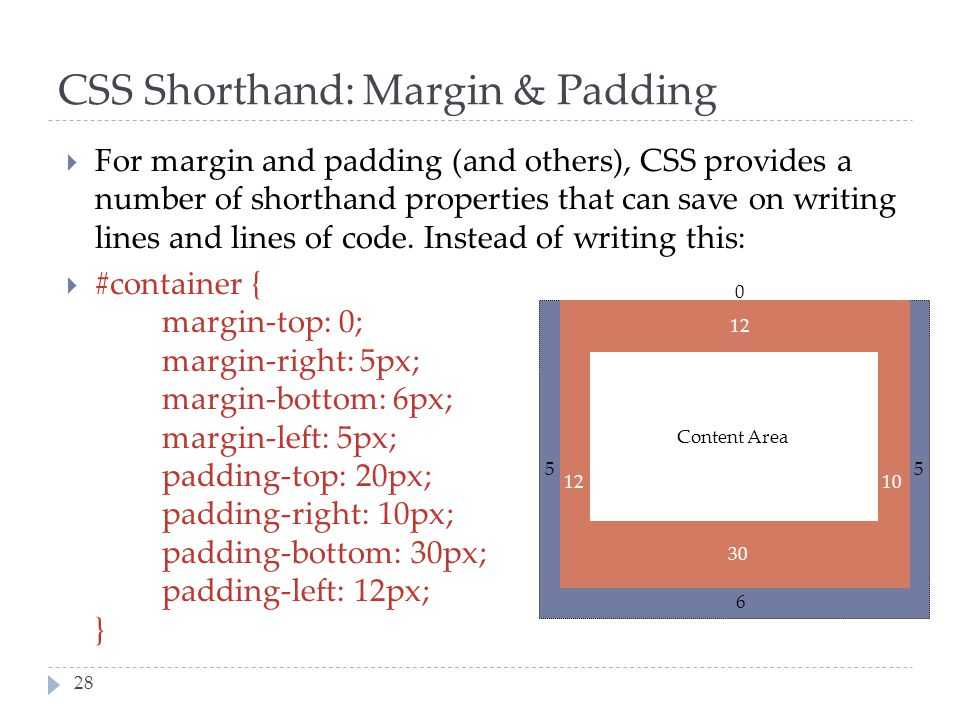
Conclusion
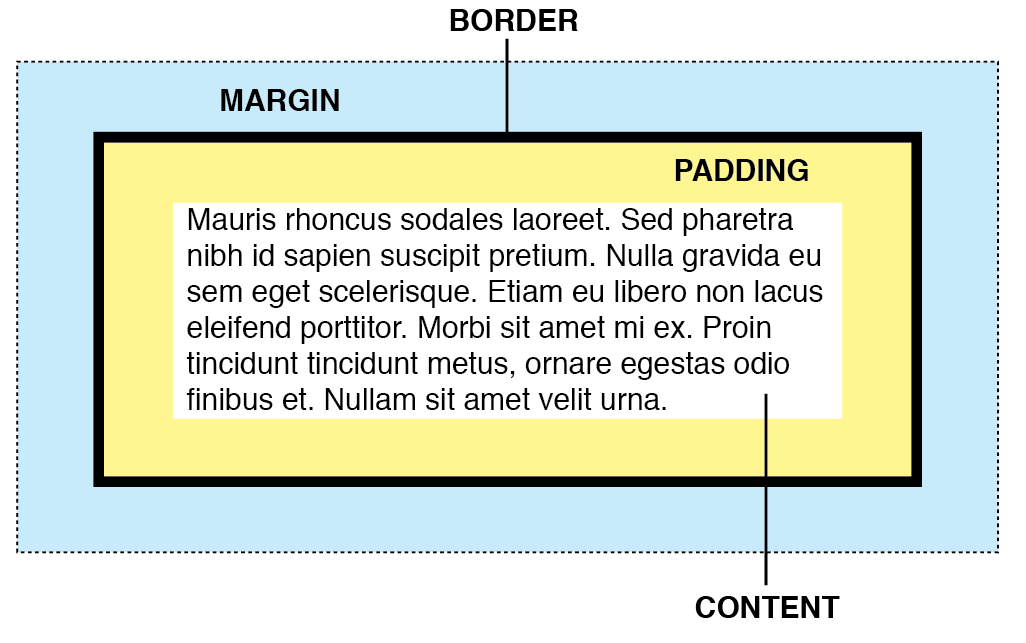
In CSS, both margin and padding add space to web elements, but each brings different results. Padding is the space between the content of an element and the border.
On the other hand, the margin makes the outermost space of the element.
For beginners, it can be a bit confusing to decide which property to apply when designing your website. However, you’ll become more familiar with them as you play around and experiment.
Hopefully, the tips mentioned in this article helped you understand their differences and when to use padding vs margin.
2. Leverage Caching
Caching stores content in local storage. Users get the content from the stored cache rather than sending requests to the main server, resulting in a faster loading time.
With our Business plan and higher, you can easily enable object cache through hPanel. Here’s how:
- Log in to hPanel and click Websites on the navigation bar. Then, find your domain name and click Manage.
Примеры использования
Рассмотрим примеры использования классов Bootstrap для установления HTML-элементам и оступов.
Пример 1. Установим HTML-элементу padding отступ сверху, равный 3:
Пример 2. Расположим 2 блока по центру. Для этого первому блоку установим в качестве свойства значение auto с помощью класса , а второму — с помощью класса . Кроме этого дополнительно зададим отступ между блоками, с помощью классов и .
Пример 3. Установим блоку:
- отступы слева и справа, равные auto ();
- на отступы сверху и снизу, равные 2 ();
- на и (т.е. ) отступы сверху и снизу, равные 3 ();
- на и (т.е. ) отступы сверху и снизу, равные 4 ();
- на всех контрольных точках отступы для 4 сторон, равные 3 ().
Пример 4. Установим элементу на отступ снизу, равный 4. На остальных контрольных точках этот отступ уберём, т.е. установим его, равным 0.
Пример 5. Установим HTML-элементу:
- по умолчанию ( >= 0 или ) отступы, равные 0 ();
- на и следующих контрольных точках отступ слева, равный 3();
- на и следующих контрольных точках (т.е. ) уберём отступ слева (установим его равным 0, т.е. ) и добавим отступ справа, равный 4 ().
CSS Margins — Auto Value
In order to center an element inside its parent, use margin: 0 auto as shown in the following example:
<html>
<head>
<style>
   div {
      width:600px; border:1px dotted
   }
   h1 {
      margin:0 auto;
   }
</style>
</head>
<body>
   <div>
        <h1>An h1 element with center position!</h1>
   </div>

</body>
</html>
Though if you are using an old browser, then above code will not work and with modern browser, you should use the following code:
<html>
<head>
<style>
   div {
      width:600px; border:1px dotted
   }
   h1 {
      display: flex; justify-content:center;
   }
</style>
</head>
<body>
   <div>
      <h1>An h1 element with center position!</h1>
   </div>

</body>
</html>