

css-свойства page-break-before и page-break-after
Для управления разрывами страницы до и после определяемых селектором блочных элементов используются ненаследуемые свойства
page-break-before и
page-break-after,
которые могут принимать следующие значения:
-
auto – браузер будет вставлять разрыв страницы, соответственно, до и после
определяемых селектором блочных элементов только в случае необходимости; значение используется браузером по умолчанию; -
always – браузер будет всегда вставлять разрыв страницы, соответственно, до и после
определяемых селектором блочных элементов; -
avoid – браузер не будет вставлять разрыв страницы, соответственно, до и после
определяемых селектором блочных элементов; -
left – браузер будет всегда вставлять разрыв страницы, соответственно, до и после
определяемых селектором блочных элементов таким образом, чтобы при распечатке или предварительном просмотре следующая левая (нечетная)
страница оставалась пустой; значение поддерживается не всеми браузерами, поэтому пока что не следует его использовать; -
right – браузер будет всегда вставлять разрыв страницы, соответственно, до и после
определяемых селектором блочных элементов таким образом, чтобы при распечатке или предварительном просмотре следующая правая (четная)
страница оставалась пустой; значение поддерживается не всеми браузерами, поэтому пока что не следует его использовать.
Separation of Concerns
A key benefit of CSS is the separation of content from presentation. In the simplest terms, this means instead of very old-fashioned stylistic markup such as:
We use semantic markup:
Not only is this much cleaner, it also means our presentation is separated from our content. Browsers render h1 elements as large, bold text by default, but we can change that style at any time with a stylesheet:
By gathering those style declarations in a separate file, and referencing that file from our HTML document, we can make even better use of separation. The style sheet can be reused, and we can change that single file at any time to update the formatting in every document that uses it.
CSS 属性
align-contentalign-itemsalign-selfallanimationanimation-delayanimation-directionanimation-durationanimation-fill-modeanimation-iteration-countanimation-nameanimation-play-stateanimation-timing-functionbackface-visibilitybackgroundbackground-attachmentbackground-blend-modebackground-clipbackground-colorbackground-imagebackground-originbackground-positionbackground-repeatbackground-sizeborderborder-bottomborder-bottom-colorborder-bottom-left-radiusborder-bottom-right-radiusborder-bottom-styleborder-bottom-widthborder-collapseborder-colorborder-imageborder-image-outsetborder-image-repeatborder-image-sliceborder-image-sourceborder-image-widthborder-leftborder-left-colorborder-left-styleborder-left-widthborder-radiusborder-rightborder-right-colorborder-right-styleborder-right-widthborder-spacingborder-styleborder-topborder-top-colorborder-top-left-radiusborder-top-right-radiusborder-top-styleborder-top-widthborder-widthbottombox-decoration-breakbox-shadowbox-sizingbreak-afterbreak-beforebreak-insidecaption-sidecaret-color@charsetclearclipclip-pathcolorcolumn-countcolumn-fillcolumn-gapcolumn-rulecolumn-rule-colorcolumn-rule-stylecolumn-rule-widthcolumn-spancolumn-widthcolumnscontentcounter-incrementcounter-resetcursordirectiondisplayempty-cellsfilterflexflex-basisflex-directionflex-flowflex-growflex-shrinkflex-wrapfloatfont@font-facefont-familyfont-feature-settingsfont-kerningfont-sizefont-size-adjustfont-stretchfont-stylefont-variantfont-variant-capsfont-weightgridgrid-areagrid-auto-columnsgrid-auto-flowgrid-auto-rowsgrid-columngrid-column-endgrid-column-gapgrid-column-startgrid-gapgrid-rowgrid-row-endgrid-row-gapgrid-row-startgrid-templategrid-template-areasgrid-template-columnsgrid-template-rowshanging-punctuationheighthyphens@importisolationjustify-content@keyframesleftletter-spacingline-heightlist-stylelist-style-imagelist-style-positionlist-style-typemarginmargin-bottommargin-leftmargin-rightmargin-topmax-heightmax-width@mediamin-heightmin-widthmix-blend-modeobject-fitobject-positionopacityorderoutlineoutline-coloroutline-offsetoutline-styleoutline-widthoverflowoverflow-xoverflow-ypaddingpadding-bottompadding-leftpadding-rightpadding-toppage-break-afterpage-break-beforepage-break-insideperspectiveperspective-originpointer-eventspositionquotesresizerightscroll-behaviortab-sizetable-layouttext-aligntext-align-lasttext-decorationtext-decoration-colortext-decoration-linetext-decoration-styletext-indenttext-justifytext-overflowtext-shadowtext-transformtoptransformtransform-origintransform-styletransitiontransition-delaytransition-durationtransition-propertytransition-timing-functionunicode-bidiuser-selectvertical-alignvisibilitywhite-spacewidthword-breakword-spacingword-wrapwriting-modez-index
Управление разрывами страниц
Так как печатные страницы, в отличие от веб-страниц, не являются бесконечными, контент будет разбиваться между страницами. У нас есть 5 свойств для управления тем, как это происходит.
Разрыв страницы перед элементом.
Если мы хотим, чтобы элемент всегда был в начале страницы, мы можем задать принудительный разрыв страницы с помощью правила .
Вдовы и сироты (висячие строки)
Иногда вам не нужен контроль над разрывом страницы, но важен контроль над тем, сколько строчек будет выведено на текущей, а сколько на следующей странице. Например, если последняя строка параграфа не помещается на текущей странице, на следующую страницу она будет перенесена вместе с предпоследней. Это потому, что соответствующее свойство по умолчанию равно 2. Мы можем изменить его.
Если мы столкнемся с другой стороной этой проблемы и на текущей странице у нас помещается только первая строка параграфа, то тогда весь параграф начнется со следующей страницы. За это отвечает свойство и его дефолтное значение 2.
Этот код означает, что как минимум 3 строки должны помещаться на текущей странице, чтобы параграф не переносился на следующую.
Вот демо на Codepen с несколькими примерами (отладочная версия для тестирования).
Не все из этих свойств и значений работают в каждом браузере, вы должны проверять стили для печати в разных браузерах.
Особенности псевдоэлементов before и after
-
1.Псевдоэлементы должны указываться сразу после селектора через двойное двоеточие без пробела, как показано в примерах выше. Однако допускается и использование одинарного двоеточия.
PHP
.block-class:before
1 .block-classbefore - 2.Псевдоэлемет является строчным элементом, поэтому если в CSS свойстве content ничего не указано то его ширина по умолчанию будет равна нулю. Так же для строчных элементов не применяется вертикальные отступы margin. Чтобы они начали работать и элемент стал на всю ширину ему нужно дописать CSS свойство display:block;
-
3.Вы можете использовать только один псевдоэлемент на селектор. То есть нельзя использовать сразу 2 псевдоэлемента для одного блока.
Запись .block-class::before::after или #content::first-line::after будет неправильной. - 4.Кроме псевдоэлементов ::before и ::after существуют и другие, такие как ::selection, ::first-line, ::first-letter, о которых я расскажу в одной из следующих статей.
Надеюсь что помогла вам разобраться с before и after если у вас возникнут вопросы или вам есть что сказать – оставляйте комментарии!
Спасибо что посетили мой сайт!
С уважением Юлия Гусарь
Значения параметров
| Параметр | Описание |
|---|---|
| content | Один или более дополнительных элементов DOM, текстовых узлов, массивы элементов и текстовых узлов, HTML строк, или jQuery объекты, которые будут вставлены перед каждым элементом в наборе совпавших элементов. |
| function(index, html) | Функция, которая возвращает HTML строку, DOM элемент(ы), текстовый узел(ы), или jQuery объект, которые необходимо вставить перед каждым элементом в наборе совпавших элементов. Получает индекс элемента в наборе и старое значение HTML элемента в качестве аргументов. Внутри функции this ссылается на текущий элемент в наборе. |
| function(index) | Функция, которая возвращает HTML строку, DOM элемент(ы), текстовый узел(ы), или jQuery объект, которые необходимо вставить перед каждым элементом в наборе совпавших элементов. Получает индекс элемента в наборе в качестве аргумента. Внутри функции this ссылается на текущий элемент в наборе. |
css-свойство orphans
Иногда пользователям приходится распечатывать интернет-страницы на бумажные носители, в результате чего возникает необходимость определения
дополнительных параметров распечатываемых страниц, например, тех же отступов, которые можно определить при помощи рассмотренного выше правила
@page. Рассмотрим остальные свойства, предназначенные для форматирования
распечатываемых веб-страниц.
Для того, чтобы задать минимальное количество строк блочного элемента, которые должны остаться при печати документа на предыдущей странице в
случае переноса части содержимого блочного элемента на следующую страницу из-за нехватки места на текущем листе бумаги, используется наследуемое
свойство orphans, которое имеет эффект, только если текст расположен на двух и более страницах
(см. пример №1). В качестве значений свойство принимает только целые положительные числа, указывающие минимальное количество строк разрываемого
блочного элемента, которые должны остаться внизу предыдущей распечатываемой веб-страницы (остальные разрешается переносить на следующую страницу).
По умолчанию используется число 2. При этом, если, например, в абзаце содержится восемь строк, но только три из
них помещаются на предыдущей странице, а значение свойства orphans требует наличия на
предыдущей странице как минимум четырех строк, браузер при распечатке или предварительном просмотре перенесет все содержимое блочного элемента на
следующую страницу.
/* Определяем параметры печати документа */
@media print{
	p{
	orphans: 3;
	widows: 3;
	color: black;
	font-family: Times, "Times New Roman", serif;
	}

	/* Запрещаем разрывы страницы до, внутри и после
	абзацев, у которых атрибут class="no_break"	 */
	p.no_break{
	page-break-before: avoid;
	page-break-after: avoid;
	page-break-inside: avoid;
	}
}
Пример №1. Определение параметров печати веб-страниц
Как работать с псевдоэлементом before в CSS?
Before позволяет нам добавить свой блок перед любым элементом на вашем сайте. Для того чтобы это сделать нам нужно:
- 1.Определяем класс или идентификатор элемента, перед которым мы хотим добавить свой блок. Как это делать показано в этой статье.
-
2.Подключаемся к сайту через FTP или заходим в файловый менеджер на хостинге.
В этой статье я рассказывала как редактировать файлы сайта сразу на хостинге при помощи Notepad++ «Редактирование файлов сайта в Notepad++»
- 3.Открываем CSS файл, в котором прописаны стили сайта. Для сайтов на CMS этот файл находится в папке с активным шаблоном и может называться style.css, stylesheet.css, main.css в зависимости от CMS.
-
4.В самом конце этого файла пишем код:
PHP
.entry-meta::before {
content:’Привет!’;
}1
2
3.entry-meta::before{
content’Привет!’;
}
Вместо .entry-meta указываете класс или идентификатор своего элемента.
Внутри css свойства content в кавычках вы можете указать свой текст или какой-то символ.Примеры символов и их коды я показывала в этой статье: «Таблица символов utf 8 для вставки иконок»
-
-
5.Так же мы можем задать для нашего псевдоэлемента следующие CSS свойства:
PHP
height:20px; /*высота псевдоэлемента*/
color:#fff; /*цвет текста*/
background:#2F73B6; /*цвет фона псевдоэлемента*/
border:1px solid #000; /*рамка*/
font-size:16px; /*размер шрифта*/
padding:10px; /*внутренний отступ псевдоэлемента*/
display:block;/*превращаем в блочный элемент*/
text-align:left;/*выравнивание текста*/ и другие CSS свойства.
width:100%; /*ширина псевдоэлемента*/1
2
3
4
5
6
7
8
9height20px;/*высота псевдоэлемента*/
color#fff; /*цвет текста*/
background#2F73B6; /*цвет фона псевдоэлемента*/
border1pxsolid#000; /*рамка*/
font-size16px;/*размер шрифта*/
padding10px;/*внутренний отступ псевдоэлемента*/
displayblock;/*превращаем в блочный элемент*/
text-alignleft;/*выравнивание текста*/идругиеCSSсвойства.
width100%;/*ширина псевдоэлемента*/
-
6.Сохраняем изменения в файле и смотрим что получилось.


Обратите внимание, как отображается наш псевдоэлемент before в HTML коде. Он не является самостоятельным тегом и привязан к элементу класс которого мы указали в CSS файле.
CSS Свойства
align-contentalign-itemsalign-selfallanimationanimation-delayanimation-directionanimation-durationanimation-fill-modeanimation-iteration-countanimation-nameanimation-play-stateanimation-timing-functionbackface-visibilitybackgroundbackground-attachmentbackground-blend-modebackground-clipbackground-colorbackground-imagebackground-originbackground-positionbackground-repeatbackground-sizeborderborder-bottomborder-bottom-colorborder-bottom-left-radiusborder-bottom-right-radiusborder-bottom-styleborder-bottom-widthborder-collapseborder-colorborder-imageborder-image-outsetborder-image-repeatborder-image-sliceborder-image-sourceborder-image-widthborder-leftborder-left-colorborder-left-styleborder-left-widthborder-radiusborder-rightborder-right-colorborder-right-styleborder-right-widthborder-spacingborder-styleborder-topborder-top-colorborder-top-left-radiusborder-top-right-radiusborder-top-styleborder-top-widthborder-widthbottombox-decoration-breakbox-shadowbox-sizingcaption-sidecaret-color@charsetclearclipcolorcolumn-countcolumn-fillcolumn-gapcolumn-rulecolumn-rule-colorcolumn-rule-stylecolumn-rule-widthcolumn-spancolumn-widthcolumnscontentcounter-incrementcounter-resetcursordirectiondisplayempty-cellsfilterflexflex-basisflex-directionflex-flowflex-growflex-shrinkflex-wrapfloatfont@font-facefont-familyfont-kerningfont-sizefont-size-adjustfont-stretchfont-stylefont-variantfont-weightgridgrid-areagrid-auto-columnsgrid-auto-flowgrid-auto-rowsgrid-columngrid-column-endgrid-column-gapgrid-column-startgrid-gapgrid-rowgrid-row-endgrid-row-gapgrid-row-startgrid-templategrid-template-areasgrid-template-columnsgrid-template-rowshanging-punctuationheighthyphens@importisolationjustify-content@keyframesleftletter-spacingline-heightlist-stylelist-style-imagelist-style-positionlist-style-typemarginmargin-bottommargin-leftmargin-rightmargin-topmax-heightmax-width@mediamin-heightmin-widthmix-blend-modeobject-fitobject-positionopacityorderoutlineoutline-coloroutline-offsetoutline-styleoutline-widthoverflowoverflow-xoverflow-ypaddingpadding-bottompadding-leftpadding-rightpadding-toppage-break-afterpage-break-beforepage-break-insideperspectiveperspective-originpointer-eventspositionquotesresizerighttab-sizetable-layouttext-aligntext-align-lasttext-decorationtext-decoration-colortext-decoration-linetext-decoration-styletext-indenttext-justifytext-overflowtext-shadowtext-transformtoptransformtransform-origintransform-styletransitiontransition-delaytransition-durationtransition-propertytransition-timing-functionunicode-bidiuser-selectvertical-alignvisibilitywhite-spacewidthword-breakword-spacingword-wrapwriting-modez-index
Определение и применение
CSS свойство page-break-before определяет наличие или отсутствие разрыва страницы перед заданным элементом при печати документа.
Обращаю Ваше внимание, что данное свойство нельзя применять к пустым блочным элементам (например, к пустому ), либо к элементам с абсолютным позиционированием (position: absolute;). Это свойство находится в стадии замены на более универсальное и функциональное в будущем свойство break-before.
Планируется, что новое свойство будет применяться не только при разрыве страниц(при печате), a также при разрыве в определённых областях и многоколоночных текстах
Это свойство находится в стадии замены на более универсальное и функциональное в будущем свойство break-before.
Планируется, что новое свойство будет применяться не только при разрыве страниц(при печате), a также при разрыве в определённых областях и многоколоночных текстах.
Printer Styling
Printer-friendly styling can now be applied. Recommendations:
- ensure you use dark text on a white background
- consider using a serif font, which may be easier to read
- adjust the text size to or higher
- modify paddings and margins where necessary. Standard , , or units may be more practical.
Further suggestions include …
Adopt CSS Columns
Standard A4 and US Letter paper can result in longer and less readable lines of text. Consider using CSS columns in print layouts. For example:


In this example, columns will be created when there’s at least of horizontal space. There’s no need to set media queries; additional columns will be added on wider paper.
Use Borders Instead of Background Colors
Your template may have sections or call-out boxes denoted by darker or inverse color schemes:
Save ink by representing those elements with a border:
Remove or Invert Images
Users will not want to print decorative and non-essential images and backgrounds. You could consider a default where all images are hidden unless they have a class:
Ideally, printed images should use dark colors on a light background. It may be possible to change HTML-embedded SVG colors in CSS, but there will be situations where you have darker bitmaps:
A CSS filter can be used to invert and adjust colors in the print style sheet. For example:
The result:
Property Values
| Value | Description |
|---|---|
| auto | Default. Automatic page/column/region break before the element |
| all | Always insert a page-break right before the principal box |
| always | Always insert a page-break before the element |
| avoid | Avoid a page/column/region break before the element |
| avoid-column | Avoid a column-break before the element |
| avoid-page | Avoid a page-break before the element |
| avoid-region | Avoid a region-break before the element |
| column | Always insert a column-break before the element |
| left | Insert one or two page-breaks before the element so that the next page is formatted as a left page |
| page | Always insert a page-break before the element |
| recto | Insert one or two page-breaks before the principal box so that the next page is formatted as a recto page |
| region | Always insert a region-break before the element |
| right | Insert one or two page-breaks before the element so that the next page is formatted as a right page |
| verso | Insert one or two page-breaks before the principal box so that the next page is formatted as a verso page |
| initial | Sets this property to its default value. Read about initial |
| inherit | Inherits this property from its parent element. Read about inherit |
What Is Fragmentation?
Fragmentation in CSS describes the process by which content becomes broken up into different boxes. Currently, we have two places in which we might run into fragmentation on the web: when we print a document, and if we use multi-column layout. These two things are essentially the same. When you print (or save to PDF) a webpage, the content is fragmented into as many pages as are required to print your content.
When you use multicol, the content is fragmented into columns. Each column box is like a page in the paged context. If you think of a set of columns as being much like a set of pages it can be a helpful way to think about multicol and how fragmentation works in it.
If you take a look at the CSS Fragmentation Specification you will see a third fragmented context mentioned — that context is Regions. As there are no current usable implementations of Regions, we won’t be dealing with that in this article, but instead looking at the two contexts that you might come across in your work.
Viewing Print Styles
In all cases, your browser and operating system should provide a print preview feature, often as part of the standard print dialog.
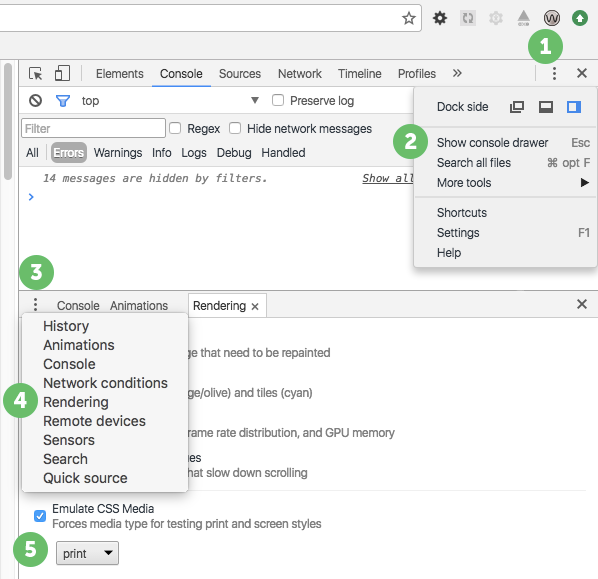
The Chrome browser makes it more convenient to check and even debug your print styles via Developer Tools, as demonstrated by this example showing a CV with a print style sheet. First, open the main menu and select More Tools followed by the Developer Tools option:
From the new panel that appears, select Menu, then More tools, followed by Rendering:
Then scroll down to the Emulate CSS media type setting. The dropdown allows you to toggle between the print and screen views of your document:
When emulating the print stylesheet, the standard Styles browser is available to inspect and modify the live style rules. Bear in mind that emulating print output on a screen is still not 100% accurate. The browser knows nothing about paper size, and the @page rule cannot be emulated.
CSS Справочники
CSS СправочникCSS ПоддержкаCSS СелекторыCSS ФункцииCSS ЗвукCSS Веб шрифтыCSS АнимацииCSS ДлиныCSS Конвертер px-emCSS Названия цветаCSS Значения цветаCSS по умолчаниюCSS Символы
CSS Свойства
align-content
align-items
align-self
all
animation
animation-delay
animation-direction
animation-duration
animation-fill-mode
animation-iteration-count
animation-name
animation-play-state
animation-timing-function
backface-visibility
background
background-attachment
background-blend-mode
background-clip
background-color
background-image
background-origin
background-position
background-repeat
background-size
border
border-bottom
border-bottom-color
border-bottom-left-radius
border-bottom-right-radius
border-bottom-style
border-bottom-width
border-collapse
border-color
border-image
border-image-outset
border-image-repeat
border-image-slice
border-image-source
border-image-width
border-left
border-left-color
border-left-style
border-left-width
border-radius
border-right
border-right-color
border-right-style
border-right-width
border-spacing
border-style
border-top
border-top-color
border-top-left-radius
border-top-right-radius
border-top-style
border-top-width
border-width
bottom
box-decoration-break
box-shadow
box-sizing
caption-side
caret-color
@charset
clear
clip
color
column-count
column-fill
column-gap
column-rule
column-rule-color
column-rule-style
column-rule-width
column-span
column-width
columns
content
counter-increment
counter-reset
cursor
direction
display
empty-cells
filter
flex
flex-basis
flex-direction
flex-flow
flex-grow
flex-shrink
flex-wrap
float
font
@font-face
font-family
font-kerning
font-size
font-size-adjust
font-stretch
font-style
font-variant
font-weight
grid
grid-area
grid-auto-columns
grid-auto-flow
grid-auto-rows
grid-column
grid-column-end
grid-column-gap
grid-column-start
grid-gap
grid-row
grid-row-end
grid-row-gap
grid-row-start
grid-template
grid-template-areas
grid-template-columns
grid-template-rows
hanging-punctuation
height
hyphens
@import
isolation
justify-content
@keyframes
left
letter-spacing
line-height
list-style
list-style-image
list-style-position
list-style-type
margin
margin-bottom
margin-left
margin-right
margin-top
max-height
max-width
@media
min-height
min-width
mix-blend-mode
object-fit
object-position
opacity
order
outline
outline-color
outline-offset
outline-style
outline-width
overflow
overflow-x
overflow-y
padding
padding-bottom
padding-left
padding-right
padding-top
page-break-after
page-break-before
page-break-inside
perspective
perspective-origin
pointer-events
position
quotes
resize
right
tab-size
table-layout
text-align
text-align-last
text-decoration
text-decoration-color
text-decoration-line
text-decoration-style
text-indent
text-justify
text-overflow
text-shadow
text-transform
top
transform
transform-origin
transform-style
transition
transition-delay
transition-duration
transition-property
transition-timing-function
unicode-bidi
user-select
vertical-align
visibility
white-space
width
word-break
word-spacing
word-wrap
writing-mode
z-index
ТестированиеСкопировать ссылку
Вам не нужно распечатывать страницу каждый раз, когда вы вносите небольшие изменения. В зависимости от вашего браузера вы можете экспортировать страницу как PDF, открыть предварительный просмотр печати или даже отлаживать прямо в браузере.
Обновление от 6 ноября 2019: Вот подробная статья Криса Койера о том, как эмулировать стили для печати в 2019 году.
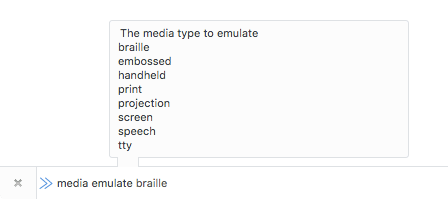
Для отладки стилей для печати в Firefox откройте Developer Toolbar (Shift F2 или Tools > Web Developer > Developer Toolbar) и введите media emulate print в поле внизу окна браузера и нажмите Enter. Активная вкладка будет вести себя так, как будто для неё задан медиа-тип , пока вы не закроете её или не обновите страницу.
Обновление от 20 октября 2018: начиная с Firefox 63+ этот способ не работает, так как Developer Toolbar был удалён.
В Chrome откройте инструменты разработчика (Cmd Opt I (macOS) или Ctrl Shift I (Windows) или View > Developer > Developer Tools, включите группу вкладок с консолью (Esc), откройте панель рендеринга, поставьте галочку возле Emulate CSS Media и выберите Print.
Расширенный синтаксис
Вы можете оставить свойство content пустым, и создать блок.
#example:before {
   content: "";
   display: block;
   width: 100px;
   height: 100px;
}
Если вы удалите свойство content, псевдоэлемент
работать не будет. По крайней мере, это совойство должно оставаться пустым.


Вы должны знать, что некоторые используют эти элементы в
виде ::before и ::after. Разницы никакой нет, браузеры поддерживают такой
синтаксис также.
Еще один момент использования. Вы можете применить
псевдоэлемент к каждому из html элементов.
:before {
   content: "#";
}
Но это используется в личных целях. Этот код вставляет # перед
контентом в каждом DOM элементе. Даже если вы удалите все теги на странице, вы
сможете видеть два символа ## на странице. Это используется, сам не знаю для
чего, но такое есть.