

Finding and excluding multiple elements #
Some pseudo-classes help you to write more compact CSS.
Browser support
- Chrome 88, Supported 88
- Firefox 78, Supported 78
- Edge 88, Supported 88
- Safari 14, Supported 14
If you want to find all of the , and child elements in a element, you might think to write a selector list like this:
With the pseudo-class, you can write a more compact version:
The pseudo-class is not only more compact than a selector list but it is also more forgiving. In most cases, if there’s an error or unsupported selector in a selector list, the entire selector list will no longer work. If there’s an error in the passed selectors in an pseudo-class, it will ignore the invalid selector, but use those which are valid.
Browser support
- Chrome 1, Supported 1
- Firefox 1, Supported 1
- Edge 12, Supported 12
- Safari 3.1, Supported 3.1
You can also exclude items with the pseudo-class. For example, you can use it to style all links that don’t have a attribute.
A pseudo-class can also help you to improve accessibility. For example, an must have an , even if its an empty value, so you could write a CSS rule that adds a thick red outline to invalid images:
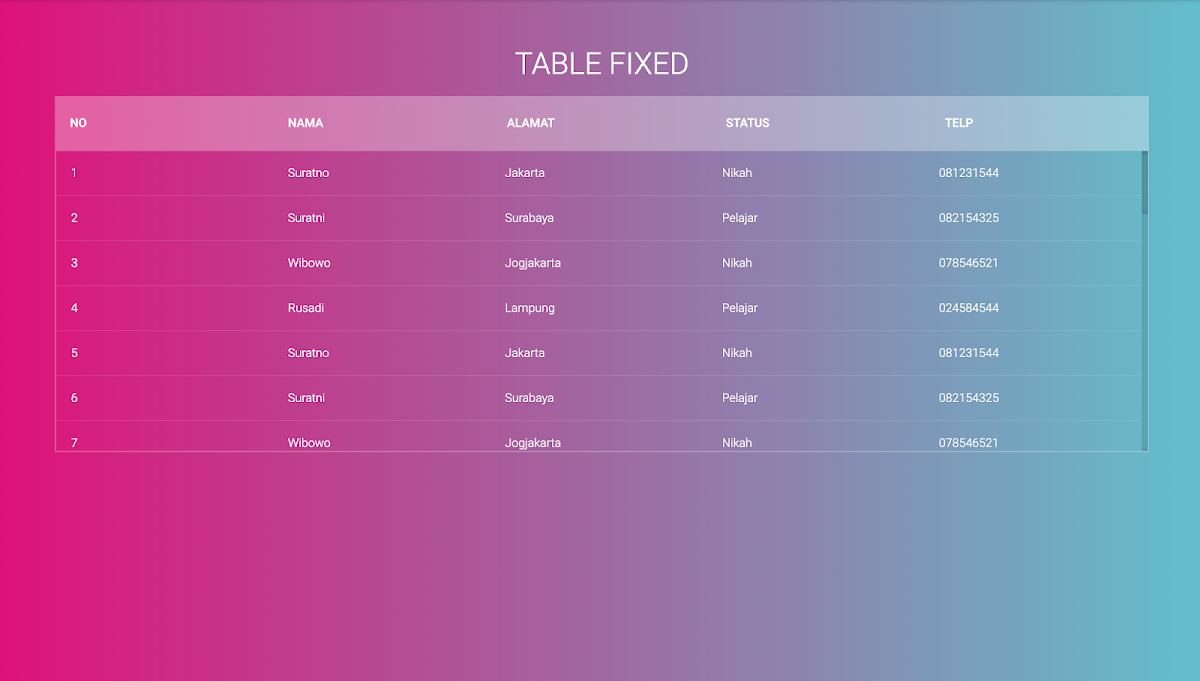
Разметка HTML
Ниже приводится пример из демонстрации. У нас есть 4 ссылки и такое же количество блоков. Каждая группа имеет свой уникальный идентификатор.
<ul>
    <li><a href="#id1">Блок 1</a></li>
    <li><a href="#id2">Блок 2</a></li>
    <li><a href="#id3">Блок 3</a></li>
    <li><a href="#id4">Блок 4</a></li>
</ul>

<div id="id1">
    <p>Lorem ipsum dolor sit amet, consectetur adipiscing elit. Donec tempus, felis at varius eleifend, neque orci porta magna, consequat aliquam ligula velit quis erat. Aenean porttitor pellentesque risus, eu tincidunt ipsum blandit in. </p>
</div>

<div id="id2">
    <p>Sed lobortis placerat elit tincidunt tempor. Nam dignissim euismod quam nec tempor. Sed tortor lorem, ultricies a auctor nec, auctor ut neque. Aenean varius, urna eget adipiscing feugiat, nunc ligula molestie massa, id accumsan turpis metus ac ante. Cum sociis natoque penatibus et magnis dis parturient montes, nascetur ridiculus mus.</p>
</div>

<div id="id3">
    <p>Pellentesque quis tortor vitae elit cursus vulputate et vel dui. Nunc commodo pretium arcu in ultricies. Nunc vel velit enim, et tincidunt leo. Class aptent taciti sociosqu ad litora torquent per conubia nostra, per inceptos himenaeos. </p>
</div>

<div id="id4">
    <p>Quisque eget tempor sapien. Cras convallis tempor orci pulvinar scelerisque. Nullam et erat eu nibh sollicitudin congue sit amet id diam. Sed in lectus ut augue euismod porta. Quisque non lacus odio. Nunc ornare adipiscing egestas. </p>
</div>
HTML Справочник
HTML Теги по алфавитуHTML Теги по категорииHTML ПоддержкаHTML АтрибутыHTML ГлобальныеHTML СобытияHTML Названия цветаHTML ХолстHTML Аудио/ВидеоHTML ДекларацииHTML Набор кодировокHTML URL кодHTML Коды языкаHTML Коды странHTTP СообщенияHTTP методыКовертер PX в EMКлавишные комбинации
HTML Теги
<!—…—>
<!DOCTYPE>
<a>
<abbr>
<acronym>
<address>
<applet>
<area>
<article>
<aside>
<audio>
<b>
<base>
<basefont>
<bdi>
<bdo>
<big>
<blockquote>
<body>
<br>
<button>
<canvas>
<caption>
<center>
<cite>
<code>
<col>
<colgroup>
<data>
<datalist>
<dd>
<del>
<details>
<dfn>
<dialog>
<dir>
<div>
<dl>
<dt>
<em>
<embed>
<fieldset>
<figcaption>
<figure>
<font>
<footer>
<form>
<frame>
<frameset>
<h1> — <h6>
<head>
<header>
<hr>
<html>
<i>
<iframe>
<img>
<input>
<ins>
<kbd>
<label>
<legend>
<li>
<link>
<main>
<map>
<mark>
<meta>
<meter>
<nav>
<noframes>
<noscript>
<object>
<ol>
<optgroup>
<option>
<output>
<p>
<param>
<picture>
<pre>
<progress>
<q>
<rp>
<rt>
<ruby>
<s>
<samp>
<script>
<section>
<select>
<small>
<source>
<span>
<strike>
<strong>
<style>
<sub>
<summary>
<sup>
<svg>
<table>
<tbody>
<td>
<template>
<textarea>
<tfoot>
<th>
<thead>
<time>
<title>
<tr>
<track>
<tt>
<u>
<ul>
<var>
<video>
<wbr>
Negating Selectors with :not()
Perhaps the most powerful of this new crop of pseudo-classes is . It returns all elements except for those that match the selector argument. For example, selects every element that lacks a class.
The pseudo-class is what’s known as a functional pseudo–class. It accepts a single argument, much like functions in other programming languages do. Any argument passed to must be a simple selector such as an element type, a class name, an ID, or another pseudo-class. Pseudo-elements will fail, as will compound selectors such as or complex selectors such as .
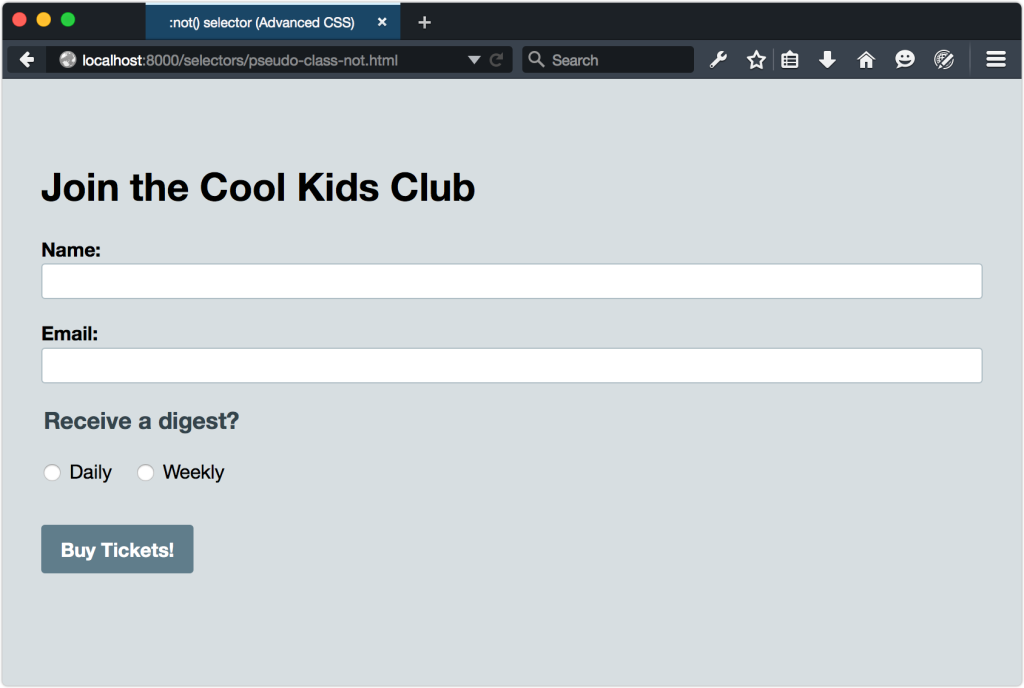
Here’s an example of a form that uses textual input types and radio buttons:
In the HTML, labels associated with a type have a class. We can use the pseudo-class: to target those elements without a class, as shown in in the figure below:
Unfortunately, this won’t work, as each selector overrides the previous one. It’s the equivalent of typing:
Instead, we need to chain our pseudo-classes, so that they all filter the element:
Using pseudo-classes (and pseudo-elements) without a simple selector is the equivalent of using it with the universal selector. In other words, is the same as . In this case, every element that lacks a attribute and value of will match―including and . To prevent this, use with a selector such as a class name, ID, or attribute selector. By the way, this also holds true true for class name, ID, and attribute selectors: and are the same as and .
CSS Selectors Level 4 refines the way works, so that it can accept a list as an argument, and not just simple selectors. Rather than chaining pseudo-classes as previously, we’ll be able to use a comma-separated argument:
Unfortunately, no major browser supports this yet, so use chaining in the meantime.
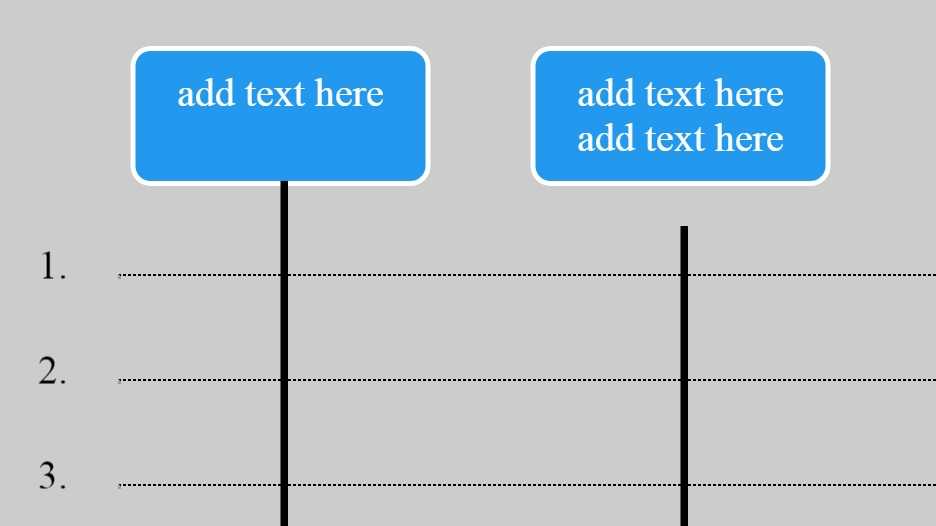
Leveraging :target To Create Click Events
Now that we’ve got a simple demo up and running that utilizes unique IDs and fragment identifiers, it’s time to pull out our :target pseudo class. Anything within a :target style block will be activated only when a fragment identifier is currently active in the URI. In a way, :target can be used to create the ever elusive CSS click event.
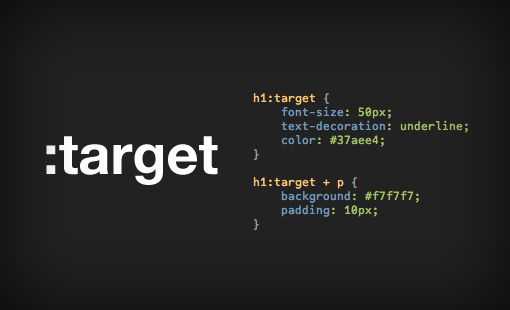
For instance, let’s say we wanted to make it so that the item that is clicked on in our navigation menu is somehow changed. This will allow users to clearly identify the section that they’re jumping to. To accomplish this, we’ll use the selector “h1:target” and add some variation through font-size, color and text-decoration. Check out the demo here.
|
1 |
h1{ fontbold30px/1.5″Helvetica Neue»,Arial,Helvetica,Geneva,sans-serif; } h1target{ font-size50px; text-decorationunderline; color#37aee4; } |
Animate It
You’re free to use :target pretty much however you would use :hover, which means you can have all kinds of fun adding animation effects. Here we added a nice little transition for the color change. See it live here.
|
1 |
h1{ fontbold30px/1.5″Helvetica Neue»,Arial,Helvetica,Geneva,sans-serif; -webkit-transitioncolor0.5sease; -moz-transitioncolor0.5sease; -o-transitioncolor0.5sease; -ms-transitioncolor0.5sease; transitioncolor0.5sease; h1target{ font-size50px; text-decorationunderline; color#37aee4; } |
Manipulating Non-Targeted Objects
Let’s say we wanted to also change the accompanying paragraph when a given heading is targeted. This may sound difficult since we’ve already set up our HTML structure so that the unique IDs are used only on the h1 tags, but remember that CSS gives us a number of powerful selectors. We can actually use a click on the targeted element to manipulate other objects on the page.
In our example, targeting the paragraph element after the clicked h1 is as easy as pulling out the adjacent sibling combinator. The code is below and the demo is here.
|
1 |
h1target+p{ background#f7f7f7; padding10px; } |
Finding empty elements #
It can sometimes be useful to identify completely empty elements, and there is a pseudo-class for that too.
Browser support
- Chrome 1, Supported 1
- Firefox 1, Supported 1
- Edge 12, Supported 12
- Safari 3.1, Supported 3.1
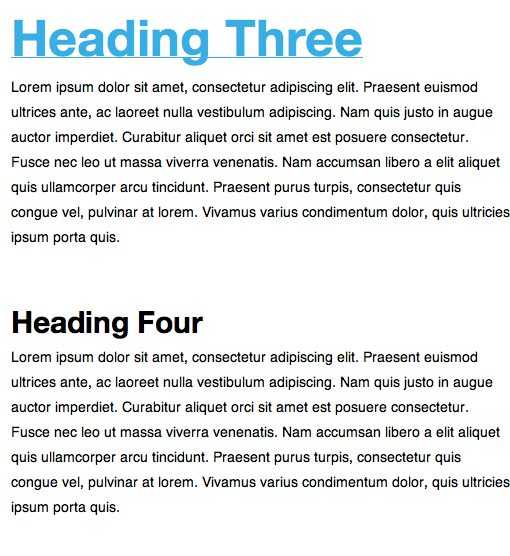
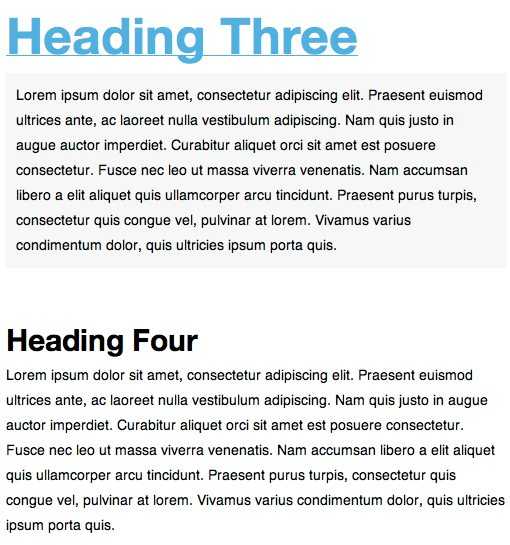
If an element has no children, the pseudo-class applies to them. Children aren’t just HTML elements or text nodes though: they can also be whitespace, which can be confusing when you’re debugging the following HTML and wondering why it isn’t working with :
The reason is that there’s some whitespace between the opening and closing , so empty won’t work.
The pseudo-class can be useful if you have little control over the HTML and want to hide empty elements, such as a WYSIWYG content editor. Here, an editor has added a stray, empty paragraph.


With , you can find that and hide it.
The CSS Pseudo-Class :target
There are lots pseudo-classes in CSS that can help us style elements in different states. For example, you can style a button when it’s hovered, active, focused, etc.
One pseudo-class you might not have heard about, though, is the pseudo-class.
The pseudo-class is used to select an element when that element’s ID matches part of the current URL.
A common use case for having an element’s ID show up in the URL is if you’re using an anchor tag () to jump to a specific spot on the current page. For example, if it’s your personal website, you might have a “Contact” button at the top of the page. On click, it could bring the user to the footer to see all your contact information.
If you’ve used an tag before, you’re likely familiar with the attribute. If you’re trying to link to a website, like Alligator.io for example, you’d create the link in your HTML like this:
However, if you want your user to stay on the current page and jump down to the footer, for example, all you have to do is set an ID on the footer and use that ID for the value in the tag.
When the user clicks on this footer link, the page will jump to the footer and their current URL will get updated to look like:
The footer element’s ID is now part of the current URL. In other words, it’s the target!
CSS
Следующий код CSS позволяет добиться нужного эффекта, с помощью которого выделяется блок с соответствующим идентификатором (появляется тень вокруг прямоугольника).
/* Добавляем немного пространства */
ul, div
{
margin-bottom: 10px;
}
/* Cтиль блока по умолчанию */
div
{
padding: 10px;
border: 1px solid #eaeaea;
-moz-border-radius: 5px;
border-radius: 5px;
}
/* Изменяем вид вывода при соответствии */
div:target
{
border-color: #9c9c9c;
-moz-box-shadow: 0 0 4px #9c9c9c;
-webkit-box-shadow: 0 0 4px #9c9c9c;
box-shadow: 0 0 4px #9c9c9c;
}
Ниже представлен результат действия кода. Если нажать на ссылке, то соответствующий блок выделяется и становится активным.
В Сети можно легко найти множество уроков с применением псевдокласса:target. Однако, не будем следовать чужому коду, а попробуем разобраться в нем и понять, как это работает? Конечно, не обойдется и без примеров
HTML Теги
<!—…—><!DOCTYPE><a><abbr><acronym><address><applet><area><article><aside><audio><b><base><basefont><bdi><bdo><big><blockquote><body><br><button><canvas><caption><center><cite><code><col><colgroup><data><datalist><dd><del><details><dfn><dialog><dir><div><dl><dt><em><embed><fieldset><figcaption><figure><font><footer><form><frame><frameset><h1> — <h6><head><header><hr><html><i><iframe><img><input><ins><kbd><label><legend><li><link><main><map><mark><meta><meter><nav><noframes><noscript><object><ol><optgroup><option><output><p><param><picture><pre><progress><q><rp><rt><ruby><s><samp><script><section><select><small><source><span><strike><strong><style><sub><summary><sup><svg><table><tbody><td><template><textarea><tfoot><th><thead><time><title><tr><track><tt><u><ul><var><video>
Как насчет семантики и доступности?
Как я уже упоминала в статье “Ссылки или кнопки” , при использовании элемента браузер ожидает переход на другую страницу или другой раздел страницы. В моих примерах (кроме последнего) именно это и происходит. Трюк только в том, что в обычном состоянии стилизуемый элемент скрыт, он динамически появлется только в нацеленном состоянии.
Насколько я могу сказать, у этого метода есть два потенциальных недостатка:
- Меняется URL, что влияет на историю браузера. Это значит, что при переходе пользователя “назад”, он может непреднамеренно перейти к целевому элементу.
- Для закрытия целевого элемента пользователю надо перейти к другому элементу или просто к # . Последний вариант (который я использую в своих примерах) не является семантичным и может перенаправить пользователя к началу статьи, к чему пользователь может быть не готов.
Тем не менее, при корректном использовании этот метод можно использовать, как минимум, в качестве запасного варианта взаимодействия для пользователей с отключенным JavaScript. В некоторых случаях, как в первом примере, это даже может быть предпочтительнее и проще, чем использование JavaScript. Как всегда, это зависит от каждого конкретного случая.
Псевдо класс:target является одной из замечательных особенностей CSS3. Он соответствует элементу, на который указывает идентификатор в URI документа.
Идентификатор в URI содержит символ “#”, за которым следует имя идентификатора, соответствующее значению атрибута id
элемента в документе.
Идентификация якорей
Цели (targets) очень просто обозначить с помощью CSS. В CSS3 существует достаточное количество псевдоэлементов и псевдоклассов, поддерживаемых современными браузерами, в частности псевдокласс . поддержка данного псевдокласса реализована в след браузерах: Opera 9.5 Kestrel, Firefox и Safari.
Псевдокласс может быть применен к любым элементам разметки, включая списки, заголовки и спаны, что отражено в данном примере.
Поскольку уже сейчас мы можем визуально обозначить цель, на которую ссылаемся, почему бы не попробовать использовать фоновый рисунок и не создать модный fade out эффект.
Реализация подобного эффекта крайне проста, однако не стоит забывать об уже заданном фоне для элементов, на которые ссылаемся, если таковое имело место. Например, внутри цели есть ссылка с фоновым цветом, отличным от цвета цели. Результат будет выглядеть неуклюже.
В общем, думаю идея понятна. Пробуйте экспериментировать.
Селекторы уровня 3
На этом уровне было добавлено гораздо больше псевдоклассов, а также некоторые селекторы атрибутов и новый комбинатор.
| Шаблон | совпадения |
|---|---|
| элемент F, которому предшествует элемент E | |
| Селекторы атрибутов | |
| элемент E, атрибут «foo» которого начинается со строки «bar» | |
| элемент E, атрибут «foo» которого заканчивается строкой «bar» | |
| элемент E, атрибут «foo» которого содержит подстроку «bar» | |
| Псевдоклассы | |
| элемент E, корень документа | |
| элемент E, n-й дочерний элемент своего родителя | |
| элемент E, n-й дочерний элемент своего родителя, считая от последнего | |
| элемент E, n-й брат своего типа | |
| элемент E, n-й брат своего типа, считая от последнего | |
| элемент E, последний дочерний элемент своего родителя | |
| элемент E, первый брат его типа | |
| элемент E, последний родственник этого типа | |
| элемент E, единственный дочерний элемент своего родителя | |
| элемент E, единственный родственник своего типа | |
| элемент E, у которого нет дочерних элементов (включая текстовые узлы) | |
| элемент E, являющийся целью ссылающегося URI | |
| элемент пользовательского интерфейса E, который включен | |
| элемент пользовательского интерфейса E, который отключен | |
| проверенный элемент пользовательского интерфейса E | |
| элемент E, который не соответствует простому селектору s |
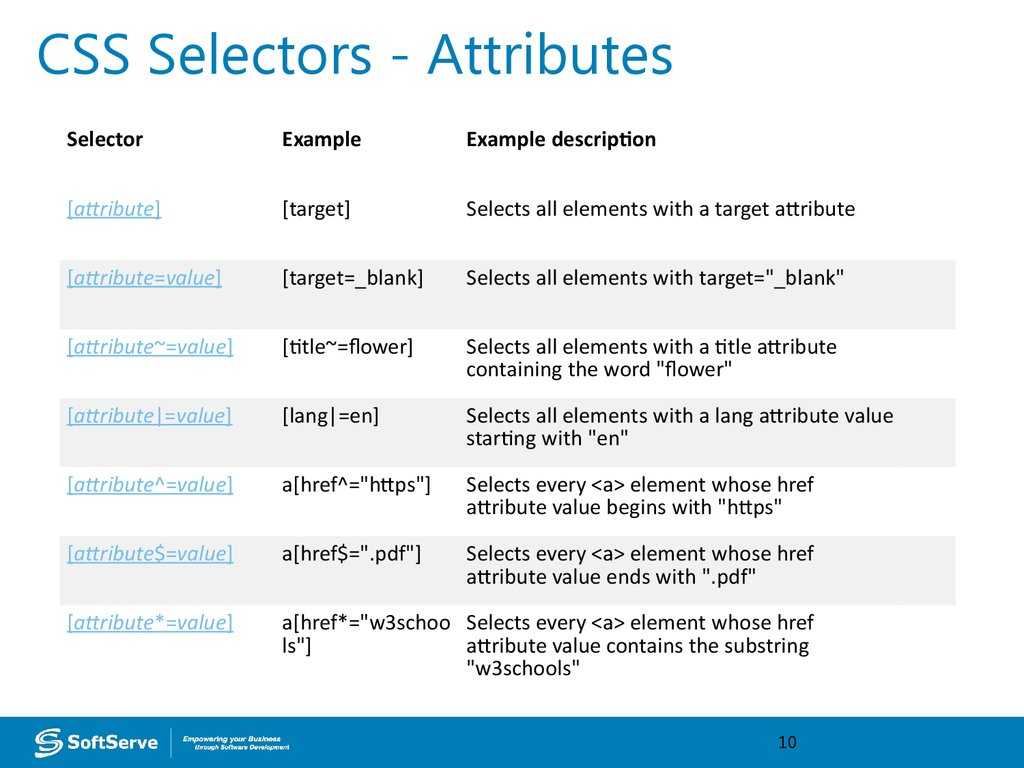
Селекторы атрибутов
Вы можете выбрать элементы с атрибутом, который начинается с заданного значения: , заканчивается заданным значением: или содержит значение: .
Псевдоклассы
Дополнительные псевдоклассы включают «: last-child», «: empty» (для соответствия элементу без содержимого) и «: checked», который соответствует элементу, подобному вводу флажка, но только когда он установлен.
Общий комбинатор братьев и сестер: следующий брат
Подобно комбинатору смежных братьев и сестер из уровня 2, он соответствует любому брату, который идет после другого, а не только следующему:
Спецификация
Каждая спецификация проходит несколько стадий одобрения.
- Recommendation (Рекомендация
) — спецификация одобрена W3C и рекомендована как стандарт. - Candidate Recommendation (Возможная рекомендация
) — группа, отвечающая за стандарт, удовлетворена, как он соответствует своим целям, но требуется помощь сообщества разработчиков по реализации стандарта. - Proposed Recommendation (Предлагаемая рекомендация
) — на этом этапе документ представлен на рассмотрение Консультативного совета W3C для окончательного утверждения. - Working Draft (Рабочий проект
) — более зрелая версия черновика после обсуждения и внесения поправок для рассмотрения сообществом. - Editor»s draft (Редакторский черновик
) — черновая версия стандарта после внесения правок редакторами проекта. - Draft (Черновик спецификации
) — первая черновая версия стандарта.
Селекторы уровня 1
Уровень 1 представил четыре основных типа селекторов, которые охватывают огромное количество случаев даже сегодня.
| Шаблон | совпадения |
|---|---|
| все элементы E | |
| все элементы с class = «c» | |
| элемент с id = «myid» | |
| элемент F внутри элемента E | |
| Псевдоклассы | |
| гиперссылка на страницу, которую ранее не посещали | |
| гиперссылка на страницу, которая уже была посещена | |
| гиперссылка, которая выбрана в данный момент | |
| Псевдоэлементы | |
| первая отформатированная строка элемента E | |
| первая форматированная буква элемента E |
Выбор типа
Самым простым селектором является «селектор типа». Он нацелен на все экземпляры элемента, такие как абзац или полужирный текст:
Селектор классов
Атрибут class позволяет добавлять к элементу HTML дополнительную семантику, например абзац определенного типа. Такие элементы можно выбрать в CSS следующим образом:
Этот селектор будет соответствовать:
Но обратите внимание, что это также будет соответствовать:
Если вы хотите, чтобы это применялось только к вводным абзацам, вы можете комбинировать селектор типа и селектор класса:
Селектор ID
Атрибут HTML id должен быть уникальным в документе, например, если у вас есть:
Это должен быть единственный элемент с идентификатором «содержимого». Селектор идентификатора позволяет вам выбрать этот конкретный элемент в документе:
Селектор потомков
Строго говоря, «комбинатор», потому что этот селектор – это пространство между двумя другими. HTML является иерархическим, как объясняется в нашем обзоре DOM . Селектор потомков позволяет идентифицировать элемент по его контексту внутри другого элемента:


Псевдоклассы и элементы
Псевдоселекторы нацелены на классы или элементы, которые явно не существуют, но в любом случае доступны. Думайте о них как о специальных бонусах к контенту:
Form states #
The following pseudo-classes can select form elements, in the various states that these elements might be in during interaction with them.
and
Browser support
- Chrome 1, Supported 1
- Firefox 1, Supported 1
- Edge 12, Supported 12
- Safari 3.1, Supported 3.1
If a form element, such as a is disabled by the browser, you can hook on to that state with the pseudo-class. The pseudo-class is available for the opposite state, though form elements are also by default, therefore you might not find yourself reaching for this pseudo-class.
and
Browser support
- Chrome 1, Supported 1
- Firefox 1, Supported 1
- Edge 12, Supported 12
- Safari 3.1, Supported 3.1
The pseudo-class is available when a supporting form element, such as a checkbox or radio button is in a checked state.
The state is a binary(true or false) state, but checkboxes do have an in-between state when they are neither checked or unchecked. This is known as the state.
An example of this state is when you have a «select all» control that checks all checkboxes in a group. If the user was to then uncheck one of these checkboxes, the root checkbox would no longer represent «all» being checked, so should be put into an indeterminate state.
The element also has an indeterminate state that can be styled. A common use case is to give it a striped appearance to indicate it’s unknown how much more is needed.
Browser support
- Chrome 47, Supported 47
- Firefox 51, Supported 51
- Edge 79, Supported 79
- Safari 9, Supported 9
If a form field has a attribute and no value, the pseudo-class can be used to attach styles to that state. As soon as there is content in the field, whether it has a or not, this state will no longer apply.
Validation states
Browser support
- Chrome 10, Supported 10
- Firefox 4, Supported 4
- Edge 12, Supported 12
- Safari 5, Supported 5
The pseudo-class is available if an input has a and , such as a numeric input and the value is within those bounds.
With HTML forms, you can determine that a field is required with the attribute. The pseudo-class will be available for required fields. Fields that are not required can be selected with the pseudo-class.
Create a Simple CSS Slideshow
Given this as a starting point, developers have come up a with a ton of great applications for utilizing the :target pseudo class. You can use it to make a pure CSS tabbed interface or even an image slideshow. Let’s see how to create the latter.
To start, we need to code up an unordered list. Each list item will contain an anchor tag pointing to a fragment identifier, followed by an image with a matching ID.
|
1 |
<div id=»slideshow»> <ul> <li><ahref=»#one»>One</a><img id=»one»src=»http://lorempixum.com/400/300/city/5″/></li> <li><ahref=»#two»>Two</a><img id=»two»src=»http://lorempixum.com/400/300/city/4″/></li> <li><ahref=»#three»>Three</a><img id=»three»src=»http://lorempixum.com/400/300/city/3″/></li> <li><ahref=»#four»>Four</a><img id=»four»src=»http://lorempixum.com/400/300/city/2″/></li> <li><ahref=»#five»>Five</a><img id=»five»src=»http://lorempixum.com/400/300/city/1″/></li> </ul> </div> |
Now we’re going to use some clever positioning to push everything into place and of course a little :target magic to make it all work. See if you can figure out what’s going on here before I walk you through it.
|
1 |
*{ margin0px; padding0px; } margin50pxauto; positionrelative; width400px; } ul{ list-stylenone; } li{ floatleft; overflowhidden; margin20px;
} lia{ color#222; text-decorationnone; font15px/1Helvetica,sans-serif; -webkit-transitioncolor0.5sease; -moz-transitioncolor0.5sease; -o-transitioncolor0.5sease; -ms-transitioncolor0.5sease; transitioncolor0.5sease; } liahover{ color#50b0df; } liimg{ positionabsolute; top50px; left; z-index-1; -webkit-transitionopacity1sease-in-out; -moz-transitionopacity1sease-in-out; -o-transitionopacity1sease-in-out; -ms-transitionopacity1sease-in-out; transitionopacity1sease-in-out; li imgtarget{ z-index1; } li imgnot(target){ opacity; } |
First we floated our list items to the left, styled the text and applied a hover effect. The interesting part about the positioning is that we’ve scooted all our images away from the text part of their list items using the wonderful technique of absolute positioning inside of a relatively positioned parent. Read this article to learn all about how this works.
Next, we set the z-index of all of the images to -1, then set the z-index of the targeted image to 1. This causes the list item that you click on to bring its image above the others. To make the switch nice and gradual, we reduce the opacity of the other images to zero and add in a CSS3 transition. See the pure CSS slideshow demo .
Псевдоклассы, которые могут применяться к любым элементам
Большинство описанных выше псевдоклассов требовало ссылок для работы. Однако не всем нужны элементы <a>. Ряд вариантов может применяться к абсолютно любым частям страницы.
- :active предназначен для стилизации элементов, по которым пользователь кликнул левой кнопкой мыши;
- :hover – CSS для элементов, на которые пользователь наводит курсор;
- :focus – для тех частей страницы, которые сейчас находятся в фокусе. Этот псевдокласс часто используется для работы с формами. Например, если вы хотите выделить строку ввода имени пользователя, когда посетитель устанавливает в нее курсор и начинает набирать символы.
Помните, что :active действует только в момент нажатия. Сразу после прекращения работы левой кнопки мыши заданные с его помощью стили исчезнут и элемент будет отображаться так, как он отображался по умолчанию. В большинстве случаев этот псевдокласс применяется для работы с кнопками. Можно задать им большое количество состояний. Например, по умолчанию кнопка будет синей, при наведении – зеленой, при нажатии – красной, и т. д.
Разумеется, псевдоклассы полностью поддерживаются только современными браузерами. Например, в IE6 и 7 не удастся использовать focus, а hover и active в IE6 работают только для ссылок. Будем надеяться, что вам не придется работать с такими браузерами, а если все же необходимость возникла, применяйте условные комментарии.
:nth-last-child
По принципу действия аналогичен упоминавшемуся ранее nth-child, но действует в обратном направлении, т. е. при использовании элементы будут перебираться снизу-вверх. Это удобно, если нужно разыскать несколько последних элементов.
Вы можете подумать, что эти псевдоклассы и псевдоэлементы CSS бесполезны, поскольку добиться цели можно также с помощью обычных классов. Это не так. :nth-child, :nth-last-child и их аналоги очень удобны при работе на больших проектах – например, в случаях, когда у блока имеется огромное количество дочерних элементов. Вручную расставлять классы долго и трудно.
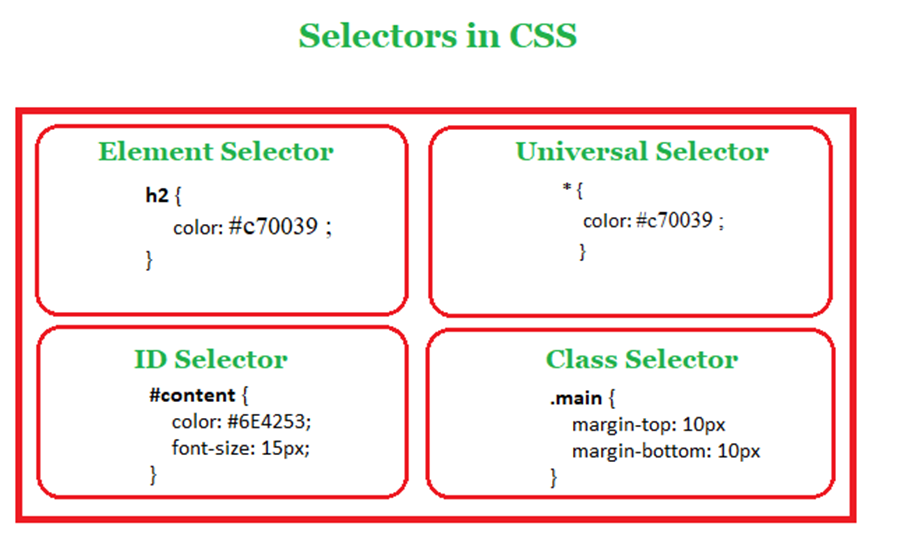
Понятие CSS селекторов
CSS-селектор является шаблоном, соответствующим определённым элементам HTML-разметки. К тегам, которые подходят для правил селектора, могут быть применены стили.
Браузеры определяют какой из стилей оформления должен быть применен к элементам сайта благодаря селекторам.
В CSS множество различных видов селекторов. Они могут использоваться по одиночке или в различных комбинациях. Это позволяет производить весьма тонкую настройку стилей к выбранным элементам кода, либо к их группам.
Понятие CSS селекторов
Несколько советов новичкам:
- Следует помнить, что в CSS необходимо учитывать регистр букв. В отличие от html это имеет смысл. Таким образом, селекторы css по классу. Center и. center кардинально различаются! Они применимы к совершенно разным элементам, имеющимся в наличии.
- Присваивайте имена селекторам для оформления таким образом, чтобы по ним было понятно о чем речь: .leftColumn – пример неплохого названия, .left в некоторых случаях будет уже неопределенным наименованием, а .llll является полнейшим абсурдом, который без кода под рукой не несет абсолютно никакой полезной информации.
- К уникальным элементам можно применять селектор по идентификатору, то есть присвоить им определенный id, если же страница содержит несколько идентичных компонентов, то следует пользоваться классами.
Заключение
Поначалу использование псевдоклассов может показаться сложным, но зачем вы поймёте, как они могут облегчить работу и сделать сайт более интересным. Псевдоселектор
:target
-хороший тому пример. Только убедитесь, что вы не переборщили со стилями.


Ещё один интересный пример использования :target
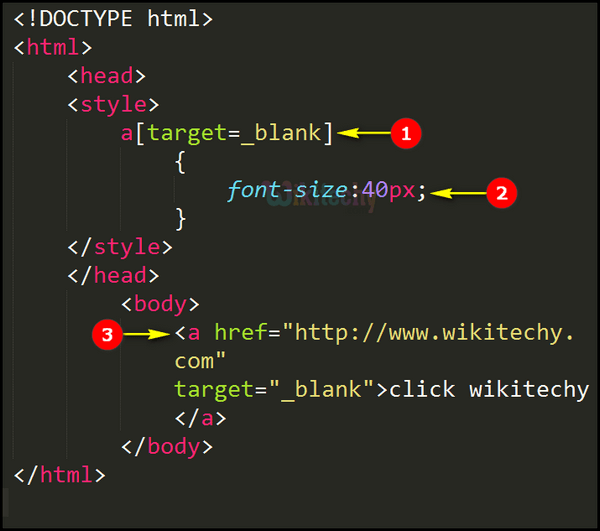
Значения
В качестве значения используется имя окна или фрейма, заданное атрибутом name
. Если установлено несуществующее имя, то будет
открыто новое окно. В качестве зарезервированных имен используются следующие.
Blank
Загружает страницу в новое окно браузера.
_self
Загружает страницу в текущее окно.
_parent
Загружает страницу во фрейм-родитель, если фреймов нет, то это значение
работает как _self
.
_top
Отменяет все фреймы и загружает страницу в полном окне браузера, если фреймов нет, то это значение работает как _self
.
Валидация
Использование этого атрибута осуждается спецификацией HTML, валидный код получается только при использовании переходного
.
HTML5
IE
Cr
Op
Sa
Fx
Тег А, атрибут target
Открыть в новом окне